Chapter 10 Suspension and steering
Chapter 10 Suspension and steering
Chapter 10 Suspension and steering

Create successful ePaper yourself
Turn your PDF publications into a flip-book with our unique Google optimized e-Paper software.
<strong>10</strong>•<strong>10</strong> <strong>Suspension</strong> <strong>and</strong> <strong>steering</strong><br />
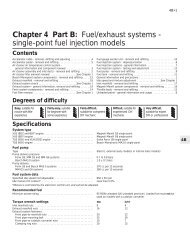
19.3 Separating the track rod end from the<br />
hub carrier <strong>steering</strong> arm<br />
3 With the engine stopped, slowly move the<br />
<strong>steering</strong> from lock-to-lock several times to<br />
purge out the trapped air, then top-up the<br />
level in the fluid reservoir. Repeat this<br />
procedure until the fluid level in the reservoir<br />
does not drop any further.<br />
4 Start the engine, then slowly move the<br />
<strong>steering</strong> from lock-to-lock several times to<br />
purge out any remaining air in the system.<br />
Repeat this procedure until bubbles cease to<br />
appear in the fluid reservoir.<br />
5 If, when turning the <strong>steering</strong>, an abnormal<br />
noise is heard from the fluid lines, it indicates<br />
that there is still air in the system. Check this<br />
by turning the wheels to the straight-ahead<br />
position <strong>and</strong> switching off the engine. If the<br />
fluid level in the reservoir rises, then air is<br />
present in the system, <strong>and</strong> further bleeding is<br />
necessary.<br />
6 Once all traces of air have been removed<br />
from the power <strong>steering</strong> hydraulic system,<br />
turn the engine off <strong>and</strong> allow the system to<br />
cool. Once cool, check that the fluid level is<br />
up to the maximum mark on the power<br />
<strong>steering</strong> fluid reservoir, topping-up if<br />
necessary.<br />
18 Power <strong>steering</strong> pump -<br />
removal <strong>and</strong> refitting 3<br />
Removal<br />
1 Remove the alternator as described in<br />
<strong>Chapter</strong> 5A.<br />
2 Prepare a suitable container, then<br />
disconnect the fluid hoses from the pump,<br />
<strong>and</strong> allow the fluid to drain into the container.<br />
3 Unscrew <strong>and</strong> remove the power <strong>steering</strong><br />
pump mounting bolts, then withdraw the<br />
pump.<br />
Refitting<br />
4 Refitting is a reversal of removal, but on<br />
completion, tension the drivebelt as described<br />
in <strong>Chapter</strong> 1, <strong>and</strong> bleed the power <strong>steering</strong><br />
hydraulic system as described in Section 17.<br />
19 Track rod end - removal <strong>and</strong><br />
refitting 3<br />
Removal<br />
1 Chock the rear wheels then jack up the<br />
front of the car <strong>and</strong> support it on axle st<strong>and</strong>s<br />
(see “Jacking <strong>and</strong> vehicle support”). Remove<br />
the relevant front roadwheel.<br />
2 Loosen the locknut on the track rod end by<br />
a quarter of a turn.<br />
3 Unscrew the balljoint locknut <strong>and</strong> use an<br />
extractor tool to separate the balljoint tapered<br />
shank from the hub carrier <strong>steering</strong> arm (see<br />
illustration).<br />
4 Unscrew the track rod end from the track<br />
rod, noting the number of turns necessary to<br />
remove it. Remove the locknut from the track<br />
rod end threads.<br />
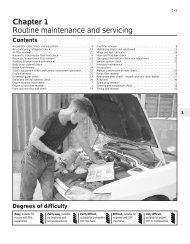
1 Bellows<br />
2 Lock washer<br />
3 Track rod<br />
20.2 Track rod components<br />
4 Locknut<br />
5 Track rod end<br />
Refitting<br />
5 Screw on the locknut then screw the new<br />
track rod end the same number of turns onto<br />
the track rod.<br />
6 Clean the taper surfaces then fit the<br />
balljoint shank to the hub carrier <strong>steering</strong> arm<br />
<strong>and</strong> tighten the nut to the specified torque.<br />
If difficulty is experienced in<br />
loosening or tightening a<br />
balljoint taper pin nut due to<br />
the taper pin turning in the<br />
eye, apply pressure with a jack or long<br />
lever to the balljoint socket to force the<br />
taper pin into its conical seat.<br />
7 Tighten the locknut on the track rod end.<br />
8 Refit the roadwheel <strong>and</strong> lower the car to the<br />
ground.<br />
9 On completion, have the front wheel toe<br />
setting checked (see Section 21).<br />
20 Track rod - removal <strong>and</strong><br />
refitting 4<br />
Removal<br />
Note: A new inner balljoint lockwasher must<br />
be used on refitting.<br />
1 Remove the track rod end as described in<br />
Section 19.<br />
2 Release the retaining clips <strong>and</strong> slide the<br />
rubber bellows off the end of the <strong>steering</strong> gear<br />
housing <strong>and</strong> track rod (see illustration).<br />
3 Unscrew the track rod inner balljoint from<br />
the <strong>steering</strong> rack end, preventing the <strong>steering</strong><br />
rack from turning by holding the balljoint<br />
lockwasher with a pair of grips. Take great<br />
care not to mark the surfaces of the rack <strong>and</strong><br />
balljoint.<br />
4 Remove the track rod assembly, <strong>and</strong><br />
discard the lockwasher - a new one must be<br />
used on refitting.<br />
5 Examine the track rod inner balljoint for<br />
signs of slackness or tight spots, <strong>and</strong> check<br />
that the track rod itself is straight <strong>and</strong> free from<br />
damage. If necessary, renew the track rod.<br />
Refitting<br />
6 Locate the new lockwasher assembly on<br />
the end of the <strong>steering</strong> rack, <strong>and</strong> apply a few<br />
drops of locking fluid to the track rod inner<br />
balljoint threads.<br />
7 Screw the balljoint into the <strong>steering</strong> rack,<br />
<strong>and</strong> tighten it to the specified torque whilst<br />
retaining the lockwasher with a pair of grips.<br />
Again, take great care not to damage or mark<br />
the track rod balljoint or <strong>steering</strong> rack.<br />
8 Carefully slide on the rubber bellows, <strong>and</strong><br />
locate it on the <strong>steering</strong> gear housing. Turn<br />
the <strong>steering</strong> fully from lock-to-lock, to check<br />
that the gaiter is correctly positioned on the<br />
track rod, then secure it in position with new<br />
retaining clips.<br />
9 Refit the track rod end as described in<br />
Section 19.