Nano brompton fitting instructions - Jobike
Nano brompton fitting instructions - Jobike
Nano brompton fitting instructions - Jobike

You also want an ePaper? Increase the reach of your titles
YUMPU automatically turns print PDFs into web optimized ePapers that Google loves.
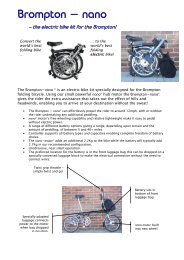
the electric<br />
wheel company<br />
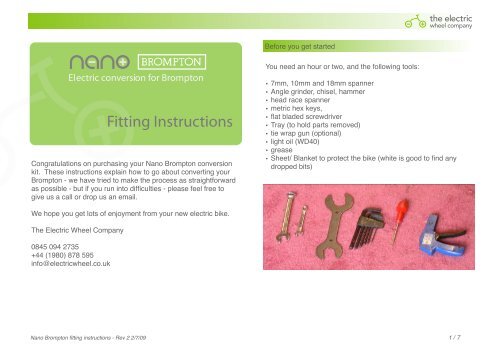
Before you get started<br />
Electric conversion for Brompton<br />
Fitting Instructions<br />
Congratulations on purchasing your <strong>Nano</strong> Brompton conversion<br />
kit. These <strong>instructions</strong> explain how to go about converting your<br />
Brompton - we have tried to make the process as straightforward<br />
as possible - but if you run into difficulties - please feel free to<br />
give us a call or drop us an email.<br />
You need an hour or two, and the following tools:<br />
• 7mm, 10mm and 18mm spanner<br />
• Angle grinder, chisel, hammer<br />
• head race spanner<br />
• metric hex keys,<br />
• flat bladed screwdriver<br />
• Tray (to hold parts removed)<br />
• tie wrap gun (optional)<br />
• light oil (WD40)<br />
• grease<br />
• Sheet/ Blanket to protect the bike (white is good to find any<br />
dropped bits)<br />
We hope you get lots of enjoyment from your new electric bike.<br />
The Electric Wheel Company<br />
0845 094 2735<br />
+44 (1980) 878 595<br />
info@electricwheel.co.uk<br />
<strong>Nano</strong> Brompton <strong>fitting</strong> <strong>instructions</strong> - Rev 2 2/7/09! 1 / 7
Electric conversion for Brompton<br />
Fitting Instructions<br />
the electric<br />
wheel company<br />
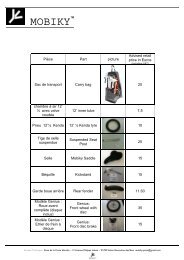
Kit contents<br />
The kit should contain the following. If anything is missing - give<br />
us a call.<br />
• Control box with cable and attached luggage block, brake<br />
levers and throttle<br />
• Wheel with nano motor built in<br />
• Parts bag with metal wheel nut cover, luggage block fasteners<br />
and cable ties<br />
• Parts bag with wiring for modifying Brompton front luggage OR<br />
pre-modified Brompton front luggage<br />
• Fork widening bar<br />
1. Modify the front fork slots<br />
Remover the front wheel. Remove tyre, inner tube and rim tape<br />
and install on new nano motor wheel<br />
When finished - the fork slots<br />
should look like this. When the<br />
axle is in place the retaining<br />
washer should lie flat with the<br />
tab located fully into the hole<br />
above the slot.<br />
We find it easier to turn the<br />
axles so they are in line<br />
vertically and grind the bottom<br />
fork slot - then turn by<br />
180degrees and repeat. This<br />
way the shavings hit the floor<br />
and do not bounce off the other<br />
fork leg and back towards you.<br />
Nest you will need to widen the slots in the front forks with an<br />
angle grinder to allow the wider axle of the nano motor to fit.<br />
Remove about 1 mm for each side of<br />
the slot and about 2mm from the top<br />
of the slot. Go slowly and remove a<br />
little then offer a motor axle to check<br />
whether you have removed enough.<br />
It is easier to remove material in<br />
stages than to try and put material<br />
back!<br />
You want to remove just enough to<br />
allow the axle to slot in - and no more.<br />
<strong>Nano</strong> Brompton <strong>fitting</strong> <strong>instructions</strong> - Rev 2 2/7/09! 2 / 7
Electric conversion for Brompton<br />
2. Widen the forks<br />
Use the bar provided. Locate each washer tab into the hole<br />
above the slots on each fork - then use a spanner to screw the<br />
nut clockwise. The movement of the nut along the bar will force<br />
the forks apart. Continue until the gap between the two legs is<br />
11.5cm. Then leave for 5 mins and unscrew and remove the rod.<br />
Fitting Instructions<br />
.<br />
the electric<br />
wheel company<br />
hammer<br />
3. Adjust the mudguard stay<br />
Remove the front mudguard with the stay attached.<br />
Then hit the top of the loop hard with the hammer - this will<br />
spread and flatten the end and allow it to fit.<br />
hammer<br />
Place the loop over a chisel and gently tap it down the chisel<br />
head by about 5-10mm.<br />
<strong>Nano</strong> Brompton <strong>fitting</strong> <strong>instructions</strong> - Rev 2 2/7/09! 3 / 7
Electric conversion for Brompton<br />
Fitting Instructions<br />
the electric<br />
wheel company<br />
3. Modify the mudguard stay (cont.) Fit nano wheel to forks. Note the sequence of washers and<br />
mudguard clip in the pictures below. If looking from the front of<br />
Increase the angle of bend in the mudguard stay by gripping in a the bike - the motor cable should be on the right hand side.<br />
vice and place the chisel barrel against the stay - then strike with<br />
a hammer.<br />
chisel<br />
hammer<br />
Fit the metal cover<br />
strip over the cable<br />
exit from the nano<br />
motor - one end fits on<br />
the wires holding the<br />
folding hook - the other<br />
end should be<br />
wrapped around the<br />
If the Brompton has an older style<br />
cable end and nut and<br />
metal stay - simply widen the loop<br />
secured around the<br />
with a set of pliers.<br />
nut with a cable tie.<br />
The cable should loop<br />
backwards inside the<br />
mudguard stay and is<br />
connected later to the<br />
motor wire which runs<br />
down the side of the fork.<br />
<strong>Nano</strong> Brompton <strong>fitting</strong> <strong>instructions</strong> - Rev 2 2/7/09! 4 / 7
Electric conversion for Brompton<br />
Fitting Instructions<br />
the electric<br />
wheel company<br />
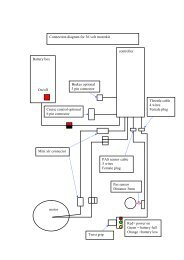
4. Fitting the nano controller Thread the power and motor control cable down the front tube -<br />
following the line of the front brake cable (in red on picture<br />
Remove the existing brakes and handlebar grips from the<br />
<strong>brompton</strong> handlebars. You will need to loosen and unclip the<br />
rear brake cable from the rear brake caliper to give enough play<br />
to remove the brake lever.<br />
Fit the left brake lever and throttle first - then fit the right brake<br />
lever. Finally fit the nano controller case using the p-clips - onto<br />
the handlebars as shown.<br />
below). Screw in the front luggage block to the front stem.<br />
Connect end of cable to motor cable.<br />
Cable goes around<br />
handlebar to front<br />
of bike - secure<br />
around the top of<br />
the handlebar<br />
stem with a thick<br />
cable tie.<br />
Remove the metal brake cable from the outer black tubes and<br />
re-thread with new brake cables. Donʼt remove the block outer<br />
brake cables - it should be possible to thread the new brake<br />
cables though without removing these.<br />
Insert the brake cables into the brake levers and tighten at both<br />
calipers. Cut the excess brake cable and crimp the end with a<br />
cable end nipple.<br />
Cable goes on the<br />
opposite side to<br />
the folding handle<br />
Secure<br />
around<br />
frame with<br />
cable tie<br />
here<br />
and cable<br />
tie here on<br />
fork<br />
<strong>Nano</strong> Brompton <strong>fitting</strong> <strong>instructions</strong> - Rev 2 2/7/09! 5 / 7
Electric conversion for Brompton<br />
5. Modify Brompton front luggage (if applicable)<br />
Fitting Instructions<br />
the electric<br />
wheel company<br />
Remove the plastic and aluminum frame from the luggage by<br />
unhooking the velcro at the bottom of the luggage. If you have<br />
an all metal frame - the luggage connectors cannot be fitted and<br />
you will need to buy a<br />
replacement frame - we can<br />
supply this or obtain from<br />
your local Brompton dealer.<br />
Pass the copper connectors<br />
through the holes in the<br />
plastic frame as shown.<br />
Note - red wire on right<br />
hand side.<br />
Secure ends of copper connectors into the slots on either side of<br />
the plastic frame as shown. Stretch the connectors so that they<br />
are tight against the inside of the plastic moulding. It is useful to<br />
secure them in place by sliding in the <strong>brompton</strong> luggage block<br />
whilst securing them in place.<br />
Drill a 2mm guide hole on<br />
either side and screw in<br />
place including the plastic<br />
screw cap. Snap the screw<br />
cap cover closed.<br />
Secure the thick wire to the<br />
frame using a cable tie to<br />
provide strain relief on the<br />
cable<br />
Make a hole in the rear face of the inside of the Brompton bag<br />
half way up. Feed the battery cable through and refit the bag<br />
frame.<br />
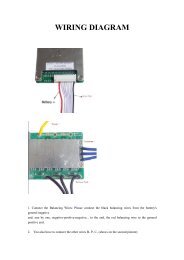
Fit the battery plug -<br />
Red to the 1+ terminal,<br />
Black to the 1- terminal.<br />
Donʼt forget to thread the plug cover over the wire BEFORE<br />
securing the wires. Screw the plug cover onto the plug body and<br />
push the gray collet home.<br />
<strong>Nano</strong> Brompton <strong>fitting</strong> <strong>instructions</strong> - Rev 2 2/7/09! 6 / 7
Electric conversion for Brompton<br />
Fitting Instructions<br />
6. Fit the battery 7. Enjoy!<br />
the electric<br />
wheel company<br />
Put the battery pack in the Brompton bag - It will fit neatly into<br />
the bottom of the bag.<br />
Connect the battery by inserting the plug and twisting slightly - it<br />
will snap in place when fitted correctly. Turn the key on the<br />
battery pack to the second ignition position. Fit the Bag onto the<br />
luggage block.<br />
Check the lights on the throttle - you should now have 3 LEDʼs<br />
lit.<br />
We recommend switching the battery off by turning the key to the<br />
off position when removing the bag from the Brompton.<br />
Thatʼs it. Please enjoy your <strong>Nano</strong> Brompton,<br />
Check and tighten all bolts and screws, brake connections etc<br />
after a couple of days and again after a couple of weeks.<br />
If you have any problems at all - please call us and we will try our<br />
best to help.<br />
The nano motor, controller and connectors and battery are<br />
covered by a no-quibble 12 month return to base guarantee - so<br />
let us know if anything stops working.<br />
We love to hear comments back from our customers - so please<br />
let us know how you get on.<br />
Thanks<br />
The Electric Wheel Company<br />
<strong>Nano</strong> Brompton <strong>fitting</strong> <strong>instructions</strong> - Rev 2 2/7/09! 7 / 7