Nano brompton fitting instructions - Jobike
Nano brompton fitting instructions - Jobike
Nano brompton fitting instructions - Jobike

Create successful ePaper yourself
Turn your PDF publications into a flip-book with our unique Google optimized e-Paper software.
Electric conversion for Brompton<br />
Fitting Instructions<br />
the electric<br />
wheel company<br />
Kit contents<br />
The kit should contain the following. If anything is missing - give<br />
us a call.<br />
• Control box with cable and attached luggage block, brake<br />
levers and throttle<br />
• Wheel with nano motor built in<br />
• Parts bag with metal wheel nut cover, luggage block fasteners<br />
and cable ties<br />
• Parts bag with wiring for modifying Brompton front luggage OR<br />
pre-modified Brompton front luggage<br />
• Fork widening bar<br />
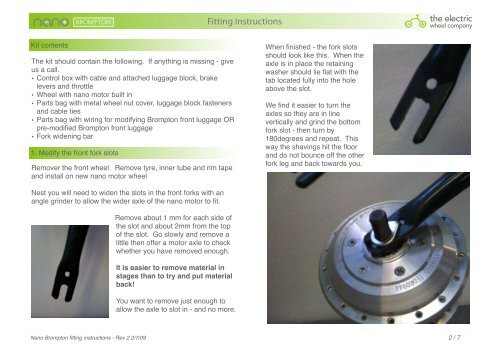
1. Modify the front fork slots<br />
Remover the front wheel. Remove tyre, inner tube and rim tape<br />
and install on new nano motor wheel<br />
When finished - the fork slots<br />
should look like this. When the<br />
axle is in place the retaining<br />
washer should lie flat with the<br />
tab located fully into the hole<br />
above the slot.<br />
We find it easier to turn the<br />
axles so they are in line<br />
vertically and grind the bottom<br />
fork slot - then turn by<br />
180degrees and repeat. This<br />
way the shavings hit the floor<br />
and do not bounce off the other<br />
fork leg and back towards you.<br />
Nest you will need to widen the slots in the front forks with an<br />
angle grinder to allow the wider axle of the nano motor to fit.<br />
Remove about 1 mm for each side of<br />
the slot and about 2mm from the top<br />
of the slot. Go slowly and remove a<br />
little then offer a motor axle to check<br />
whether you have removed enough.<br />
It is easier to remove material in<br />
stages than to try and put material<br />
back!<br />
You want to remove just enough to<br />
allow the axle to slot in - and no more.<br />
<strong>Nano</strong> Brompton <strong>fitting</strong> <strong>instructions</strong> - Rev 2 2/7/09! 2 / 7