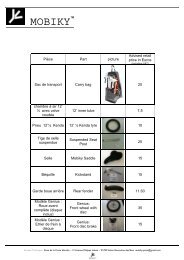
Nano brompton fitting instructions - Jobike
Nano brompton fitting instructions - Jobike
Nano brompton fitting instructions - Jobike

Create successful ePaper yourself
Turn your PDF publications into a flip-book with our unique Google optimized e-Paper software.
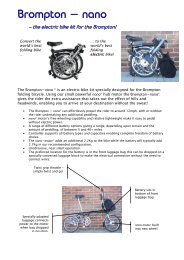
Electric conversion for Brompton<br />
Fitting Instructions<br />
the electric<br />
wheel company<br />
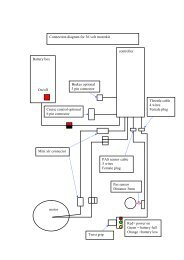
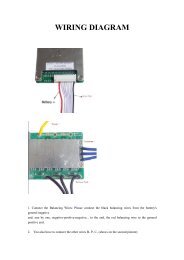
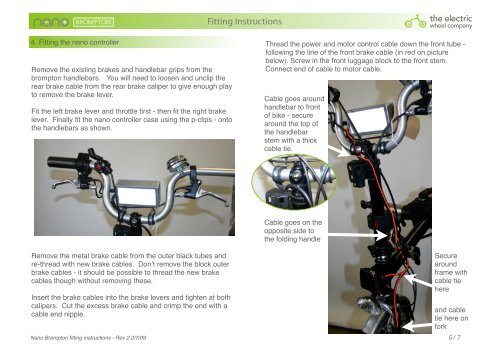
4. Fitting the nano controller Thread the power and motor control cable down the front tube -<br />
following the line of the front brake cable (in red on picture<br />
Remove the existing brakes and handlebar grips from the<br />
<strong>brompton</strong> handlebars. You will need to loosen and unclip the<br />
rear brake cable from the rear brake caliper to give enough play<br />
to remove the brake lever.<br />
Fit the left brake lever and throttle first - then fit the right brake<br />
lever. Finally fit the nano controller case using the p-clips - onto<br />
the handlebars as shown.<br />
below). Screw in the front luggage block to the front stem.<br />
Connect end of cable to motor cable.<br />
Cable goes around<br />
handlebar to front<br />
of bike - secure<br />
around the top of<br />
the handlebar<br />
stem with a thick<br />
cable tie.<br />
Remove the metal brake cable from the outer black tubes and<br />
re-thread with new brake cables. Donʼt remove the block outer<br />
brake cables - it should be possible to thread the new brake<br />
cables though without removing these.<br />
Insert the brake cables into the brake levers and tighten at both<br />
calipers. Cut the excess brake cable and crimp the end with a<br />
cable end nipple.<br />
Cable goes on the<br />
opposite side to<br />
the folding handle<br />
Secure<br />
around<br />
frame with<br />
cable tie<br />
here<br />
and cable<br />
tie here on<br />
fork<br />
<strong>Nano</strong> Brompton <strong>fitting</strong> <strong>instructions</strong> - Rev 2 2/7/09! 5 / 7