Overview and general instructions - PatternMaker Software
Overview and general instructions - PatternMaker Software
Overview and general instructions - PatternMaker Software

You also want an ePaper? Increase the reach of your titles
YUMPU automatically turns print PDFs into web optimized ePapers that Google loves.
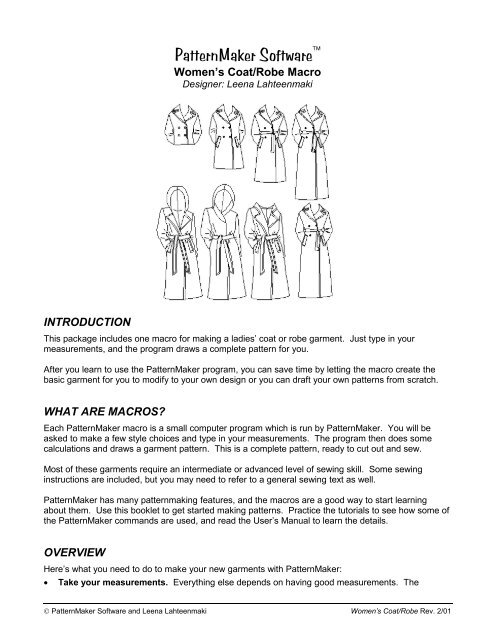
<strong>PatternMaker</strong> <strong>Software</strong> <br />
Women’s Coat/Robe Macro<br />
Designer: Leena Lahteenmaki<br />
INTRODUCTION<br />
This package includes one macro for making a ladies’ coat or robe garment. Just type in your<br />
measurements, <strong>and</strong> the program draws a complete pattern for you.<br />
After you learn to use the <strong>PatternMaker</strong> program, you can save time by letting the macro create the<br />
basic garment for you to modify to your own design or you can draft your own patterns from scratch.<br />
WHAT ARE MACROS?<br />
Each <strong>PatternMaker</strong> macro is a small computer program which is run by <strong>PatternMaker</strong>. You will be<br />
asked to make a few style choices <strong>and</strong> type in your measurements. The program then does some<br />
calculations <strong>and</strong> draws a garment pattern. This is a complete pattern, ready to cut out <strong>and</strong> sew.<br />
Most of these garments require an intermediate or advanced level of sewing skill. Some sewing<br />
<strong>instructions</strong> are included, but you may need to refer to a <strong>general</strong> sewing text as well.<br />
<strong>PatternMaker</strong> has many patternmaking features, <strong>and</strong> the macros are a good way to start learning<br />
about them. Use this booklet to get started making patterns. Practice the tutorials to see how some of<br />
the <strong>PatternMaker</strong> comm<strong>and</strong>s are used, <strong>and</strong> read the User’s Manual to learn the details.<br />
OVERVIEW<br />
Here’s what you need to do to make your new garments with <strong>PatternMaker</strong>:<br />
• Take your measurements. Everything else depends on having good measurements. The<br />
© <strong>PatternMaker</strong> <strong>Software</strong> <strong>and</strong> Leena Lahteenmaki Women’s Coat/Robe Rev. 2/01
Women’s Coat/Robe<br />
measurement form included in this package provides detailed <strong>instructions</strong> on how to take the<br />
measurements. Read the <strong>instructions</strong> carefully, <strong>and</strong> be very careful when taking the<br />
measurements.<br />
If you want to make clothes for more than one person, photocopy the measurement form (both<br />
sides) for each subject. Don’t write on the original before you copy it! You will use these<br />
measurements for all the macros, so keep the form in a safe place for future reference. Don’t<br />
forget to fill in the name <strong>and</strong> date – you may not remember whose measurements these are a few<br />
months from now.<br />
• Run the macro for the garment you want. <strong>PatternMaker</strong> will ask you for some measurements,<br />
which you will type in. Then it will draw the pattern. You can now use all of <strong>PatternMaker</strong>’s various<br />
features to modify your pattern, if you wish. Or you can just print it out <strong>and</strong> sew it.<br />
• Arrange for printing. You may need to use the MOVE <strong>and</strong> ROTATE comm<strong>and</strong>s to arrange the<br />
pieces for the most efficient printing.<br />
• Print your pattern. If you have a small desktop printer, you will need to tape the pages together.<br />
The pages will be marked to make it easy to assemble them.<br />
• Cut out <strong>and</strong> sew your new garment. This booklet gives you most of the sewing <strong>instructions</strong> you<br />
need, but always rely on your common sense. We hope you enjoy your new clothes!<br />
RUNNING A MACRO<br />
When you first start the <strong>PatternMaker</strong> program, you will see a blank drawing area. To run the macros,<br />
select the MACRO comm<strong>and</strong> from the File menu, or click on the icon which has the word MAC. (Users of<br />
<strong>PatternMaker</strong> Basic should select OPEN from the File menu, or click the OPEN icon.)<br />
A dialog box will ask you to select a file. Each macro is a separate file in your <strong>PatternMaker</strong> directory. The<br />
file name for this macro is:<br />
• COAT_ROBE<br />
Click on the name of the file, <strong>and</strong> then click “OK”. It may take a few seconds for <strong>PatternMaker</strong> to load the<br />
macro.<br />
You will now see a series of dialog boxes which ask questions <strong>and</strong> offer choices. To continue through<br />
the macro, you must select one of the options. If you click "Cancel" the macro will abort <strong>and</strong> you will be<br />
returned to the drawing screen. Also, be aware that you cannot move backwards through the options.<br />
You may wish to write down which options you choose. Refer to the enclosed pages for a “map” of the<br />
macro options.<br />
After you’ve made your garment style choices, a dialog box will<br />
ask you for the measurements. The illustration at the right shows<br />
the first of two measurements dialog boxes. Fill these in from<br />
your measurement chart. Remember to use decimal numbers:<br />
1/8----------.125<br />
1/4----------.25<br />
3/8----------.375<br />
1/2----------.5<br />
5/8----------.625<br />
3/4----------.75<br />
7/8----------.875<br />
Be careful to enter the right numbers in the right spaces. When<br />
you are ready, click “OK” or press the key.<br />
2
Women’s Coat/Robe<br />
You may have to wait a minute for the macro to run, especially if you don’t have a fast computer. You<br />
will know the macro is done when the hourglass cursor changes back to an arrow <strong>and</strong> the word<br />
Comm<strong>and</strong>: appears on the prompt line.<br />
IF YOU CANNOT SEE THE PATTERN PIECES, OR IF YOU ONLY SEE PART OF THEM, PRESS<br />
THE KEY TO VIEW ALL THE PIECES IN THE DRAWING.<br />
Look at your macro<br />
The macro will draw your new pattern in the drawing area. If you already had something on the<br />
screen, the new items will be added to the existing ones. To zoom out <strong>and</strong> see the entire pattern,<br />
press the key. To zoom in, use or . Use the arrow keys to move up, down, left, <strong>and</strong><br />
right. (See the PAN <strong>and</strong> ZOOM comm<strong>and</strong>s in the Help file.)<br />
ARRANGE YOUR PATTERN<br />
Now, you can use the <strong>PatternMaker</strong> editing features to make changes to your pattern. <strong>PatternMaker</strong><br />
has tools to make almost any alteration. Some simple changes you may want to make before you print<br />
are:<br />
• Erasing an object (ERASE comm<strong>and</strong>)<br />
• Moving an object (MOVE comm<strong>and</strong>)<br />
• Rotating an object 90 or 180 degrees (ROTATE comm<strong>and</strong>)<br />
• Label your pieces (TEXT comm<strong>and</strong>)<br />
Refer to the User’s Manual or the Help file for detailed <strong>instructions</strong> on these comm<strong>and</strong>s.<br />
IF YOU MAKE A MISTAKE<br />
If you make a mistake in one of the above operations, you can use the UNDO comm<strong>and</strong> to undo your<br />
last change. The Undo icon looks like a letter “U.” If you make a really big mistake, you can use the<br />
New comm<strong>and</strong> (on the File menu) to start all over. Luckily, this isn’t hard to do.<br />
READ THE MANUAL<br />
Here are some other comm<strong>and</strong>s you’ll want to learn before long. Look them up in the User’s Manual<br />
or the on-line Help system.<br />
• MOVE VERTEX to adjust shapes<br />
• SET LINE to draw dotted lines<br />
• COLOR to draw in different colors<br />
• GROUP to keep groups of things together<br />
• DIM <strong>and</strong> SET/MEASURE DISTANCE to check measurements<br />
• POLY to draw your own objects<br />
• COPY <strong>and</strong> MIRROR to copy objects<br />
• LAYER to hide things from view<br />
Note: These comm<strong>and</strong>s are available only in the Home Version <strong>and</strong> higher.<br />
PRINT YOUR PATTERN<br />
Before you print out your pattern, you should use the MOVE comm<strong>and</strong> to arrange the pieces in the<br />
most efficient way you can, to save paper. The pieces aren’t arranged for you, because the best<br />
arrangement will depend on your measurements <strong>and</strong> the size of the printer you have. If possible,<br />
arrange the pieces to fit within a rectangle no wider than your printer’s page size. Make sure you leave<br />
enough room for seam allowances, if you didn’t already have the macro add them.<br />
3
Women’s Coat/Robe<br />
We assume you already have your printer set up <strong>and</strong> working. <strong>PatternMaker</strong> works with any Windowsdriven<br />
printing or plotting device. If you have a printer with tractor-feed paper, print in L<strong>and</strong>scape mode<br />
to make the pages connect in the correct order.<br />
See “Printing a pattern” in the Help file for details about the various Print comm<strong>and</strong>s, <strong>and</strong> “Assembling<br />
a printed pattern” for <strong>instructions</strong> on putting the pages together.<br />
COAT/ROBE OPTION DESCRIPTIONS:<br />
NO HOOD/COLLAR ONLY<br />
This model has a collar <strong>and</strong> lapels, but no hood. Choose between round <strong>and</strong> pointed collar.<br />
HOOD/LAPELS NO COLLAR<br />
In this version, the hood is cut as a separate piece <strong>and</strong> attached to the neckline of the garment instead<br />
of a collar.<br />
HOOD AND COLLAR<br />
In this model, the garment has a collar <strong>and</strong> lapels, <strong>and</strong> the hood is a separate piece. Choose between<br />
round <strong>and</strong> pointed collar. The hood is made to be detachable, <strong>and</strong> can be fastened under the collar<br />
with snaps, buttons, or a zipper.<br />
INTEGRATED HOOD<br />
This version has a shawl collar/lapels <strong>and</strong> an attached hood. The hood <strong>and</strong> the body of the garment<br />
are cut as a single piece.<br />
ABOUT EASE<br />
This garment has three ease choices (bust ease): Minimum, Normal, <strong>and</strong> Maximum. Be sure to notice<br />
the numbers given in the Ease dialog box. They will tell you how much ease is to be added. Since this<br />
garment is intended as an overcoat or a loose-fitting robe, the amount of ease added is greater than in<br />
other <strong>PatternMaker</strong> macros. Keep in mind that the type of fabric you choose will also affect the amount<br />
of ease that will be appropriate.<br />
SEWING INSTRUCTIONS<br />
FOLLOW THESE STEPS FOR WORRY-FREE CONSTRUCTION<br />
GENERAL INSTRUCTIONS<br />
• When you buy your fabric, ask how much it will shrink when washed. In all cases, when the fabric is<br />
washable <strong>and</strong> when you are not sure that the fabric won't shrink, it is safe to wash <strong>and</strong> iron it before<br />
cutting. Don't forget to preshrink lining as well.<br />
• Cut pattern pieces on folded fabric, right side of the fabric folded inwards. Make the necessary<br />
marks on the fabric with chalk or pencil. If the fabric is plaid, striped or checkered, align the hem<br />
lines at the same point on the repeating pattern. For sleeves, the repeating pattern should match<br />
where the bottom of the armscye <strong>and</strong> bottom of sleeve cap meet. Vertical centerline of sleeve<br />
4
Women’s Coat/Robe<br />
should be placed at a vertical stripe or at center of a plaid square. The coat front center should be<br />
placed the same way.<br />
• Transfer notch marks from your pattern to the fabric by cutting snips (depth 1/4 inch/5 mm) into<br />
seam allowances. When joining garment pieces, place corresponding notch marks in the two<br />
pieces together.<br />
• If you are making a coat, cut <strong>and</strong> iron interfacing onto facings, belt, <strong>and</strong> pocket flap. For a neat<br />
hem at the bottom of the coat, apply interfacing to the hem seam allowance as well. For a robe,<br />
you <strong>general</strong>ly do not need to use interfacing.<br />
• Cut lining along with garment patterns without space for facings (but remember to add seam<br />
allowances) <strong>and</strong> hem seam allowances. Do not cut lining for collars. Lining fabric usually is not as<br />
elastic as garment fabric, so cut it with about 1/8 inch (0.3 cm) wider seam allowances than for the<br />
garment pieces.<br />
• Use the longest possible machine stitches for basting. It is quick <strong>and</strong> the stitches can easily be<br />
removed.<br />
• You will get the best result if you always press seams <strong>and</strong> darts as you sew. First iron seams or<br />
darts flat without turning them to either direction. Then press them towards center, side seam<br />
towards front. Two-piece sleeve seams are both pressed towards shoulder mark. Use a steam<br />
iron. If you press seams from right side of the fabric, use pressing cloth if necessary.<br />
• Edgestitching gives a well-finished look to garment, but only if it is straight <strong>and</strong> even. Long stitches<br />
of 1/4 inch (4-5 mm) look best in edgestitching. Sew edgestitching only after you have ironed the<br />
seam.<br />
HOW TO SEW POCKETS<br />
Flap, welt or buttonhole pocket: The techniques for these three kinds of pockets are similar. The<br />
difference lies in treatment of the pocket opening.<br />
1. Garment preparation: First, decide on the width of the pocket opening, also called the pocket line<br />
or cutting line. Mark the pocket line with a pencil on the wrong side of the garment. Transfer<br />
markings to the right side with basting thread (2).<br />
2. Cut a piece of interfacing measuring 1¼ in. (3 cm) wide <strong>and</strong> 1½ in. (4 cm) longer than pocket line.<br />
Baste or press interfacing to wrong side of garment.<br />
3. Stitch a rectangle or “box” around pocket line as in picture (3). The edge pieces for flap, welt, or<br />
buttonhole opening are attached to the garment along this stitched “box.” The rectangular “box” is<br />
about ¾ inch (2 cm) high <strong>and</strong> the length of the pocket opening.<br />
4. Cut flap, welt, or buttonhole pieces along the straight grain of fabric, as described below. Always<br />
include seam allowances. Press interfacing to wrong side of pieces. Fold pieces as described,<br />
<strong>and</strong> place on right side of garment. With machine basting, fasten edge pieces to stitched “box” as<br />
described below.<br />
a) Flap Cut two pieces with a finished width equal to the cutting line plus seam allowances <strong>and</strong> a<br />
finished length sufficient to cover the stitched “box.” Interface. Place pocket flaps right sides<br />
together <strong>and</strong> stitch along sides. Leave raw edge to be fastened to garment. Turn piece right<br />
side out, open seams well <strong>and</strong> press. Edgestitch if desired (1).<br />
b) Buttonhole The buttonhole pocket mouth has two narrow folded strips of fabric meeting in the<br />
center of the stitched “box.”<br />
Cut a strip of fabric, width 1½ “ (4 cm) <strong>and</strong> long enough for all the pockets. For the length of<br />
the strip, multiply the length of each pocket plus seam allowances, by twice the number of<br />
pockets.<br />
5
Women’s Coat/Robe<br />
Iron interfacing to strips, fold them in half lengthwise, wrong sides together. Press lightly.<br />
Overlock raw edges of strips. Machine baste strips ¼” (6 mm) from the folded edge to mark<br />
stitching line. Place two strips on the rectangular “box,” with the folded edges meeting over the<br />
pocket cutting line, <strong>and</strong> machine basting over the stitch lines of the “box.” Zigzag the folded<br />
edges together to hold them in place until the pocket is completed, then remove the zigzag.<br />
Stitch rectangle again from wrong side.<br />
c) Welt Cut welt piece with a length two seam allowances longer than the stitched rectangle.<br />
Welt piece height is twice the stitched box height, plus two seam allowances. Normal height of<br />
finished welt piece is ½” (1-2 cm). Interface welt, overlock raw edges <strong>and</strong> fold lengthwise<br />
wrong sides together.<br />
Place welt on the stitched rectangle with the welt seam line along lower stitching line of “box.”<br />
Folded edge faces down, <strong>and</strong> raw edge is turned upward toward the “box” center. From wrong<br />
side, stitch around “box” rectangle again.<br />
5. Attach pocket piece: Cut a rectangle with width 2½ -4½ inches (4-6 cm) greater than pocket line<br />
<strong>and</strong> length twice the desired pocket depth, about 16 inches (40 cm) total (4). If you don’t have<br />
enough garment fabric, the lower half can be of pocket lining fabric.<br />
6. Pin pocket fabric to right side of garment over the pocket opening <strong>and</strong> the attached edging. Place<br />
the horizontal centerline of pocket fabric onto the upper edge of the stitched rectangle.<br />
Working from the wrong side of garment (5), stitch again over the stitched “box.”<br />
7. On wrong side of garment, slash rectangle along pocket center line <strong>and</strong> diagonally to the rectangle<br />
corners. Cut the garment <strong>and</strong> pocket material carefully along cutting line, being careful not to cut<br />
stitching (6). DO NOT CUT POCKET FLAP, BUTTONHOLE, OR WELT pieces.<br />
8. Pull pocket through the opening; turn pocket to inside <strong>and</strong> press well. Edgestitch over the<br />
rectangle.<br />
9. Turn pocket downwards, sew <strong>and</strong> overlock pocket edges (8) together. Press.<br />
10. Turn pocket edging to its correct position on the right side of garment, press well (7). Topstitch the<br />
edging treatment as appropriate to make sure it lies flat.<br />
SEWING A COAT/ROBE<br />
Iron interfacing to coat's front <strong>and</strong> back facings, under collar<br />
<strong>and</strong> pocket flaps. It is also good to iron interfacing to coat's<br />
hem seam allowance. When cutting the collar pieces, cut<br />
upper collar about 1/4 inch (1/2 cm) bigger at the neck edge.<br />
This forces the collar to turn down to its correct position when<br />
it is done.<br />
Only vertical coat seams need to be overlocked. Collar,<br />
shoulder <strong>and</strong> sleeve seams do not need to be overlocked as<br />
they will be inside the lining. Press all seams after sewing <strong>and</strong><br />
overlocking them.<br />
Cut a seam at the linings CB <strong>and</strong> add extra width to the seam,<br />
to form a pleat.<br />
Sew pocket flaps together along the outer edge right side to<br />
right side. (Picture 1A). Clip seam allowances at corners. Turn<br />
flaps right side out <strong>and</strong> iron. Edgestitch at a distance of 3/4" (1.5 cm) from the edges.<br />
6
Women’s Coat/Robe<br />
Sew pockets to the front pieces. Mark the pocket mouth line on the front pattern pieces by machine<br />
basting. Place pocket flap on the line raw edges towards side seam. Place one pocket bag on top of<br />
the flap <strong>and</strong> the other opposite it on the pocket mouth line. (Picture 1B).<br />
Sew a rectangle around the pocket mouth line, sewing through all thicknesses. (Picture 1C). Cut along<br />
the line <strong>and</strong> diagonally at the ends at the corners. Push pocket bags to the wrong side of the garment<br />
<strong>and</strong> press. Turn pocket flap to its right position <strong>and</strong> press. Attach the flap ends to the garment along<br />
the edgestitching, sewing through all thicknesses.<br />
For more <strong>instructions</strong> of how to sew pockets, refer to the <strong>general</strong> sewing <strong>instructions</strong>, above.<br />
Sew the coat's shoulder <strong>and</strong> side seams. (Picture 2A).<br />
Prepare collar. Sew under collar <strong>and</strong> top collar together right side to right side. Clip at corners <strong>and</strong><br />
turn right side out <strong>and</strong> iron. (Picture 2B). Machine baste the raw edges of the collar (neck seam)<br />
together.<br />
Place collar on the coat's neckline, with right side of under collar against the coat's right side. Match<br />
collar shoulder mark with the coat's shoulder seam. Machine baste the collar to the coat's neck from<br />
lapel corner (Picture 2C, point c) to other lapel corner. Clip the seam allowance at the lapel corners.<br />
7
Women’s Coat/Robe<br />
Prepare sleeves. Sew sleeve elbow darts <strong>and</strong> sleeve seams. Sew sleeves to the armscyes. Easestitch<br />
sleeve cap, allowing a seam allowance of 1/4 inch (1/2 cm). Turn sleeves right side out <strong>and</strong> coat wrong<br />
side out. Place sleeves inside coat (right side against right side) so that sleeves' shoulder marks<br />
match with the coat's shoulder seams. Insert sleeves by sewing along easestiches Adjust ease by<br />
pulling on the stitching in the ease cap. If there tends to be too much ease at sleeve cap (some fabrics<br />
tolerate more ease than others do), you can adjust this by placing sleeves lower at the armpit. There<br />
should be as much ease as possible, but no wrinkles at cap seams, when done.<br />
HINT: In the design tutorial there are <strong>instructions</strong> of how to use a facing in sleeve cap<br />
to helps to get nicely formed sleeve heads.<br />
Prepare lining. Sew the side <strong>and</strong> the back seams of the lining. Fold the lining's hem seam allowance<br />
twice in <strong>and</strong> sew. Sew front facings to the lining front edges <strong>and</strong> back neck facing on top of the right<br />
side of the lining's back neck. Sew lining's shoulder seams. Sew lining's sleeves <strong>and</strong> sew the sleeves<br />
to the lining.<br />
To join the jacket <strong>and</strong> the lining, place the lining on top of the coat with right side against right side.<br />
Leave collar in between <strong>and</strong> upside down. (Picture 2D). Sew a continuous seam as follows: across<br />
hem of front facing, along one front edge, around neck to other front edge <strong>and</strong> finally across hem of<br />
other front facing. Clip seam allowance at neck seam at about 1 inch (2 cm) intervals. Cut corners<br />
diagonally (including the corner at the front of hem) <strong>and</strong> turn the lining inside the jacket. Open seams<br />
well <strong>and</strong> press. Edgestitch along the front edges <strong>and</strong> around the collar at a distance of 3/4" (1.5 cm)<br />
from the edges.<br />
If you sew a hood to your coat, attach it to the the coat the same way you attach the collar. You can<br />
sew the coat with hood with or without collar. The latter one is sewn the same way a shawl collar is<br />
sewn.<br />
If you choose to sew a normal or a detachable hood, cut the hood pieces in 4 copies. If you use<br />
different fabric to the hood lining, cut 2 hood pieces from the coat fabric <strong>and</strong> 2 from lining fabric. Sew<br />
the back seam of the hood, hood pieces right side aganst right side (Picture 3A). Sew the back seam<br />
of the lining the same way. Place the lining inside the hood, right side against right side <strong>and</strong> sew along<br />
front edge (Picture 3B). Turn hood right side out, open seams, press <strong>and</strong> edgestitch at a distance of<br />
3/4" (1.5 cm) from the edge. Baste the neck edges of the hood together. Attach the hood to the coat<br />
the same way you attach the collar. You can sew both the collar <strong>and</strong> the hood to your coat.<br />
If you want to sew a detachable hood, sew its neck seam from the wrong side - before turning the hood<br />
right side out. Leave an opening for turning the hood right side out. Close the opening with h<strong>and</strong><br />
stitches. Then press <strong>and</strong> edgestitch. Sew buttonholes to the neck edge of the hood <strong>and</strong> buttons to the<br />
8
Women’s Coat/Robe<br />
coat neck (Picture 3B). Or use snaps. If you use zipper as the fastener, sew one half of it to the coat<br />
neck seam under the collar <strong>and</strong> the other half to the hood neck seam.<br />
If you choose the integrated hood, sew the coat's shoulder<br />
(Picture 4A, a) <strong>and</strong> side seams (Picture 4A, b) <strong>and</strong> the back<br />
seam of the hood (Picture 4A, d-g). Cut the seam allowance<br />
at the shoulder/neck corner of the coat (Picture 4A, arrow)<br />
<strong>and</strong> sew the hood neck (Picture 4A, c) to the coat neck<br />
(Picture 4A, g). Cut clips to the seam allowances with<br />
intervals of about 1" (2 cm).<br />
Prepare the lining as for coat with collar <strong>and</strong> attach the front<br />
facing with the integrated hood to the front edges of the lining<br />
(Picture 4B ). Sew shoulder seam. Cut seam allowance at<br />
the shoulder/neck corner. Sew the back seam of the hood<br />
<strong>and</strong> sew the hood neck to the coat neck in the lining as in the<br />
coat. Cut clips to the seam allowances. Press coat <strong>and</strong> lining.<br />
Put them right side against right side <strong>and</strong> sew across the<br />
hem of one facing <strong>and</strong> around front <strong>and</strong> hood edges <strong>and</strong><br />
across the hem of the other front facing. Turn the coat right<br />
side out, open seams <strong>and</strong> press. Edgestitch front edge at a<br />
distance of 3/4" (1.5 cm) from the edge.<br />
Fold sleeve cuff seam allowances in <strong>and</strong> sew with invisible<br />
stitches. Attach the lining to the sleeve ends. Sew hem with<br />
invisible stitches. Sew buttons <strong>and</strong> buttonholes. Do the final<br />
pressing<br />
9
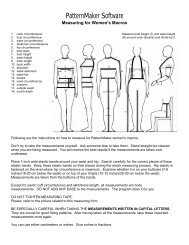
<strong>PatternMaker</strong> <strong>Software</strong><br />
Measuring for Women's Macros<br />
1. neck circumference Measure bust height (7) <strong>and</strong> waist height<br />
2. bust circumference (8) around neck (double) <strong>and</strong> divide by 2.<br />
3. waist circumference<br />
4. abdomen circumference<br />
5. hip circumference<br />
6. bust span<br />
7. bust height<br />
8. waist height<br />
9. back length<br />
10. back width<br />
11. shoulder<br />
12. waist-abdomen<br />
13. waist-hip<br />
14. biceps<br />
15. wrist circumference<br />
16. overarm<br />
17. outside seam<br />
18. crotch depth<br />
Following are the <strong>instructions</strong> on how to measure for <strong>PatternMaker</strong> women's macros.<br />
Don't try to take the measurements yourself. Ask someone else to take them. St<strong>and</strong> straight but relaxed<br />
when you are being measured. You will receive the best results if the measurements are taken over<br />
underwear.<br />
Place 1-inch wide elastic b<strong>and</strong>s around your waist <strong>and</strong> hip. Search carefully for the correct places of these<br />
elastic b<strong>and</strong>s. Keep these elastic b<strong>and</strong>s on their places during the whole measuring process. Hip elastic is<br />
fastened on the level where hip circumference is maximum. Examine whether it is on your buttocks (7-8<br />
inches/18-20 cm below the waist) or on top of your thighs (10-12 inches/25-30 cm below the waist).<br />
Measurements are taken from the bottoms of the b<strong>and</strong>s.<br />
Except for pants' cuff circumference <strong>and</strong> skirt/dress length, all measurements are body<br />
measurements. DO NOT ADD ANY EASE to the measurements. The program does it for you.<br />
DO NOT TIGHTEN MEASURING TAPE.<br />
Please, refer to the picture related to this measuring form.<br />
BE ESPECIALLY CAREFUL WHEN TAKING THE MEASUREMENTS WRITTEN IN CAPITAL LETTERS.<br />
They are crucial for good fitting patterns. After having taken all the measurements, take these important<br />
measurements once again.<br />
You can use either centimeters or inches. Give inches in fractions.
<strong>PatternMaker</strong> <strong>Software</strong><br />
Women’s Measuring Chart<br />
Name: ___________________________<br />
Date: ___________<br />
1 Neck Circumference: Measure around lowest part of neck, at the base<br />
2 Bust Circumference: Marked with elastic. Measure around the fullest part of the<br />
bust, keeping the tape high at the back<br />
3 Waist Circumference: Measure waist at the elastic tape<br />
4 Abdomen Circumference: Measured on the level where abdomen circumference is<br />
maximum<br />
5 Hip Circumference: Measured over the largest part of your bottom/thighs (at elastic)<br />
6 Bust Span: Horizontal distance between bust apexes (also called bust bridge).<br />
Measured along bust elastic.<br />
7 Bust Height: Measure from center of back neck over shoulder to apex of one breast<br />
8 WAIST HEIGHT: Measure from center of back neck over shoulder to breast apex<br />
<strong>and</strong> from there vertically to lower edge of waist elastic. To be sure to get right<br />
measurements, take this <strong>and</strong> bust height as a link around neck (=double) <strong>and</strong><br />
divide the result by 2 (see picture).<br />
9 BACK LENGTH: Measure from center of back neck to lower edge of waist elastic<br />
10 BACK WIDTH: hang your arms relaxed on your sides. The measurement is taken<br />
horizontally between shoulder blades (i.e. from sleeve seam to sleeve seam), from<br />
<strong>and</strong> to the point where your arm meets your body (but not to armpit) about 4" (10<br />
cms) from neck downwards.<br />
11 Shoulder length: Measure from neck to shoulder tip. Shoulder tip is found when you<br />
raise your arm to horizontal position <strong>and</strong> feel where there is hollow/pit between<br />
shoulder <strong>and</strong> arm bones. Hold your arm horizontal, if necessary, to find this point.<br />
12 Waist-Abdomen: Measure vertically from lower edge of waist elastic to lower edge<br />
of abdomen elastic. Measure at front center.<br />
13 Waist-Hip: Measure vertically from lower edge of waist elastic to lower edge of hip<br />
elastic. Measure at the side.<br />
14 Biceps circumference: Measure at widest point of upper arm.<br />
15 Wrist circumference: Measure over wrist bone<br />
16 Overarm: Arm length from shoulder tip (as described above) to wrist. Bend arm<br />
slightly <strong>and</strong> measure over outside of elbow.<br />
17 Outside seam: Measure from waist over the outside curvature of the hip to the<br />
desired cuff length.<br />
18 CROTCH DEPTH: Sit on unpadded bench or chair. Measure vertically from waist<br />
elastic to chair level on both sides, <strong>and</strong> use the longer measurement. Measure in a<br />
straight line, not along the outside hip curve. (Crotch depth can also be measured<br />
from a pair of old, well fitting pants.) Crotch depth is the difference between outside<br />
<strong>and</strong> inside length of pants.<br />
Desired cuff circumference, not ankle circumference<br />
Desired jacket length from waist elastic to hem<br />
Desired skirt /dress length from waist elastic to hem
Important things to be taken into consideration when measuring<br />
The most important measurements are the ones written in on the measuring chart in BOLD CAPITAL LETTERS: waist<br />
height, back length, back width, <strong>and</strong> pants' crotch depth.<br />
If one of these four measurements is wrong, the result may be a distorted pattern <strong>and</strong> it is difficult to figure what<br />
measurement is wrong. If some other measurement is wrong, you get either a too-tight or a too-loose garment <strong>and</strong> you<br />
can easily see what measurement to correct <strong>and</strong> to what direction.<br />
Figure 3: normal<br />
sloper<br />
Figure 2: back width<br />
wrong<br />
Figure 1: waist height/back length<br />
wrong<br />
Normally the pattern for basic sloper is more or less like Figure 1. Front <strong>and</strong> back shoulders slope downwards to shoulder<br />
tip. Armscyes curve inward. Back armscye can be rather straight but should never bulge outward.<br />
If the pattern is like in Figure 2 -- i.e. front armscye curves strongly inward (a) <strong>and</strong> back armscye bulges outward (b), back<br />
width has been measured wrong <strong>and</strong> is too much. Measure back width anew.<br />
Please note that this measuring error causes the garment to be too loose at back <strong>and</strong> too tight at front. Therefore the<br />
situation cannot be corrected by only reducing width of back piece. The pattern must be redrawn using the correct back<br />
width measurement.<br />
If waist height in relation to back length is wrong (refer to Figure 3), the result is either a shoulder that slopes to wrong<br />
direction (a) or a shoulder which is too steep (b). If you measure waist height as instructed in <strong>PatternMaker</strong> measuring<br />
<strong>instructions</strong> i.e. double around back neck <strong>and</strong> divide the result by 2, there seldom is any error in waist height. Therefore<br />
the error usually is in back length.<br />
If shoulder slopes in wrong direction (a), back length is too much <strong>and</strong> if shoulder is too steep (b), back length is too little.<br />
Change back length 2-3 cm in the needed direction <strong>and</strong> see if it is enough to correct the situation. If it looks good, you see<br />
to which point at neck back length has to be measured to be OK.<br />
If the subject st<strong>and</strong>s in a very upright, military position with bust out <strong>and</strong> abdomen in, also waist height may be too much.<br />
Please make sure that the subject st<strong>and</strong>s in a relaxed position when she is being measured.<br />
In some cases a steep shoulder may be due to the subject's body shape. This is the case if the subject has a very<br />
prominent bust. And conversely, if a subject has a very flat bust <strong>and</strong>/or a very round back, the shoulder can be rather<br />
straight.<br />
Thus, there are cases, where the patterns are all right even if they look "odd". When the patterns are drawn according to a<br />
person's own measurements, they should not be compared with patterns drawn according to "normal" or "average"<br />
measurements. If you are not sure of the measurements taken, you have a very good <strong>and</strong> simple way to check them: sew<br />
a muslin with the basic bodice patterns. If it fits on the subject, you can be sure that all other garments sewn with<br />
<strong>PatternMaker</strong> macros will fit well.<br />
If you get an error message:<br />
value out of range in line …<br />
coord (32,33,sqrt(op*op-oke*oke),-oke);<br />
it means the measuring error is so drastic that the program is unable to draw the patterns at all. Front shoulder does not<br />
meet armscye line. Then either back length is too little or waist height too much. It may also be that shoulder length has<br />
some influence: shoulder length may be too short.<br />
Also, in some other cases there may be reason for checking shoulder length measurement. If shoulder is too short, there<br />
will be a corner inward where front <strong>and</strong> back shoulder meet at shoulder tip <strong>and</strong> vice versa.