PatternMaker Software
PatternMaker Software
PatternMaker Software

Create successful ePaper yourself
Turn your PDF publications into a flip-book with our unique Google optimized e-Paper software.
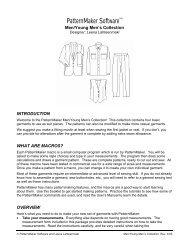
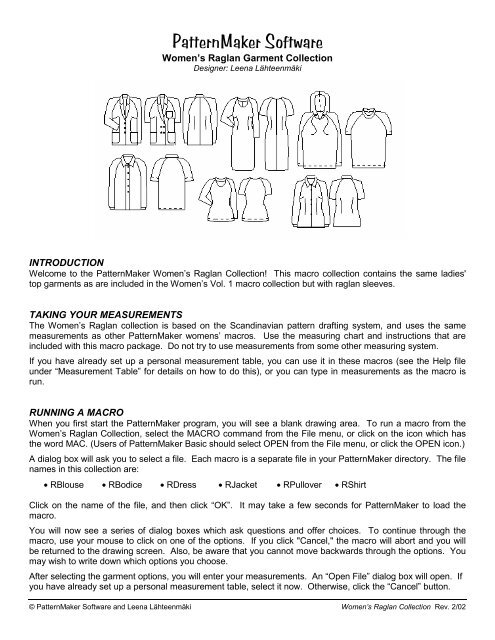
<strong>PatternMaker</strong> <strong>Software</strong><br />
Women’s Raglan Garment Collection<br />
Designer: Leena Lähteenmäki<br />
INTRODUCTION<br />
Welcome to the <strong>PatternMaker</strong> Women’s Raglan Collection! This macro collection contains the same ladies'<br />
top garments as are included in the Women’s Vol. 1 macro collection but with raglan sleeves.<br />
TAKING YOUR MEASUREMENTS<br />
The Women’s Raglan collection is based on the Scandinavian pattern drafting system, and uses the same<br />
measurements as other <strong>PatternMaker</strong> womens’ macros. Use the measuring chart and instructions that are<br />
included with this macro package. Do not try to use measurements from some other measuring system.<br />
If you have already set up a personal measurement table, you can use it in these macros (see the Help file<br />
under “Measurement Table” for details on how to do this), or you can type in measurements as the macro is<br />
run.<br />
RUNNING A MACRO<br />
When you first start the <strong>PatternMaker</strong> program, you will see a blank drawing area. To run a macro from the<br />
Women’s Raglan Collection, select the MACRO command from the File menu, or click on the icon which has<br />
the word MAC. (Users of <strong>PatternMaker</strong> Basic should select OPEN from the File menu, or click the OPEN icon.)<br />
A dialog box will ask you to select a file. Each macro is a separate file in your <strong>PatternMaker</strong> directory. The file<br />
names in this collection are:<br />
• RBlouse • RBodice • RDress • RJacket • RPullover • RShirt<br />
Click on the name of the file, and then click “OK”. It may take a few seconds for <strong>PatternMaker</strong> to load the<br />
macro.<br />
You will now see a series of dialog boxes which ask questions and offer choices. To continue through the<br />
macro, use your mouse to click on one of the options. If you click "Cancel," the macro will abort and you will<br />
be returned to the drawing screen. Also, be aware that you cannot move backwards through the options. You<br />
may wish to write down which options you choose.<br />
After selecting the garment options, you will enter your measurements. An “Open File” dialog box will open. If<br />
you have already set up a personal measurement table, select it now. Otherwise, click the “Cancel” button.<br />
© <strong>PatternMaker</strong> <strong>Software</strong> and Leena Lähteenmäki Women’s Raglan Collection Rev. 2/02
Women’s Raglan Collection<br />
The macro will then prompt you to enter measurements manually. Most of the macros have two dialog boxes<br />
for measurements.<br />
GARMENT NOTES<br />
Blouse:<br />
Fitted blouse with bust and waist darts. Two-piece collar, button-up front.<br />
• 3 ease categories<br />
• 2 collar styles<br />
• Long or short sleeves<br />
• Shoulder pads yes/no<br />
Dress:<br />
Jewel-neck sheath dress with bust and waist darts<br />
• 3 ease categories<br />
• Long or short sleeves<br />
• Shoulder pads yes/no<br />
Jacket:<br />
Fitted jacket with bust and waist darts<br />
• 3 ease categories<br />
• Single-breasted or double-breasted<br />
• Long or short sleeves<br />
• 3 lapel height options<br />
• 4 pocket shape options<br />
• Shoulder pads yes/no<br />
Pullover:<br />
Close-fit pullover top<br />
• 3 ease categories<br />
• Long or short sleeves<br />
Shirt/T-shirt:<br />
Shirt: Men’s-style shirt with two-piece collar and button-up front.<br />
T-shirt: Loose-fit pullover top with hood (optional: erase hood and cut ribbing for neckline). Suitable for ribbedknit<br />
collar and cuffs.<br />
• 4 ease categories<br />
• Bust darts or unfitted (no darts)<br />
• 2 sleeve styles<br />
• Long or short sleeves<br />
GARMENT EASE<br />
The Shirt/T-shirt macro has 4 ease options. The three first ease options are for normal shirt and T-shirt:<br />
normal, minimum and maximum. The last ease option (jacket/sweater maximum) is for loose casual jackets<br />
and sweaters. For a jacket, use the shirt model and for a sweater the T-shirt model. If you want to sew a<br />
jacket with hood, run both model options and erase all the T-shirt pattern pieces except the hood.<br />
PATTERNS<br />
As with all patterns drafted with <strong>PatternMaker</strong> macros, you have to remember that they are drafted according<br />
to your own measurements. So they may not look like the patterns you have been used to. Most significantly,<br />
the direction of the front shoulder very much depends on the ratio of your front and back heights. If you have a<br />
2
Women’s Raglan Collection<br />
prominent bust, your front shoulder may be steeper than you have seen in the patterns drafted according to<br />
standard measurements.<br />
Here you have the patterns of three real ladies. There are the patterns of the basic bodice with normal sleeves<br />
and with raglan sleeves drafted on top of one another. You can see how different the patterns look:<br />
Lady A has a very steep front shoulder which also makes her raglan sleeve head very narrow at the front.<br />
Lady C has a completely different figure; her front shoulder is more or less horizontal (it will slope downwards<br />
when the bust dart is sewn) and her raglan front sleeve head is much wider.<br />
In the raglan sleeve design there has been added space at armpit to give the arm more space to move. That's<br />
why the raglan sleeve is wider at the armpit than the normal sleeve.<br />
The patterns of Lady B look more like the raglan patterns you have seen but the back sleeve is wider than the<br />
front sleeve. Look at the above picture where the raglan sleeve has been drafted on top of the normal sleeve<br />
to verify that the sleeves are identical, only the armpit of the raglan sleeve has been lowered and made wider.<br />
SEWING THE GARMENTS<br />
For sewing instructions for this collection, please refer to a good sewing text, or use the instructions for the<br />
Women’s Vol. 1 Collection, provided in PDF format on the <strong>PatternMaker</strong> installation CD or available online at:<br />
www.leenas.com<br />
ALTERATIONS<br />
Altering the shoulder shape<br />
If there is too much room in the raglan sleeve shoulders even if you have not chosen the shoulder pad option,<br />
try the garment on and pin the desired shoulder shape. Then re-sew the shoulder seam.<br />
Altering the design with help of other <strong>PatternMaker</strong> macros<br />
If you want to draft a different kind of collar for your shirt, T-shirt or jacket, use the collars macros which comes<br />
free with all <strong>PatternMaker</strong> program versions.<br />
If you want to alter the design of a raglan garment, use other <strong>PatternMaker</strong> macros as a guide. For example,<br />
let's presume you want to draft patterns for a jacket with a shawl collar and raglan sleeves.<br />
In the raglan jacket macro there is not an option for shawl collar, but in the super jacket macro there is. Run<br />
the macros on top of each other. Trace and add the shawl collar to the raglan jacket shell and sleeve as in the<br />
drawing above. Please be sure to use the same ease in both macros. This way you can combine any two<br />
macros.<br />
3
<strong>PatternMaker</strong> <strong>Software</strong><br />
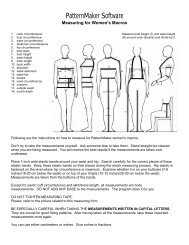
Measuring for Women's Macros<br />
1. neck circumference Measure bust height (7) and waist height<br />
2. bust circumference (8) around neck (double) and divide by 2.<br />
3. waist circumference<br />
4. abdomen circumference<br />
5. hip circumference<br />
6. bust span<br />
7. bust height<br />
8. waist height<br />
9. back length<br />
10. back width<br />
11. shoulder<br />
12. waist-abdomen<br />
13. waist-hip<br />
14. biceps<br />
15. wrist circumference<br />
16. overarm<br />
17. outside seam<br />
18. crotch depth<br />
Following are the instructions on how to measure for <strong>PatternMaker</strong> women's macros.<br />
Don't try to take the measurements yourself. Ask someone else to take them. Stand straight but relaxed<br />
when you are being measured. You will receive the best results if the measurements are taken over<br />
underwear.<br />
Place 1-inch wide elastic bands around your waist and hip. Search carefully for the correct places of these<br />
elastic bands. Keep these elastic bands on their places during the whole measuring process. Hip elastic is<br />
fastened on the level where hip circumference is maximum. Examine whether it is on your buttocks (7-8<br />
inches/18-20 cm below the waist) or on top of your thighs (10-12 inches/25-30 cm below the waist).<br />
Measurements are taken from the bottoms of the bands.<br />
Except for pants' cuff circumference and skirt/dress length, all measurements are body<br />
measurements. DO NOT ADD ANY EASE to the measurements. The program does it for you.<br />
DO NOT TIGHTEN MEASURING TAPE.<br />
Please, refer to the picture related to this measuring form.<br />
BE ESPECIALLY CAREFUL WHEN TAKING THE MEASUREMENTS WRITTEN IN CAPITAL LETTERS.<br />
They are crucial for good fitting patterns. After having taken all the measurements, take these important<br />
measurements once again.<br />
You can use either centimeters or inches. Give inches in fractions.
<strong>PatternMaker</strong> <strong>Software</strong><br />
Women’s Measuring Chart<br />
Name: ___________________________<br />
Date: ___________<br />
1 Neck Circumference: Measure around lowest part of neck, at the base<br />
2 Bust Circumference: Marked with elastic. Measure around the fullest part of the<br />
bust, keeping the tape high at the back<br />
3 Waist Circumference: Measure waist at the elastic tape<br />
4 Abdomen Circumference: Measured on the level where abdomen circumference is<br />
maximum<br />
5 Hip Circumference: Measured over the largest part of your bottom/thighs (at elastic)<br />
6 Bust Span: Horizontal distance between bust apexes (also called bust bridge).<br />
Measured along bust elastic.<br />
7 Bust Height: Measure from center of back neck over shoulder to apex of one breast<br />
8 WAIST HEIGHT: Measure from center of back neck over shoulder to breast apex<br />
and from there vertically to lower edge of waist elastic. To be sure to get right<br />
measurements, take this and bust height as a link around neck (=double) and<br />
divide the result by 2 (see picture).<br />
9 BACK LENGTH: Measure from center of back neck to lower edge of waist elastic<br />
10 BACK WIDTH: hang your arms relaxed on your sides. The measurement is taken<br />
horizontally between shoulder blades (i.e. from sleeve seam to sleeve seam), from<br />
and to the point where your arm meets your body (but not to armpit) about 4" (10<br />
cms) from neck downwards.<br />
11 Shoulder length: Measure from neck to shoulder tip. Shoulder tip is found when you<br />
raise your arm to horizontal position and feel where there is hollow/pit between<br />
shoulder and arm bones. Hold your arm horizontal, if necessary, to find this point.<br />
12 Waist-Abdomen: Measure vertically from lower edge of waist elastic to lower edge<br />
of abdomen elastic. Measure at front center.<br />
13 Waist-Hip: Measure vertically from lower edge of waist elastic to lower edge of hip<br />
elastic. Measure at the side.<br />
14 Biceps circumference: Measure at widest point of upper arm.<br />
15 Wrist circumference: Measure over wrist bone<br />
16 Overarm: Arm length from shoulder tip (as described above) to wrist. Bend arm<br />
slightly and measure over outside of elbow.<br />
17 Outside seam: Measure from waist over the outside curvature of the hip to the<br />
desired cuff length.<br />
18 CROTCH DEPTH: Sit on unpadded bench or chair. Measure vertically from waist<br />
elastic to chair level on both sides, and use the longer measurement. Measure in a<br />
straight line, not along the outside hip curve. (Crotch depth can also be measured<br />
from a pair of old, well fitting pants.) Crotch depth is the difference between outside<br />
and inside length of pants.<br />
Desired cuff circumference, not ankle circumference<br />
Desired jacket length from waist elastic to hem<br />
Desired skirt /dress length from waist elastic to hem
Important things to be taken into consideration when measuring<br />
The most important measurements are the ones written in on the measuring chart in BOLD CAPITAL LETTERS: waist<br />
height, back length, back width, and pants' crotch depth.<br />
If one of these four measurements is wrong, the result may be a distorted pattern and it is difficult to figure what<br />
measurement is wrong. If some other measurement is wrong, you get either a too-tight or a too-loose garment and you<br />
can easily see what measurement to correct and to what direction.<br />
Figure 3: normal<br />
sloper<br />
Figure 2: back width<br />
wrong<br />
Figure 1: waist height/back length<br />
wrong<br />
Normally the pattern for basic sloper is more or less like Figure 1. Front and back shoulders slope downwards to shoulder<br />
tip. Armscyes curve inward. Back armscye can be rather straight but should never bulge outward.<br />
If the pattern is like in Figure 2 -- i.e. front armscye curves strongly inward (a) and back armscye bulges outward (b), back<br />
width has been measured wrong and is too much. Measure back width anew.<br />
Please note that this measuring error causes the garment to be too loose at back and too tight at front. Therefore the<br />
situation cannot be corrected by only reducing width of back piece. The pattern must be redrawn using the correct back<br />
width measurement.<br />
If waist height in relation to back length is wrong (refer to Figure 3), the result is either a shoulder that slopes to wrong<br />
direction (a) or a shoulder which is too steep (b). If you measure waist height as instructed in <strong>PatternMaker</strong> measuring<br />
instructions i.e. double around back neck and divide the result by 2, there seldom is any error in waist height. Therefore<br />
the error usually is in back length.<br />
If shoulder slopes in wrong direction (a), back length is too much and if shoulder is too steep (b), back length is too little.<br />
Change back length 2-3 cm in the needed direction and see if it is enough to correct the situation. If it looks good, you see<br />
to which point at neck back length has to be measured to be OK.<br />
If the subject stands in a very upright, military position with bust out and abdomen in, also waist height may be too much.<br />
Please make sure that the subject stands in a relaxed position when she is being measured.<br />
In some cases a steep shoulder may be due to the subject's body shape. This is the case if the subject has a very<br />
prominent bust. And conversely, if a subject has a very flat bust and/or a very round back, the shoulder can be rather<br />
straight.<br />
Thus, there are cases, where the patterns are all right even if they look "odd". When the patterns are drawn according to a<br />
person's own measurements, they should not be compared with patterns drawn according to "normal" or "average"<br />
measurements. If you are not sure of the measurements taken, you have a very good and simple way to check them: sew<br />
a muslin with the basic bodice patterns. If it fits on the subject, you can be sure that all other garments sewn with<br />
<strong>PatternMaker</strong> macros will fit well.<br />
If you get an error message:<br />
value out of range in line …<br />
coord (32,33,sqrt(op*op-oke*oke),-oke);<br />
it means the measuring error is so drastic that the program is unable to draw the patterns at all. Front shoulder does not<br />
meet armscye line. Then either back length is too little or waist height too much. It may also be that shoulder length has<br />
some influence: shoulder length may be too short.<br />
Also, in some other cases there may be reason for checking shoulder length measurement. If shoulder is too short, there<br />
will be a corner inward where front and back shoulder meet at shoulder tip and vice versa.