Detectable Warning Tiles - City of Winnipeg
Detectable Warning Tiles - City of Winnipeg
Detectable Warning Tiles - City of Winnipeg

You also want an ePaper? Increase the reach of your titles
YUMPU automatically turns print PDFs into web optimized ePapers that Google loves.
January 2014<br />
DIVISION 4 - CW 3326 – R1<br />
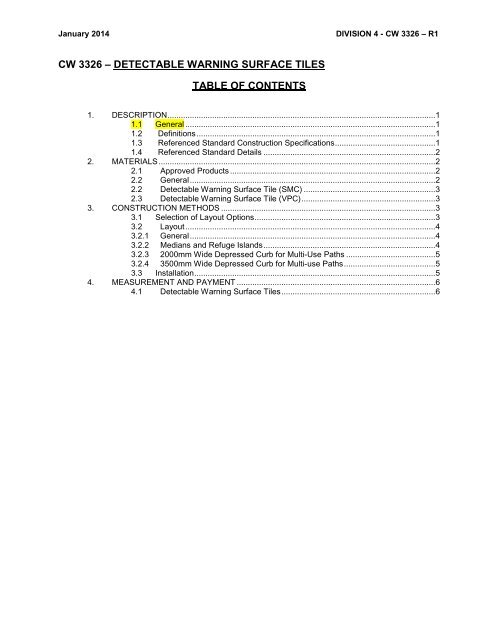
CW 3326 – DETECTABLE WARNING SURFACE TILES<br />
TABLE OF CONTENTS<br />
1. DESCRIPTION ........................................................................................................................ 1<br />
1.1 General ................................................................................................................ 1<br />
1.2 Definitions ........................................................................................................... 1<br />
1.3 Referenced Standard Construction Specifications ............................................. 1<br />
1.4 Referenced Standard Details ............................................................................. 2<br />
2. MATERIALS ............................................................................................................................ 2<br />
2.1 Approved Products ............................................................................................ 2<br />
2.2 General .............................................................................................................. 2<br />
2.2 <strong>Detectable</strong> <strong>Warning</strong> Surface Tile (SMC) ........................................................... 3<br />
2.3 <strong>Detectable</strong> <strong>Warning</strong> Surface Tile (VPC)............................................................ 3<br />
3. CONSTRUCTION METHODS ................................................................................................ 3<br />
3.1 Selection <strong>of</strong> Layout Options ................................................................................. 3<br />
3.2 Layout ................................................................................................................ 4<br />
3.2.1 General .............................................................................................................. 4<br />
3.2.2 Medians and Refuge Islands ............................................................................. 4<br />
3.2.3 2000mm Wide Depressed Curb for Multi-Use Paths ........................................ 5<br />
3.2.4 3500mm Wide Depressed Curb for Multi-use Paths ......................................... 5<br />
3.3 Installation ............................................................................................................ 5<br />
4. MEASUREMENT AND PAYMENT ......................................................................................... 6<br />
4.1 <strong>Detectable</strong> <strong>Warning</strong> Surface <strong>Tiles</strong> ..................................................................... 6
January 2014 Page 1<br />
DIVISION 4 - CW 3326 – R1<br />
CW 3326 – DETECTABLE WARNING SURFACE TILES<br />
1. DESCRIPTION<br />
1.1 General<br />
.1 This specification covers the supply and installation <strong>of</strong> detectable warning surface tiles in<br />
sidewalk ramps, and multi-use path ramps.<br />
.2 Execution Requirements<br />
.1 This specification applies to sidewalk ramps on P1 streets and to sidewalk ramps in<br />
new construction <strong>of</strong> P2 streets in developments.<br />
.2 This specification applies to all ramps on Multi-use paths.<br />
.3 A list <strong>of</strong> Regional Streets (P1) and Non-regional streets (P2) roadways can be found at<br />
the following web address:<br />
http://winnipeg.ca/publicworks/Streets/SnowRoutes.asp<br />
.4 Further to Clause 1.1.2.1 <strong>of</strong> this specification, install detectable warning surface tiles at<br />
all four corners <strong>of</strong> intersections within the project limits for new construction,<br />
reconstruction, rehabilitation, and mill and fill projects on P1 streets; and all four<br />
corners <strong>of</strong> intersections on new P2 street in developments.<br />
.5 Install detectable warning surface tiles on all sidewalk ramps on P2 streets for TBO<br />
projects. Install detectable warning surface tiles at all four corners if all sidewalk ramps<br />
in an intersection are being reconstructed as part <strong>of</strong> the project or as directed by the<br />
Contract Administrator.<br />
.6 Where a road is being reconstructed, rehabilitated, or mill and filled in one direction<br />
only, place tiles on all four corners, medians and islands <strong>of</strong> signalized intersections. All<br />
remaining intersections within the project limits shall receive tiles in only the longitudinal<br />
direction <strong>of</strong> the project. For pedestrian corridors with overhead beacon lights. within the<br />
project limits, also place detectable warning surface tiles on the median and on both<br />
sides <strong>of</strong> the road.<br />
.7 Do not install tiles at private approaches or alleys.<br />
.8 Install detectable warning surface tiles on curb ramps at all legs <strong>of</strong> a roundabout,<br />
including the splitter islands, regardless <strong>of</strong> street priority.<br />
1.2 Definitions<br />
.1 Clear Path <strong>of</strong> Travel means a path that is unobstructed by vertical and /or overhanging<br />
elements.<br />
.2 Curb Ramp means the combined curb taper and depressed curb.<br />
.3 Sidewalk Ramp means the ramped portion <strong>of</strong> sidewalk behind the depressed curb.<br />
1.3 Referenced Standard Construction Specifications<br />
.1 CW 3235 - Renewal <strong>of</strong> Existing Miscellaneous Concrete Slabs<br />
.2 CW 3240 - Renewal <strong>of</strong> Existing Curbs<br />
.3 CW 3310 - Portland Cement Concrete Pavement Works
January 2014 Page 2<br />
DIVISION 4 - CW 3326 – R1<br />
.4 CW 3325 - Portland Cement Concrete Sidewalk<br />
1.4 Referenced Standard Details<br />
.1 SD-229A - Curb Ramp for 1500 Sidewalk at Intersections<br />
.2 SD-229AA - <strong>Detectable</strong> <strong>Warning</strong> Surface Tile for Intersections, Layout Option 1<br />
.3 SD-229AC – 300x300 <strong>Detectable</strong> <strong>Warning</strong> Surface Tile, Layout Option 3<br />
.4 SD-229AE – Curb Ramp for Pedestrian Corridor with a Traffic Control Device<br />
.5 SD-229AF – <strong>Detectable</strong> <strong>Warning</strong> Surface Tile Orientation for Offset Intersections<br />
.6 SD-229BA - Curb Ramp for Full Width Sidewalk at Intersections<br />
.7 SD-229BB – <strong>Detectable</strong> <strong>Warning</strong> Surface Tile in Curb Ramps for Medians<br />
.8 SD-229C - Curb Ramp for Concrete Pavement<br />
.9 SD-229D - Curb Ramp for Asphalt Overlay<br />
.10 SD-229E - Curb Ramp and Depressed Curb with <strong>Detectable</strong> <strong>Warning</strong> Surface Tile<br />
2. MATERIALS<br />
2.1 Approved Products<br />
.1 Use only those materials listed as Approved Products for Surface Works. The Approved<br />
Products are available in Adobe acrobat (.pdf) format at the <strong>City</strong> <strong>of</strong> <strong>Winnipeg</strong>, Corporate<br />
Finance, and Material Management Internet site at: http://www.winnipeg.ca/matmgt/info.stm<br />
2.2 General<br />
.1 <strong>Detectable</strong> warning surface tiles shall be Federal Yellow (USA); or Safety Yellow (Canada).<br />
Colour shall be homogeneous throughout the tile.<br />
.2 <strong>Detectable</strong> warning surface tiles shall be cast in place type with ribs. (Anchored type is not<br />
allowed)<br />
.3 Truncated domes on detectable warning surface tiles shall be in accordance with ADA<br />
Accessibility Guidelines (ADAAG).<br />
.4 <strong>Detectable</strong> domes shall be on a square grid (in line pattern).<br />
.5 <strong>Detectable</strong> warning surface tiles shall be as follows:<br />
(a) 610 x 1220mm (2’x 4’) Cast in Place<br />
(b) 300 x 300mm (1’x1’) Cast in Place
January 2014 Page 3<br />
DIVISION 4 - CW 3326 – R1<br />
2.2 <strong>Detectable</strong> <strong>Warning</strong> Surface Tile (SMC)<br />
.1 <strong>Detectable</strong> <strong>Warning</strong> Surface Tile (SMC) shall be made <strong>of</strong> glass and carbon reinforced<br />
polyester based Sheet Moulding Compound.<br />
Table CW 3326.1 – SMC <strong>Detectable</strong> <strong>Warning</strong> Surface Tile requirements:<br />
Physical Property Standard Test Method<br />
Compressive Strength 25,000psi (172MPa) minimum ASTM D695<br />
Slip Resistance 0.80 - minimum ASTM C1028<br />
Tensile Strength 10,000psi (69MPa) minimum ASTM D638<br />
Flexural Strength 25,000psi (172MPa) minimum ASTM D790<br />
Abrasion Resistance 300 minimum ASTM C501<br />
Accelerated Weathering ∆E
January 2014 Page 4<br />
DIVISION 4 - CW 3326 – R1<br />
3.2 Layout<br />
3.2.1 General<br />
the Contract Administrator.<br />
.3 Layout Option Three – Install detectable warning surface tiles in accordance with<br />
SD-229AC.<br />
.1 Construct curb ramps, sidewalk ramps and multi-use paths in accordance with the<br />
referenced Standard Construction Specifications and Standard Details.<br />
.2 Install the detectable warning surface tiles as shown on the Drawings or as<br />
directed by the Contract Administrator.<br />
.3 <strong>Detectable</strong> warning surface tile shall not be placed at private approaches or alleys.<br />
.4 All curb ramps opposite each other shall have the same width.<br />
.5 Orient the detectable warning surface tiles perpendicular to the crossing direction.<br />
.6 Construct the lip <strong>of</strong> the depressed curb in accordance with SD–229E.<br />
.7 Construct ramp slopes in accordance with SD-229C and SD-229D. Use a ramp slope with<br />
preference for a slope as close to 5% maximum as possible.<br />
.8 Rest Area<br />
a) Construct a rest area at the top <strong>of</strong> the sidewalk ramp 1500mm x 1500mm.<br />
b) If the rest area is lower in elevation than the existing sidewalk, construct the sidewalk<br />
grades leading down to the rest area 2% – 5%<br />
.9 Construct flare and curb taper slopes for full width sidewalks as follows:<br />
a) If a full width sidewalk has a clear path <strong>of</strong> travel at the top <strong>of</strong> the ramp that is ≥1500mm<br />
in width, construct the curb taper 900mm in length and a flare to match the curb taper.<br />
b) If a full width sidewalk has a clear path <strong>of</strong> travel at the top <strong>of</strong> the ramp that is
January 2014 Page 5<br />
DIVISION 4 - CW 3326 – R1<br />
3.2.3 2000mm Wide Depressed Curb for Multi-Use Paths<br />
.1 Construct a curb ramp with a 2000mm depressed curb in accordance with SD-229E.<br />
.2 Construct the concrete ramp 2000mm wide and a minimum <strong>of</strong> 1500mm deep from back <strong>of</strong><br />
curb.<br />
.3 Construct the curb ramp in accordance with SD-229C and SD-229D.<br />
.4 Install one 610mm x 1220mm tile centered to the 2000m wide depressed curb. The part <strong>of</strong><br />
the tile nearest the curb must be 50mm from the back <strong>of</strong> curb similar to tile placement<br />
in SD-229AA.<br />
3.2.4 3500mm Wide Depressed Curb for Multi-use Paths<br />
.1 Construct a curb ramp with a 3500mm depressed curb in accordance with SDE-229E.<br />
.2 Construct the concrete ramp 3500mm wide and a minimum <strong>of</strong> 1500mm deep from back <strong>of</strong><br />
curb.<br />
.3 Construct the curb ramp in accordance with SD-229C and SD-229D.<br />
.4 Install two (2) tiles in each concrete ramp, one (1) on each side for each direction. Place the<br />
short edge <strong>of</strong> each tile 150mm from the edge <strong>of</strong> the concrete ramp, with both tiles in line with<br />
each other transversely across the concrete ramp. The tile(s) nearest the curb must be 50mm<br />
from back <strong>of</strong> curb similar to tile placement in SD-229AA.<br />
.5 Saw cut the middle <strong>of</strong> the concrete slab, perpendicular to the curb and to a depth <strong>of</strong> D/4. Cut<br />
additional sawcuts as directed by the Contract Administrator.<br />
3.3 Installation<br />
.1 Pour and finish the concrete to the finished grades.<br />
.2 Do not remove concrete to prepare the finished surface to accept the tile.<br />
.3 Do not remove the protective plastic wrap until the tile has been installed and the concrete<br />
has set.<br />
.4 Drill additional 6mm vent holes in the ribs as required, to seat the tile in the concrete.<br />
.5 Where the corner <strong>of</strong> the tile is 50mm from the back <strong>of</strong> curb at a radius, trim the corner <strong>of</strong> the<br />
tile at curb radii in accordance with SD-229AA and SD-229AC, as directed by the Contract<br />
Administrator.<br />
.6 If required, bolt individual tiles together using 6mm or equivalent bolts to obtain a flush<br />
edge across the tiles. Tape or caulk the underside <strong>of</strong> the joint to ensure that concrete does<br />
not rise up between the tiles. Replace the protective plastic before installation.<br />
.7 Orient the detectable warning surface tiles perpendicular to the crossing direction in<br />
accordance with SD-229AF.<br />
.8 Set the tile in wet concrete. Use suitable weights such as concrete blocks, or sand bags
January 2014 Page 6<br />
DIVISION 4 - CW 3326 – R1<br />
on each tile to prevent a wet mix from floating the tile. Eliminate any air voids under<br />
the tile by setting one end first into the wet concrete and then the other end.<br />
.9 Use a large non-marring rubber mallet and/or vibrating unit as required to set the tile. The<br />
vibrating unit should be fixed to a s<strong>of</strong>t base.<br />
.10 Embed the tile so the top <strong>of</strong> the truncated domes are flush with the adjacent concrete in<br />
accordance with SD-229E. Stepping on the tile may cause uneven settling.<br />
.11 Finish the concrete using an edging tool to create a finished edge. Then use a trowel<br />
around the edge <strong>of</strong> the tile.<br />
.12 Remove the plastic wrap with a sharp knife after the concrete has set. Remove any concrete<br />
from the surface <strong>of</strong> the tile with a s<strong>of</strong>t wire brass brush.<br />
4. MEASUREMENT AND PAYMENT<br />
4.1 <strong>Detectable</strong> <strong>Warning</strong> Surface <strong>Tiles</strong><br />
.1 <strong>Detectable</strong> <strong>Warning</strong> Surface <strong>Tiles</strong> shall be measured on a unit basis and paid for at the<br />
Contract Unit Price per unit for the “Items <strong>of</strong> Work” listed here below. The number <strong>of</strong> units to<br />
be paid for shall be the total number <strong>of</strong> detectable warning surface tiles supplied and<br />
installed in accordance with this specification, accepted and measured by the Contract<br />
Administrator.<br />
<strong>Detectable</strong> <strong>Warning</strong> Surface <strong>Tiles</strong>:<br />
i) 300mm x 300mm tiles<br />
ii) 610mm x 1220mm tiles<br />
.2 The area under the detectable warning surface tile is part <strong>of</strong> the concrete sidewalk ramp and<br />
shall be measured for payment in accordance with CW 3235 or CW 3325.<br />
.3 The concrete sidewalk ramp and the concrete ramp for multi-use paths will be paid as<br />
100mm or 150mm sidewalk in accordance with CW 3235 or CW 3325.<br />
.4 Curb ramp will be paid in accordance with CW 3240 or CW 3310.