Installation & Operation Manual: Portable Premier Series
Installation & Operation Manual: Portable Premier Series
Installation & Operation Manual: Portable Premier Series

You also want an ePaper? Increase the reach of your titles
YUMPU automatically turns print PDFs into web optimized ePapers that Google loves.
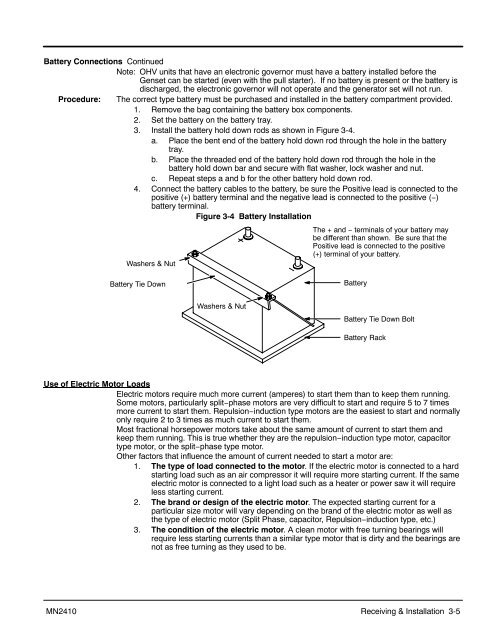
Battery Connections Continued<br />
Note: OHV units that have an electronic governor must have a battery installed before the<br />
Genset can be started (even with the pull starter). If no battery is present or the battery is<br />
discharged, the electronic governor will not operate and the generator set will not run.<br />
Procedure: The correct type battery must be purchased and installed in the battery compartment provided.<br />
1. Remove the bag containing the battery box components.<br />
2. Set the battery on the battery tray.<br />
3. Install the battery hold down rods as shown in Figure 3-4.<br />
a. Place the bent end of the battery hold down rod through the hole in the battery<br />
tray.<br />
b. Place the threaded end of the battery hold down rod through the hole in the<br />
battery hold down bar and secure with flat washer, lock washer and nut.<br />
c. Repeat steps a and b for the other battery hold down rod.<br />
4. Connect the battery cables to the battery, be sure the Positive lead is connected to the<br />
positive (+) battery terminal and the negative lead is connected to the positive (−)<br />
battery terminal.<br />
Figure 3-4 Battery <strong>Installation</strong><br />
Washers & Nut<br />
The + and − terminals of your battery may<br />
be different than shown. Be sure that the<br />
Positive lead is connected to the positive<br />
(+) terminal of your battery.<br />
Battery Tie Down<br />
Battery<br />
Washers & Nut<br />
Battery Tie Down Bolt<br />
Battery Rack<br />
Use of Electric Motor Loads<br />
Electric motors require much more current (amperes) to start them than to keep them running.<br />
Some motors, particularly split−phase motors are very difficult to start and require 5 to 7 times<br />
more current to start them. Repulsion−induction type motors are the easiest to start and normally<br />
only require 2 to 3 times as much current to start them.<br />
Most fractional horsepower motors take about the same amount of current to start them and<br />
keep them running. This is true whether they are the repulsion−induction type motor, capacitor<br />
type motor, or the split−phase type motor.<br />
Other factors that influence the amount of current needed to start a motor are:<br />
1. The type of load connected to the motor. If the electric motor is connected to a hard<br />
starting load such as an air compressor it will require more starting current. If the same<br />
electric motor is connected to a light load such as a heater or power saw it will require<br />
less starting current.<br />
2. The brand or design of the electric motor. The expected starting current for a<br />
particular size motor will vary depending on the brand of the electric motor as well as<br />
the type of electric motor (Split Phase, capacitor, Repulsion−induction type, etc.)<br />
3. The condition of the electric motor. A clean motor with free turning bearings will<br />
require less starting currents than a similar type motor that is dirty and the bearings are<br />
not as free turning as they used to be.<br />
MN2410<br />
Receiving & <strong>Installation</strong> 3-5