Kodak EasyShare M820/M1020 digital frame
Kodak EasyShare M820/M1020 digital frame
Kodak EasyShare M820/M1020 digital frame

You also want an ePaper? Increase the reach of your titles
YUMPU automatically turns print PDFs into web optimized ePapers that Google loves.
<strong>Kodak</strong> <strong>EasyShare</strong><br />
<strong>M820</strong>/<strong>M1020</strong> <strong>digital</strong> <strong>frame</strong><br />
Extended user guide<br />
www.kodak.com<br />
For help with your picture <strong>frame</strong>, www.kodak.com/go/<strong>digital</strong><strong>frame</strong>support
Eastman <strong>Kodak</strong> Company<br />
Rochester, New York 14650<br />
© Eastman <strong>Kodak</strong> Company, 2008<br />
All screen images are simulated.<br />
<strong>Kodak</strong> and <strong>EasyShare</strong> are trademarks of Eastman <strong>Kodak</strong> Company.<br />
Eastman <strong>Kodak</strong> Company is an authorized licensee of the CompactFlash trademark.<br />
P/N 4F8175_en
Front View<br />
Back/Right View<br />
1<br />
2<br />
2<br />
1<br />
3<br />
3<br />
4<br />
5<br />
1 LCD screen<br />
2 Touch border (tap/slide)<br />
3 Touch border (tap only)<br />
4 Lights<br />
5 Raised guide<br />
To use the touch border,<br />
see page 3.<br />
Product features<br />
NOTE: When screen icons appear,<br />
Lights turn on at touch-sensitive<br />
points near the raised guide.<br />
1 Audio In<br />
2 Audio Out<br />
3 DC-In (12V)<br />
4 Speakers (2)<br />
www.kodak.com/go/support i<br />
4
Back/Side View<br />
1<br />
2<br />
3<br />
1Power button 5 Volume button<br />
2 Wall mounting holes 6 Memory card slot - CF, MD<br />
3 Rotating/extending stand (see page 1) 7 USB connector (to camera/USB device)<br />
4 Memory card slot - SD, MMC, MS, xD 8 USB connector (to computer)<br />
ii www.kodak.com/go/support<br />
4<br />
9<br />
5<br />
6<br />
7<br />
8
Table of contents 1<br />
1 Getting started ......................................................................................1<br />
Setting up your <strong>frame</strong>....................................................................................1<br />
Turning on your <strong>frame</strong>...................................................................................2<br />
Using your <strong>frame</strong>’s touch border....................................................................3<br />
Setting your language ...................................................................................4<br />
Enjoying your pictures immediately! ..............................................................4<br />
Inserting a memory card................................................................................5<br />
Connecting a <strong>digital</strong> camera or other USB device ...........................................5<br />
Turning off your <strong>frame</strong>...................................................................................6<br />
Changing your <strong>frame</strong> orientation ...................................................................6<br />
Mounting your <strong>frame</strong> on the wall ..................................................................7<br />
2 Viewing pictures ....................................................................................8<br />
Accessing your pictures .................................................................................8<br />
Running a slide show ....................................................................................9<br />
Viewing thumbnails (multi-up).....................................................................10<br />
Viewing a single picture ..............................................................................10<br />
Viewing pictures by filename .......................................................................11<br />
3 Doing more with your <strong>frame</strong> ...............................................................12<br />
Playing music only.......................................................................................12<br />
Playing a video............................................................................................13<br />
Printing pictures..........................................................................................14<br />
Copying on your <strong>frame</strong>................................................................................16<br />
Copying between your <strong>frame</strong> and computer.................................................17<br />
Deleting pictures .........................................................................................20<br />
Selecting multiple pictures...........................................................................20<br />
4 Changing settings and more ...............................................................22<br />
Changing <strong>frame</strong> settings .............................................................................22<br />
Settings menus ...........................................................................................22<br />
Setting the clock and timer..........................................................................25<br />
www.kodak.com/go/support iii
Table of contents<br />
Upgrading your firmware.............................................................................26<br />
Installing the software.................................................................................27<br />
Customizing your <strong>frame</strong> ..............................................................................28<br />
Maintaining your <strong>frame</strong> and mattes .............................................................28<br />
Learning more about your <strong>frame</strong>..................................................................28<br />
5 Troubleshooting and support ..............................................................29<br />
Picture <strong>frame</strong> problems ...............................................................................29<br />
Picture <strong>frame</strong>/computer communications .....................................................30<br />
Screen messages.........................................................................................31<br />
6 Appendix .............................................................................................33<br />
Digital <strong>frame</strong> specifications..........................................................................33<br />
Important safety instructions .......................................................................35<br />
Upgrading your software and firmware........................................................35<br />
Additional care and maintenance ................................................................36<br />
Limited warranty .........................................................................................36<br />
FCC compliance and advisory ......................................................................38<br />
iv www.kodak.com/go/support
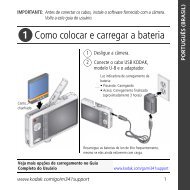
1 Getting started<br />
Welcome to your <strong>Kodak</strong> <strong>EasyShare</strong> <strong>M820</strong>/<strong>M1020</strong> <strong>digital</strong> <strong>frame</strong>. Viewing your pictures<br />
couldn’t be simpler!<br />
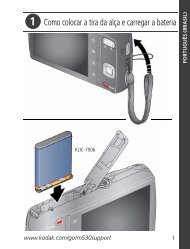
Setting up your <strong>frame</strong><br />
Setting up the stand<br />
Your <strong>frame</strong> displays pictures in landscape orientation. To change to portrait<br />
orientation, see page 6.<br />
Stand (pull to adjust the <strong>frame</strong> angle)<br />
When displayed with the<br />
stand extended, the <strong>frame</strong><br />
rests at a 68-90 ° angle.<br />
www.kodak.com/go/support 1
Getting started<br />
Attaching the power cable<br />
CAUTION:<br />
Do not use this power cable with other devices, including <strong>digital</strong><br />
cameras.<br />
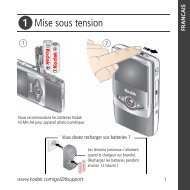
Turning on your <strong>frame</strong><br />
1<br />
2<br />
Your power cable may look different from<br />
the one pictured. Use the plug that<br />
accommodates your type of power outlet.<br />
Power button - press and hold (for about 2 seconds), then release<br />
2 www.kodak.com/go/support
Using your <strong>frame</strong>’s touch border<br />
Getting started<br />
Touch at the bottom (tap/slide) or right (tap only) border to find/highlight menu items<br />
or pictures. Press OK to select them.<br />
NOTE: The screen is not touch-sensitive. Do not touch. Lights appear on the border to show you where to<br />
touch.<br />
CAUTION:<br />
Only use your finger to touch the borders. Using sharp or metal<br />
objects may damage the border or screen.<br />
On the bottom border,<br />
tap on lights between<br />
the icons and the<br />
raised guide.<br />
(Slider): Under slider, slide, or touch and hold<br />
(for about 3 seconds to scroll even faster through your images), or tap slider arrows.<br />
Tap Menu for more options, or tap to resume a slide show.<br />
If the icons disappear, tap the bottom or right border.<br />
On the side border, tap on lights<br />
next to the icons.<br />
(Home)<br />
(Slide show)<br />
(Close),<br />
Raised guide<br />
or (Done)<br />
,<br />
www.kodak.com/go/support 3
Getting started<br />
Setting your language<br />
The language screen appears the first time you turn on your <strong>frame</strong>.<br />
1<br />
2<br />
■ Slide or tap below slider arrows to find your<br />
language, then tap OK.<br />
To change the language at a later time:<br />
■ Tap (Home) → (Settings) → Language.<br />
The language screen appears.<br />
Slide to find your language, then tap OK.<br />
Enjoying your pictures immediately!<br />
NOTE: If the software installation screen appears, dismiss it and start playing a slide show immediately. To<br />
install the software later, see page 27.<br />
■ To view your pictures or play a slide show,<br />
insert a memory card, or connect a camera or other<br />
USB device (see page 5).<br />
If a slide show is already playing (for example, from the<br />
pre-loaded sample pictures/video), your pictures begin<br />
playing automatically.<br />
To increase your <strong>frame</strong>’s internal memory, delete<br />
the pre-loaded samples. Access them on My Frame<br />
(see page 8), then see page 20 to delete them.<br />
If you are at the Home screen, see page 8 to start<br />
your slide show.<br />
To change the slide show order, see page 11.<br />
4 www.kodak.com/go/support
Inserting a memory card<br />
To insert a card, push the card firmly into<br />
the slot until it stops.<br />
To remove a card from:<br />
top card slot - push in the card to release it<br />
side card slot - pull out the card<br />
CAUTION: Insert a micro or mini<br />
memory card in an adapter first,<br />
or the card will get stuck in your<br />
<strong>frame</strong>.<br />
Getting started<br />
Secure Digital<br />
MultiMedia Card<br />
Memory Stick<br />
xD<br />
CompactFlash<br />
MicroDrive<br />
Connecting a <strong>digital</strong> camera or other USB device<br />
USB devices: camera, flash<br />
drive, card reader, computer,<br />
etc. (sold separately)<br />
USB cable to computer<br />
(sold separately)<br />
USB cable included<br />
with your USB device<br />
www.kodak.com/go/support 5
Getting started<br />
Turning off your <strong>frame</strong><br />
■ Standby mode—Press and hold the power<br />
button (for about 2 seconds), then release.<br />
■ Power off—Unplug the power cable.<br />
Changing your <strong>frame</strong> orientation<br />
Change the <strong>frame</strong> orientation setting if you change to portrait orientation.<br />
Change the stand position and angle:<br />
■ Rotate the stand 90 °, then pull it out or push it in to adjust<br />
the <strong>frame</strong> angle.<br />
NOTE: When displayed with the stand extended, the <strong>frame</strong> rests at a<br />
68-90 ° angle.<br />
Change the <strong>frame</strong> orientation setting:<br />
1 Tap (Home) → (Settings).<br />
2 Slide to highlight (Viewing options), then tap<br />
OK.<br />
3 Slide to highlight Frame orientation, then tap OK.<br />
4 Slide to highlight Portrait, then tap OK<br />
5 Tap to exit.<br />
Your <strong>frame</strong> is set up now to display pictures in portrait<br />
orientation.<br />
6 www.kodak.com/go/support
Mounting your <strong>frame</strong> on the wall<br />
Getting started<br />
Use wall-anchoring hardware (not included) to anchor your <strong>frame</strong> securely to your<br />
wall.<br />
Wall mounting<br />
holes<br />
Clip (use to reroute, secure, and<br />
center the power cable)<br />
Power cable<br />
To change to portrait orientation, turn your <strong>frame</strong><br />
90° and use the wall mounting holes at the top.<br />
www.kodak.com/go/support 7
2 Viewing pictures<br />
Accessing your pictures<br />
Tap Home to access pictures, videos, music from internal memory, your memory card,<br />
and all connected devices. Use the touch borders to make your selections (see page 3).<br />
1 Tap (Home) → (Pictures and Videos).<br />
The <strong>frame</strong>’s internal memory and connected picture<br />
sources are displayed.<br />
2 Slide to highlight a picture source, then:<br />
■ Tap (Slide show) to start a slide show.<br />
OR<br />
■ Tap OK to view thumbnails.<br />
Picture source icons and settings:<br />
My Frame—the <strong>frame</strong>’s 128 MB internal memory. Copy your pictures into My<br />
Frame from a memory card or other device (page 16).<br />
Memory card—appears when you insert a card (page 5). The label and icon<br />
indicate the type of card.<br />
Camera—appears when you connect a <strong>digital</strong> camera via USB cable (page 5).<br />
USB drive—appears when you insert a USB flash drive (page 5).<br />
Settings—customize your <strong>frame</strong> settings. For example; set slide show durations<br />
and transitions, set viewing options, screen brightness, clock, and timer. See<br />
page 22.<br />
My Slide show—appears when you save a slide show you are viewing for quick<br />
access anytime (see page 9).<br />
8 www.kodak.com/go/support
Running a slide show<br />
There are two ways to start a slide show on your <strong>frame</strong>:<br />
Viewing pictures<br />
■ Turn on the <strong>frame</strong>, then insert a card or connect a USB device—a new slide show<br />
starts automatically, replacing a currently running slide show or single view<br />
picture.<br />
■ Select a picture in thumbnail view or tap (Home) → (Pictures and<br />
Videos) to select a picture source. Then, tap (Slide show).<br />
Other slide show information<br />
– A slide show plays continuously until you stop it or turn off the <strong>frame</strong>.<br />
– You can change the slide duration and transition style (see page 22).<br />
Saving your favorite slide show for easy access<br />
While viewing the slide show:<br />
■ Tap the touch-sensitive border to pause your slide show and to display the screen<br />
icons.<br />
■ Tap<br />
confirm.<br />
(Viewing Options) → Save as My Slide show → OK. Tap Yes to<br />
NOTE: The saved slide show appears on the Pictures and Videos screen as a picture source (see page 8).<br />
www.kodak.com/go/support 9
Viewing pictures<br />
Viewing thumbnails (multi-up)<br />
There are two ways to view your pictures as thumbnails:<br />
■ Tap (Home) → (Pictures and Videos),<br />
■<br />
then select a picture source (see page 8). Tap OK.<br />
OR,<br />
From a slide show (tap the touch-sensitive border to<br />
display the icons) or from single view, tap<br />
(Multi-up).<br />
To navigate through the thumbnails, slide your finger left/right along the slider at the<br />
bottom. To move even faster through the thumbnails, touch and hold until the screen<br />
changes (about 3 seconds).<br />
To play a folder of thumbnail (multi-up) images, highlight the folder then tap<br />
(Slide show).<br />
Viewing a single picture<br />
■ To view a single, full-screen picture, highlight it in thumbnails view, then tap OK.<br />
■ To magnify a picture up to 8X, tap (Menu), then tap (Zoom). Slide from<br />
left to right under the zoom bar to magnify the picture. To view other parts of the<br />
picture, tap . To return to 1X, slide from right to left.<br />
■ To rotate a picture, tap (Menu), then tap (Rotate).<br />
10 www.kodak.com/go/support
Viewing pictures by filename<br />
Viewing pictures<br />
By default, the pictures on your <strong>frame</strong> are arranged and played by date, starting with<br />
the oldest. You can play the arrangement or order by date, newest to oldest, or<br />
alphabetically by filename.<br />
NOTE: If a picture source with numerous images (greater than 500) takes too long to load, change the<br />
order to play by filename.<br />
To change the play order:<br />
1 Select a picture source (for example, a folder with pictures), or multiple pictures<br />
(see page 20), then tap OK.<br />
2 Tap (Viewing Options).<br />
3 Highlight Sort, then tap OK.<br />
4 Select a sort order:<br />
-Date, oldest to newest (default)<br />
-Date, newest to oldest<br />
-Filename, A - Z<br />
-Filename, Z - A<br />
5 Tap OK.<br />
www.kodak.com/go/support 11
3 Doing more with your <strong>frame</strong><br />
Playing music only<br />
1 Tap the touch border to pause your slide show and<br />
to display the screen icons.<br />
2 Tap (Home), then (Music) to view music<br />
sources.<br />
3 Slide to the right/left to move up/down the music<br />
source list, then tap OK.<br />
4 Slide right/left to go to the previous/next song, or<br />
select Play all songs, then tap OK.<br />
Your music starts playing.<br />
5 Tap (Slide show) to return to your picture or slide show.<br />
NOTE: Music plays automatically when a memory card or USB device with music on it is connected.<br />
Notes on playing, copying, deleting music:<br />
■ A headphone jack is available on the side of the <strong>frame</strong> (page i).<br />
■ Adjust the volume with the Volume button (page ii).<br />
■ To copy or delete music files (MP3), slide to highlight each song in the music<br />
source, then tap (Select). Or tap (Select All) to highlight all the songs.<br />
Tap OK. Tap (Menu) → Copy or Delete → OK.<br />
■<br />
-For copying, highlight the source you want to copy to, then tap OK.<br />
-For deleting, tap Yes to confirm.<br />
To copy music files (MP3) to internal memory, drag and drop them from your<br />
computer. See Copying pictures to/from your computer, page 17.<br />
12 www.kodak.com/go/support
Playing a video<br />
Doing more with your <strong>frame</strong><br />
■ During a slide show, videos play automatically. When the video ends, the slide<br />
show resumes. To play a video from thumbnails view, highlight a video thumbnail,<br />
then tap OK.<br />
■ Videos in thumbnail view:<br />
– MOV videos are indicated with .<br />
– AVI, MPEG, and MPG videos display the first <strong>frame</strong>.<br />
■ Video control buttons:<br />
play, pause, and resume the video.<br />
rewind / fast forward.<br />
or stop the video and return to thumbnails.<br />
www.kodak.com/go/support 13
Doing more with your <strong>frame</strong><br />
Printing pictures<br />
Your <strong>frame</strong> is compatible with PictBridge technology, so you can print directly to<br />
PictBridge enabled printers.<br />
1 Turn off the <strong>frame</strong> and printer.<br />
2 Make sure your <strong>frame</strong> is disconnected from the<br />
printer.<br />
3 On the <strong>frame</strong>, change your connection mode from<br />
Computer to Printer. See page 15.<br />
4 Reconnect your <strong>frame</strong> to the printer, using the USB<br />
cable.<br />
Printing to a PictBridge enabled printer<br />
1 Turn on the printer. Turn on the <strong>frame</strong>.<br />
2 From a slide show (tap the touch-sensitive border to pause the slide show and<br />
display the icons) or from single view:<br />
■ Tap (Menu), then (Print).<br />
Printing begins.<br />
If you are in thumbnails (multi-up) view:<br />
■ Slide to select a picture, or see page 20 to select multiple pictures.<br />
■ Tap (Menu).<br />
If you selected multiple pictures to print, they appear on the screen.<br />
■ Tap (Print), then Yes to start printing.<br />
NOTE: Remember to change your connection mode back to Computer when you are done (see page 15).<br />
14 www.kodak.com/go/support
Manually changing USB connection mode<br />
Doing more with your <strong>frame</strong><br />
The connection mode must match the device you connect the <strong>frame</strong> to: Computer or<br />
Printer. The default is Connect to computer. You can change the connection mode<br />
manually.<br />
1 Disconnect the printer or computer from the <strong>frame</strong>.<br />
2 On the <strong>frame</strong>, tap (Home).<br />
3 Tap (Settings).<br />
4 Slide to highlight Device configuration, then tap OK.<br />
5 Highlight USB connection mode, then tap OK.<br />
6 Slide to highlight the mode you want to connect to, printer or computer, then tap<br />
OK.<br />
7 Reconnect the device (printer or computer) that matches the connection mode.<br />
www.kodak.com/go/support 15
Doing more with your <strong>frame</strong><br />
Copying on your <strong>frame</strong><br />
Copy pictures from your current viewing location to other connected devices (see<br />
page 5).<br />
CAUTION:<br />
Removing a card or disconnecting a device while copying may<br />
damage your card, pictures, or device.<br />
1 Highlight a picture to copy:<br />
In thumbnails view, slide or tap below the slider<br />
arrows to find a picture; or, display a picture in<br />
single view (see page 10).<br />
2 Tap (Menu).<br />
3 Tap (Copy), then OK.<br />
4 Tap the available destination you want to copy to,<br />
then tap OK.<br />
The picture is copied.<br />
5 Tap (Close) to close the menu.<br />
To copy multiple pictures, see page 20.<br />
16 www.kodak.com/go/support
Doing more with your <strong>frame</strong><br />
Copying between your <strong>frame</strong> and computer<br />
Copy pictures, videos, and music via a USB cable.<br />
Connecting to your computer<br />
USB cable<br />
(sold separately)<br />
Copying pictures to/from your computer<br />
Drag and drop pictures, videos, and music easily between your <strong>frame</strong> and computer,<br />
then play a slide show on your <strong>frame</strong> right away. See page 33 for applicable file<br />
formats.<br />
1 Install the software that came with your <strong>frame</strong> (see page 27).<br />
2 Set the USB connection mode to Computer (see page 15), then connect the USB<br />
cable from the <strong>frame</strong> to your computer (see page 17).<br />
3 Double-click (<strong>Kodak</strong> <strong>EasyShare</strong> <strong>digital</strong> display software icon) on your desktop<br />
to open the software.<br />
The <strong>frame</strong>, memory card, and connected devices appear in the Drag and Drop Zone.<br />
www.kodak.com/go/support 17
Doing more with your <strong>frame</strong><br />
Pictures/videos on your<br />
computer<br />
My Devices:<br />
Internal memory<br />
Memory card<br />
Connected device<br />
Select pictures here<br />
(Viewer pane)<br />
Drag and drop here<br />
(Drag and Drop Zone)<br />
4 Click My Devices to see the folders on your <strong>frame</strong> and the connected devices.<br />
The <strong>frame</strong> appears as removable drives—one drive for each picture source on the<br />
<strong>frame</strong>’s picture source: internal memory (My Frame), and any inserted memory cards or<br />
connected devices.<br />
5 In Pictures and Videos, click the folder or location on your computer that contains<br />
the pictures you want to copy.<br />
6 In the Viewer pane, select the pictures, videos, etc., then drag and drop them to<br />
the new location in the Drag and Drop Zone (for example, the <strong>frame</strong>’s internal<br />
memory, a memory card, or connected USB device).<br />
7 Unplug the USB cable, then go to the copy location (see page 8) to play a slide<br />
show with your copied picture.<br />
NOTE: The slide show order of play for available sources is: memory card, USB device, internal memory.<br />
NOTE: To maintain the slide show order during playback, see page 11 and select Filename, A - Z.<br />
18 www.kodak.com/go/support
Copying pictures from <strong>EasyShare</strong> software<br />
Doing more with your <strong>frame</strong><br />
It’s easy to copy pictures/videos from My Collection to your <strong>frame</strong>.<br />
1 Install the software that came with your <strong>frame</strong> (see page 27).<br />
2 Set the USB connection mode to Computer (see page 15), then connect the USB<br />
cable (see page 17).<br />
3 On your computer, open <strong>EasyShare</strong> software. Click My Collection, then select the<br />
pictures in the Viewer pane. Drag and drop them into the Picture tray.<br />
4 In the menu bar, select File → Copy to.<br />
The <strong>frame</strong> appears as removable drives—one drive for each connected picture source in<br />
the <strong>frame</strong>: internal memory, memory cards, USB devices.<br />
My Collection Select pictures here Drag and drop to here (Picture tray)<br />
5 Browse to the <strong>frame</strong> location to which you are copying.<br />
6 Select Best For Digital Picture Frame to resize the picture you are copying. Full<br />
resolution is unnecessary and quickly fills up the <strong>frame</strong>’s memory.<br />
7 Click Copy. Pictures are copied to your <strong>frame</strong>.<br />
8 Unplug the USB cable, then go to the copy location (see page 8) to view your<br />
copied pictures on your <strong>frame</strong> and to play a slide show.<br />
www.kodak.com/go/support 19
Doing more with your <strong>frame</strong><br />
Deleting pictures<br />
CAUTION:<br />
Removing a card or disconnecting a device while deleting may<br />
damage your card, pictures, or device.<br />
1 Highlight a picture to delete:<br />
In thumbnails view, slide or tap below the slider<br />
arrows to find a picture; or, display a picture in<br />
single view.<br />
2 Tap (Menu) → (Delete), then tap OK.<br />
3 Tap Yes to confirm.<br />
The picture is deleted.<br />
Selecting multiple pictures<br />
4 Tap (Close) to close the menu.<br />
To delete multiple pictures, see page 20.<br />
Use the multi-select feature to copy or delete two or more pictures or to play a slide<br />
show of selected pictures.<br />
1 In multi-up (thumbnails) view, slide or tap below the slider arrows to find a picture,<br />
then tap (Select).<br />
A check mark appears on the selected picture.<br />
2 Continue selecting pictures.<br />
To remove a check mark, tap (Unselect) while the picture is highlighted.<br />
20 www.kodak.com/go/support
Select/Unselect all<br />
Select all<br />
Doing more with your <strong>frame</strong><br />
■ In thumbnails view (page 10), tap<br />
All).<br />
(Select<br />
Unselect all<br />
■ To remove all check marks, tap Unselect All.<br />
www.kodak.com/go/support 21
4 Changing settings and more<br />
Changing <strong>frame</strong> settings<br />
The options in the Settings menu let you customize and configure your <strong>frame</strong>.<br />
1 Tap (Home), then (Settings).<br />
2 Slide or tap below the slider arrows to highlight a setting, then tap OK.<br />
3 Follow the on-screen instructions. Tap OK to accept your selections.<br />
4 Tap (Back) to exit.<br />
Settings menus<br />
Setting Options<br />
Upgrade firmware<br />
This option is only displayed if<br />
the upgrade file (.img) is<br />
available on the <strong>frame</strong><br />
(memory card, flash drive,<br />
internal memory, etc.).<br />
Upgrade firmware—load the latest version of firmware on<br />
your <strong>frame</strong> (page 26).<br />
Exit—return to the Home screen.<br />
22 www.kodak.com/go/support
Setting Options<br />
Changing settings and more<br />
Viewing options Slide duration—specify how long each picture is displayed<br />
in a slide show, from 3 seconds to 1 hour. (The default is 5<br />
seconds.)<br />
Transitions—specify the transition style between pictures in<br />
a slide show. See screen for options. The default is Random.<br />
Shuffle—plays the images in random order.<br />
Slide show start—when pictures are sorted from oldest to<br />
newest (see page 11), specify where a slide show starts<br />
automatically (from picture dated 1 week back, or from oldest<br />
picture).<br />
Brightness—slide to adjust the screen brightness according<br />
to your lighting conditions.<br />
Frame orientation—display your <strong>frame</strong> in landscape<br />
(default) or portrait orientation.<br />
Screen Fit or Fill—<br />
Fit entire image (default). Show the entire picture.<br />
Black borders may appear around the image.<br />
Fill the screen .The picture fills the entire screen; some<br />
Clock and timer<br />
of the picture may be cut off (cropped).<br />
Music auto-play—choose to play music automatically<br />
during a slide show. (Music files must be in the same location<br />
as your pictures.)<br />
Audio priority—when you are playing music (page 12),<br />
choose whether or not to play the audio portion of a video.<br />
Play music (default). Music continues to play, video plays but<br />
its audio is muted. Play video soundtrack. Music stops<br />
playing while the video, with audio, plays.<br />
On/Off schedule—set your <strong>frame</strong> to turn on and off at a<br />
specified time every day (page 25).<br />
Set time—manually set the clock to the current time<br />
(page 25).<br />
www.kodak.com/go/support 23
Changing settings and more<br />
Setting Options<br />
Language Choose your language (page 4).<br />
Automatic resizing Choose to turn on or off automatic resizing of your pictures<br />
when copying. Full resolution is unnecessary and quickly fills<br />
up the <strong>frame</strong>’s memory.<br />
About Check your <strong>frame</strong> model, serial number, and firmware version.<br />
24 www.kodak.com/go/support
Setting the clock and timer<br />
Manually setting the clock<br />
Changing settings and more<br />
1 Tap (Home), then (Settings).<br />
2 Highlight Clock and timer, then tap OK.<br />
3 Highlight Set time, then tap OK.<br />
4 Slide to set the hour. Tap the right arrow to highlight the next setting (minutes),<br />
then slide to adjust it.<br />
5 Tap OK to accept your changes.<br />
Setting automatic on/off<br />
Set your <strong>frame</strong> to turn on and off at a specified time every day.<br />
NOTE: Set the clock before enabling auto on/off.<br />
1 Tap (Home), then (Settings).<br />
2 Highlight Clock and timer, then tap OK.<br />
3 Highlight On/Off schedule, then tap OK.<br />
The current time is displayed and the hour field is highlighted.<br />
4 Slide to adjust the hour. Tap the right arrow to highlight the next setting (minutes),<br />
then slide to adjust it. Repeat to set Turn off time.<br />
5 Tap Enable, then OK when you’re done.<br />
Your <strong>frame</strong> will now automatically turn on and off at the times you specified.<br />
NOTE: Make sure the power button on the <strong>frame</strong> is On. See page 2.<br />
If your <strong>frame</strong> loses power, the clock time returns to the factory setting and the<br />
automatic on/off times, if set, are disabled. To reset the clock and re-enable your<br />
on/off times, see Resetting the clock after losing power, page 30.<br />
www.kodak.com/go/support 25
Changing settings and more<br />
Upgrading your firmware<br />
Firmware is the software that runs on your <strong>frame</strong>. To check for the latest version, visit<br />
www.kodak.com/go/<strong>digital</strong><strong>frame</strong>downloads.<br />
Download the firmware to your computer, then upgrade your <strong>frame</strong>:<br />
1 On your computer, go to www.kodak.com/go/<strong>digital</strong><strong>frame</strong>downloads.<br />
2 Follow the screen directions to download the <strong>frame</strong> firmware to your computer.<br />
3 Copy the IMG file to a memory card or USB flash drive, then insert into the <strong>frame</strong>.<br />
See page 17 for copying files.<br />
4 Tap (Home), then (Settings).<br />
5 Highlight Firmware Upgrade, then tap OK to begin the upgrade.<br />
IMPORTANT: Do not turn off the <strong>frame</strong> or remove the memory card or USB flash drive<br />
during the upgrade!<br />
When the upgrade is complete, your <strong>frame</strong> automatically restarts. If it doesn’t, press the<br />
power button on the <strong>frame</strong> to Off, then back to On.<br />
26 www.kodak.com/go/support
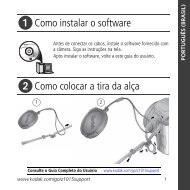
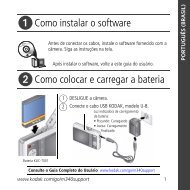
Installing the software<br />
Changing settings and more<br />
Follow these directions to install the software CD that was packaged with your <strong>frame</strong>.<br />
The CD contains the <strong>Kodak</strong> <strong>EasyShare</strong> software and the <strong>Kodak</strong> <strong>EasyShare</strong> <strong>digital</strong><br />
display software. While these software applications work well independently, both<br />
applications work together for the best experience when working with your pictures<br />
(see page 17).<br />
1 Close all software applications that are open on your computer (including<br />
anti-virus software; see the anti-virus software manual for details).<br />
2 Place the <strong>EasyShare</strong> software CD into the CD-ROM drive.<br />
The <strong>Kodak</strong> <strong>EasyShare</strong> software Install Wizard opens on your computer screen.<br />
3 If the Install Wizard does not appear, choose Run from the Start menu and type<br />
d:\setup.exe where d is the drive letter that contains the CD.<br />
4 Follow the on-screen instructions to install the software. Select Complete to<br />
automatically install both the <strong>Kodak</strong> <strong>EasyShare</strong> software and the <strong>Kodak</strong> <strong>digital</strong><br />
display software. Or, click Customize to choose the applications you wish to install.<br />
NOTE: When prompted, take a few minutes to electronically register your picture <strong>frame</strong> and software. To<br />
register later, visit www.kodak.com/go/register.<br />
5 If prompted, restart the computer. If you turned off anti-virus software, turn it back<br />
on.<br />
The software icon(s) appear on your desktop when the installation is complete.<br />
www.kodak.com/go/support 27
Changing settings and more<br />
Customizing your <strong>frame</strong><br />
For a custom look, remove the adhesive matte (included) from its liner, align it<br />
carefully, then attach it to your <strong>frame</strong>.<br />
Maintaining your <strong>frame</strong> and mattes<br />
IMPORTANT: Always disconnect the power before cleaning. Do not use water, cleaning<br />
solutions, or other adhesives on the <strong>frame</strong> or any of its parts.<br />
Gently wipe the <strong>frame</strong>, LCD, or matte with a clean, dry, lint-free cloth (included). For<br />
fingerprints on the <strong>frame</strong>, apply light pressure.<br />
Learning more about your <strong>frame</strong><br />
When you are not using the matte,<br />
reapply it to the liner and store in a<br />
plastic bag to keep the adhesive<br />
backing clean.<br />
www.kodak.com/go/<strong>digital</strong><strong>frame</strong>s Frame accessories, including decorative faceplates<br />
and custom mattes<br />
www.kodak.com/go/<strong>digital</strong><strong>frame</strong>support Interactive troubleshooting and repairs<br />
Interactive tutorials<br />
FAQs<br />
Downloads<br />
Product registration<br />
28 www.kodak.com/go/support
5 Troubleshooting and support<br />
For step-by-step product support, visit www.kodak.com/go/<strong>digital</strong><strong>frame</strong>support and<br />
select Interactive Troubleshooting & Repairs.<br />
Picture <strong>frame</strong> problems<br />
If... Try one or more of the following<br />
Frame does not<br />
turn on.<br />
Nothing happens when<br />
a memory card, camera,<br />
or USB device is<br />
connected.<br />
Touch border doesn’t<br />
work.<br />
■ Make sure the power cable that was included with your <strong>frame</strong> is<br />
connected securely (see page 2).<br />
■ Unplug the power cable from the <strong>frame</strong>. Wait 5 seconds, then<br />
reconnect the cable. Press and hold the power button (for about 2<br />
seconds), then release.<br />
■ Insert a certified SD/MMC/MS/xD/CF/MD card with images into the<br />
designated card slot, then push to seat it (see page 5). In the top<br />
card slot, make sure the card is seated flush with the top.<br />
■ Make sure the USB cable that was included with your camera or USB<br />
device is connected securely (see page 5).<br />
■ Make sure the file format of your pictures and videos are supported.<br />
(See page 33).<br />
NOTE: A large picture file may take time to appear.<br />
■ Use your finger to make your selections on the touch-sensitive<br />
borders (see page 3). Lights on the border show you where to<br />
touch.<br />
IMPORTANT: Do not slide on the right border (tap only).<br />
■ Unplug the power cable from the <strong>frame</strong>. Wait 5 seconds, then<br />
reconnect the cable. Press and hold the power button (for about 2<br />
seconds), then release.<br />
Frame freezes up. ■ Unplug the power cable from the <strong>frame</strong>. Wait 5 seconds, then<br />
reconnect the cable. Press and hold the power button (for about 2<br />
seconds), then release.<br />
www.kodak.com/go/support 29
Troubleshooting and support<br />
If... Try one or more of the following<br />
Music doesn’t play. ■ Make sure the volume is turned up (see page ii).<br />
You set automatic<br />
on/off but the <strong>frame</strong><br />
doesn’t turn on and off<br />
at the specified times.<br />
■ If your <strong>frame</strong> has songs you purchased, they may be protected files.<br />
Convert the files to standard (unprotected) AAC or MP3 formats.<br />
■ Make sure you Enabled the on/off setting after you set the times,<br />
then press OK (not Back). See page 25.<br />
■ If your <strong>frame</strong> loses power, the clock returns to the factory setting<br />
and auto on/off times are disabled. See Resetting the clock after<br />
losing power, page 30.<br />
Resetting the clock after losing power<br />
If you turn off the power on the <strong>frame</strong> or otherwise lose power for half a day or more,<br />
the clock time returns to the factory setting and the automatic on/off times, if set, are<br />
disabled.<br />
■ When you turn the <strong>frame</strong> back on, the set time screen appears on the <strong>frame</strong>.<br />
■ Slide to set the hour. Tap the left/right arrows to highlight the previous or next<br />
setting (hour and minutes), then slide to adjust the setting.<br />
■ Tap OK.<br />
The Home screen appears. The time is reset and the automatic on/off times (if set) are<br />
re-enabled. It is not necessary to reset the on/off times.<br />
NOTE: If you exit the set time screen without setting the time, you can manually reset the clock and<br />
re-enable the automatic on/off times (see page 25). It is not necessary to reset the on/off times.<br />
Picture <strong>frame</strong>/computer communications<br />
If... Try one or more of the following<br />
Cannot copy pictures to my ■ Make sure your computer is on.<br />
computer.<br />
■ Make sure the USB cable is securely connected (page 17).<br />
Cannot see my <strong>frame</strong> as a<br />
removable drive.<br />
■ Make sure the power button on the <strong>frame</strong> is On (page ii).<br />
30 www.kodak.com/go/support
If... Try one or more of the following<br />
Cannot copy pictures from<br />
<strong>Kodak</strong> <strong>EasyShare</strong> software.<br />
Screen messages<br />
Troubleshooting and support<br />
■ Make sure your <strong>frame</strong> and computer are on.<br />
■ Make sure the USB cable is securely connected (page 17).<br />
■ Make sure to install the software that was packaged with<br />
your <strong>frame</strong> (page 27).<br />
■ From My Collection in <strong>EasyShare</strong> software, make sure the<br />
pictures are in the Picture Tray.<br />
Screen message Try one or more of the following<br />
Create file failed. The device (memory card, USB drive, camera, etc.) you are<br />
trying to copy to is protected.<br />
■ See your device documentation to remove write<br />
protection.<br />
■ Insert or connect a different device.<br />
Printer unavailable.<br />
Unable to connect to printer.<br />
■ Make sure your printer is on and the USB cable is<br />
securely connected (page 14).<br />
■ Make sure you changed your USB connection mode<br />
from computer to printer (page 15).<br />
Printing error. ■ Make sure your printer is on and the USB cable is<br />
securely connected (page 14).<br />
■ Check your printer for more info.<br />
Time out occurred while printing. ■ Check cables and printer supplies. Print again.<br />
Write failed. Select another The <strong>frame</strong> was unable to copy the picture.<br />
location.<br />
■ Insert a different card or device (page 5).<br />
www.kodak.com/go/support 31
Troubleshooting and support<br />
Screen message Try one or more of the following<br />
Unable to create file. Device write<br />
protected or full.<br />
Disk full.<br />
Error attempting to open file or<br />
directory.<br />
Error duplicate filename.<br />
Error occurred while closing a file.<br />
Error invalid filename<br />
Error reading from file.<br />
Error writing from file.<br />
Error writing a file.<br />
Error writing to a file.<br />
File Copy Failed!<br />
Internal error.<br />
Parameter is invalid.<br />
Unknown error.<br />
The <strong>frame</strong> was unable to copy the picture.<br />
■ Insert a different card or device (page 5).<br />
■ Remove write protection, unlock card.<br />
■ Delete pictures from card.<br />
■ Turn off the <strong>frame</strong>, then turn it back on. Press and hold<br />
the power button (for about 2 seconds), then release. If<br />
the problem persists, contact customer support help,<br />
at www.kodak.com/go/<strong>digital</strong><strong>frame</strong>support.<br />
32 www.kodak.com/go/support
6 Appendix<br />
Digital <strong>frame</strong> specifications<br />
For more specifications, visit www.kodak.com/go/<strong>digital</strong><strong>frame</strong>support.<br />
<strong>Kodak</strong> <strong>EasyShare</strong> <strong>M820</strong>/<strong>M1020</strong> <strong>digital</strong> <strong>frame</strong><br />
Color display<br />
<strong>M820</strong> 20.3 cm (8 in.) diagonal <strong>digital</strong> LCD, 800 x 480 pixels, 4:3 or 16:9 aspect<br />
ratio,<br />
17.6 x 10 cm (6.9 x 3.9 in.) viewable area<br />
<strong>M1020</strong> 25.4 cm (10 in.) diagonal <strong>digital</strong> LCD, 800 x 480 pixels, 16:9 aspect ratio,<br />
23.5 x 14.6 cm (9.3 x 5.8 in.) viewable area<br />
Internal storage capacity<br />
<strong>M820</strong>, <strong>M1020</strong> 128 MB<br />
Power<br />
Leader Electronics Inc. AC adapter, model MU18-2120150-A1, 12-volt, 1.5 amp.<br />
Europe: Phihong AC adapter, model PSA 18R-120P<br />
(See page 35 for more information.)<br />
Communication with computer<br />
USB 1.0 cable<br />
Wi-Fi wireless network compatibility<br />
<strong>M820</strong>, <strong>M1020</strong> No<br />
Other features<br />
PictBridge Yes<br />
support<br />
Picture formats JPEG, EXIF 2.2<br />
www.kodak.com/go/support 33
Appendix<br />
<strong>Kodak</strong> <strong>EasyShare</strong> <strong>M820</strong>/<strong>M1020</strong> <strong>digital</strong> <strong>frame</strong><br />
Video formats MOV, AVI, MPG, MPEG (Video formats created with <strong>digital</strong> cameras are<br />
certified for <strong>Kodak</strong> <strong>digital</strong> <strong>frame</strong>s. Videos created with or copied from other<br />
sources may not play on the <strong>frame</strong>.)<br />
Music format MP3<br />
Memory cards MMC (MultiMedia Card); SD/SDHC (Secure Digital/Secure Digital High<br />
Capacity); Memory Stick, xD; CF; MD<br />
Tripod mount 1/4 inch<br />
Temperature Operating: -4 to 140°F (-20 to 60°C)<br />
Storage: -22 to 185°F (-30 to 85°C)<br />
Size <strong>M820</strong>: 28.5 x 21 x 3.8 cm (11.2 x 8.3 x 1.5 in.)<br />
<strong>M1020</strong>: 33 x 24 x 3.8 cm (13 x 9.5 x 1.5 in.)<br />
34 www.kodak.com/go/support
Important safety instructions<br />
Appendix<br />
CAUTION:<br />
Do not disassemble this product; there are no user-serviceable<br />
parts inside. Refer servicing to qualified service personnel. Do not<br />
expose this product to liquid, moisture, or extreme temperatures.<br />
The use of controls, adjustments, or procedures other than those<br />
specified herein may result in exposure to shock and/or electrical<br />
or mechanical hazards. If the LCD breaks, do not touch the glass<br />
or liquid. Contact <strong>Kodak</strong> customer support.<br />
■ The use of an accessory that is not recommended by <strong>Kodak</strong> may cause fire, electric<br />
shock, or injury. For approved accessories, visit www.kodak/go/accessories.<br />
■ Use only a Leader Electronics Inc. AC adapter, model MU18-2120150-A1, 12-volt,<br />
1 amp.<br />
In Europe, use only a Phihong AC adapter, model PSA 18R-120P.<br />
Use of other AC adapters may damage the <strong>frame</strong> and void your warranties.<br />
■ Use only a USB-certified computer equipped with a current-limiting motherboard.<br />
Contact your computer manufacturer if you have questions.<br />
Upgrading your software and firmware<br />
Upgrade to the latest versions of the software included on the <strong>Kodak</strong> <strong>EasyShare</strong><br />
software CD and the <strong>frame</strong> firmware—www.kodak.com/go/<strong>digital</strong><strong>frame</strong>downloads.<br />
See page 26 for upgrading firmware.<br />
www.kodak.com/go/support 35
Appendix<br />
Additional care and maintenance<br />
■ Wipe the <strong>frame</strong> and the LCD gently with a soft, lint-free cloth (included). Do not<br />
use cleaning solutions unless designed specifically for LCD screens. Do not allow<br />
chemicals, such as suntan lotion, to contact painted surfaces.<br />
■ Service agreements are available in some countries. Contact a dealer of <strong>Kodak</strong><br />
products for more information.<br />
■ For <strong>digital</strong> <strong>frame</strong> disposal or recycling information, contact your local authorities. In<br />
the US, visit the Electronics Industry Alliance Web site at www.eiae.org or visit<br />
www.kodak.com/go/<strong>digital</strong><strong>frame</strong>support.<br />
Limited warranty<br />
<strong>Kodak</strong> warrants <strong>Kodak</strong> consumer electronic products and accessories (“Products”),<br />
excluding batteries, to be free from malfunctions and defects in both materials and<br />
workmanship for one year from the date of purchase. Retain the original dated sales<br />
receipt. Proof of the date of purchase will be required with any request for warranty<br />
repair.<br />
Limited warranty coverage<br />
Warranty service is only available from within the country where the Products were<br />
originally purchased. You may be required to ship Products, at your expense, to the<br />
authorized service facility for the country where the Products were purchased. <strong>Kodak</strong><br />
will repair or replace Products if they fail to function properly during the warranty<br />
period, subject to any conditions and/or limitations stated herein. Warranty service<br />
will include all labor as well as any necessary adjustments and/or replacement parts. If<br />
<strong>Kodak</strong> is unable to repair or replace a Product, <strong>Kodak</strong> will, at its option, refund the<br />
purchase price paid for the Product provided the Product has been returned to <strong>Kodak</strong><br />
along with proof of the purchase price paid. Repair, replacement, or refund of the<br />
purchase price are the sole remedies under the warranty. If replacement parts are<br />
used in making repairs, those parts may be remanufactured, or may contain<br />
remanufactured materials. If it is necessary to replace the entire Product, it may be<br />
replaced with a remanufactured Product. Remanufactured Products, parts and<br />
36 www.kodak.com/go/support
Appendix<br />
materials are warranted for the remaining warranty term of the original Product, or 90<br />
days after the date of repair or replacement, whichever is longer.<br />
Limitations<br />
This warranty does not cover circumstances beyond <strong>Kodak</strong>'s control. This warranty<br />
does not apply when failure is due to shipping damage, accident, alteration,<br />
modification, unauthorized service, misuse, abuse, use with incompatible accessories<br />
or attachments (such as third party ink or ink tanks), failure to follow <strong>Kodak</strong> 's<br />
operation, maintenance or repacking instructions, failure to use items supplied by<br />
<strong>Kodak</strong> (such as adapters and cables), or claims made after the duration of this<br />
warranty. <strong>Kodak</strong> makes no other express or implied warranty for this product, and<br />
disclaims the implied warranties of merchantability and fitness for a particular<br />
purpose. In the event that the exclusion of any implied warranty is ineffective under<br />
the law, the duration of the implied warranty will be one year from the purchase date<br />
or such longer period as required by law. The option of repair, replacement, or refund<br />
is <strong>Kodak</strong>'s only obligation. <strong>Kodak</strong> will not be responsible for any special,<br />
consequential or incidental damages resulting from the sale, purchase, or use of this<br />
product regardless of the cause. Liability for any special, consequential or incidental<br />
damages (including but not limited to loss of revenue or profit, downtime costs, loss<br />
of the use of the equipment, cost of substitute equipment, facilities or services, or<br />
claims of your customers for such damages resulting from the purchase use or failure<br />
of the Product), regardless of cause or for breach of any written or implied warranty is<br />
expressly disclaimed.<br />
Your rights<br />
Some states or jurisdictions do not allow exclusion or limitation of incidental or<br />
consequential damages, so the above limitation or exclusion may not apply to you.<br />
Some states or jurisdictions do not allow limitations on how long an implied warranty<br />
lasts, so the above limitation may not apply to you. This warranty gives you specific<br />
rights, and you may have other rights which vary from state to state or by jurisdiction.<br />
www.kodak.com/go/support 37
Appendix<br />
Outside the United States and Canada<br />
In countries other than the United States and Canada, the terms and conditions of<br />
this warranty may be different. Unless a specific <strong>Kodak</strong> warranty is communicated to<br />
the purchaser in writing by a <strong>Kodak</strong> company, no warranty or liability exists beyond<br />
any minimum requirements imposed by law, even though defect, damage, or loss may<br />
be by negligence or other act.<br />
FCC compliance and advisory<br />
<strong>Kodak</strong> <strong>EasyShare</strong> <strong>M820</strong>/<strong>M1020</strong> <strong>digital</strong> <strong>frame</strong>s<br />
This equipment has been tested and found to comply with the limits for a Class B<br />
<strong>digital</strong> device, pursuant to Part 15 of the FCC Rules. These limits are designed to<br />
provide reasonable protection against harmful interference in a residential<br />
installation.<br />
This equipment generates, uses, and can radiate radio frequency energy and, if not<br />
installed or used in accordance with the instructions, may cause harmful interference<br />
to radio communications. However, there is no guarantee that interference will not<br />
occur in a particular installation.<br />
If this equipment does cause harmful interference to radio or television reception,<br />
which can be determined by turning the equipment off and on, the user is encouraged<br />
to try to correct the interference by one or more of the following measures: 1) reorient<br />
or relocate the receiving antenna; 2) increase the separation between the equipment<br />
and the receiver; 3) connect the equipment to an outlet on a circuit different from that<br />
to which the receiver is connected; 4) consult the dealer or an experienced radio/TV<br />
technician for additional suggestions.<br />
Any changes or modifications not expressly approved by the party responsible for<br />
compliance could void the user’s authority to operate the equipment. Where shielded<br />
interface cables have been provided with the product or specified additional<br />
components or accessories elsewhere defined to be used with the installation of the<br />
product, they must be used in order to ensure compliance with FCC regulation.<br />
38 www.kodak.com/go/support
FCC and Industry Canada<br />
Appendix<br />
This device complies with Industry Canada RSS-210 and FCC Rules. Operation is<br />
subject to the following two conditions: (1) this device may not cause harmful<br />
interference, and (2) this device must accept any interference received, including<br />
interference that may cause undesired operation.<br />
CE<br />
Hereby, Eastman <strong>Kodak</strong> Company declares that this <strong>Kodak</strong> product is in compliance<br />
with the essential requirements and other relevant provisions of Directive 1999/5/EC.<br />
Canadian DOC statement<br />
DOC Class B Compliance—This Class B <strong>digital</strong> apparatus complies with Canadian<br />
ICES-003.<br />
Observation des normes-Classe B—Cet appareil numérique de la classe B est<br />
conforme à la norme NMB-003 du Canada.<br />
www.kodak.com/go/support 39
Appendix<br />
Waste Electrical and Electronic Equipment labeling<br />
Australian C-Tick<br />
MPEG-4<br />
EU: It is the final user’s responsibility to discard this equipment into an<br />
approved, segregated collection scheme to enable its suitable<br />
treatment/disposal and to improve human/environmental protection. For<br />
more information, see your retailer, local authority, or<br />
www.kodak.com/go/recycle.<br />
N137<br />
Use of this product in any manner that complies with the MPEG-4 visual standard is<br />
prohibited, except for use by a consumer engaging in personal and non-commercial<br />
activities.<br />
Russian GOST-R<br />
Eastman <strong>Kodak</strong> Company<br />
Rochester, New York 14650<br />
40 www.kodak.com/go/support
China RoHS<br />
Korean Class B ITE<br />
Appendix<br />
Licensing<br />
Supply of this product does not convey a license nor imply any right to distribute<br />
content created with this product in revenue-generating broadcast systems<br />
(terrestrial, satellite, cable and/or other distribution channels), streaming applications<br />
www.kodak.com/go/support 41
Appendix<br />
(via Internet, intranets and/or other networks), other content distribution systems<br />
(pay-audio or audio-on-demand applications and the like) or on physical media<br />
(compact discs, <strong>digital</strong> versatile discs, semiconductor chips, hard drives, memory cards<br />
and the like). An independent license for such use is required. For details, please visit<br />
http://mp3licensing.com.<br />
42 www.kodak.com/go/support
Index 1<br />
A<br />
about, <strong>frame</strong>, 24<br />
appendix, 33<br />
automatic on/off, 23, 25<br />
B<br />
battery<br />
safety, 35<br />
button<br />
macro/landscape, ii<br />
C<br />
cables<br />
USB, connecting, 5<br />
camera, connecting, 5<br />
changing picture locations, 8<br />
clock and timer, setting, 23, 25<br />
computer<br />
connecting to <strong>frame</strong>, 17<br />
copying to/from, 17<br />
help with communicating, 30<br />
connection mode, 15<br />
copying<br />
from <strong>EasyShare</strong> software, 19<br />
to/from computer, USB, 17<br />
D<br />
deleting pictures and videos, 20<br />
displaying slide show, 9<br />
disposal, recycling, 36<br />
doing more with your <strong>frame</strong>, 12<br />
E<br />
<strong>EasyShare</strong> software<br />
copying pictures from, 19<br />
installing, 27<br />
error messages, 31<br />
F<br />
fast forward video, 13<br />
firmware<br />
checking version, 24<br />
upgrading, 22, 35<br />
flash drive, connecting, 5<br />
<strong>frame</strong>, picture<br />
changing orientation, 1<br />
checking model, firmware, serial<br />
number, 24<br />
setup, 1<br />
specifications, 33<br />
troubleshooting, 29<br />
turning on/off, 6<br />
H<br />
help<br />
communicating with computer, 30<br />
<strong>frame</strong>, 29<br />
home<br />
changing picture locations, 8<br />
screen, 8<br />
I<br />
installing software, 27<br />
internal memory<br />
www.kodak.com/go/support 43
Index<br />
capacity, 33<br />
L<br />
landscape, set orientation, 23<br />
language<br />
setting, 24<br />
setting first time, 4<br />
loading software, 27<br />
M<br />
macro/landscape button, ii<br />
multi-up view, 10<br />
O<br />
on/off, setting auto, 23, 25<br />
orientation setting, 1, 23<br />
P<br />
PictBridge enabled printer, 14<br />
pictures<br />
copying connected, 17<br />
copying from <strong>EasyShare</strong> software, 19<br />
deleting, 20<br />
location, changing, 8<br />
selecting more than one, 20<br />
viewing, 8<br />
play/pause, video, 13<br />
portrait, set orientation, 23<br />
power<br />
specifications, 33<br />
turning on, 6<br />
printer connection mode, 15<br />
printing, PictBridge printer, 14<br />
R<br />
recycling, disposal, 36<br />
regulatory compliance, 38<br />
rewind video, 13<br />
running slide show, 9<br />
S<br />
safety information, 35<br />
screen<br />
cleaning, 36<br />
error messages, 31<br />
selecting multiple pictures, 20<br />
serial number, checking, 24<br />
setting<br />
auto on/off, 23, 25<br />
language, 24<br />
language first time, 4<br />
time, 23<br />
viewing options, 23<br />
setup<br />
picture <strong>frame</strong>, 1<br />
slide duration, setting, 23<br />
slide show<br />
running, 9<br />
slide transitions, setting, 23<br />
software<br />
installing, 27<br />
upgrading, 35<br />
source, picture location, 8<br />
specifications, <strong>frame</strong>, 33<br />
stop<br />
video, 13<br />
storage capacity, internal memory, 33<br />
44 www.kodak.com/go/support
T<br />
thumb drive. See flash drive., 5<br />
thumbnails, 10<br />
time, setting, 23<br />
transitions, slides, setting, 23<br />
troubleshooting<br />
error messages, 31<br />
<strong>frame</strong>, 29<br />
turning on/off <strong>frame</strong>, 6<br />
U<br />
upgrading<br />
firmware, 22<br />
software and firmware, 35<br />
USB connection mode, 15<br />
USB device, connecting, 5<br />
V<br />
viewing<br />
full screen picture, 10<br />
pictures/videos, 8<br />
thumbnails, 10<br />
W<br />
warranty, 36<br />
Index<br />
www.kodak.com/go/support 45