
You also want an ePaper? Increase the reach of your titles
YUMPU automatically turns print PDFs into web optimized ePapers that Google loves.
Tales from the Creeper<br />
Changing front brake pads<br />
Begin by jacking up the car and safely supporting<br />
it on jack stands before removing the front wheels.<br />
Using a set of calipers, you’ll want to measure the<br />
thickness of the brake rotor and compare it to the<br />
minimum thickness stamped either on the center hub<br />
or along the circumference. If you’re close to or below<br />
the minimum, you’ll want to replace the rotor.<br />
Begin disassembly by first removing the springlike<br />
clip, that holds the outside of the caliper tightly<br />
against the caliper bracket, using a screwdriver.<br />
Next, remove the two sliding pins (hidden under<br />
plastic dust caps) using a hex socket. With a little<br />
rocking the caliper can now be removed from the<br />
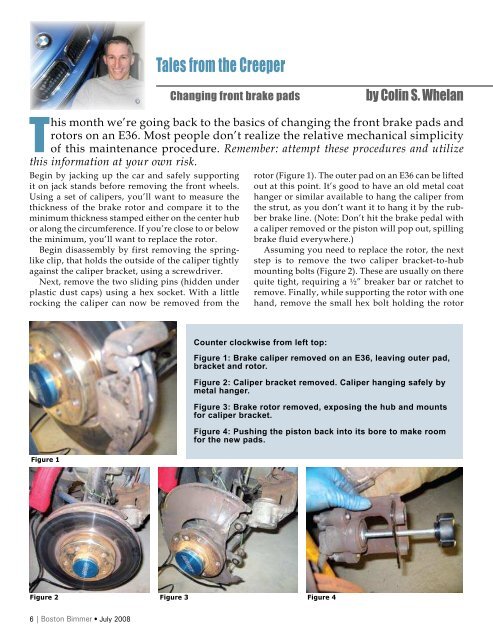
rotor (Figure 1). The outer pad on an E36 can be lifted<br />
out at this point. It’s good to have an old metal coat<br />
hanger or similar available to hang the caliper from<br />
the strut, as you don’t want it to hang it by the rubber<br />
brake line. (Note: Don’t hit the brake pedal with<br />
a caliper removed or the piston will pop out, spilling<br />
brake fluid everywhere.)<br />
Assuming you need to replace the rotor, the next<br />
step is to remove the two caliper bracket-to-hub<br />
mounting bolts (Figure 2). These are usually on there<br />
quite tight, requiring a ½” breaker bar or ratchet to<br />
remove. Finally, while supporting the rotor with one<br />
hand, remove the small hex bolt holding the rotor<br />
Counter clockwise from left top:<br />
by Colin S. Whelan<br />
This month we’re going back to the basics of changing the front brake pads and<br />
rotors on an E36. Most people don’t realize the relative mechanical simplicity<br />
of this maintenance procedure. Remember: attempt these procedures and utilize<br />
this information at your own risk.<br />
Figure 1<br />
Figure 1: Brake caliper removed on an E36, leaving outer pad,<br />
bracket and rotor.<br />
Figure 2: Caliper bracket removed. Caliper hanging safely by<br />
metal hanger.<br />
Figure 3: Brake rotor removed, exposing the hub and mounts<br />
for caliper bracket.<br />
Figure 4: Pushing the piston back into its bore to make room<br />
for the new pads.<br />
Figure 2 Figure 3 Figure 4<br />
to the hub. Sometimes this bolt can be tough to<br />
remove and is easily stripped. I’ve always had<br />
success using an impact driver, which is a cheap<br />
$20 tool available at your local auto parts store. It<br />
works by converting the impact of a hammer blow<br />
into a small twisting motion, and is a valuable<br />
tool for your collection. If you’re lucky, the rotor<br />
will come right off the hub, otherwise you’ll need<br />
to resort to using a dead-blow hammer to get the<br />
job done.<br />
To prevent this from happening again, it’s best<br />
to use a wire brush to clean the hub (Figure 3)<br />
of any rust or corrosion and apply a thin coat of<br />
anti-seize. Before placing the rotor on the hub<br />
and securing it with the hex bolt, you’ll want to<br />
thoroughly clean the friction surfaces of any oil/<br />
coatings using “brake clean” solvents. (Tip: If the<br />
rotor is directional, make sure you place the correct<br />
rotor on its respective side of the car. This can<br />
be done by matching <strong>BMW</strong> parts numbers or by<br />
examining the cooling vanes along the circumference.<br />
When attached to the hub and viewed from<br />
above, the vanes/channels should be bending<br />
back towards the rear of the car as they extend<br />
from the center hub to the edge of the rotor.)<br />
With the new rotor and caliper bracket back in<br />
place, let’s turn our attention the caliper and pads.<br />
The first step is to remove the pad wear sensor<br />
wire from the inner pad, if so equipped, using<br />
a pair of pliers. Next, the inner pad can simply<br />
be lifted out. Make note of both pads’ orientation<br />
before removal so that you can put the new<br />
ones in the same way. Using a C-clamp tool to<br />
push the piston back into its bore (Figure 4). You<br />
might need to remove some brake fluid from the<br />
reservoir to prevent it from overflowing. (A garage-only<br />
turkey baster works well. Remember,<br />
the old fluid should be recycled.)<br />
Before installing the new pads there are two<br />
things that are often overlooked. First, you might<br />
consider lightly coating the backside (metal side,<br />
not friction side) of the pad with an anti-squeal<br />
coating and secondly, lubricating the metal-tometal<br />
contact points between the caliper, bracket<br />
and pad.<br />
This is also a great time to re-lubricate the metal<br />
pins that hold the floating caliper in place. You’ll<br />
want to make sure that this is a high temperature<br />
lubricant capable of withstanding the somewhat extreme<br />
temperatures found in braking systems. You can<br />
pick this up at your local auto parts store, but I happen<br />
to like Pastelub and Ceramilub dry-film lubricants that<br />
I found at www.GWRauto.com.<br />
With the inner pad back on the caliper and the outer<br />
pad back on the bracket, simply slide the caliper back<br />
in place, tighten the sliding pins and replace the plastic<br />
covers. Now reattach the spring clip. This is a good<br />
time to double check that everything is torqued to spec,<br />
including the wheels. With everything reassembled and<br />
the car back on the ground, make sure you pump the<br />
brake pedal until it is stiff, since this will push the pistons<br />
tightly against the new pads and rotors. I always<br />
like to try the brakes a few times before moving the car<br />
more than a couple of inches to make sure everything<br />
is well.<br />
Now follow your pad manufacturer’s bedding procedure<br />
to insure proper brake-in of the new pads. ♦<br />
FACTORY STOCK<br />
vs.<br />
HID WHITE BLUE RED AMBER<br />
FOUR AVAILABLE COLORS<br />
ANGEL iBRIGHT<br />
Upgrade for <strong>BMW</strong> Angel Eyes<br />
Brightest Angel Eyes on the market<br />
Easy to install upgrade<br />
Fits most <strong>BMW</strong> models<br />
100% Plug&Play<br />
Patent–Pending<br />
Carried by many <strong>BMW</strong> parts retailers<br />
Limited time offer. Must use coupon code: promo408<br />
Not to be used in conjunction with any other offers,<br />
coupons or group buys.<br />
2 Ways to Order<br />
Phone: (800) 6200 <strong>BMW</strong><br />
Online: www.angelibright.com<br />
6 | <strong>Boston</strong> Bimmer • <strong>July</strong> <strong>2008</strong> www.boston-bmwcca.org | 7