Service Manual â G4 Gemini Twin Coffee Brewer WILBUR CURTIS ...
Service Manual â G4 Gemini Twin Coffee Brewer WILBUR CURTIS ...
Service Manual â G4 Gemini Twin Coffee Brewer WILBUR CURTIS ...

You also want an ePaper? Increase the reach of your titles
YUMPU automatically turns print PDFs into web optimized ePapers that Google loves.
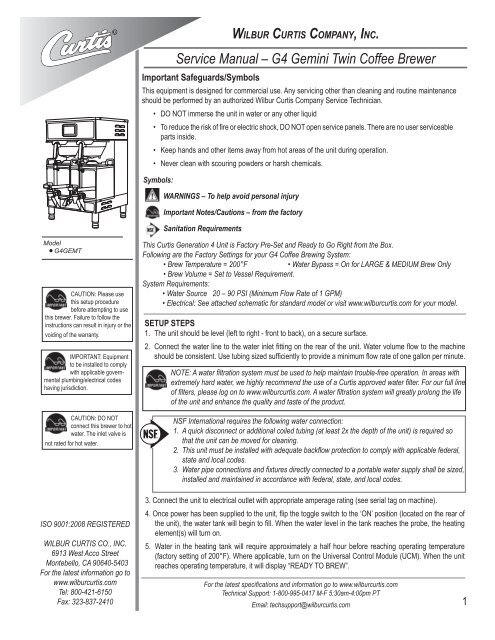
Important Safeguards/Symbols<br />
This equipment is designed for commercial use. Any servicing other than cleaning and routine maintenance<br />
should be performed by an authorized Wilbur Curtis Company <strong>Service</strong> Technician.<br />
<br />
<br />
<br />
<br />
<br />
<br />
parts inside.<br />
<br />
<br />
Symbols:<br />
<br />
WARNINGS – To help avoid personal injury<br />
<strong>WILBUR</strong> <strong>CURTIS</strong> COMPANY, INC.<br />
Important Notes/Cautions – from the factory<br />
Sanitation Requirements<br />
Model<br />
<strong>G4</strong>GEMT<br />
CAUTION: Please use<br />
this setup procedure<br />
before attempting to use<br />
this brewer. Failure to follow the<br />
instructions can result in injury or the<br />
voiding of the warranty.<br />
IMPORTANT: Equipment<br />
to be installed to comply<br />
with applicable governmental<br />
plumbing/electrical codes<br />
having jurisdiction.<br />
CAUTION: DO NOT<br />
connect this brewer to hot<br />
water. The inlet valve is<br />
not rated for hot water.<br />
<br />
<br />
<br />
<br />
For the latest information go to<br />
<br />
<br />
<br />
This Curtis Generation 4 Unit is Factory Pre-Set and Ready to Go Right from the Box.<br />
Following are the Factory Settings for your <strong>G4</strong> <strong>Coffee</strong> Brewing System:<br />
<br />
<br />
<br />
<br />
<br />
SETUP STEPS<br />
<br />
<br />
<br />
<br />
<br />
<br />
<br />
<br />
<br />
<br />
<br />
state and local codes.<br />
<br />
<br />
3. Connect the unit to electrical outlet with appropriate amperage rating (see serial tag on machine).<br />
<br />
<br />
element(s) will turn on.<br />
<br />
<br />
<br />
<br />
<br />
<br />
1
COFFEE BREWING INSTRUCTIONS<br />
<br />
<br />
<br />
<br />
<br />
<br />
ground coffee.<br />
<br />
<br />
<br />
<br />
<br />
6. Touch desired<br />
<br />
<br />
immediately.<br />
Touch Screen Control Module<br />
The touch screen turns on when power is available to the controller. The screen will contain standard control feature such as symbols and but-<br />
<br />
buttons are shown in the illustration below.<br />
STATUS LIGHTS<br />
WARMERS<br />
BREW BUTTONS<br />
<strong>CURTIS</strong> LOGO<br />
TO ENTER PROGRAMMING<br />
Tap Curtis logo 5 times to bring<br />
up the ACCESS CODE screen.<br />
CONTROL SYMBOLS<br />
All of these symbols may not be<br />
visible at one time.<br />
2<br />
RETURN TO HOME UNDO<br />
SCROLL RETURN TO PREVIOUS
PROGRAMMING<br />
ACCESS CODE<br />
<br />
<br />
<br />
<br />
<br />
MAIN MENU screen<br />
<br />
<br />
<br />
<br />
<br />
<br />
Menu Tree<br />
<br />
Single<br />
<strong>Twin</strong><br />
Single<br />
<strong>Twin</strong><br />
3
Menu Features<br />
Recipes<br />
Control Settings<br />
4
Menu Features<br />
Brew Settings<br />
5
System Fault Messages<br />
*<br />
6
Illustrated Parts<br />
Main View<br />
1<br />
2<br />
3<br />
4<br />
5<br />
6<br />
7<br />
8<br />
9<br />
10<br />
24<br />
25<br />
26<br />
27<br />
28<br />
29<br />
30<br />
16<br />
17<br />
18<br />
11<br />
12<br />
13<br />
14<br />
15<br />
31<br />
19<br />
20<br />
21<br />
22<br />
23<br />
7
Illustrated Parts<br />
Top Wrap<br />
34<br />
35<br />
32<br />
33<br />
38<br />
36<br />
37<br />
39<br />
40<br />
8
Parts List<br />
<br />
<br />
<br />
<br />
<br />
<br />
<br />
<br />
<br />
<br />
<br />
<br />
<br />
<br />
<br />
<br />
<br />
Rough-In Drawing<br />
9
Electrical Schematic<br />
10
Cleaning the <strong>Coffee</strong> <strong>Brewer</strong><br />
Regular cleaning and preventive maintenance is essential in keeping your coffee brewer looking and working like new.<br />
CAUTION – Do not use cleansers, bleach liquids, powders or any other substance containing chlorine. These<br />
products promote corrosion and will pit the stainless steel. USE OF THESE PRODUCTS WILL VOID THE<br />
WARRANTY.<br />
1. Wipe exterior surfaces with a moist cloth, removing spills and debris.<br />
2. Slide the brewcone out and clean it. Clean the sprayhead area with a moist clean cloth.<br />
3. Rinse and dry the brewcone.<br />
4. Drain drip tray of coffee. Wash out the drip tray. Dry the tray.<br />
5. Rub a stainless steel polish on the outside surfaces to protect the brewer.<br />
Cleaning the Satellite Server<br />
To clean the Satellite components, prepare a mild solution of detergent and warm water..<br />
1. Remove lid from Satellite. Clean the lid at the funnel area with a spiral brush and detergent solution.<br />
2. Rinse the lid, removing all traces of cleaning solution.<br />
3. Unscrew the handle/bonnet assembly and remove it from the dispensing faucet.<br />
4. Pull the silicone seat cup from faucet stem and inspect it for wear, cracks, or hardening. Replace the seat cup<br />
if necessary.<br />
5. Clean all parts. Thoroughly rinse with clear warm water.<br />
6. Dry and assemble the handle/bonnet parts. Hand-tighten<br />
the assembly onto the faucet.<br />
7. Remove the gauge glass tube by unscrewing the gauge<br />
glass cap.<br />
8. Clean the gauge glass tube and the two washers with<br />
a gauge brush and detergent solution. Rinse with clear<br />
water. Dry the parts and assemble them onto the Satellite.<br />
DO NOT immerse the Satellite in water or any other<br />
liquid.<br />
9. Clean inside of the Satellite. Remove coffee residue with<br />
the detergent solution.<br />
10. Thoroughly rinse out the Satellite with clear warm water.<br />
SEAT<br />
CUP<br />
CAP<br />
WASHER<br />
GLASS TUBE<br />
WASHER<br />
11
Product Warranty Information<br />
<br />
warranties and conditions apply:<br />
3 .<br />
2 <br />
1 <br />
<br />
ment<br />
parts are warranted for ninety (90) days from date of purchase or for the remainder of the limited warranty period of the equipment in which<br />
the component is installed.<br />
<br />
<br />
Additional conditions may apply. Go to www.wilburcurtis.com to view the full product warranty information.<br />
<br />
ment<br />
parts installed on Curtis equipment that have not been purchased from the<br />
<br />
does not cover and is void under the following circumstances:<br />
1) Improper operation of equipment: <br />
2) Improper installation of equipment: <br />
<br />
3) Improper voltage: <br />
4) Improper water supply: <br />
rate.<br />
5) Adjustments and cleaning: <br />
<br />
6) Damaged in transit: rier.<br />
7) Abuse or neglect (including failure to periodically clean or remove lime accumulations): <br />
<br />
recommendations.<br />
8) Replacement of items subject to normal use and wear: <br />
<br />
9) Repairs and/or Replacements <br />
<br />
<br />
<br />
<br />
RETURN MERCHANDISE AUTHORIZATION: <br />
<br />
NO UNITS OR PARTS WILL<br />
BE ACCEPTED WITHOUT A RETURN MERCHANDISE AUTHORIZATION (RMA). RMA NUMBER MUST BE MARKED ON THE CARTON<br />
OR SHIPPING LABEL. All in-warranty service calls must be performed by an authorized service agent. Call the Wilbur Curtis Technical Sup-<br />
<br />
10/10/12@7.8 . ecn 14475 . ear 10674<br />
7/6/11@10.3 . EDR 7842<br />
<strong>WILBUR</strong> <strong>CURTIS</strong> CO., INC.<br />
6913 Acco St., Montebello, CA 90640-5403 USA<br />
Phone: 800/421-6150 Fax: 323-837-2410<br />
Technical Support Phone: 800/995-0417 (M-F 5:30A - 4:00P PST)<br />
Web Site: www.wilburcurtis.com<br />
E-Mail: techsupport@wilburcurtis.com<br />
10/2012 . F-3804 rev A