free pattern instructions (pdf) - Coats & Clark
free pattern instructions (pdf) - Coats & Clark
free pattern instructions (pdf) - Coats & Clark

Create successful ePaper yourself
Turn your PDF publications into a flip-book with our unique Google optimized e-Paper software.
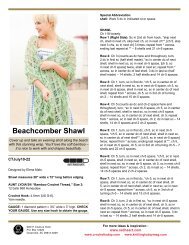
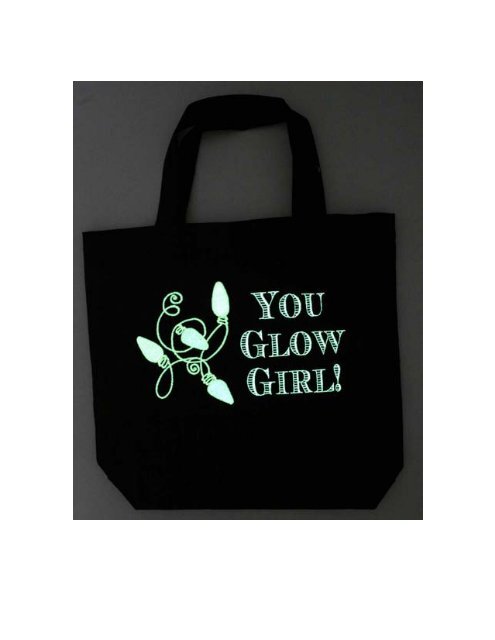
You Glow Girl! Tote<br />
CS0031<br />
Level: Easy<br />
For the shopper with attitude, whether it is you or your BFF, this sassy tote embroidered with<br />
<strong>Coats</strong> Glow in the Dark thread, says it all! We’ve added the design to a tote, but it could adorn a<br />
pillow, purse or sweatshirt. No embroidery machine? No problem—we’ve included the <strong>pattern</strong><br />
for an appliqué.<br />
Skill Level: Easy<br />
Supplies<br />
<strong>Coats</strong> Glow in the Dark embroidery thread, colors 01, 72, 57, 91, 31, 03<br />
<strong>Coats</strong> Bobbin Thread<br />
Black canvas tote bag, 14" x 14"<br />
Adhesive tear-away stabilizer<br />
Embroidery needle, size 90/14<br />
Embroidery machine with large hoop<br />
Christmas Lights Embroidery design.( #WH0011 (Happy Holiday Lights) from<br />
www.embroidery.com was used in our sample)<br />
Lettering software or built-in letters (Our sample uses the Campbell TrueType font digitized with<br />
Brother PE Design)<br />
Instructions Using customizing software:
1. Use customizing software to remove the lettering from the Christmas lights embroidery<br />
design. Increase the size 25% with resizing software that recalculates the stitches to maintain<br />
the proper density. Rotate the string of lights 90° counterclockwise.<br />
2. Open a workspace the size of the machine's largest hoop in customizing software and<br />
position the Christmas lights to the left of the centerline.<br />
3. Arrange letters to spell "You Glow Girl!" and position them to the right of the centerline.<br />
Save the combined design under a new name and transfer it to the embroidery machine.<br />
4. With a removable marking tool, draw a vertical line along the center of one tote side.<br />
Measure down 5-1/2" from the tote's top edge and draw a horizontal line. The embroidery<br />
will be centered at the junction of these two lines.<br />
5. Hoop adhesive tear-away stabilizer in the machine's largest hoop and expose or activate the<br />
adhesive. Turn the tote wrong side out and attach it to the stabilizer with the embroidery<br />
location centered.<br />
NOTE: If necessary, open the side seams below the tote hem to access the tote surface for<br />
embroidery.<br />
6. Stitch the embroidery design, using a different color of <strong>Coats</strong> Glow in the Dark embroidery<br />
thread for each light on the strand.<br />
7. When the embroidery is complete, remove the excess stabilizer. Replace any seams removed<br />
for embroidery and turn the tote right side out.<br />
8. Expose the stitches to sunlight or artificial illumination to "charge" the thread, then turn out<br />
the lights for a holiday glow.<br />
To create the tote design without software or a large hoop:
1. Use your machine's controls to enlarge and rotate the design and skip over the letters while<br />
embroidering.<br />
2. Make a template of the enlarged embroidery design by stitching it on scrap fabric and use the<br />
template to position the Christmas lights to the left of the tote centerline.<br />
3. Hoop adhesive stabilizer, attach the tote with the design placement centered, and embroider<br />
all but the lettering included with the design.<br />
4. Spell out "You Glow Girl!" with built-in lettering and use the machine's controls to arrange<br />
the words. If necessary, stitch the words in two or more hoopings.<br />
5. Mark a centerline for the words to the right of the tote centerline, opposite the embroidered<br />
lights. Hoop a fresh piece of adhesive stabilizer and embroider the words.<br />
To appliqué design:<br />
Additional supplies:<br />
Fabric scraps in colors to match thread colors (approx 2” squares)<br />
Paper-backed fusible web.<br />
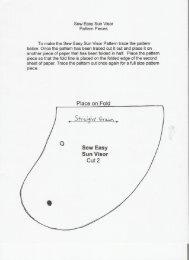
1. Fuse web to wrong side of fabric. Trace bulb <strong>pattern</strong> on each fabric squares. You will need a<br />
total of X bulbs. Cut out bulbs. Position bulbs on tote, lightly mark position. Remove paper<br />
backing and fuse to right side of tote, following manufacturers <strong>instructions</strong>.<br />
2. Thread machine with Glow-in-the Dark and bobbin thread. Set machine for a satin stitch<br />
(width 3 mm, length 0.35 mm). Place adhesive stabilizer under designs against the wrong side of<br />
fabric. Stitch around bulbs.<br />
3. Draw a line connecting bulbs for wire. Satin stitch along marked line.
4. Spell out "You Glow Girl!" with built-in lettering and use the machine's controls to arrange<br />
the words. If necessary, stitch the words in two or more hoopings.<br />
5. Mark a centerline for the words to the right of the tote centerline, opposite the embroidered<br />
lights. Hoop a fresh piece of adhesive stabilizer and embroider the words.