120-60 - Constant Speed Blender - OFI Testing Equipment, Inc.
120-60 - Constant Speed Blender - OFI Testing Equipment, Inc.
120-60 - Constant Speed Blender - OFI Testing Equipment, Inc.
Create successful ePaper yourself
Turn your PDF publications into a flip-book with our unique Google optimized e-Paper software.
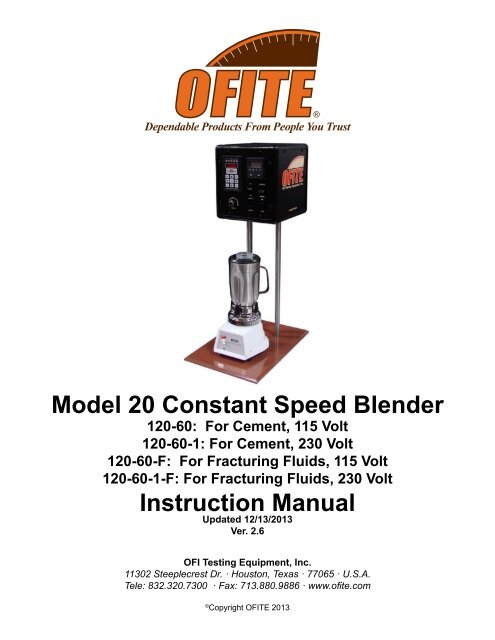
Model 20 <strong>Constant</strong> <strong>Speed</strong> <strong>Blender</strong><br />
<strong>120</strong>-<strong>60</strong>: For Cement, 115 Volt<br />
<strong>120</strong>-<strong>60</strong>-1: For Cement, 230 Volt<br />
<strong>120</strong>-<strong>60</strong>-F: For Fracturing Fluids, 115 Volt<br />
<strong>120</strong>-<strong>60</strong>-1-F: For Fracturing Fluids, 230 Volt<br />
Instruction Manual<br />
Updated 12/13/2013<br />
Ver. 2.6<br />
<strong>OFI</strong> <strong>Testing</strong> <strong>Equipment</strong>, <strong>Inc</strong>.<br />
11302 Steeplecrest Dr. · Houston, Texas · 77065 · U.S.A.<br />
Tele: 832.320.7300 · Fax: 713.880.9886 · www.ofite.com<br />
©<br />
Copyright <strong>OFI</strong>TE 2013
Table of<br />
Contents<br />
Intro..................................................................................................2<br />
Description.......................................................................................2<br />
Components....................................................................................3<br />
Specifications..................................................................................3<br />
Installation.......................................................................................7<br />
Operation.........................................................................................8<br />
Manual Mode...............................................................................8<br />
Variable Mode..............................................................................9<br />
Auto Mode....................................................................................9<br />
Timer..........................................................................................10<br />
<strong>Speed</strong> Controller........................................................................10<br />
PID Parameters......................................................................... 11<br />
<strong>OFI</strong>TE, 11302 Steeplecrest Dr., Houston, TX 77065 USA / Tel: 832-320-7300 / Fax: 713-880-9886 / www.ofite.com 1
Intro<br />
Description<br />
<strong>OFI</strong>TE’s Model 20 <strong>Constant</strong> <strong>Speed</strong> <strong>Blender</strong> was designed to prepare well<br />
cements for testing according to the guidelines stated within API Specification<br />
10. Research has demonstrated that the properties of well cements<br />
are highly dependent upon mixing procedures. In addition, studies have<br />
indicated that when constant speed blenders/mixers are used, data obtained<br />
from thickening time tests has greater reproducibility and generally correlates<br />
better with data obtained from other laboratories. The Model 20 was<br />
designed to provide a means of consistently preparing cement slurries for<br />
testing purposes and can be utilized to mix cements according to the procedures<br />
stated by the API.<br />
The proper amount of mix water is carefully weighed and poured into the<br />
mixing container of the blender. The rotational speed is set to 4,000 RPM<br />
and allowed to stabilize at this speed. The “TIMER” switch is pressed and<br />
the cement is immediately added to the mix water. The cement should be<br />
uniformly added to the water in less than 15 seconds. After 15 seconds the<br />
rotational speed is automatically increased to 12,000 RPM and the slurry is<br />
mixed an additional 35 seconds. A microprocessor is utilized to maintain the<br />
rotational speed within the recommendations established by the API and is<br />
independent of fluctuations in line voltage and the viscosity of the cement<br />
slurry.<br />
The <strong>120</strong>-<strong>60</strong>-F <strong>Constant</strong> <strong>Speed</strong> <strong>Blender</strong> is intended for testing Fracturing<br />
Fluids. The rotational speeds are set to 500 and 1,000 RPM respectively.<br />
<strong>OFI</strong>TE, 11302 Steeplecrest Dr., Houston, TX 77065 USA / Tel: 832-320-7300 / Fax: 713-880-9886 / www.ofite.com 2
#122-073-1 Fuse, 3-Amp, 5 mm × 20 mm (230 Volt Only)<br />
Components<br />
#122-074-1 Fuse, 5-Amp, 5 mm × 20 mm (230 Volt Only)<br />
#122-075 Fuse, 7-Amp, 5 mm × 20 mm (115 Volt Only)<br />
#122-077 Fuse, 10-Amp, 5 mm × 20 mm (115 Volt Only)<br />
#122-200 Hardened Blade Assemblies<br />
#122-202 Container, Stainless Steel<br />
#122-203 Container Lid<br />
#122-204 Bottom Gasket<br />
#122-209 Waring <strong>Blender</strong> ® with Magnetic Pickup<br />
#152-34 Container, Glass (For Fracturing Fluids)<br />
#164-42 Male Connector for Power Cable (230 Volt Only)<br />
Optional:<br />
#<strong>120</strong>-61 Spare Parts Kit, 115 Volt<br />
#122-075 Fuse, 7-Amp, 5 mm × 20 mm (115 Volt Only), Qty: 4<br />
#122-077 Fuse, 10-Amp, 5 mm × 20 mm (115 Volt Only), Qty: 4<br />
#122-200 Blending Assembly / Square Drive, 1 qt, Qty: 12<br />
#122-202 Stainless Steel Container, 1 qt<br />
#122-203 Container Lid, 1 qt<br />
#122-204 Bottom Gasket, Qty: 6<br />
#<strong>120</strong>-61-1 Spare Parts Kit, 230 Volt<br />
#122-073-1 Fuse, 3-Amp, 5 mm × 20 mm, Qty: 4<br />
#122-074-1 Fuse, 5-Amp, 5 mm × 20 mm, Qty: 4<br />
#122-200 Blending Assembly / Square Drive, 1 qt, Qty: 12<br />
#122-202 Stainless Steel Container, 1 qt<br />
#122-203 Container Lid, 1 qt<br />
#122-204 Bottom Gasket, Qty: 6<br />
Specifications<br />
- Hardened stainless steel mixing blades<br />
- Stainless steel 1-liter mixing container<br />
- Two preset mixing speeds and variable speed<br />
- Maximum <strong>Speed</strong> for Cement <strong>Testing</strong> (<strong>120</strong>-<strong>60</strong> / <strong>120</strong>-<strong>60</strong>-1): 16,000 RPM<br />
- Maximum <strong>Speed</strong> for Fracturing Fluid <strong>Testing</strong> (<strong>120</strong>-<strong>60</strong>-F / <strong>120</strong>-<strong>60</strong>-1-<br />
F): 5,000 RPM<br />
- Rotational speed is maintained at setpoint with microprocessor<br />
- Timing relays automatically control mixing times at required RPM<br />
- Digital instrumentation provides excellent readability<br />
- Crated Size: 45" × 32" × 12" (114 × 81 × 31 cm)<br />
- Crated Weight: Approximately 75 pounds (34.1 kg)<br />
<strong>OFI</strong>TE, 11302 Steeplecrest Dr., Houston, TX 77065 USA / Tel: 832-320-7300 / Fax: 713-880-9886 / www.ofite.com 3
1<br />
2<br />
3<br />
5<br />
9 10<br />
4 6<br />
7 8<br />
11<br />
12 13<br />
14 15<br />
16<br />
1. Rotational <strong>Speed</strong> Display (RPM)<br />
This display shows the speed of the blade. On models for cement<br />
testing (<strong>120</strong>-<strong>60</strong> / <strong>120</strong>-<strong>60</strong>-1), multiply the value displayed here by<br />
10 to determine the actual RPM of the blade.<br />
2. Timer Display (Seconds)<br />
3. Edit Setpoint 1 / <strong>Inc</strong>rease Setpoint Digit<br />
Press this button to change the timer value of Setpoint 1. When<br />
editing a setpoint value, this button increases the first digit of the<br />
value by 1.<br />
<strong>OFI</strong>TE, 11302 Steeplecrest Dr., Houston, TX 77065 USA / Tel: 832-320-7300 / Fax: 713-880-9886 / www.ofite.com 4
4. Edit Setpoint 2 / <strong>Inc</strong>rease Setpoint Digit<br />
Press this button to change the timer value of Setpoint 2. When<br />
editing a setpoint value, this button increases the second digit of<br />
the value by 1.<br />
5. <strong>Inc</strong>rease Setpoint Digit<br />
This button increases the fourth digit of the setpoint value by 1.<br />
6. <strong>Inc</strong>rease Setpoint Digit<br />
This button increases the third digit of the setpoint value by 1.<br />
7. Enter Button<br />
Press this button to store the Setpoint value in memory.<br />
8. Timer Reset<br />
Press this button to reset the timer to zero.<br />
9. Keypad: VAR<br />
This button accesses the PID Parameter Control Menu.<br />
10. Keypad: SETPT<br />
Press this button to change the rotational speed of Setpoint 1 or<br />
Setpoint 2.<br />
11. Keypad: ENTER<br />
Press this button to store the Setpoint value in memory.<br />
12. Two-Way Switch: ON - OFF<br />
This switch provides power to the unit.<br />
13. Two-Way Switch: MAN/AUTO - Variable<br />
This switch determines the operating mode of the unit. If it is set<br />
to MAN/AUTO, the MAN - AUTO switch (15) becomes active. If<br />
it is set to VARIABLE, the unit will be in Variable Mode.<br />
<strong>OFI</strong>TE, 11302 Steeplecrest Dr., Houston, TX 77065 USA / Tel: 832-320-7300 / Fax: 713-880-9886 / www.ofite.com 5
14. Three-Way Switch: ST PT 1 / ST PT 2<br />
This switch remains inactive unless the MAN/AUTO - Variable<br />
switch (13) is set to MAN/AUTO and the MAN - AUTO switch<br />
(15) is set to MAN. It toggles the rotational speed between<br />
Setpoint 1 and Setpoint 2. If it is in the center position, the unit will<br />
not rotate.<br />
For testing Cement (part numbers <strong>120</strong>-<strong>60</strong> and <strong>120</strong>-<strong>60</strong>-1),<br />
Setpoint 1 is 4,000 RPM and Setpoint 2 is 12,000 RPM. For<br />
testing Fracturing Fluids, Setpoint 1 is 500 and Setpoint 2 is<br />
1,000 RPM.<br />
15. Three-Way Switch: MAN - AUTO<br />
This switch remains inactive unless the MAN/AUTO - Variable<br />
switch (13) is set to MAN/AUTO. It toggles the operating mode<br />
between Manual Mode and Auto Mode. If it is in the center position,<br />
the unit will not rotate.<br />
16. Potentiometer<br />
This knob remains inactive unless the MAN/AUTO - Variable<br />
switch (13) is set to Variable. It provides greater control over the<br />
rotational speed of the unit.<br />
<strong>OFI</strong>TE, 11302 Steeplecrest Dr., Houston, TX 77065 USA / Tel: 832-320-7300 / Fax: 713-880-9886 / www.ofite.com 6
Installation<br />
1. Carefully remove the unit from the packing box and place it on a counter<br />
safely away from sinks and other possible hazards.<br />
2. Place the blending assembly on the base of the unit.<br />
3. Plug the power supply cord into the port underneath the cabinet housing<br />
labeled “BLENDER”.<br />
4. Plug the transducer cable into the center port and fasten in place with the<br />
two clamps and screws provided. Do not over tighten.<br />
5. Finally, plug the power supply cord into a suitable AC power supply.<br />
<strong>OFI</strong>TE, 11302 Steeplecrest Dr., Houston, TX 77065 USA / Tel: 832-320-7300 / Fax: 713-880-9886 / www.ofite.com 7
Operation<br />
The blending assembly has two speeds, “HI” and “LO”. The <strong>Constant</strong><br />
<strong>Speed</strong> <strong>Blender</strong> will not operate unless the blending assembly is set to “HI”.<br />
Before operation, press the “HI” button on the blending assembly.<br />
The unit has three operating modes: Manual, Variable, and Auto. The<br />
MAN/AUTO - Variable switch (13) and the MAN/AUTO switch (15) set the<br />
mode.<br />
1. To set the unit to Manual Mode, set the MAN/AUTO - Variable switch<br />
(13) to MAN/AUTO and the MAN - AUTO switch (15) to MAN.<br />
2. To set the unit to Auto Mode, set the MAN/AUTO - Variable switch (13)<br />
to MAN/AUTO and the MAN - AUTO switch (15) to AUTO.<br />
3. To set the unit to Variable Mode, set the MAN/AUTO - Variable switch<br />
(13) to Variable.<br />
Before turning the unit on, be sure to set the MAN/AUTO switch (15)<br />
and the ST PT 1 / ST PT 2 switch (14) to the center position and turn<br />
the Potentiometer (16) fully counter-clockwise.<br />
Operation<br />
Manual Mode<br />
1. Place the mix water into the mixing cup and place the lid on top of the<br />
container.<br />
2. The MAN/AUTO - Variable switch (13) should be in the MAN/AUTO<br />
position. The MAN/AUTO switch (15) should be in the MAN position.<br />
3. Place the ST PT 1 / ST PT 2 switch (14) to the ST PT 1 position to start<br />
the unit.<br />
When you initially start the unit, the rotational speed may exceed<br />
the setpoint, but will stabilize within a few seconds.<br />
4. After stabilization, you have 15 seconds to add the cement to the mix<br />
water and cover the container with the lid. Reset the timer to zero by<br />
pressing the Reset Button (8).<br />
5. After 15 seconds, increase the rotational speed by setting the ST PT 1 /<br />
ST PT 2 switch (14) to ST PT 2.<br />
6. After mixing the cement an additional 35 seconds, stop the blender by<br />
setting the ST PT 1 / ST PT 2 switch (14) to the center position.<br />
7. Return the MAN/AUTO switch (15) to the center position.<br />
8. After mixing is complete, clean the blending cup and lid as soon as possible<br />
to prevent any cement from building up on the container.<br />
<strong>OFI</strong>TE, 11302 Steeplecrest Dr., Houston, TX 77065 USA / Tel: 832-320-7300 / Fax: 713-880-9886 / www.ofite.com 8
Operation<br />
Variable Mode<br />
1. Place the mix water into the mixing cup and place the lid on top of the<br />
container. Ensure that the potentiometer control knob is in the fully<br />
counter-clockwise position.<br />
2. Make certain that the ST PT 1 / ST PT 2 switch (14) is in the center<br />
position. Place the MAN/AUTO - VARIABLE (13) switch in the Variable<br />
position.<br />
3. <strong>Inc</strong>rease the rotational speed of the blender by turning the control<br />
Potentiometer (16) clockwise.<br />
4. Reset the timer to zero by pressing the reset button (8).<br />
5. After mixing is complete, clean the blending cup and lid as soon as<br />
possible to prevent any cement from building up on the container.<br />
Operation<br />
Auto Mode<br />
1. Place the mix water into the mixing cup and place the lid on top of the<br />
container.<br />
2. Make certain that the ST PT 1 / ST PT 2 switch (14) is in the center<br />
position. Place the MAN/AUTO - VARIABLE switch (13) to the<br />
MAN/AUTO position. Place the MANUAL/AUTO switch (15) switch to<br />
the AUTO position.<br />
Once the switch is placed into the AUTO position, the blender<br />
should start to accelerate. If the blender does not accelerate, reset<br />
the timer by pressing the reset button (8).<br />
When you initially start the unit, the rotational speed may exceed<br />
the setpoint, but will stabilize within a few seconds.<br />
3. After stabilization, reset the timer to zero again and immediately begin<br />
adding the cement. You have 15 seconds to add the cement to the mix<br />
water and place the lid on the container.<br />
After 15 seconds the timer will automatically increase the rotational<br />
speed to Setpoint 2. Ensure that the cement is added to the mix<br />
water and that the lid is placed on the container in less than 15<br />
seconds.<br />
4. After mixing the cement at Setpoint 2 for 35 seconds the timer will<br />
automatically stop the blender.<br />
5. After mixing is complete, clean the blending cup and lid as soon as<br />
possible to prevent any cement from building up on the container.<br />
<strong>OFI</strong>TE, 11302 Steeplecrest Dr., Houston, TX 77065 USA / Tel: 832-320-7300 / Fax: 713-880-9886 / www.ofite.com 9
Operation<br />
Timer<br />
The timer is continuously on whenever power is applied to the unit. The<br />
unit will measure elapsed time to its maximum value and then stop at setpoint<br />
2.<br />
By default, setpoint 1 is set to 15 seconds and setpoint 2 is set to 50 seconds.<br />
These values conform to the guidelines established in API Specification<br />
10.<br />
To change these values, do the following:<br />
1. Press “1” (3) or “2” (4) to change setpoint 1 or setpoint 2 respectively.<br />
2. The display will show the current setpoint value. The four buttons beneath<br />
the display (3 - 6) each increase a separate digit of the setpoint<br />
value. The digits will scroll from 0 to 9 and then return to 0.<br />
3. When you reach the correct setpoint value, press the enter button (7) to<br />
store it in the timer's memory.<br />
Operation<br />
<strong>Speed</strong> Controller<br />
The <strong>Constant</strong> <strong>Speed</strong> <strong>Blender</strong> has two setpoints that are set at the factory.<br />
For Cementing testing, Setpoint 1 and Setpoint 2 are set to 4,000 and<br />
12,000 RPM respectively. For Fracturing Fluid testing, they are set to 500<br />
and 1,000 RPM.<br />
To change these values, do the following:<br />
1. Press “SETPT” (10) to activate the speed control menu.<br />
2. Use the arrow keys to scroll to either “SETPOINT 1” or “SETPOINT 2”.<br />
3. Press “ENTER” (11).<br />
4. Key in the numeric value (rotational <strong>Speed</strong>) of the new setpoint with the<br />
keypad.<br />
5. Press “ENTER” (11) to store the new value into the controller’s memory.<br />
<strong>OFI</strong>TE, 11302 Steeplecrest Dr., Houston, TX 77065 USA / Tel: 832-320-7300 / Fax: 713-880-9886 / www.ofite.com 10
Operation<br />
Pid Parameters<br />
For optimum performance, it may be necessary to change the PID parameters<br />
within the controller. To tune the controller, do the following:<br />
1. Operate the unit in Manual Mode with a typical fluid within the container.<br />
Toggle between ST PT 1 and ST PT 2 and watch for over or undershoot.<br />
If there is significant overshoot access “VARIABLE 9” and reduce the<br />
value by 4.<br />
To access “VARIABLE 9” press the “VAR” (9) key, press “9”, and then<br />
press “ENTER” (11). Key in the new value and press “ENTER” (11) to<br />
store it into memory.<br />
If there is no overshoot or undershoot, but the response was slow, increase<br />
the value of “Variable 9” by 4.<br />
Repeat the above procedure, changing the value of “VARIABLE 9” until<br />
there is minimal overshoot and the ramp is smooth. Note that to fine<br />
tune the controller, the value can be incremented in steps of 1 or 2 and<br />
not necessarily a value of 4.<br />
Variable 10 may be accessed and changed in the same manner.<br />
2. Run the controller at ST PT 2. <strong>Inc</strong>rease “VARIABLE 10” by 4 and watch<br />
for any oscillations around the setpoint. If no oscillations occur increase<br />
“Variable 10” by 4 until oscillations begin.<br />
3. After the onset of oscillations, reduce “VARIABLE 10” by 4.<br />
4. Repeat steps 2 and 3 until minimal over and undershoot occur.<br />
This is a trial and error process. After each change, record the setting and<br />
its result. Variable 9 and 10 are initially set to 10 and 8 respectively.<br />
<strong>OFI</strong>TE, 11302 Steeplecrest Dr., Houston, TX 77065 USA / Tel: 832-320-7300 / Fax: 713-880-9886 / www.ofite.com 11


