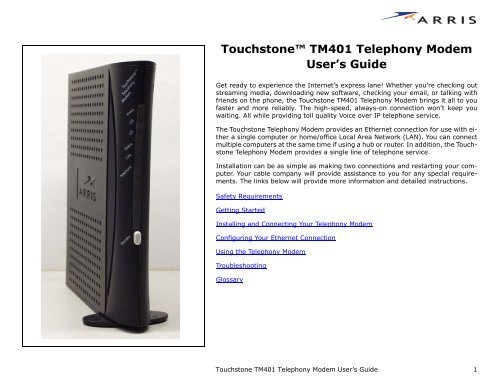
Touchstone⢠TM401 Telephony Modem User's Guide - Ono
Touchstone⢠TM401 Telephony Modem User's Guide - Ono
Touchstone⢠TM401 Telephony Modem User's Guide - Ono

You also want an ePaper? Increase the reach of your titles
YUMPU automatically turns print PDFs into web optimized ePapers that Google loves.
Touchstone <strong>TM401</strong> <strong>Telephony</strong> <strong>Modem</strong><br />
User’s <strong>Guide</strong><br />
Get ready to experience the Internet’s express lane! Whether you’re checking out<br />
streaming media, downloading new software, checking your email, or talking with<br />
friends on the phone, the Touchstone <strong>TM401</strong> <strong>Telephony</strong> <strong>Modem</strong> brings it all to you<br />
faster and more reliably. The high-speed, always-on connection won’t keep you<br />
waiting. All while providing toll quality Voice over IP telephone service.<br />
The Touchstone <strong>Telephony</strong> <strong>Modem</strong> provides an Ethernet connection for use with either<br />
a single computer or home/office Local Area Network (LAN). You can connect<br />
multiple computers at the same time if using a hub or router. In addition, the Touchstone<br />
<strong>Telephony</strong> <strong>Modem</strong> provides a single line of telephone service.<br />
Installation can be as simple as making two connections and restarting your computer.<br />
Your cable company will provide assistance to you for any special requirements.<br />
The links below will provide more information and detailed instructions.<br />
Safety Requirements<br />
Getting Started<br />
Installing and Connecting Your <strong>Telephony</strong> <strong>Modem</strong><br />
Configuring Your Ethernet Connection<br />
Using the <strong>Telephony</strong> <strong>Modem</strong><br />
Troubleshooting<br />
Glossary<br />
Touchstone <strong>TM401</strong> <strong>Telephony</strong> <strong>Modem</strong> User’s <strong>Guide</strong> 1
Export Regulations<br />
This product may not be exported outside the U.S. and Canada without U.S. Department of Commerce, Bureau of Export Administration authorization.<br />
Any export or re-export by the purchaser, directly or indirectly, in contravention of U.S. Export Administration Regulation is prohibited.<br />
Copyright © 2005 ARRIS International, Inc. Patents pending. All rights reserved.<br />
The information in this document is subject to change without notice. The statements, configurations, technical data, and recommendations in<br />
this document are believed to be accurate and reliable, but are presented without express or implied warranty. Users must take full responsibility<br />
for their applications of any products specified in this document. The information in this document is proprietary to ARRIS.<br />
ARRIS, Touchstone, and the ARRIS logo are trademarks of ARRIS International, Inc. All other trademarks and registered trademarks are the<br />
property of their respective holders.<br />
Document number: ARSVD00955<br />
Release 4 Standard 1.0 May 2005<br />
Touchstone <strong>TM401</strong> <strong>Telephony</strong> <strong>Modem</strong> User’s <strong>Guide</strong> 2
Safety Getting Started Installation Ethernet Configuration Usage Troubleshooting Glossary<br />
Safety Requirements<br />
ARRIS <strong>Telephony</strong> <strong>Modem</strong>s comply with the applicable requirements for<br />
performance, construction, labeling, and information when used as<br />
outlined below:<br />
CAUTION<br />
Connecting the <strong>Telephony</strong> <strong>Modem</strong> to the home's<br />
existing telephone wiring should only be performed<br />
by a professional installer. Physical connections to<br />
the previous telephone provider must be removed<br />
and the wiring must be checked; there must not be<br />
any voltages. Cancellation of telephone service is not<br />
adequate. Failure to do so may result in loss of<br />
service and/or permanent damage to the EMTA.<br />
tial voltage differences between the cable TV coaxial cable and<br />
other grounding systems. Refer to the individual country’s National<br />
Electric Code for further details.<br />
• In areas of high surge events or poor grounding situations and<br />
areas prone to lightning strikes, additional surge protection<br />
may be required (i.e. PF11VNT3 from American Power Conversion)<br />
on the AC, RF, Ethernet and Phone lines.<br />
• When the embedded multimedia terminal adapter (EMTA) is<br />
connected to a local computer through the Ethernet cable, the<br />
computer must be properly grounded to the building/residence<br />
AC ground network. All plug-in cards within the computer must<br />
be properly installed and grounded to the computer frame per<br />
the manufacturer’s specifications.<br />
• The <strong>Telephony</strong> <strong>Modem</strong> is designed to be installed directly into a<br />
telephone.<br />
• Connecting the <strong>Telephony</strong> <strong>Modem</strong> to the home's existing telephone<br />
wiring should only be performed by a professional installer.<br />
• Do not use product near water (i.e. wet basement, bathtub,<br />
sink or near a swimming pool, etc.), to avoid risk of electrocution.<br />
• Avoid using and/or connecting the equipment during an electrical<br />
storm, to avoid risk of electrocution.<br />
• Do not locate the equipment within 6 feet (1.9 m) of a flame or<br />
ignition source, to avoid damage (i.e. heat registers, space<br />
heaters, fireplaces, etc.).<br />
• Use only power supply and power cord included with the equipment.<br />
• Equipment should be installed near the power outlet and should<br />
be easily accessible.The RF drop cable’s shield must be grounded<br />
at the building/residence either close to the point of entrance<br />
or at the point of attachment. It should be grounded as<br />
close as practical to the building/residence AC ground to minimize<br />
grounding connector length and thereby limit the poten-<br />
Touchstone <strong>TM401</strong> <strong>Telephony</strong> <strong>Modem</strong> User’s <strong>Guide</strong> 3
Safety Getting Started Installation Ethernet Configuration Usage Troubleshooting Glossary<br />
European Compliance<br />
This product complies with the provisions of the Electromagnetic Compatibility<br />
(EMC) Directive (89/336/EEC), the Amending Directive (92/31/EEC),<br />
the Low Voltage Directive (73/23/EEC), and the CE Marking Directive (93/<br />
68/EEC). As such, this product bears the CE marking in accordance with the<br />
above applicable Directive(s).<br />
A copy of the Declaration of Conformity may be obtained from: ARRIS<br />
International, Inc., 3871 Lakefield Drive, Suite 300, Suwanee, GA 30024.<br />
As indicated by the symbol below, disposal of this product or battery is governed<br />
by Directive 2002/96/EC of the European Parliament and of the<br />
Council on waste electrical and electronic equipment (WEEE). WEEE could<br />
potentially prove harmful to the environment; as such, upon disposal of the<br />
<strong>Telephony</strong> <strong>Modem</strong> the Directive requires that this product must not be disposed<br />
as unsorted municipal waste, but rather collected separately and disposed<br />
of in accordance with local WEEE ordinances.<br />
and conditions of this Agreement in which ARRIS grants you a personal,<br />
nonexclusive license to use the supplied software, including software internal<br />
to the unit, and related materials, including documentation, which<br />
together constitute the "Software".<br />
1. Use the Software. You may use the Software only in connection with<br />
operation of the product for personal use subject to the limitations contained<br />
in this Agreement.<br />
2. Transfer the Software. You may not transfer this license except if you<br />
permanently transfer all of your rights as part of a permanent sale or transfer<br />
of the hardware and Software, provided that you retain no copies, you<br />
transfer all of the Software, and the recipient agrees to all of the terms of<br />
this Agreement.<br />
3. Terminate this license. You may terminate this license by returning<br />
the product and all separately provided Software and all copies of the Software.<br />
LICENSOR may terminate this license if you fail to comply with all of<br />
the licensing terms. In such event, you must destroy all copies of the Software,<br />
all copies of the Software and all of its component parts.<br />
REFUND. If you do not agree to the terms of this End User License Agreement,<br />
do not install, use or copy the product. You should promptly contact<br />
the point of purchase or service provider for instructions on return of the<br />
unused product(s) for a refund.<br />
End User License Agreement and Limited<br />
Warranty<br />
ARRIS Touchstone <strong>Telephony</strong>, ARRIS Touchstone Cable <strong>Modem</strong> and<br />
Cornerstone® <strong>Telephony</strong> Voice Port, all are ARRIS International, Inc.<br />
(ARRIS) products classified as Customer Premise Equipment (CPE).<br />
GRANT OF LICENSE. By breaking the seal on this product bag, installing,<br />
copying, or otherwise using the software, you are agreeing to the terms<br />
TITLE. The Software is licensed, not sold. You acknowledge that ARRIS<br />
retains all right, title and interest to the Software. Software provided by<br />
third parties may be subject to separate end user license agreements from<br />
the manufacturers of such software.<br />
LIMITATIONS ON USE.<br />
1. You may not reverse engineer, decompile, or disassemble the Software.<br />
2. You many not make copies of the Software, including the printed materials<br />
accompanying the Software for any purpose other than backup. You<br />
may make only one copy of the Software for backup purposes.<br />
3. You may not rent, lease or lend the Software.<br />
4. Except as explicitly described in the documentation, you may not modify<br />
Touchstone <strong>TM401</strong> <strong>Telephony</strong> <strong>Modem</strong> User’s <strong>Guide</strong> 4
Safety Getting Started Installation Ethernet Configuration Usage Troubleshooting Glossary<br />
the Software or create derivative works of the Software.<br />
5. You may not sell or distribute the copies of the Software or publish the<br />
Software.<br />
6. You may not remove or erase any copyright notice or legend from the<br />
Software.<br />
7. You may not separate the Software into component parts.<br />
This warranty excludes (1) physical damage to the surface of the product,<br />
including cracks or scratches on the casing; (2) damage caused by misuse,<br />
neglect, improper installation or testing, unauthorized attempts to open,<br />
repair or modify the product, or any other cause beyond the range of the<br />
intended use; (3) damage caused by accident , fire, power changes, other<br />
hazards, or acts of God; or (4) use of the product with any non-ARRIS<br />
approved device or service if such device or service causes the problem.<br />
IF YOU PURCHASED THIS PRODUCT FROM A CABLE OR OTHER SER-<br />
VICE PROVIDER, YOU DO NOT RECEIVE ANY WARRANTY DIRECTLY<br />
FROM ARRIS. YOUR EXCLUSIVE WARRANTY, IF YOU RECEIVE ANY<br />
WARRANTY AT ALL, COMES FROM YOUR CABLE OR OTHER SERVICE<br />
PROVIDER AND THE REMAINDER OF THIS SECTION DOES NOT<br />
APPLY TO YOU.<br />
If you purchased this product directly from ARRIS or an ARRIS<br />
authorized retailer the following warranties apply:<br />
HARDWARE: ARRIS warrants the original purchaser ("Customer") that<br />
this product will be free from defects in workmanship and materials, under<br />
normal use, for one (1) year from the ship date of this product.<br />
BATTERY PACK: ARRIS warrants the original purchaser ("Customer")<br />
that the battery pack, if included, will be free from defects in workmanship<br />
and materials, under normal use, for one (1) year from the ship date of this<br />
product.<br />
SOFTWARE: ARRIS warrants to Customer that the Software and any<br />
ARRIS branded software will perform in substantial conformance to its<br />
specifications for a period of ninety (90) days from the date of invoice for<br />
the product in question. ARRIS warrants the media containing the Software<br />
against failure during the warranty period. ARRIS makes no warranty<br />
or representation that the operation of the Software will be uninterrupted<br />
or error free, or that all defects in the Software will be corrected.<br />
EXCLUSIONS<br />
Any non-ARRIS provided or non-ARRIS approved third party products,<br />
including software, are not covered by this ARRIS warranty and ARRIS<br />
makes no representations or warranties on behalf of such third party software<br />
or product. Any warranty on such products is from the supplier and<br />
licensor of the product.<br />
EXCLUSIVE REMEDIES<br />
Should a covered problem occur during the warranty period and you notify<br />
ARRIS, your sole exclusive remedy shall be, at ARRIS' sole option and<br />
expense, to repair or replace the affected Product or Software. If ARRIS<br />
cannot reasonably repair nor replace, then ARRIS may, in its sole discretion,<br />
refund the purchase price paid for the impaired Product. Replacement<br />
products or parts may be new, reconditioned or comparable versions of the<br />
impaired item. ARRIS warrants any replaced or repaired product, part, or<br />
software for a period of ninety (90) days from shipment, or through the end<br />
of the original warranty, whichever is longer.<br />
OBTAINING WARRANTY SERVICE: Customer may contact the ARRIS<br />
Repair Services center within the applicable warranty period to obtain warranty<br />
service authorization number by sending an email to support@arrisi.com.<br />
Dated proof of original purchase will be required. Product<br />
or parts shipped by Customer to ARRIS must be sent postage paid and<br />
packaged appropriately for safe shipment. ARRIS is not responsible for<br />
Customer products received without a warranty service authorization and<br />
may be rejected. Repaired or replacement products will be shipped to Customer<br />
at ARRIS' expense. All products or parts that are replaced become<br />
the property of ARRIS. The repair and replacement process for products or<br />
parts in locations outside the United States will vary depending on Customer's<br />
location and Service Provider.<br />
Touchstone <strong>TM401</strong> <strong>Telephony</strong> <strong>Modem</strong> User’s <strong>Guide</strong> 5
Safety Getting Started Installation Ethernet Configuration Usage Troubleshooting Glossary<br />
WARRANTIES EXCLUSIVE: THE FOREGOING WARRANTIES AND REME-<br />
DIES ARE EXCLUSIVE AND IN LIEU OF ALL OTHER WARRANTIES, TERMS<br />
OR CONDITIONS, EXPRESS, IMPLIED OR STATUTORY, INCLUDING WAR-<br />
RANTIES OF MERCHANTABLITY, FITNESS FOR A PARTICULAR PURPOSE,<br />
ACCURACY, CORRESPONDENCE WITH DESCRIPTION, SATISFACTORY<br />
QUALITY AND NON-INFRINGEMENT, ALL OF WHICH ARE EXPRESSIVELY<br />
DISCLAIMED BY ARRIS AND ITS SUPPLIERS.<br />
entirety from the application to this Limited Warranty.<br />
LIMITATION OF LIABILITY: NEITHER ARRIS NOR ITS SUPPLIERS SHALL BE<br />
LIABLE FOR INCIDENTIAL, CONSEQUENTIAL, INDIRECT, SPECIAL, OR<br />
PUNITIVE DAMAGES OF ANY KIND, LOSS OF INFORMATION OR DATE,<br />
LOSS OF REVENUE, LOSS OF BUSINESS OR OTHER FINANCIAL LOSS ARIS-<br />
ING OUT OF OR IN CONNECTION WITH THE SALE OR USE OF THIS PROD-<br />
UCT, WHETHER BASED IN CONTRACT, TORT (INCLUDING NEGLIGENCE),<br />
STRICT PRODUCT LIABILITY OR ANY OTHER THEORY, EVEN IF ARRIS HAS<br />
BEEN ADVISED OF THE POSSIBILITY OF SUCH DAMAGES OR EVEN IF ANY<br />
LIMITED REMEDY SPECIFIED IN THIS LICENSE AGREEMENT IS DEEMED TO<br />
HAVE FAILED OF ITS ESSENTIAL PURPOSE. ARRIS' ENTIRE LIABILITY<br />
SHALL BE LIMITED TO REPLACEMENT, REPAIR, OR REFUND OF THE PUR-<br />
CHASE PRICE PAID, AT ARRIS' OPTION.<br />
DISCLAIMER: Some countries, states, or provinces do not allow the exclusions<br />
of limitation of implied warranties or the limitation of incidental or<br />
consequential damages so the above limitations or exclusions may be limited<br />
in their application to you. When implied warranties may not be<br />
excluded in their entirety, they will be limited to the duration of the applicable<br />
written warranty. This warranty gives you specific legal rights; you may<br />
have other rights that may vary depending on local law. Your statutory<br />
rights are not affected.<br />
THE LIMITED WARRANTY, LIMITED REMEDIES, WARRANTY DISCLAIMER<br />
AND LIMITED LIABILITY ARE FUNDAMENTAL ELEMENTS OF THE BASIS OF<br />
THE BARGAIN BETWEEN ARRIS AND CUSTOMER. ARRIS WOULD NOT BE<br />
ABLE TO PROVIDE THE PRODUCT WITHOUT SUCH LIMITATIONS.<br />
GOVERNING LAW: This Limited Warranty shall be governed by the laws<br />
of the State of Georgia, U.S.A. and by the laws of the United States, excluding<br />
their conflicts of laws principles. The United Nations Convention on<br />
Contracts for the International Sale of Goods is hereby excluded in its<br />
Touchstone <strong>TM401</strong> <strong>Telephony</strong> <strong>Modem</strong> User’s <strong>Guide</strong> 6
Safety Getting Started Installation Ethernet Configuration Usage Troubleshooting Glossary<br />
Getting Started<br />
About Your New <strong>Telephony</strong> <strong>Modem</strong><br />
The Touchstone <strong>TM401</strong> <strong>Telephony</strong> <strong>Modem</strong> is DOCSIS or EuroDOCSIS compliant<br />
with the following features:<br />
• Speed: much faster than dialup or ISDN service<br />
• Simplicity: provides standard high speed Ethernet connection<br />
• Flexibility: provides one line of telephone service as well as high speed data<br />
• Security: a Standby button lets you isolate connected computer(s) from<br />
the Internet without turning off the <strong>Telephony</strong> <strong>Modem</strong><br />
• Compatibility: supports tiered data services (if offered by your cable<br />
company)<br />
What’s in the Box?<br />
Make sure you have the following items before proceeding. Call your cable company<br />
for assistance if anything is missing.<br />
• <strong>Telephony</strong> <strong>Modem</strong><br />
• AC Adapter or Power Cord<br />
• Quick Installation <strong>Guide</strong><br />
• Ethernet Cable<br />
• CD-ROM<br />
• Screws for Wall Mounting the Unit<br />
• End User License Agreement<br />
What’s on the CD?<br />
The CD provides the following items:<br />
• User’s <strong>Guide</strong><br />
• Quick Installation <strong>Guide</strong><br />
Touchstone <strong>TM401</strong> <strong>Telephony</strong> <strong>Modem</strong> User’s <strong>Guide</strong> 7
Safety Getting Started Installation Ethernet Configuration Usage Troubleshooting Glossary<br />
Items You Need<br />
If you are installing the <strong>Telephony</strong> <strong>Modem</strong> yourself, make sure you have the following<br />
items on hand before continuing:<br />
Coax Cable<br />
• <strong>Telephony</strong> modem package: see What’s in the Box? for a list of items in<br />
the package.<br />
• Coaxial cable (coax): as shown in the image to the left, this is a thin cable<br />
with a connector on each end. It is the same kind of wire used to connect<br />
to your television for cable TV. You can buy coax from any electronics retailer<br />
and many discount stores; make sure it has connectors on both ends. There<br />
are two types of connectors, slip-on and screw-on; the screw-on connectors<br />
are best for use with your <strong>Telephony</strong> <strong>Modem</strong>. The coax should be long<br />
enough to reach from your <strong>Telephony</strong> <strong>Modem</strong> to the nearest cable outlet.<br />
• Phone Cable: as shown in the image to the left, this is a standard phone<br />
cable with standard phone connectors (RJ11 type) on both ends. You can<br />
buy phone cables from any electronics retailer and many discount stores.<br />
• Splitter (optional): provides an extra cable connection by splitting a single<br />
outlet into two. You may need a splitter if you have a TV already connected<br />
to the cable outlet that you want to use. You can buy a splitter from any<br />
electronics retailer and most discount stores; you may also need a short<br />
piece of coaxial cable (with connectors); use it to connect the splitter to the<br />
cable outlet and then connect the <strong>Telephony</strong> <strong>Modem</strong> and TV to the splitter.<br />
Note: A splitter effectively cuts the signal in half and sends each half to its<br />
two outputs. Using several splitters in a line may deteriorate the quality of<br />
your television, telephone, and/or internet connection.<br />
• Information packet: your cable company should furnish you with a packet<br />
containing information about your service and how to set it up. Read this<br />
information carefully and contact your cable company if you have any questions.<br />
Phone Cable<br />
Touchstone <strong>TM401</strong> <strong>Telephony</strong> <strong>Modem</strong> User’s <strong>Guide</strong> 8
Safety Getting Started Installation Ethernet Configuration Usage Troubleshooting Glossary<br />
Ethernet Cable<br />
Ethernet is a standard method of connecting two or more computers into a Local<br />
Area Network (LAN). Use the Ethernet connection if your PC has built-in Ethernet<br />
hardware, does not use Windows, or you want to share the <strong>Telephony</strong> <strong>Modem</strong> connection<br />
with several computers.<br />
Note:<br />
To connect two or more computers to the Ethernet port, you will need a<br />
hub or broadband router (available at computer retailers).<br />
Ethernet Cable<br />
The <strong>Telephony</strong> <strong>Modem</strong> package comes with a 6-foot (1.9m) Ethernet cable (the<br />
connectors look like wide telephone connectors); you can purchase more cables if<br />
necessary at a computer retailer. If you are connecting the <strong>Telephony</strong> <strong>Modem</strong> directly<br />
to a PC, or to an Ethernet hub or broadband router with a cross-over switch,<br />
ask for Category 5 (CAT5) straight-through cable. If you are connecting the <strong>Telephony</strong><br />
<strong>Modem</strong> to an Ethernet hub or broadband router without a crossover switch,<br />
ask for a Category 5 crossover cable.<br />
Touchstone <strong>TM401</strong> <strong>Telephony</strong> <strong>Modem</strong> User’s <strong>Guide</strong> 9
Safety Getting Started Installation Ethernet Configuration Usage Troubleshooting Glossary<br />
System Requirements<br />
The Touchstone <strong>Telephony</strong> <strong>Modem</strong> operates with most computers. The following<br />
describes requirements for each operating system; see the documentation for your<br />
system for details on enabling and configuring networking.<br />
To use the <strong>Telephony</strong> <strong>Modem</strong>, you need DOCSIS high-speed Internet service from<br />
your cable company.<br />
Windows<br />
Ethernet connection: Windows 95, Windows 98, Windows 98 SE (Second Edition),<br />
Windows ME, Windows 2000, or Windows XP<br />
MacOS<br />
Ethernet connection only: System 7.5 to MacOS 9.2 (Open Transport recommended)<br />
or MacOS X<br />
Linux/other Unix<br />
Ethernet connection only: Hardware drivers, TCP/IP, and DHCP must be enabled in<br />
the kernel<br />
Model Number<br />
About this Manual<br />
This manual is written to cover all <strong>TM401</strong> models. Your model may or may not have<br />
all of the capabilities outlined in this manual. To determine which model you have<br />
purchased, refer to the image at the left. The model number is on the label affixed<br />
to the <strong>Telephony</strong> <strong>Modem</strong>.<br />
Model : <strong>TM401</strong>AP/100<br />
P/N : <strong>TM401</strong>PC101<br />
PS<br />
E<br />
100-120 VAC, 50/60 Hz, 0.5 A MAX<br />
Made in "Country", Patents Pending<br />
Copyright 2004 - ARRIS International,Inc<br />
All Rights Reserved<br />
Touchstone <strong>TM401</strong> <strong>Telephony</strong> <strong>Modem</strong> User’s <strong>Guide</strong> 10
Safety Getting Started Installation Ethernet Configuration Usage Troubleshooting Glossary<br />
What About Security?<br />
Having a high-speed, always-on connection to the Internet requires a certain<br />
amount of responsibility to other Internet users—including the need to maintain a<br />
reasonably secure system. While no system is 100% secure, you can use the following<br />
tips to enhance your system’s security:<br />
Standby button<br />
• Keep your operating system updated with the latest security patches. Run<br />
the system update utility at least weekly.<br />
• Keep your email program updated with the latest security patches. In addition,<br />
avoid opening email containing attachments, or opening files sent<br />
through chat rooms, whenever possible.<br />
• Install a virus checker and keep it updated.<br />
• Use the Standby button on your <strong>Telephony</strong> <strong>Modem</strong> to disconnect your PC<br />
from the cable system when you are not using the Internet. Telephone service<br />
is not affected by the Standby button; it is always on.<br />
• Avoid providing web or file-sharing services over your <strong>Telephony</strong> <strong>Modem</strong>.<br />
Besides certain vulnerability problems, most cable companies prohibit running<br />
servers on consumer-level accounts and may suspend your account for<br />
violating your terms of service.<br />
• Use the cable company’s mail servers for sending email.<br />
• Avoid using proxy software unless you are certain that it is not open for<br />
abuse by other Internet users (some are shipped open by default). Criminals<br />
can take advantage of open proxies to hide their identity when breaking<br />
into other computers or sending spam. If you have an open proxy, your cable<br />
company may suspend your account to protect the rest of the network.<br />
• If you connect your <strong>Telephony</strong> <strong>Modem</strong> to a wireless LAN, make sure you enable<br />
security and encryption on the wireless hub (for the same reason that<br />
you should run only secured proxies). Consult the documentation and technical<br />
support of the wireless equipment provider for help.<br />
Touchstone <strong>TM401</strong> <strong>Telephony</strong> <strong>Modem</strong> User’s <strong>Guide</strong> 11
Safety Getting Started Installation Ethernet Configuration Usage Troubleshooting Glossary<br />
Installing and Connecting Your<br />
<strong>Telephony</strong> <strong>Modem</strong><br />
Before you start, make sure that:<br />
• You have contacted your cable company and verified that they provide data<br />
and telephone service using standard DOCSIS technology.<br />
• You have all the Items You Need.<br />
• Cable, phone, and power outlets are available near the PC. If a cable outlet<br />
is not conveniently located, your cable company can install a new one.<br />
Getting Service<br />
Before trying to use your new <strong>Telephony</strong> <strong>Modem</strong>, contact your local cable company<br />
to establish an Internet account and telephone service. When you call, have the following<br />
information ready:<br />
• the <strong>Telephony</strong> <strong>Modem</strong> serial number and MAC addresses of the unit (printed<br />
on a sticker on the bottom of the <strong>Telephony</strong> <strong>Modem</strong>)<br />
• the model number of the <strong>Telephony</strong> <strong>Modem</strong><br />
Save this information for future use. In addition, you should ask your cable company<br />
the following questions:<br />
• Do you have any special system requirements or files that I need to download<br />
after I am connected?<br />
• When can I start using my <strong>Telephony</strong> <strong>Modem</strong>?<br />
• Do I need a user ID or password to access the Internet or my e-mail?<br />
• Will my phone number change?<br />
• What new calling features will I have and how do I use them?<br />
Touchstone <strong>TM401</strong> <strong>Telephony</strong> <strong>Modem</strong> User’s <strong>Guide</strong> 12
Safety Getting Started Installation Ethernet Configuration Usage Troubleshooting Glossary<br />
<strong>Telephony</strong> <strong>Modem</strong> Front Panel<br />
<strong>TM401</strong><br />
Front Panel <strong>TM401</strong><br />
The front of the <strong>Telephony</strong> <strong>Modem</strong> has the following Light Emitting Diode (LED) indicators<br />
and controls:<br />
A<br />
Standby: pressing this button isolates the <strong>Telephony</strong> <strong>Modem</strong> from the internet.<br />
C<br />
E<br />
G<br />
B<br />
Telephone: blinks when the telephone line is being used<br />
C<br />
Link: blinks when the <strong>Telephony</strong> <strong>Modem</strong> is connected to the internet<br />
D<br />
On-Line: blinks during boot up or when data is being transmitted over the<br />
internet<br />
E<br />
US: blinks during boot up or when data is being sent from the <strong>Telephony</strong><br />
<strong>Modem</strong><br />
F<br />
DS: blinks during boot up or when data is being received by the <strong>Telephony</strong><br />
<strong>Modem</strong><br />
G<br />
Power: lights when AC power is connected to the unit<br />
A<br />
B<br />
D<br />
F<br />
Touchstone <strong>TM401</strong> <strong>Telephony</strong> <strong>Modem</strong> User’s <strong>Guide</strong> 13
Safety Getting Started Installation Ethernet Configuration Usage Troubleshooting Glossary<br />
<strong>Telephony</strong> <strong>Modem</strong> Rear Panel<br />
<strong>TM401</strong><br />
D<br />
Rear Panel<br />
The rear of the <strong>Telephony</strong> <strong>Modem</strong> has the following connectors and controls:<br />
A Power: plug the AC adapter in here.<br />
B Tel: plug the phone line in here.<br />
C Ethernet connector: for connecting the <strong>Telephony</strong> <strong>Modem</strong> to a PC or home<br />
network LAN.<br />
D Reset button: resets the <strong>Telephony</strong> <strong>Modem</strong> as if you power cycled the unit.<br />
Use a pointed non-metallic object to press this button.<br />
E Cable: plug the coax cable in here.<br />
A<br />
B<br />
C<br />
E<br />
Touchstone <strong>TM401</strong> <strong>Telephony</strong> <strong>Modem</strong> User’s <strong>Guide</strong> 14
Safety Getting Started Installation Ethernet Configuration Usage Troubleshooting Glossary<br />
Mounting the <strong>Telephony</strong> <strong>Modem</strong><br />
You can either mount the <strong>Telephony</strong> <strong>Modem</strong> on a wall or place it on a desktop. For<br />
wall-mount applications, you can mount the <strong>Telephony</strong> <strong>Modem</strong> with the indicators<br />
facing upward (vertical) or to the size (horizontal).<br />
Tools and Materials<br />
For wall-mounted installations, make sure you have the following tools and materials<br />
before proceeding:<br />
• for mounting on drywall: Two 1/4” (6mm) drywall anchors and a drill with<br />
1/4” (6mm) bit<br />
• for mounting on plywood or studs: two #6 x 1.5” (38.1 mm) self tapping<br />
screws (included); the head diameter should be approximately 1/4” (6 mm)<br />
and a drill with a 1/8” (3mm) bit<br />
• screwdriver (flat-blade or Phillips, depending on what kind of screws you<br />
use)<br />
• wall-mount template (included with the <strong>Telephony</strong> <strong>Modem</strong> Quick Installation<br />
<strong>Guide</strong>)<br />
• transparent tape (for temporarily securing the mounting template to the<br />
wall)<br />
Location<br />
Always position the <strong>Telephony</strong> <strong>Modem</strong>:<br />
• within 4 feet (1.3 m) of an AC outlet. The power cord must reach the outlet<br />
without stretching and without adding extension cords.<br />
• near a cable outlet (to avoid long cable runs).<br />
Note:<br />
When mounting the <strong>Telephony</strong> <strong>Modem</strong> on drywall, try to position the <strong>Telephony</strong><br />
<strong>Modem</strong> so at least one of the screws are fastened to a stud. This<br />
may prevent the <strong>Telephony</strong> <strong>Modem</strong> from pulling out of the wall in the future.<br />
To prevent overheating your Cable <strong>Modem</strong>, do not block the ventilation<br />
holes on the sides of the unit.<br />
Touchstone <strong>TM401</strong> <strong>Telephony</strong> <strong>Modem</strong> User’s <strong>Guide</strong> 15
Safety Getting Started Installation Ethernet Configuration Usage Troubleshooting Glossary<br />
Action<br />
Wall-mounting instructions<br />
1 Print out the <strong>Telephony</strong> <strong>Modem</strong> Wall Mounting Template.<br />
2 Position the mounting template on the surface where you intend to mount<br />
the <strong>Telephony</strong> <strong>Modem</strong> and secure in place with transparent tape.<br />
3 Drill holes through the template in the specified locations for the mounting<br />
screws. After drilling holes, remove the template from the surface.<br />
4 If using drywall anchors, set them into the wall. Then, drive the screws into<br />
the wall leaving a gap of about 1/8” (3 mm) between the screw head and<br />
the wall. If not using anchors, just drive the screws.<br />
5 Orient the <strong>Telephony</strong> <strong>Modem</strong> with the indicator lights facing up or right, as<br />
desired. Slip both mounting slots (in the back of the <strong>Telephony</strong> <strong>Modem</strong>) over<br />
the screws, then slide the case down until the narrow end of the keyhole slot<br />
contacts the screw shaft.<br />
6 Proceed to Connecting the <strong>Telephony</strong> <strong>Modem</strong>.<br />
Desktop mounting instructions<br />
1 Position the <strong>Telephony</strong> <strong>Modem</strong> so that:<br />
• air flows freely around it<br />
• the back faces the nearest wall<br />
• it will not fall to the floor if bumped or moved<br />
2 The <strong>TM401</strong> has an oval foot on the side to provide stability in the event that<br />
the <strong>Telephony</strong> <strong>Modem</strong> is positioned vertically on a surface. If you want to<br />
stand the <strong>Telephony</strong> <strong>Modem</strong> up on its side, pull the oval foot out slightly,<br />
twist the foot (as shown in the image to the left), and place the <strong>Telephony</strong><br />
<strong>Modem</strong> in the desired location.<br />
3 Proceed to Connecting the <strong>Telephony</strong> <strong>Modem</strong>.<br />
Touchstone <strong>TM401</strong> <strong>Telephony</strong> <strong>Modem</strong> User’s <strong>Guide</strong> 16
Safety Getting Started Installation Ethernet Configuration Usage Troubleshooting Glossary<br />
Rear Panel<br />
Connecting the <strong>Telephony</strong> <strong>Modem</strong><br />
<strong>TM401</strong><br />
D<br />
WARNING: Connecting the <strong>Telephony</strong> <strong>Modem</strong> to the home's existing wiring<br />
should only be performed by a qualified telephone technician. Physical connections<br />
to the previous telephone provider must be removed and the wiring must<br />
be checked for unexpected voltages. Discontinuation of service alone is not adequate.<br />
Failure to do so may result in loss of service and/or permanent damage<br />
to the EMTA.<br />
1 Connect one end of the coaxial cable to the cable outlet or splitter, and the<br />
other end to the <strong>Telephony</strong> <strong>Modem</strong>’s Cable connector (E). Tighten the connections<br />
by hand.<br />
2 Insert the plug from the AC adapter or the power cord into the Power connector<br />
on the <strong>Telephony</strong> <strong>Modem</strong> (A).<br />
3 Insert the power cord into a convenient AC outlet.<br />
The Power light on the front of the <strong>Telephony</strong> <strong>Modem</strong> should light up, then<br />
start flashing. See Troubleshooting if the Power light does not turn on.<br />
4 Connect one end of the Ethernet cable to the port on the back of the <strong>Telephony</strong><br />
<strong>Modem</strong> labeled “Ethernet 10/100,” (C) and the other end to the<br />
Ethernet port on a computer, hub, or broadband router.<br />
Note: If you are connecting to a computer, use the Ethernet cable included<br />
in the <strong>Telephony</strong> <strong>Modem</strong> package.<br />
5 Connect one end of the telephone cable to the telephone port on the back<br />
of the <strong>Telephony</strong> <strong>Modem</strong> (B). Connect the other end to the telephone.<br />
A B<br />
C<br />
E<br />
Touchstone <strong>TM401</strong> <strong>Telephony</strong> <strong>Modem</strong> User’s <strong>Guide</strong> 17
Safety Getting Started Installation Ethernet Configuration Usage Troubleshooting Glossary<br />
Configuring Your Ethernet Connection<br />
If your computer is equipped with a LAN card providing an Ethernet connection, you<br />
may have to configure your computer’s TCP/IP settings. The steps that follow will<br />
guide you through setting your computer’s TCP/IP settings to work with the <strong>Telephony</strong><br />
<strong>Modem</strong>.<br />
Requirements<br />
Make sure you have the following before attempting to configure your ethernet connection:<br />
• PC with:<br />
— one of: Windows 98SE, Windows 2000, Windows ME, or Windows XP<br />
(Windows 95 and Windows NT are not supported)<br />
• Ethernet cable of appropriate length<br />
• IP address, subnet, gateway, and DNS information for installations not using<br />
DHCP<br />
How to use this chapter<br />
The following table lists the procedures for modifying the TCP/IP settings on the<br />
computer. The procedure is slightly different depending on the operating system<br />
that you are using. Please ensure you are using the correct steps for the operating<br />
system on your computer. Follow the links below for instructions to configure your<br />
ethernet connection on your operating system.<br />
• TCP/IP Configuration for Windows 98SE<br />
• TCP/IP Configuration for Windows 2000<br />
• TCP/IP Configuration for Windows ME<br />
• TCP/IP Configuration for Windows XP<br />
Touchstone <strong>TM401</strong> <strong>Telephony</strong> <strong>Modem</strong> User’s <strong>Guide</strong> 18
Safety Getting Started Installation Ethernet Configuration Usage Troubleshooting Glossary<br />
TCP/IP Configuration for Windows 98SE<br />
Follow these steps to configure the TCP/IP settings on a Windows 98SE operating<br />
system.<br />
Note:<br />
Dialog boxes shown on your computer may differ slightly from those<br />
shown in this procedure.<br />
1 From the computer, select Start > Settings > Control Panel.<br />
2 Double click on the Network icon in the Control Panel.<br />
3 Click the Configuration tab in the Network window to display the list of<br />
Network Adapters.<br />
Touchstone <strong>TM401</strong> <strong>Telephony</strong> <strong>Modem</strong> User’s <strong>Guide</strong> 19
Safety Getting Started Installation Ethernet Configuration Usage Troubleshooting Glossary<br />
4 Highlight TCP/IP by clicking on it one time, then click on Properties.<br />
5 Click the IP Address tab, click Obtain an IP address automatically, then<br />
click OK.<br />
Touchstone <strong>TM401</strong> <strong>Telephony</strong> <strong>Modem</strong> User’s <strong>Guide</strong> 20
Safety Getting Started Installation Ethernet Configuration Usage Troubleshooting Glossary<br />
6 Click OK to accept the new settings, and OK again to close the Configuration<br />
window.<br />
7 You may have to restart your computer in order for your computer to obtain<br />
a new IP address from the network.<br />
—end—<br />
Touchstone <strong>TM401</strong> <strong>Telephony</strong> <strong>Modem</strong> User’s <strong>Guide</strong> 21
Safety Getting Started Installation Ethernet Configuration Usage Troubleshooting Glossary<br />
TCP/IP Configuration for Windows 2000<br />
Follow these steps to configure the TCP/IP settings on a Windows 2000 operating<br />
system.<br />
Note:<br />
Dialog boxes shown on your computer may differ slightly from those<br />
shown in this procedure.<br />
8 From the computer, select Start > Settings > Network and Dial-up Connections<br />
> Local Area Connection.<br />
9 In the Local Area Connections Properties window, highlight TCP/IP by clicking<br />
on it one time, then click on Properties.<br />
Note: If your computer has more than one Ethernet card, you may have to<br />
select the appropriate Ethernet card in the Connect using: area of the Local<br />
Area Connection Properties window.<br />
Touchstone <strong>TM401</strong> <strong>Telephony</strong> <strong>Modem</strong> User’s <strong>Guide</strong> 22
Safety Getting Started Installation Ethernet Configuration Usage Troubleshooting Glossary<br />
10 Click Obtain an IP address automatically and Obtain DNS server address<br />
automatically, then click OK.<br />
11 Click OK to accept the new settings, and OK again to close the Configuration<br />
window.<br />
12 You may have to restart your computer in order for your computer to obtain<br />
a new IP address from the network.<br />
—end—<br />
Touchstone <strong>TM401</strong> <strong>Telephony</strong> <strong>Modem</strong> User’s <strong>Guide</strong> 23
Safety Getting Started Installation Ethernet Configuration Usage Troubleshooting Glossary<br />
TCP/IP Configuration for Windows ME<br />
Follow these steps to configure the TCP/IP settings on a Windows ME operating systetem.<br />
Note:<br />
Dialog boxes shown on your computer may differ slightly from those<br />
shown in this procedure.<br />
13 From the computer, select Start > Settings > Control Panel.<br />
14 Double click on the Network icon in the Control Panel.<br />
15 Click the Configuration tab in the Network window to display the list of<br />
Network Adapters.<br />
Touchstone <strong>TM401</strong> <strong>Telephony</strong> <strong>Modem</strong> User’s <strong>Guide</strong> 24
Safety Getting Started Installation Ethernet Configuration Usage Troubleshooting Glossary<br />
16 Highlight TCP/IP by clicking on it one time, then click on Properties.<br />
17 Click the IP Address tab, then click OK.<br />
18 Click OK to accept the new settings, and OK again to close the Configuration<br />
window.<br />
Touchstone <strong>TM401</strong> <strong>Telephony</strong> <strong>Modem</strong> User’s <strong>Guide</strong> 25
Safety Getting Started Installation Ethernet Configuration Usage Troubleshooting Glossary<br />
19 You may have to restart your computer in order for your computer to obtain<br />
a new IP address from the network.<br />
—end—<br />
Touchstone <strong>TM401</strong> <strong>Telephony</strong> <strong>Modem</strong> User’s <strong>Guide</strong> 26
Safety Getting Started Installation Ethernet Configuration Usage Troubleshooting Glossary<br />
TCP/IP Configuration for Windows XP<br />
Follow these steps to configure the TCP/IP settings on a Windows XP operating systetem.<br />
Note:<br />
Dialog boxes shown on your computer may differ slightly from those<br />
shown in this procedure.<br />
20 From the computer, select Start > Settings > Control Panel and double<br />
click on the Network Connections icon in the Control Panel.<br />
21 Click the Configuration tab in the Network window to display the list of<br />
Network Adapters.<br />
Touchstone <strong>TM401</strong> <strong>Telephony</strong> <strong>Modem</strong> User’s <strong>Guide</strong> 27
Safety Getting Started Installation Ethernet Configuration Usage Troubleshooting Glossary<br />
22 Highlight TCP/IP by clicking on it one time, then click on Properties.<br />
23 Click the IP Address tab, click Obtain an IP address automatically, then<br />
click OK.<br />
Touchstone <strong>TM401</strong> <strong>Telephony</strong> <strong>Modem</strong> User’s <strong>Guide</strong> 28
Safety Getting Started Installation Ethernet Configuration Usage Troubleshooting Glossary<br />
24 Click OK to accept the new settings, and OK again to close the Configuration<br />
window.<br />
25 You may have to restart your computer in order for your computer to obtain<br />
a new IP address from the network.<br />
—end—<br />
Touchstone <strong>TM401</strong> <strong>Telephony</strong> <strong>Modem</strong> User’s <strong>Guide</strong> 29
Safety Getting Started Installation Ethernet Configuration Usage Troubleshooting Glossary<br />
Using the <strong>Telephony</strong> <strong>Modem</strong><br />
This chapter describes the controls and features available on the Touchstone <strong>Telephony</strong><br />
<strong>Modem</strong>, and covers basic troubleshooting procedures.<br />
• Setting up Your Computer to Use the <strong>Telephony</strong> <strong>Modem</strong><br />
• Indicator Lights for the <strong>TM401</strong><br />
• Using the Reset Button<br />
• Using the Standby Button<br />
Setting up Your Computer to Use the <strong>Telephony</strong> <strong>Modem</strong><br />
Follow the instructions in the information packet supplied by your cable company.<br />
Contact your cable company if you need help setting up your computer.<br />
Touchstone <strong>TM401</strong> <strong>Telephony</strong> <strong>Modem</strong> User’s <strong>Guide</strong> 30
Safety Getting Started Installation Ethernet Configuration Usage Troubleshooting Glossary<br />
Indicator Lights for the <strong>TM401</strong><br />
The Touchstone <strong>Telephony</strong> <strong>Modem</strong> has six LEDs to assist in troubleshooting.<br />
Patterns: Normal Operation<br />
The following table shows light patterns during normal operation.<br />
Table 1:<br />
Mode Power DS US Online Link Telephone<br />
A/C<br />
Power<br />
On<br />
On =<br />
Online<br />
Flash =<br />
Off-line<br />
On =<br />
Online<br />
Flash =<br />
Off-line<br />
On =<br />
network<br />
available<br />
Off =<br />
network<br />
not<br />
available<br />
On =<br />
Computer<br />
Connected<br />
Off =<br />
Computer<br />
disconnected<br />
Flash =<br />
Computer<br />
Activity<br />
On =<br />
On-hook<br />
Flash = Offhook<br />
Off = disabled<br />
AC<br />
Power<br />
Fail<br />
Flash Off Off Off Off<br />
On =<br />
On-hook<br />
Flash = Offhook<br />
Off = disabled<br />
See Using the Standby Button for more information about the standby mode.<br />
Touchstone <strong>TM401</strong> <strong>Telephony</strong> <strong>Modem</strong> User’s <strong>Guide</strong> 31
Safety Getting Started Installation Ethernet Configuration Usage Troubleshooting Glossary<br />
LED Indicators: Startup Sequence<br />
The following table shows the <strong>Telephony</strong> <strong>Modem</strong> light patterns during each phase<br />
of the startup sequence. There are two phases of startup; the <strong>Telephony</strong> phase and<br />
the cable modem phase. Both are outlined below.<br />
Power, DS, US,<br />
Online<br />
Link<br />
Telephone<br />
Description<br />
Off Off Off No power to Cable <strong>Modem</strong><br />
Flash Flash Flash Power-on Self Test*<br />
See “Cable <strong>Modem</strong> Start Up Sequence” Below<br />
On On Flash Retrieving telephone network<br />
information<br />
On On Off Retrieving telephone line information<br />
ON On Flash Activating telephone service<br />
* = If this pattern of all LEDs flashing persists, the <strong>Telephony</strong> <strong>Modem</strong> has detected foreign voltage on<br />
the telephone line. Disconnect the telephone connection and call a qualified telephone installer to<br />
troubleshoot.<br />
Cable <strong>Modem</strong> Start Up Sequence<br />
Power DS US Online Description<br />
On Flash Off Off Downstream search<br />
On On Flash Off Downstream found, upstream search<br />
On On On flash Downstream and Upstream found,<br />
retrieving setup information from cable<br />
operator<br />
CM Normal Operation<br />
Touchstone <strong>TM401</strong> <strong>Telephony</strong> <strong>Modem</strong> User’s <strong>Guide</strong> 32
Safety Getting Started Installation Ethernet Configuration Usage Troubleshooting Glossary<br />
<strong>TM401</strong><br />
Using the Reset Button<br />
Use the Reset button, on the back of the <strong>Telephony</strong> <strong>Modem</strong>, to reset the modem<br />
as if you power cycled the unit. You may need to reset the <strong>Telephony</strong> <strong>Modem</strong> if you<br />
are having problems connecting to the Internet. Using this button will be rare.<br />
Use a pointed non-metallic object to press this button. The photo to the left shows<br />
the location of the Reset button.<br />
The Reset button is recessed to prevent accidental resets.<br />
Reset Button<br />
Touchstone <strong>TM401</strong> <strong>Telephony</strong> <strong>Modem</strong> User’s <strong>Guide</strong> 33
Safety Getting Started Installation Ethernet Configuration Usage Troubleshooting Glossary<br />
<strong>TM401</strong><br />
Using the Standby Button<br />
The <strong>Telephony</strong> <strong>Modem</strong> has a Standby button on top of the unit. Press the Standby<br />
button to switch between:<br />
• Inactive (normal) mode: the Ethernet interface is connected to the Internet.<br />
The Online light stays on to indicate normal mode.<br />
• Active (standby) mode: the Ethernet interface is disconnected from the<br />
Internet. Computers connected to the Ethernet interface can still communicate<br />
with each other, but not with the Internet. The Online light blinks to<br />
indicate active mode.<br />
The <strong>Telephony</strong> <strong>Modem</strong> remembers the standby setting when you reset the <strong>Telephony</strong><br />
<strong>Modem</strong> or turn it off. The Standby button does not affect telephony service; telephony<br />
service will work regardless of the status of the internet connection.<br />
The Standby button has no effect while the Power light is blinking.<br />
Standby button<br />
Touchstone <strong>TM401</strong> <strong>Telephony</strong> <strong>Modem</strong> User’s <strong>Guide</strong> 34
Safety Getting Started Installation Ethernet Configuration Usage Troubleshooting Glossary<br />
Troubleshooting<br />
Problems and Solutions<br />
The <strong>Telephony</strong> modem is plugged in, but the Power light is off.<br />
Check all power connections. Is the AC adapter plugged in firmly at both<br />
ends?<br />
If you plugged the AC adapter into a power strip, make sure the strip is<br />
switched on.<br />
Avoid using an outlet controlled by a wall switch, if possible.<br />
Finally, check the fuse or circuit breaker panel.<br />
I’m not getting on the Internet.<br />
It may take up to 30 minutes to establish a connection the first time you<br />
power up your <strong>Telephony</strong> <strong>Modem</strong>, especially when many people are online.<br />
Always leave your <strong>Telephony</strong> <strong>Modem</strong> plugged in and connected; use the<br />
Standby button to disconnect your PC from the Internet.<br />
Check the front panel lights:<br />
• The Power and Online lights should be on.<br />
• If the Online light is blinking, press the Standby button.<br />
• The Link light should be either on or blinking.<br />
• If the Power light blinks for more than 30 minutes, call your cable<br />
company for assistance.<br />
Check your cable connections. Connectors should be finger-tight. The coax<br />
cable should not be pinched, kinked, or bent sharply—any of these can<br />
cause a break or short in the cable (you may have to replace the cable). If<br />
you have one or more splitters between the <strong>Telephony</strong> <strong>Modem</strong> and CATV<br />
outlet, remove the splitters and connect the <strong>Telephony</strong> <strong>Modem</strong> directly to<br />
the outlet.<br />
Proceed to the Ethernet solutions (next page) if necessary.<br />
Touchstone <strong>TM401</strong> <strong>Telephony</strong> <strong>Modem</strong> User’s <strong>Guide</strong> 33
Safety Getting Started Installation Ethernet Configuration Usage Troubleshooting Glossary<br />
I was on the Internet, but now I’m can’t get on the Internet.<br />
If you are using a hub, is the hub turned on?<br />
Are you using the right type of Ethernet cable? (Straight cable for direct connection<br />
to a PC, cross-over cable for connection to a hub.)<br />
Press the Reset button on the back of the <strong>Telephony</strong> <strong>Modem</strong>.<br />
I can get on the Internet, but everything is slow.<br />
If the Web site you are visiting is very popular, that site may be having trouble<br />
servicing all the requests. If other sites download quickly, wait for a few<br />
minutes and try again. Usage during peak hours may also affect the connection<br />
speed.<br />
If your <strong>Telephony</strong> <strong>Modem</strong> is connected to a LAN (Local Area Network), either<br />
directly or through a firewall, other communications on the LAN may slow<br />
down your connection.<br />
I have two PCs connected to the <strong>Telephony</strong> <strong>Modem</strong>, but only one can get<br />
on the Internet.<br />
Check your cable company’s terms of service: they may allow only one computer<br />
to connect directly to the <strong>Telephony</strong> <strong>Modem</strong>.<br />
I don’t have dial tone when I pick up my phone, why?<br />
In order for telephone service to be functional on the <strong>Telephony</strong> <strong>Modem</strong>,<br />
telephone service must have been purchased from the service provider and<br />
configured on your <strong>Telephony</strong> <strong>Modem</strong>. The following steps should help in<br />
identifying the source of the problem.<br />
• Is the Power LED lit?<br />
• If not, check to make sure the <strong>Telephony</strong> <strong>Modem</strong> is plugged in and<br />
the outlet has power.<br />
• If the LED is lit, go to the next step.<br />
• Is the Online LED lit?<br />
• If not, check the coax connection at the <strong>Telephony</strong> <strong>Modem</strong> and the<br />
wall. Ensure they are connected and tight. If they are and you do not<br />
have dial tone, contact your service provider.<br />
• If the Online LED is lit, go to the next step.<br />
• Is the Telephone LED lit?<br />
Touchstone <strong>TM401</strong> <strong>Telephony</strong> <strong>Modem</strong> User’s <strong>Guide</strong> 34
Safety Getting Started Installation Ethernet Configuration Usage Troubleshooting Glossary<br />
• If not, phone service has not been provisioned on that line. Contact<br />
your service provider.<br />
• If it is blinking, there is a phone off hook somewhere in the house.<br />
Find that phone and hang it up.<br />
• If it is lit, go to the next step<br />
• Is the Phone plugged directly into the <strong>Telephony</strong> <strong>Modem</strong>?<br />
• Make sure the phone is plugged into the port on the back of the <strong>Telephony</strong><br />
<strong>Modem</strong> labeled “Tel”.<br />
• If so, try a different phone. Make sure the new phone is a working<br />
phone.<br />
• If a known good phone is used and you still don’t have dial tone, try<br />
a different phone cable. If a new phone and cable do not restore dial<br />
tone, call your service provider.<br />
• Is the <strong>Telephony</strong> <strong>Modem</strong> plugged into a wall outlet?<br />
• If so, unplug the RJ-11 connector at the back of the <strong>Telephony</strong> Port<br />
and plug in a known working phone. If you now have dial tone, the<br />
problem is with the house wiring. Contact your MSO or a qualified<br />
wiring technician to correct the house wiring. If you still do not have<br />
dial tone, contact your service provider.<br />
Touchstone <strong>TM401</strong> <strong>Telephony</strong> <strong>Modem</strong> User’s <strong>Guide</strong> 35
Safety Getting Started Installation Ethernet Configuration Usage Troubleshooting Glossary<br />
Glossary<br />
The following is a list of common cable and networking terms.<br />
Terms and Abbreviations<br />
Category 5 (Cat5)<br />
A high-quality type of cable, used for Fast Ethernet (100BaseT) connections.<br />
When purchasing Ethernet cables, always look for Category 5 cable.<br />
Coaxial cable (coax)<br />
A thin wire, used to connect your television and <strong>Telephony</strong> <strong>Modem</strong> to the<br />
cable TV system. You can buy coax from any electronics retailer and many<br />
discount stores.<br />
CPE<br />
Customer Premise Equipment. This is the equipment that is plugged in to<br />
the telephony modem; typically a computer, hub, or router.<br />
Cross-over<br />
An Ethernet cable used to connect two hubs (or a hub and a cable modem)<br />
together. Also, some Ethernet hubs may have built-in cross-over on one or<br />
more ports (which eliminates the need for a cross-over cable).<br />
DHCP<br />
Dynamic Host Configuration Protocol. An IP protocol used to provide an IP<br />
address and location of services (such as DNS and TFTP) needed by a<br />
device connecting to the network. DHCP allows the cable company to configure<br />
your computer’s networking software for you.<br />
DNS<br />
Domain Name Service (Server). An IP service that associates a domain<br />
name (such as www.example.com) with an IP address.<br />
Downstream<br />
In an HFC network, the direction from the head-end to the subscriber.<br />
Some older cable documentation may refer to this as the forward path.<br />
Touchstone <strong>TM401</strong> <strong>Telephony</strong> <strong>Modem</strong> User’s <strong>Guide</strong> 35
Safety Getting Started Installation Ethernet Configuration Usage Troubleshooting Glossary<br />
DOCSIS<br />
Data Over Cable System Interface Specification. The interoperability standards<br />
used for data communications equipment on an HFC network.<br />
EMTA<br />
Embedded Multimedia Terminal Adapter. An MTA device that is integrated<br />
with a cable modem.<br />
Ethernet<br />
A standard method of connecting two or more computers into a Local Area<br />
Network (LAN).<br />
EuroDOCSIS<br />
The European version of DOCSIS.<br />
Event<br />
An informational message used for monitoring network status.<br />
F-connector<br />
The type of connector used on coaxial cable. There are two common types<br />
of F-connector, slip-on and screw-on. Use coax with screw-on connectors<br />
for connecting your <strong>Telephony</strong> <strong>Modem</strong>.<br />
Gateway<br />
The device, usually a router, that connects devices on a given IP subnet to<br />
other IP subnets.<br />
Headend<br />
The “central office” in an HFC network. The headend houses both video and<br />
data equipment. In larger cable networks, a “master” headend often feeds<br />
several “remote” headends to provide distributed services.<br />
HTTP<br />
Hub<br />
HyperText Transfer Protocol.<br />
A box with several Ethernet connectors. Ethernet hubs provide a common<br />
point of contact for all connected devices.<br />
Touchstone <strong>TM401</strong> <strong>Telephony</strong> <strong>Modem</strong> User’s <strong>Guide</strong> 36
Safety Getting Started Installation Ethernet Configuration Usage Troubleshooting Glossary<br />
IP address<br />
A number assigned to your computer by your cable company, used to identify<br />
your computer to other systems on the Internet.<br />
ISDN<br />
LAN<br />
LED<br />
Integrated Services Digital Network. A digital telephony standard that provides<br />
communication speeds about twice as fast as standard dialup.<br />
Local Area Network. A network that allows computers in a single location<br />
(such as a building) to communicate with one another.<br />
Light Emitting Diode. A semi-conductor diode that emits light when current<br />
is passed through it.<br />
MAC address<br />
A number that uniquely identifies any device connected to a network. Your<br />
cable company uses your <strong>Telephony</strong> <strong>Modem</strong>’s MAC address to authorize<br />
access to the Internet. The MAC address is printed on a label on the bottom<br />
of your <strong>Telephony</strong> <strong>Modem</strong>.<br />
Protocol<br />
A set of rules and formats that determines the communication behavior of<br />
network entities at a given layer.<br />
Proxy<br />
A device or program that stands in between a server (for example, a web<br />
site) and a client (your browser), providing a way to relieve some of the<br />
burden from the server. For example, your cable company may have a web<br />
proxy that keeps copies of popular web pages; the proxy can send you<br />
those pages instead of fetching them directly from the web site, resulting<br />
in faster page loading and less network congestion.<br />
RF<br />
Abbreviation for Radio Frequency. Some literature refers to coax as “RF<br />
cable” and the connectors as “RF connectors.”<br />
Touchstone <strong>TM401</strong> <strong>Telephony</strong> <strong>Modem</strong> User’s <strong>Guide</strong> 37
Safety Getting Started Installation Ethernet Configuration Usage Troubleshooting Glossary<br />
RJ-11<br />
RJ-45<br />
A standard 4-pin modular connector, commonly used in North America for<br />
connecting telephones.<br />
A standard 6-pin modular connector, commonly used on Ethernet cable. An<br />
RJ-45 connector looks like a wide RJ-11 (telephone) connector.<br />
Splitter<br />
A small box with three cable connectors: one input and two outputs. You<br />
may need a splitter if you have a TV already connected to the cable outlet<br />
that you want to use for your <strong>Telephony</strong> <strong>Modem</strong>. You can buy a splitter<br />
from any electronics retailer and most discount stores.<br />
Standby mode<br />
A <strong>Telephony</strong> <strong>Modem</strong> operating mode that disconnects the Ethernet interface<br />
from the Internet. The <strong>Telephony</strong> <strong>Modem</strong>’s Online light blinks while<br />
the modem is in Standby mode.<br />
Switched outlet<br />
A power outlet that may be turned on and off using a wall switch. Usually<br />
intended for lamps. Avoid plugging your computer or <strong>Telephony</strong> <strong>Modem</strong><br />
into a switched outlet to avoid disruptions.<br />
TCP/IP<br />
Transmission Control Protocol/Internet Protocol. The protocols used to<br />
facilitate communications across one or more connected networks.<br />
TDMA<br />
Time Division Multiple Access. A method used by DOCSIS-compliant cable<br />
modems for sending upstream data with minimal interference.<br />
Upstream<br />
The path from a subscriber device to the headend. Some older cable documentation<br />
may refer to this as the return path or reverse path.<br />
WHQL<br />
Windows Hardware Qualification Labs. A division of Microsoft that certifies<br />
hardware as being compatible with Windows operating systems.<br />
Touchstone <strong>TM401</strong> <strong>Telephony</strong> <strong>Modem</strong> User’s <strong>Guide</strong> 38
Touchstone <strong>TM401</strong> <strong>Telephony</strong> <strong>Modem</strong> User’s <strong>Guide</strong> 40
Touchstone<br />
<strong>TM401</strong> <strong>Telephony</strong> <strong>Modem</strong> User’s <strong>Guide</strong><br />
© 2005 ARRIS<br />
All rights reserved<br />
All information contained in this document is subject to change<br />
without notice. ARRIS reserves the right to make changes to<br />
equipment design or program components, as progress in<br />
engineering, manufacturing methods, or other circumstances<br />
may warrant.<br />
ARRIS, ARRIS Interactive, and Touchstone <strong>Telephony</strong> are<br />
trademarks of ARRIS Licensing Company. Cornerstone is a<br />
registered trademark of ARRIS Licensing Company. All other<br />
trademarks and registered trademarks are the property of their<br />
respective holders.<br />
ARSVD00955<br />
Release 4 Standard 1.0<br />
May 2005<br />
Touchstone <strong>TM401</strong> <strong>Telephony</strong> <strong>Modem</strong> User’s <strong>Guide</strong> 41