Orion AstroView 90 EQ Instructions - Oceanside Photo and Telescope
Orion AstroView 90 EQ Instructions - Oceanside Photo and Telescope
Orion AstroView 90 EQ Instructions - Oceanside Photo and Telescope

You also want an ePaper? Increase the reach of your titles
YUMPU automatically turns print PDFs into web optimized ePapers that Google loves.
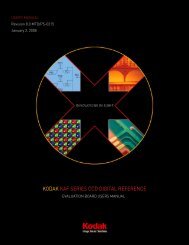
Depending on the altitude of the object you want to observe,<br />
the counterweight shaft will be oriented somewhere between<br />
vertical <strong>and</strong> horizontal.<br />
Figure 6 illustrates how the telescope will look pointed at the<br />
four cardinal directions—north, south, east, <strong>and</strong> west.<br />
The key things to remember when pointing the telescope<br />
are, first that you only move it in R.A. <strong>and</strong> Dec., not in azimuth<br />
or latitude (altitude), <strong>and</strong> second, the counterweight<br />
<strong>and</strong> shaft will not always appear as it does in Figure 1. In<br />
fact, it almost never will!<br />
6. Using Your <strong>Telescope</strong>—<br />
Astronomical Observing<br />
Choosing an Observing Site<br />
When selecting a location for observing, get as far away as<br />
possible from direct artificial light such as streetlights, porch<br />
lights, <strong>and</strong> automobile headlights. The glare from these lights<br />
will greatly impair your dark-adapted night vision. Set up on<br />
a grass or dirt surface, not asphalt, because asphalt radiates<br />
more heat. Heat disturbs the surrounding air <strong>and</strong> degrades<br />
the images seen through the telescope. Avoid viewing over<br />
rooftops <strong>and</strong> chimneys, as they often have warm air currents<br />
rising from them. Similarly, avoid observing from indoors<br />
through an open (or closed) window, because the temperature<br />
difference between the indoor <strong>and</strong> outdoor air will cause<br />
image blurring <strong>and</strong> distortion.<br />
If at all possible, escape the light-polluted city sky <strong>and</strong> head<br />
for darker country skies. You’ll be amazed at how many more<br />
stars <strong>and</strong> deep-sky objects are visible in a dark sky!<br />
Cooling the <strong>Telescope</strong><br />
All optical instruments need time to reach “thermal equilibrium.”<br />
The bigger the instrument <strong>and</strong> the larger the temperature<br />
change, the more time is needed. Allow at least a halfhour<br />
for your telescope to cool to the temperature outdoors.<br />
In very cold climates (below freezing), it is essential to store<br />
the telescope as cold as possible. If it has to adjust to more<br />
than a 40° temperature change, allow at least one hour.<br />
Let Your Eyes Dark-Adapt<br />
Don’t expect to go from a lighted house into the darkness<br />
of the outdoors at night <strong>and</strong> immediately see faint nebulas,<br />
galaxies, <strong>and</strong> star clusters—or even very many stars, for<br />
that matter. Your eyes take about 30 minutes to reach perhaps<br />
80% of their full dark-adapted sensitivity. As your eyes<br />
become dark-adapted, more stars will glimmer into view <strong>and</strong><br />
you’ll be able to see fainter details in objects you view in your<br />
telescope.<br />
To see what you’re doing in the darkness, use a red-filtered<br />
flashlight rather than a white light. Red light does not spoil<br />
your eyes’ dark adaptation like white light does. A flashlight<br />
with a red LED light is ideal, or you can cover the front of a<br />
regular inc<strong>and</strong>escent flashlight with red cellophane or paper.<br />
Beware, too, that nearby porch lights, streetlights, <strong>and</strong> car<br />
headlights will ruin your night vision.<br />
Aiming the <strong>Telescope</strong><br />
To view an object in the main telescope, first loosen both the<br />
R.A. <strong>and</strong> Dec. lock knobs. Aim the telescope at the object<br />
you wish to observe by “eyeballing” along the length of the<br />
telescope tube (or use the setting circles to “dial in” the<br />
object’s coordinates). Then look through the (aligned) finder<br />
scope <strong>and</strong> move the telescope tube until the object is generally<br />
centered on the finder’s crosshairs. Retighten the R.A.<br />
<strong>and</strong> Dec. lock knobs. Then accurately center the object on<br />
the finder’s crosshairs using the R.A. <strong>and</strong> Dec. slow-motion<br />
controls. The object should now be visible in the main telescope<br />
with a low-power (long focal length) eyepiece. If necessary,<br />
use the R.A. <strong>and</strong> Dec. slow-motion controls to reposition<br />
the object within the field of view of the main telescope’s<br />
eyepiece.<br />
Focusing the <strong>Telescope</strong><br />
Practice focusing the telescope in the daytime before using it<br />
for the first time at night. Start by turning the focus knob until<br />
the focuser drawtube is near the center of its adjustment<br />
range. Insert the star diagonal into the focuser drawtube <strong>and</strong><br />
an eyepiece into the star diagonal (secure with the thumbscrews).<br />
Point the telescope at a distant subject <strong>and</strong> center it<br />
in the field of view. Now, slowly rotate the focus knob until the<br />
object comes into sharp focus. Go a little bit beyond sharp<br />
focus until the image just starts to blur again, then reverse<br />
the rotation of the knob, just to make sure you hit the exact<br />
focus point. The telescope can only focus on objects at least<br />
50 to 100 feet away.<br />
Do You Wear Eyeglasses?<br />
If you wear eyeglasses, you may be able to keep them on<br />
while you observe, if your eyepieces have enough “eye relief”<br />
to allow you to see the whole field of view. You can try this<br />
by looking through the eyepiece first with your glasses on<br />
<strong>and</strong> then with them off, <strong>and</strong> see if the glasses restrict the<br />
view to only a portion of the full field. If they do, you can easily<br />
observe with your glasses off by just refocusing the telescope<br />
the needed amount.<br />
Calculating the Magnification<br />
It is desirable to have a range of eyepieces of different focal<br />
lengths, to allow viewing over a range of magnifications. To<br />
calculate the magnification, or power, of a telescope, simply<br />
divide the focal length of the telescope by the focal length of<br />
the eyepiece (the number printed on the eyepiece):<br />
<strong>Telescope</strong> F.L. ÷ Eyepiece F.L. = Magnification<br />
For example, the <strong>AstroView</strong> <strong>90</strong> <strong>EQ</strong>, which has a focal length<br />
of 910mm, used in combination with the suppled 25mm<br />
Sirius Plössl eyepiece, yields a magnification of:<br />
910 ÷ 25 = 36x<br />
Every telescope has a useful magnification limit of about 2x<br />
per millimenter of aperture. This comes to about 180x for the<br />
<strong>AstroView</strong> <strong>90</strong>. Claims of higher power by some telescope<br />
10