Orion AstroView 90 EQ Instructions - Oceanside Photo and Telescope
Orion AstroView 90 EQ Instructions - Oceanside Photo and Telescope
Orion AstroView 90 EQ Instructions - Oceanside Photo and Telescope

Create successful ePaper yourself
Turn your PDF publications into a flip-book with our unique Google optimized e-Paper software.
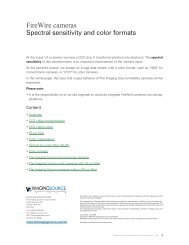
Alignment thumbscrews<br />
Focus<br />
lock-ring<br />
Tensioner<br />
Figure 2a. The 6x30 finder scope <strong>and</strong> bracket<br />
apart enough to connect each end of the accessory tray<br />
bracket to the attachment point on each leg. Use the<br />
screw that comes installed in each attachment point to do<br />
this. First remove the screw, then line up one of the ends<br />
of the bracket with the attachment point <strong>and</strong> reinstall the<br />
screw. Make sure the accessory tray bracket is oriented<br />
so that the ribs in its plastic molding face downward.<br />
4. Now, with the accessory tray bracket attached, spread<br />
the tripod legs apart as far as they will go, until the bracket<br />
is taut. Attach the accessory tray to the accessory<br />
tray bracket with the three wingnut-head screws already<br />
installed in the tray. This is done by pushing the screws<br />
up through the holes in the accessory tray bracket, <strong>and</strong><br />
then threading them into the holes in the accessory tray.<br />
5. Next, tighten the screws at the tops of the tripod legs, so<br />
the legs are securely fastened to the equatorial mount.<br />
Use the larger wrench <strong>and</strong> your fingers to do this.<br />
6. Orient the equatorial mount as it appears in Figure 1,<br />
at a latitude of about 40, (i.e., so the pointer next to the<br />
latitude scale—located directly above the latitude locking<br />
T-bolt—is pointing to the mark at “40.”) To do this, loosen<br />
the latitude locking T-bolt, <strong>and</strong> turn the latitude adjustment<br />
T-bolt until the pointer <strong>and</strong> the “40” line up. Then tighten<br />
the latitude locking T-bolt. The declination (Dec.) <strong>and</strong> right<br />
ascension (R.A.) axes may need repositioning (rotation)<br />
as well. Be sure to loosen the R.A. <strong>and</strong> Dec. lock knobs<br />
before doing this. Retighten the R.A. <strong>and</strong> Dec. lock knobs<br />
once the equatorial mount is properly oriented.<br />
7. Slide the counterweight onto the counterweight shaft.<br />
Make sure the counterweight lock knob is adequately<br />
loosened so the metal pin the knob pushes against<br />
(inside the counterweight) is recessed enough to allow<br />
the counterweight shaft to pass through the hole in the<br />
counterweight.<br />
8. Now, with the counterweight lock knob still loose, grip the<br />
counterweight with one h<strong>and</strong> <strong>and</strong> thread the shaft into the<br />
Figure 2b. Inserting the finder scope into the finder scope bracket<br />
equatorial mount (at the base of the declination axis) with<br />
the other h<strong>and</strong>. When it is threaded as far in as it will go,<br />
position the counterweight about halfway up the shaft <strong>and</strong><br />
tighten the counterweight lock knob.<br />
9. Attach the two tube rings to the equatorial head using the<br />
screws that come installed in the bottom of the rings. First<br />
remove the screws. then push the screws, with the washers<br />
still attached, up through the holes in the tube ring<br />
mounting plate (on the top of the equatorial mount) <strong>and</strong><br />
re-thread them into the bottom of the tube rings. Tighten<br />
the screws securely with the smaller wrench. Open the<br />
tube rings by first loosening the knurled ring clamps.<br />
10. Lay the telescope optical tube in the tube rings at about<br />
the midpoint of the tube’s length. Rotate the tube in the<br />
rings so the focus knobs are on the underside of the<br />
telescope. Close the rings over the tube <strong>and</strong> tighten the<br />
knurled ring clamps finger-tight to secure the telescope in<br />
position.<br />
11. Now attach the two slow-motion cables to the R.A. <strong>and</strong><br />
Dec. worm gear shafts of the equatorial mount by positioning<br />
the thmb screw on the end of the cable over the<br />
indented slot on the worm gear shaft. Then tighten the<br />
thumb screw.<br />
12. To place the finder scope in the finder scope bracket, first<br />
unthread the two black nylon screws until the screw ends<br />
are flush with the inside diameter of the bracket. Place<br />
the O-ring that comes on the base of the bracket over the<br />
body of the finder scope until it seats into the slot on the<br />
middle of the finder scope. Slide the eyepiece end (narrow<br />
end) of the finder scope into the end of the bracket’s<br />
cylinder opposite the adjustment screws while pulling the<br />
chrome, spring-loaded tensioner on the bracket with your<br />
fingers (Figure 2b). Push the finder scope through the<br />
bracket until the O-ring seats just inside the front opening<br />
of the bracket’s cylinder. Now, release the tensioner <strong>and</strong><br />
4