

Staple Fixation System - Stryker
Staple Fixation System - Stryker
Staple Fixation System - Stryker

Create successful ePaper yourself
Turn your PDF publications into a flip-book with our unique Google optimized e-Paper software.
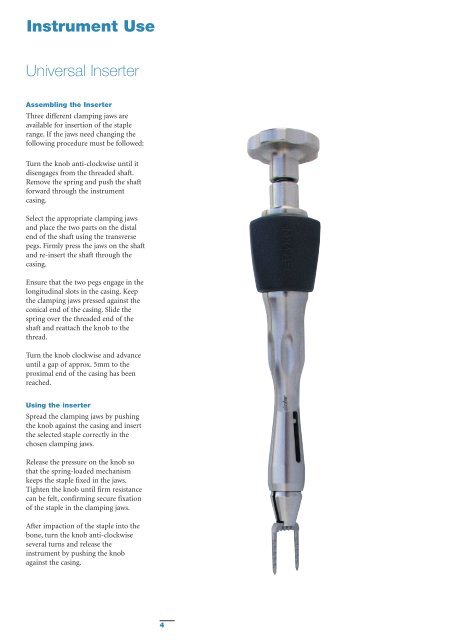
Instrument Use<br />
Universal Inserter<br />
Assembling the Inserter<br />
Three different clamping jaws are<br />
available for insertion of the staple<br />
range. If the jaws need changing the<br />
following procedure must be followed:<br />
Turn the knob anti-clockwise until it<br />
disengages from the threaded shaft.<br />
Remove the spring and push the shaft<br />
forward through the instrument<br />
casing.<br />
Select the appropriate clamping jaws<br />
and place the two parts on the distal<br />
end of the shaft using the transverse<br />
pegs. Firmly press the jaws on the shaft<br />
and re-insert the shaft through the<br />
casing.<br />
Ensure that the two pegs engage in the<br />
longitudinal slots in the casing. Keep<br />
the clamping jaws pressed against the<br />
conical end of the casing. Slide the<br />
spring over the threaded end of the<br />
shaft and reattach the knob to the<br />
thread.<br />
Turn the knob clockwise and advance<br />
until a gap of approx. 5mm to the<br />
proximal end of the casing has been<br />
reached.<br />
Using the inserter<br />
Spread the clamping jaws by pushing<br />
the knob against the casing and insert<br />
the selected staple correctly in the<br />
chosen clamping jaws.<br />
Release the pressure on the knob so<br />
that the spring-loaded mechanism<br />
keeps the staple fixed in the jaws.<br />
Tighten the knob until firm resistance<br />
can be felt, confirming secure fixation<br />
of the staple in the clamping jaws.<br />
After impaction of the staple into the<br />
bone, turn the knob anti-clockwise<br />
several turns and release the<br />
instrument by pushing the knob<br />
against the casing.<br />
4


