

HydroSet Brochure - Stryker
HydroSet Brochure - Stryker
HydroSet Brochure - Stryker

You also want an ePaper? Increase the reach of your titles
YUMPU automatically turns print PDFs into web optimized ePapers that Google loves.
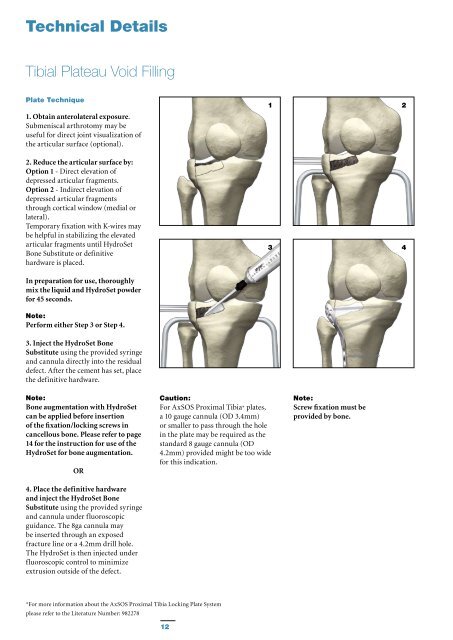
Technical Details<br />
Tibial Plateau Void Filling<br />
Plate Technique<br />
1. Obtain anterolateral exposure.<br />
Submeniscal arthrotomy may be<br />
useful for direct joint visualization of<br />
the articular surface (optional).<br />
2. Reduce the articular surface by:<br />
Option 1 - Direct elevation of<br />
depressed articular fragments.<br />
Option 2 - Indirect elevation of<br />
depressed articular fragments<br />
through cortical window (medial or<br />
lateral).<br />
Temporary fixation with K-wires may<br />
be helpful in stabilizing the elevated<br />
articular fragments until <strong>HydroSet</strong><br />
Bone Substitute or definitive<br />
hardware is placed.<br />
1 2<br />
3 4<br />
In preparation for use, thoroughly<br />
mix the liquid and <strong>HydroSet</strong> powder<br />
for 45 seconds.<br />
Note:<br />
Perform either Step 3 or Step 4.<br />
3. Inject the <strong>HydroSet</strong> Bone<br />
Substitute using the provided syringe<br />
and cannula directly into the residual<br />
defect. After the cement has set, place<br />
the definitive hardware.<br />
Note:<br />
Bone augmentation with <strong>HydroSet</strong><br />
can be applied before insertion<br />
of the fixation/locking screws in<br />
cancellous bone. Please refer to page<br />
14 for the instruction for use of the<br />
<strong>HydroSet</strong> for bone augmentation.<br />
OR<br />
4. Place the definitive hardware<br />
and inject the <strong>HydroSet</strong> Bone<br />
Substitute using the provided syringe<br />
and cannula under fluoroscopic<br />
guidance. The 8ga cannula may<br />
be inserted through an exposed<br />
fracture line or a 4.2mm drill hole.<br />
The <strong>HydroSet</strong> is then injected under<br />
fluoroscopic control to minimize<br />
extrusion outside of the defect.<br />
Caution:<br />
For AxSOS Proximal Tibia* plates,<br />
a 10 gauge cannula (OD 3.4mm)<br />
or smaller to pass through the hole<br />
in the plate may be required as the<br />
standard 8 gauge cannula (OD<br />
4.2mm) provided might be too wide<br />
for this indication.<br />
Note:<br />
Screw fixation must be<br />
provided by bone.<br />
*For more information about the AxSOS Proximal Tibia Locking Plate System<br />
please refer to the Literature Number: 982278<br />
12


