You also want an ePaper? Increase the reach of your titles
YUMPU automatically turns print PDFs into web optimized ePapers that Google loves.
<strong>pottery</strong> <strong>barn</strong> <strong>kids</strong><br />
THOMAS QUEEN BED<br />
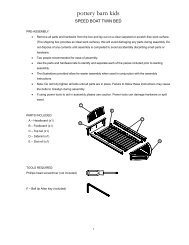
PRE-ASSEMBLY:<br />
• For safety and ease, assembly by two adults is recommended.<br />
• Remove all parts and hardware from the box and lay out on a clean, carpeted, or scratch-free work<br />
surface. Use care as some parts or hardware may have sharp points or edges.<br />
• Do not dispose of any contents until assembly is completed to avoid accidentally discarding small parts<br />
or hardware.<br />
• Use the parts and hardware lists to identify and separate each of the pieces included.<br />
• Read all instructions before beginning assembly. The illustrations provided allow for easier assembly<br />
when used in conjunction with the assembly instructions.<br />
• Note: Do not fully tighten all bolts until all parts are in place. Failure to follow these instructions may<br />
cause the bolts to misalign during assembly.<br />
• If using power tools to aid in assembly please use caution. Power tools can damage hardware or split<br />
wood.<br />
PARTS INCLUDED:<br />
A - Headboard (1 pc)<br />
B - Footboard (1 pc)<br />
C - Side rail (2 pc)<br />
D - Finials (4 pc)<br />
E – Feet (4 pc)<br />
F – Slat Roll (1 pc)<br />
G – Slat Support (1 pc)<br />
H – Support Legs (3 pc)<br />
HARDWARE INCLUDED:<br />
I – Small Phillips Head Screws (12 pc) 6x15mm<br />
J – Large Phillips Head Screws (28 pc) 8x30mm<br />
K – “L” Shape Slat Bracket (2 pc)<br />
TOOLS NEEDED:<br />
Phillips Head Screwdriver (not included)<br />
Page 1/4
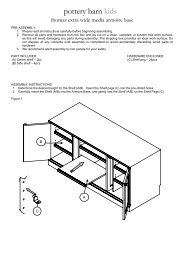
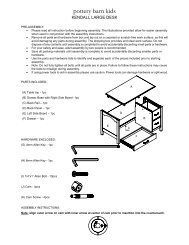
ASSEMBLY INSTRUCTIONS:<br />
1. Attach the feet (E) to the bottom posts of the headboard and footboard as shown. Important: The<br />
bottom of the footboard bedpost has 4 holes, while the top of the footboard bedpost has 3 holes.<br />
2. Attach the side rails (C) to the headboard and footboard by inserting the hooked ends into the<br />
corresponding slots.<br />
NOTE: Side rails (C) are adjustable to two heights.<br />
• If you are using a trundle, or are assembling the bed for to be used with a mattress only<br />
(no box spring), please insert side rails into upper slots.<br />
• If you are using a mattress and box spring, please insert side rails into lower slots.<br />
.<br />
3. Screw Finials (D) into the post of headboard and footboard.<br />
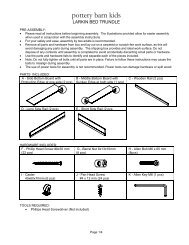
4. Prepare to assemble Slat Support Rail (G), by attaching the “L” Shape Slat Bracket (K) into the<br />
headboard and footboard using the Small Phillips Head Screws (I) as shown in Figure 1.<br />
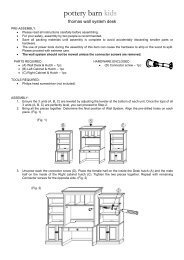
NOTE: Slat Support Rail (G) is adjustable to four possible positions:<br />
• If you are using the trundle, the Slat Support (G) must be placed either on the right (position K1)<br />
or left (position K2) of headboard / footboard to allow the trundle to slide under the bed (See<br />
Figure 1). Slat support (G) should be placed on right (K1) if the trundle will slide out to the left of<br />
the bed, or on the left (K2) if the trundle will slide out to right side of bed (See Figure 2 on Pg. 3).<br />
• If you are NOT using the trundle, Slat Support (G) must be positioned in K3 (for use with<br />
mattress only) or K4 (for use with mattress and box spring).<br />
Figure 1<br />
Page 2/4
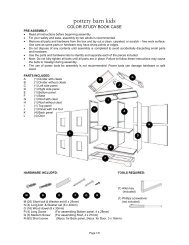
K1<br />
Figure 2<br />
Trundle slides out to LEFT side<br />
of bed, if Slat Support (G) is<br />
installed at position K1.<br />
5. Screw Support Legs (H) into the Slat Support (G) and ensure all are tight (Figure 3).<br />
6. Attach Slat Support (G) to “L” Shape Bracket (K) using the Small Phillips head screws (I) (Figure 3).<br />
Figure 3<br />
Page 3/4
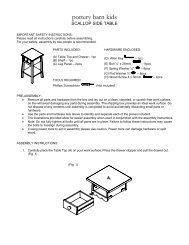
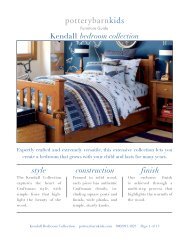
7. Lay the Slat Roll (F) in on the Side Rails (C) and fasten with Large Phillips Head Screws (J) using<br />
the Phillips head screwdriver (Figure 4).<br />
Figure 4<br />
8. Retighten all bolts and screws to secure bed structure. It is recommended all bolts and screws be<br />
checked from time to time for safety.<br />
CARE INSTRUCTIONS:<br />
• Dust often using a clean, soft, dry lint-free cloth.<br />
• Blot spills immediately, and wipe with a clean, damp, cloth.<br />
• We do not recommend the use of chemical cleansers, abrasives, or furniture polish on our lacquered<br />
finish.<br />
• If the unit’s is to be stored, store in cool dry place and carefully package all original hardware to<br />
protect from loss or damage.<br />
• Check fasteners periodically for tightness. DO NOT over tighten. This may cause distortion or<br />
breakage<br />
Thank you for your purchase<br />
stores | catalog | www.<strong>pottery</strong><strong>barn</strong><strong>kids</strong>.com<br />
USA 1.800.290.8181<br />
Page 4/4