pottery barn kids
pottery barn kids
pottery barn kids

You also want an ePaper? Increase the reach of your titles
YUMPU automatically turns print PDFs into web optimized ePapers that Google loves.
<strong>pottery</strong> <strong>barn</strong> <strong>kids</strong><br />
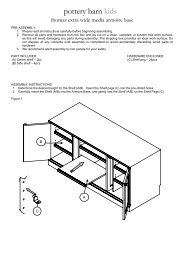
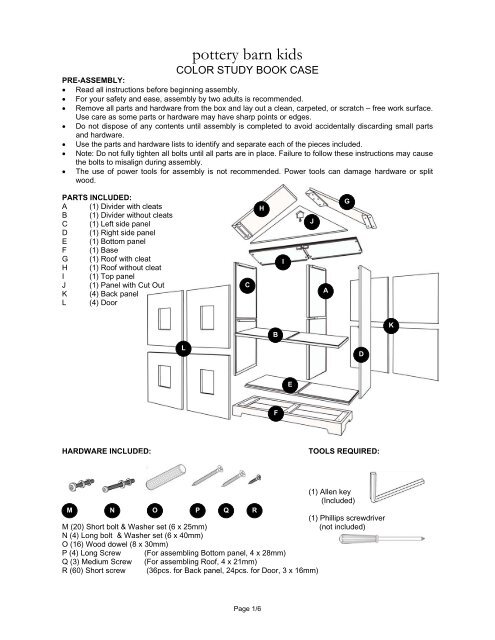
COLOR STUDY BOOK CASE<br />
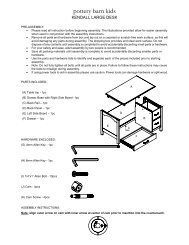
PRE-ASSEMBLY:<br />
• Read all instructions before beginning assembly.<br />
• For your safety and ease, assembly by two adults is recommended.<br />
• Remove all parts and hardware from the box and lay out a clean, carpeted, or scratch – free work surface.<br />
Use care as some parts or hardware may have sharp points or edges.<br />
• Do not dispose of any contents until assembly is completed to avoid accidentally discarding small parts<br />
and hardware.<br />
• Use the parts and hardware lists to identify and separate each of the pieces included.<br />
• Note: Do not fully tighten all bolts until all parts are in place. Failure to follow these instructions may cause<br />
the bolts to misalign during assembly.<br />
• The use of power tools for assembly is not recommended. Power tools can damage hardware or split<br />
wood.<br />
PARTS INCLUDED:<br />
A (1) Divider with cleats<br />
B (1) Divider without cleats<br />
C (1) Left side panel<br />
D (1) Right side panel<br />
E (1) Bottom panel<br />
F (1) Base<br />
G (1) Roof with cleat<br />
H (1) Roof without cleat<br />
I (1) Top panel<br />
J (1) Panel with Cut Out<br />
K (4) Back panel<br />
L (4) Door<br />
C<br />
H<br />
I<br />
J<br />
A<br />
G<br />
B<br />
K<br />
L<br />
D<br />
E<br />
F<br />
HARDWARE INCLUDED:<br />
TOOLS REQUIRED:<br />
(1) Allen key<br />
(Included)<br />
M N O P Q R<br />
(1) Phillips screwdriver<br />
M (20) Short bolt & Washer set (6 x 25mm)<br />
(not included)<br />
N (4) Long bolt & Washer set (6 x 40mm)<br />
O (16) Wood dowel (8 x 30mm)<br />
P (4) Long Screw (For assembling Bottom panel, 4 x 28mm)<br />
Q (3) Medium Screw (For assembling Roof, 4 x 21mm)<br />
R (60) Short screw (36pcs. for Back panel, 24pcs. for Door, 3 x 16mm)<br />
Page 1/6
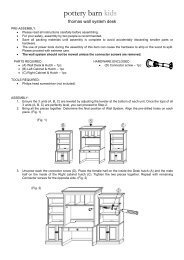
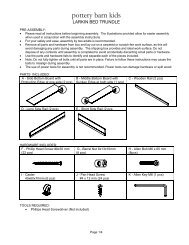
ASSEMBLY INSTRUCTIONS:<br />
1. Assemble the Roof with Cleat (G) and Roof without Cleat (H) with three (3) Medium Screws (Q) using<br />
Philips Screwdriver (not included), (See Figures 1 & 1-1).<br />
H<br />
H<br />
G<br />
G<br />
Q<br />
Figure 1 Figure 1-1<br />
2. Attach the Panel with Cut Out (J) to the assembled Roof with four (4) Short Bolt & Washer Sets (M)<br />
using the Allen Key, (See Figures 2 & 2-1).<br />
H<br />
G<br />
J<br />
G<br />
J<br />
M<br />
Figure 2<br />
Figure 2-1<br />
3. Assemble the two (2) Dividers (A) and (B). The Divider with Cleat (A) notch-out should be facing up.<br />
(See figure 3).<br />
B<br />
A<br />
Figure 3<br />
Page 2/6
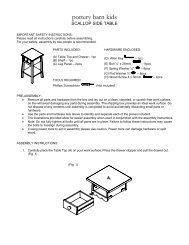
4. Attach the Bottom Panel (E) to Dividers A & B with two (2) Wood Dowels (O), (See figures 4 & 4-1).<br />
B<br />
O<br />
A<br />
A<br />
E<br />
E<br />
Figure 4 Figure 4-1<br />
5. Attach the Top Panel (I) to the already assembled Dividers A & B with two (2) Wood Dowels (O) and<br />
four (4) Short Bolt & Washer Sets (M) using Allen Key, (See figures 5 & 5-1).<br />
B<br />
I<br />
A<br />
E<br />
O<br />
Figure 5<br />
Figure 5-1<br />
A<br />
I<br />
M<br />
Page 3/6
6. Attach the Right Side Panel (D) and the Left Side Panel (C) to the already assembled body with eight<br />
(8) Wood Dowels (O), two (2) on both ends of the Bottom Panel (E), and two (2) on both ends of the<br />
Divider (B). Secure Divider (B) to the Left and Right Side Panels (C & D) with four (4) Short Bolt &<br />
Washer Sets (M) using Allen Key. Then, connect the Bottom Panel (E) to the Side Panels (C & D)<br />
with four (4) Long Screws (P) using Philips Screwdriver (not included). (See figures 6, 6-1 & 6-2).<br />
B<br />
C<br />
O<br />
M<br />
D<br />
Figure 6<br />
Figure 6-1<br />
P<br />
D<br />
E<br />
O<br />
Figure 6-2<br />
7. Attach the pre-assembled Base (F) to the Bottom Panel (E) with two (2) Wood Dowels (O). Fasten<br />
using six (6) Short Bolt & Washer Sets (M) using the Allen Key. (See figures 7, 7-1 & 7-2).<br />
F<br />
C<br />
A<br />
E<br />
E<br />
M<br />
B<br />
D<br />
F<br />
Figure 7-2<br />
E<br />
Figure 7<br />
D<br />
O<br />
F<br />
Figure 7-1<br />
Page 4/6
8. Attach the assembled Roof to the assembled Body with two (2) Wood dowels (O) (Figure 8-1). Fasten<br />
using four (4) Long Bolt & Washer sets (N) (Figure 8-2) and two (2) Short Bolt & Washer sets (M)<br />
(Figure 8-3) using the Allen Key.<br />
H<br />
G<br />
H<br />
M<br />
I<br />
C<br />
Figure 8-3<br />
G<br />
H<br />
Figure 8-2<br />
N<br />
I<br />
B<br />
G<br />
I<br />
A<br />
O<br />
D<br />
Figure 8-1<br />
9. Attach the four (4) Back panels (K) to the piece with (36) Short Screws (R) using a Phillips<br />
Screwdriver (not included). Attach the Blue panel first followed by the Red, then Orange and lastly<br />
the Green. Match the color of each Back Panel (K) with the interior color of the corresponding<br />
cubby (See figures 9 & 9-1). Stand up the item after attaching the back panels.<br />
K<br />
R<br />
D<br />
K<br />
F<br />
Page 5/6
10. Attach the four (4) Doors (L) to the Left and Ride Side Panels (C & D) with six (6) Short Screws (R) on<br />
each door using the Phillips Screwdriver (not included). Match-up the color of the door to the<br />
corresponding color of the cubby. (See figures 10 & 10-1).<br />
D<br />
L<br />
L<br />
R<br />
Figure 10-1<br />
C<br />
D<br />
Figure 10<br />
Figure 10-2<br />
CARE INSTRUCTIONS :<br />
• Dust often using a clean, soft, dry, lint-free cloth.<br />
• Blot spills immediately, and wipe with a clean, damp, cloth.<br />
• We do not recommend the use of chemical cleansers, abrasives or furniture polish.<br />
Thank you for your purchase<br />
stores / catalog / www.<strong>pottery</strong><strong>barn</strong><strong>kids</strong>.com<br />
U.S.A. 1.800.290.8181<br />
Page 6/6