Gateway Lite BT (A2DP) Install Guide - Dension
Gateway Lite BT (A2DP) Install Guide - Dension
Gateway Lite BT (A2DP) Install Guide - Dension

You also want an ePaper? Increase the reach of your titles
YUMPU automatically turns print PDFs into web optimized ePapers that Google loves.
<strong>Gateway</strong> <strong>Lite</strong> <strong>BT</strong><br />
iPod, USB and Bluetooth<br />
(<strong>A2DP</strong> & HFP)<br />
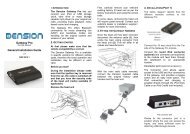
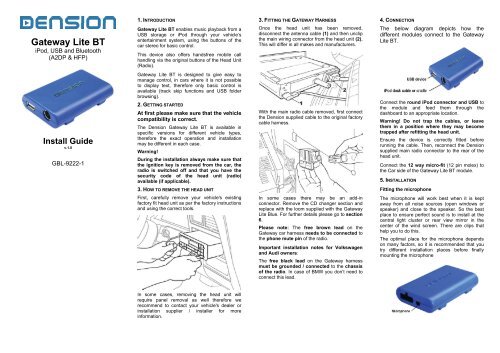
1. INTRODUCTION<br />
<strong>Gateway</strong> <strong>Lite</strong> <strong>BT</strong> enables music playback from a<br />
USB storage or iPod through your vehicle’s<br />
entertainment system, using the buttons of the<br />
car stereo for basic control.<br />
This device also offers handsfree mobile call<br />
handling via the original buttons of the Head Unit<br />
(Radio).<br />
<strong>Gateway</strong> <strong>Lite</strong> <strong>BT</strong> is designed to give easy to<br />
manage control, in cars where it is not possible<br />
to display text, therefore only basic control is<br />
available (track skip functions and USB folder<br />
browsing).<br />
2. GETTING STARTED<br />
At first please make sure that the vehicle<br />
compatibility is correct.<br />
The <strong>Dension</strong> <strong>Gateway</strong> <strong>Lite</strong> <strong>BT</strong> is available in<br />
specific versions for different vehicle types,<br />
therefore the exact operation and installation<br />
may be different in each case.<br />
Warning!<br />
During the installation always make sure that<br />
the ignition key is removed from the car, the<br />
radio is switched off and that you have the<br />
security code of the head unit (radio)<br />
available (if applicable).<br />
3. HOW TO REMOVE THE HEAD UNIT<br />
First, carefully remove your vehicle's existing<br />
factory fit head unit as per the factory instructions<br />
and using the correct tools.<br />
3. FITTING THE GATEWAY HARNESS<br />
Once the head unit has been removed,<br />
disconnect the antenna cable (1) and then unclip<br />
the main wiring connector from the head unit (2).<br />
This will differ in all makes and manufacturers.<br />
4. CONNECTION<br />
The below diagram depicts how the<br />
different modules connect to the <strong>Gateway</strong><br />
<strong>Lite</strong> <strong>BT</strong>.<br />
<strong>Install</strong> <strong>Guide</strong><br />
v.1.0<br />
GBL-9222-1<br />
With the main radio cable removed, first connect<br />
the <strong>Dension</strong> supplied cable to the original factory<br />
cable harness.<br />
Connect the round iPod connector and USB to<br />
the module and feed them through the<br />
dashboard to an appropriate location.<br />
Warning! Do not trap the cables, or leave<br />
them in a position where they may become<br />
trapped after refitting the head unit.<br />
Ensure the device is correctly fitted before<br />
running the cable. Then, reconnect the <strong>Dension</strong><br />
supplied main radio connector to the rear of the<br />
head unit.<br />
Connect the 12 way micro-fit (12 pin molex) to<br />
the Car side of the <strong>Gateway</strong> <strong>Lite</strong> <strong>BT</strong> module.<br />
5. INSTALLATION<br />
Fitting the microphone<br />
The microphone will work best when it is kept<br />
away from all noise sources (open windows or<br />
speaker) and close to the speaker. So the best<br />
place to ensure perfect sound is to install at the<br />
central light cluster or rear view mirror in the<br />
center of the wind screen. There are clips that<br />
help you to do this.<br />
The optimal place for the microphone depends<br />
on many factors, so it is recommended that you<br />
try different installation places before finally<br />
mounting the microphone<br />
In some cases there may be an add-in<br />
connector. Remove the CD changer section and<br />
replace with the loom supplied with the <strong>Gateway</strong><br />
<strong>Lite</strong> Blue. For further details please go to section<br />
6.<br />
Please note: The free brown lead on the<br />
<strong>Gateway</strong> car harness needs to be connected to<br />
the phone mute pin of the radio.<br />
Important installation notes for Volkswagen<br />
and Audi owners:<br />
The free black lead on the <strong>Gateway</strong> harness<br />
must be grounded / connected to the chassis<br />
of the radio. In case of BMW you don’t need to<br />
connect this lead.<br />
In some cases, removing the head unit will<br />
require panel removal as well therefore we<br />
recommend to contact your vehicle's dealer or<br />
installation supplier / installer for more<br />
information.
6. TEST AND REFIT<br />
Before you refit the head unit, test the <strong>Gateway</strong><br />
<strong>Lite</strong> <strong>BT</strong> with your car audio, making sure all<br />
connections are correct and that you have full<br />
functionality.<br />
Note: If during testing you notice any<br />
changes or inconsistencies in the way the<br />
car's electrical system operates, disconnect<br />
the <strong>Gateway</strong> product immediately and consult<br />
your dealer.<br />
When you have tested everything, refit your head<br />
unit. Take care not to trap any wires or the<br />
<strong>Dension</strong> product. We supply cable ties to mount<br />
the <strong>Gateway</strong> <strong>Lite</strong> <strong>BT</strong> module. Please mount the<br />
module away from heat or damp surfaces.<br />
Refit of the Head Unit is the reversal of the<br />
removal process for your specific vehicle, as per<br />
your manufacturer's instructions.<br />
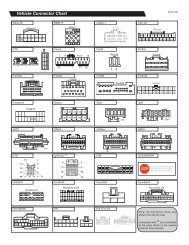
7. CAR-SPECIFIC CONNECTIONS<br />
Cars with mini ISO connector<br />
BMWs with 17-pin connector<br />
Cars with Quadlock connector (not break-in)<br />
7. DISCLAIMER<br />
All photos / illustrations are for representation<br />
purposes only and may differ visually from the<br />
equipment in your vehicle. Information correct at<br />
time of going to print E. & O. E. <strong>Dension</strong> Audio<br />
Sytems Ltd. and it’s registered partners cannot<br />
be held liable for any damages caused by the<br />
incorrect installation of any <strong>Dension</strong> product.<br />
8. FURTHER ASSISTANCE<br />
If you need further assistance in using your<br />
<strong>Dension</strong> product, please contact your local<br />
supplier or visit www.dension.com/en/support<br />
and click on ‘Support’.<br />
Please check also the download section for the<br />
latest firmware version and product<br />
documentation, as these may provide additional<br />
features or easier use of the product.<br />
If the CDC connector has a separate housing