Owner's Manual - PAC Audio
Owner's Manual - PAC Audio
Owner's Manual - PAC Audio

You also want an ePaper? Increase the reach of your titles
YUMPU automatically turns print PDFs into web optimized ePapers that Google loves.
®<br />
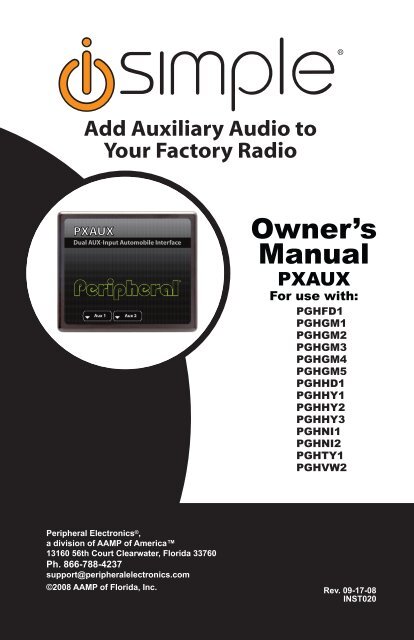
Add Auxiliary <strong>Audio</strong> to<br />
Your Factory Radio<br />
Owner’s<br />
<strong>Manual</strong><br />
PXAUX<br />
For use with:<br />
PGHFD1<br />
PGHGM1<br />
PGHGM2<br />
PGHGM3<br />
PGHGM4<br />
PGHGM5<br />
PGHHD1<br />
PGHHY1<br />
PGHHY2<br />
PGHHY3<br />
PGHNI1<br />
PGHNI2<br />
PGHTY1<br />
PGHVW2<br />
Peripheral Electronics ® ,<br />
a division of AAMP of America<br />
13160 56th Court Clearwater, Florida 33760<br />
Ph. 866-788-4237<br />
support@peripheralelectronics.com<br />
©2008 AAMP of Florida, Inc.<br />
Rev. 09-17-08<br />
INST020
Table of Contents<br />
Pages<br />
Introduction 1<br />
Ford/Lincoln/Mercury PGHFD1 1<br />
General Motors PGHGM1 1<br />
General Motors PGHGM2/PGHGM3 2<br />
General Motors PGHGM4 2<br />
General Motors PGHGM5 2<br />
Honda PGHHD1 3<br />
Hyundai PGHHY1 3<br />
Hyundai PGHHY2 3<br />
Hyundai PGHHY3 3<br />
Nissan PGHNI1/PGHNI2 3<br />
Toyota PGHTY1 3<br />
Volkswagen PGHVW2 4<br />
Troubleshooting 4<br />
Warranty Information 5
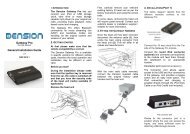
PXAUX & Optional Add-ons<br />
Factory Radio<br />
(not included)<br />
Vehicle Specific Harness<br />
(actual harness may vary)<br />
PXAUX Interface<br />
RCA Input<br />
RCA Input<br />
OR<br />
OR<br />
3.5mm Input<br />
3.5mm Input<br />
Your <strong>Audio</strong> Devices<br />
MP3 Player<br />
(not included)<br />
DVD Player<br />
(not included)
Introduction<br />
Thank you for purchasing the Peripheral Electronics® PXAUX. The PXAUX is<br />
designed to provide endless hours of listening pleasure from your factory radio.<br />
To ensure that your auxiliary audio input performs correctly with your radio, we<br />
recommend that you read this entire manual before attempting installation of<br />
the PXAUX. This interface allows connectivity for auxiliary audio input.<br />
This manual is a supplemental guide to explain the operation of the PXAUX. For<br />
other information such as Precautions and Installation, please refer to the full<br />
PXAMG owner’s manual that is included with your vehicle specific harness.<br />
Compatibility<br />
Please visit www.peripheralelectronics.com for the most up-to-date<br />
compatibility information to determine the proper vehicle specific harness<br />
for your application.<br />
Ford/Lincoln/Mercury PGHFD1 Operation<br />
Selecting AUX:<br />
Press the “AUX” or “SAT” button (SR123 icon on navigation radio) until<br />
“AUX1” is displayed on the screen. When you press the “AUX” button, you<br />
will see the corresponding “SAT” modes, a slight delay, and then the current<br />
mode will be displayed.<br />
Selecting between AUX1 / AUX2<br />
Press the “AUX” or “SAT” button (SR123 icon on navigation radio) until<br />
“AUX1” or “AUX2” is displayed on the screen.<br />
General Motors PGHGM1 Operation<br />
Non Navigation<br />
Selecting AUX<br />
Press the “BAND” button a few times until “XM” is displayed on the screen.<br />
Immediately turn the rotary knob in the top right hand corner to scroll through<br />
available sources. Once “AUX1” is displayed, press the “FWD>>” button to<br />
select it. If you are currently in “SAT” mode you will need to press the “►I<br />
SEEK” button instead of “FWD>>” to select “AUX1” mode.<br />
Selecting between AUX1 / AUX2<br />
If you are currently in “AUX1” or “AUX2” mode turn the rotary knob to cycle<br />
through the available sources. Once “AUX1” or “AUX2” is displayed on the<br />
screen press the “FWD>>” button to select it.<br />
Navigation radio operation<br />
Selecting AUX<br />
Press the “FM” button then press the “XM” button. Immediately turn the rotary<br />
tune knob in the top right hand corner to scroll through available sources.
Once “AUX1” is displayed, press the “►” button on the screen to select it. If you<br />
are currently in “SAT” mode, press the “SEEK ►I” button instead of the “►” button<br />
to select “AUX” mode.<br />
Selecting between AUX1 / AUX2<br />
If you are currently in “AUX1” or “AUX2” mode, turn the rotary knob to<br />
cycle through the available sources. Once “AUX1” or “AUX2” is displayed<br />
on the screen, press the “►” button to select it..<br />
General Motors PGHGM2/PGHGM3 Operation<br />
Selecting AUX<br />
Press the “BAND” button a few times until XM is displayed on the screen.<br />
Immediately turn the rotary knob to scroll through available sources. Once<br />
“AUX1” is displayed press PRESET 2 to select it.<br />
Selecting between AUX1 / AUX2<br />
If you are currently in “AUX1” or “AUX2” mode turn the rotary knob to cycle<br />
through the available sources. Once “AUX1” or “AUX 2” is displayed on the<br />
screen press PRESET 2 to select it.<br />
General Motors PGHGM4 Operation<br />
Selecting AUX<br />
Press the “AM/FM” button and then the “XM” button. Turn the rotary tune knob<br />
clockwise until “AUX1” is displayed. Press the “>>>>>” button to select it. (It may be<br />
necessary to press the “CAT” button in order to make the “>>>>>” button visible.)<br />
Selecting between AUX1 / AUX2<br />
Press the “AM/FM” button and then the “XM” button. Turn the rotary tune knob<br />
clockwise until “AUX2” is displayed. Press the “>>>>>” button to select it. (It may<br />
be necessary to press the “CAT” button in order to make the “>>>>>” button<br />
General Motors PGHGM5 Operation<br />
Non Navigation<br />
Selecting AUX<br />
Press the “BAND” button until “XM” is displayed on the screen. Immediately<br />
turn the rotary knob to scroll through available sources. Once “AUX1” is<br />
displayed, press PRESET 2 to select it.<br />
Selecting between AUX1 / AUX2<br />
If you are currently in “AUX1” or “AUX2” mode turn the rotary knob to cycle<br />
through available sources. Once “AUX1” or “AUX2” is displayed on the<br />
screen press PRESET 2 to select it..
Honda/Acura PGHHD1 Operation<br />
Selecting AUX<br />
Press the “FM” button and then the “XM” button. Immediately turn the rotary<br />
knob to scroll through the available sources. Once “AUX1” is displayed, press<br />
PRESET 6 to select it.<br />
Selecting between AUX1 / AUX2<br />
Press the “FM” button and then the “XM” button. Immediately turn the rotary<br />
knob to scroll through the available sources. Once “AUX1” or “AUX2” is<br />
displayed, press PRESET 6 to select it.<br />
Hyundai PGHHY1/PGHHY2 Operation<br />
Selecting AUX<br />
Press the “XM” button to cycle through the PXAUX sources until “AUX1” or<br />
“AUX2” is displayed.<br />
Selecting between AUX1 / AUX2<br />
Press the “XM” button to cycle through the PXAUX sources until “AUX1” or<br />
“AUX2” is displayed.<br />
Hyundai PGHHY3 Operation<br />
Selecting AUX<br />
Press the “XM” button to put the factory radio into XM mode. If the vehicle IS<br />
NOT equipped with XM then “AUX1” will be channel #1 and “AUX2” will be<br />
channel #2. If the vehicle is equipped with an XM tuner then the PXAUX will<br />
relocate the “AUX1” and “AUX2” sources consecutively above the highest<br />
populated XM channel number.<br />
Nissan PGHNI1/PGHNI2 Operation<br />
Selecting AUX<br />
Radios equipped with a “SAT” button<br />
Press the “FM” button and then the “SAT” button. Immediately press the<br />
“SEEK>>” button to scroll through the available sources. Once “AUX1” is<br />
displayed, press the “
Selecting between AUX1 / AUX2<br />
For radios that have a “SAT” button<br />
Press the “FM” button and then the “SAT” button. Immediately press the<br />
“SEEK >>” button to scroll through the available sources. Once “AUX2” is<br />
displayed, press the “
Warranty Information<br />
One Year Limited Warranty<br />
The quality controls used in the manufacture of this product will ensure your satisfaction.<br />
This warranty applies only to the original purchaser of this product from an authorized<br />
Peripheral Electronics dealer. This warranty covers any supplied or manufactured<br />
parts of this product that, upon inspection by Peripheral Electronics authorized personnel,<br />
is found to have failed in normal use due to defects in material or workmanship. This<br />
warranty does not apply to installation expenses. Attempting to service or modify this<br />
unit, operating this unit under conditions other than the recommended voltage will render this<br />
WARRANTY VOID.<br />
Unless otherwise prescribed by law, Peripheral Electronics shall not be liable for any personal<br />
injury, property damage and or any incidental or consequential damages of any kind<br />
(including water damage) resulting from malfunctions, defects, misuse, improper installation<br />
or alteration of this product. All parts of this Peripheral Electronics product are guaranteed<br />
for a period of 1 year as follows:<br />
Within the first 12 months from date of purchase, subject to the conditions above, Peripheral<br />
Electronics will repair or replace the product at their discretion, if it is defective in material<br />
or workmanship providing it is returned to an Authorized Peripheral Electronic’s Dealer, with<br />
PROOF OF PURCHASE from an authorized Peripheral Electronics dealer.<br />
Warning:<br />
This equipment may be reset by unintentional electrostatic discharge during operation. Exposure<br />
to direct sunlight or extreme heat may cause damage or malfunction.<br />
FCC Class B Radio Frequency<br />
Interference Statement<br />
This equipment has been tested and found to comply with the limits for a Class B digital<br />
device, pursuant to Part 15 of FCC rules. These limits are designed to provide reasonable<br />
protection against harmful interference in a residential installation. This equipment generates,<br />
uses, and can radiate radio frequency energy and, if not installed and used in accordance<br />
with the instructions, may cause harmful interference to radio communications.<br />
However, there is no guarantee that interference will not occur in a particular installation. If<br />
this equipment does cause harmful interference to radio or television reception, which can<br />
be determined by turning the equipment off and on, the user is encouraged to try to correct<br />
the interference by one or more of the following measures:<br />
1. Reorient or relocate the receiving antenna.<br />
2. Increase the separation between the equipment and receiver.<br />
3. Connect the equipment into an outlet on a circuit different from<br />
that of which the receiver is connected.<br />
4. Consult the dealer or an experienced radio / television technical<br />
for help.<br />
Notice : The changes or modifications not expressly approved by the party responsible for<br />
compliance could void the user authority to operate the equipment.<br />
www.peripheralelectronics.com<br />
Peripheral Electronics ® ,<br />
a division of AAMP of America<br />
13160 56th Court Clearwater, Florida 33760<br />
Ph. 800-477-2267 ext. 230<br />
support@peripheralelectronics.com<br />
©2008 AAMP of Florida, Inc.