30681 Spitfire MK IX Multi Manual.indb - Horizon Hobby
30681 Spitfire MK IX Multi Manual.indb - Horizon Hobby
30681 Spitfire MK IX Multi Manual.indb - Horizon Hobby

Create successful ePaper yourself
Turn your PDF publications into a flip-book with our unique Google optimized e-Paper software.
EN<br />
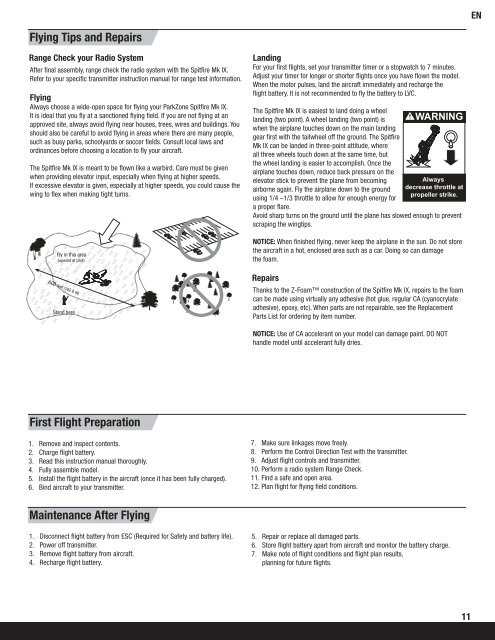
Flying Tips and Repairs<br />
Range Check your Radio System<br />
After fi nal assembly, range check the radio system with the Spitfi re Mk <strong>IX</strong>.<br />
Refer to your specifi c transmitter instruction manual for range test information.<br />
Flying<br />
Always choose a wide-open space for fl ying your ParkZone Spitfi re Mk <strong>IX</strong>.<br />
It is ideal that you fl y at a sanctioned fl ying fi eld. If you are not fl ying at an<br />
approved site, always avoid fl ying near houses, trees, wires and buildings. You<br />
should also be careful to avoid fl ying in areas where there are many people,<br />
such as busy parks, schoolyards or soccer fi elds. Consult local laws and<br />
ordinances before choosing a location to fl y your aircraft.<br />
The Spitfi re Mk <strong>IX</strong> is meant to be fl own like a warbird. Care must be given<br />
when providing elevator input, especially when fl ying at higher speeds.<br />
If excessive elevator is given, especially at higher speeds, you could cause the<br />
wing to fl ex when making tight turns.<br />
Fly in this area<br />
(upwind of pilot)<br />
600 feet (182.8 m)<br />
Stand here<br />
Landing<br />
For your fi rst fl ights, set your transmitter timer or a stopwatch to 7 minutes.<br />
Adjust your timer for longer or shorter fl ights once you have fl own the model.<br />
When the motor pulses, land the aircraft immediately and recharge the<br />
fl ight battery. It is not recommended to fl y the battery to LVC.<br />
The Spitfi re Mk <strong>IX</strong> is easiest to land doing a wheel<br />
landing (two point). A wheel landing (two point) is<br />
when the airplane touches down on the main landing<br />
gear fi rst with the tailwheel off the ground. The Spitfi re<br />
Mk <strong>IX</strong> can be landed in three-point attitude, where<br />
all three wheels touch down at the same time, but<br />
the wheel landing is easier to accomplish. Once the<br />
airplane touches down, reduce back pressure on the<br />
elevator stick to prevent the plane from becoming<br />
airborne again. Fly the airplane down to the ground<br />
using 1/4 –1/3 throttle to allow for enough energy for<br />
a proper fl are.<br />
Always<br />
decrease throttle at<br />
propeller strike.<br />
Avoid sharp turns on the ground until the plane has slowed enough to prevent<br />
scraping the wingtips.<br />
NOTICE: When fi nished fl ying, never keep the airplane in the sun. Do not store<br />
the aircraft in a hot, enclosed area such as a car. Doing so can damage<br />
the foam.<br />
Repairs<br />
Thanks to the Z-Foam construction of the Spitfi re Mk <strong>IX</strong>, repairs to the foam<br />
can be made using virtually any adhesive (hot glue, regular CA (cyanocrylate<br />
adhesive), epoxy, etc). When parts are not repairable, see the Replacement<br />
Parts List for ordering by item number.<br />
NOTICE: Use of CA accelerant on your model can damage paint. DO NOT<br />
handle model until accelerant fully dries.<br />
First Flight Preparation<br />
1. Remove and inspect contents.<br />
2. Charge fl ight battery.<br />
3. Read this instruction manual thoroughly.<br />
4. Fully assemble model.<br />
5. Install the fl ight battery in the aircraft (once it has been fully charged).<br />
6. Bind aircraft to your transmitter.<br />
7. Make sure linkages move freely.<br />
8. Perform the Control Direction Test with the transmitter.<br />
9. Adjust fl ight controls and transmitter.<br />
10. Perform a radio system Range Check.<br />
11. Find a safe and open area.<br />
12. Plan fl ight for fl ying fi eld conditions.<br />
Maintenance After Flying<br />
1. Disconnect fl ight battery from ESC (Required for Safety and battery life).<br />
2. Power off transmitter.<br />
3. Remove fl ight battery from aircraft.<br />
4. Recharge fl ight battery.<br />
5. Repair or replace all damaged parts.<br />
6. Store fl ight battery apart from aircraft and monitor the battery charge.<br />
7. Make note of fl ight conditions and fl ight plan results,<br />
planning for future fl ights.<br />
11