Download Boosting Your Productivity With These Simple Shop ...
Download Boosting Your Productivity With These Simple Shop ...
Download Boosting Your Productivity With These Simple Shop ...

You also want an ePaper? Increase the reach of your titles
YUMPU automatically turns print PDFs into web optimized ePapers that Google loves.
SCREEN PRINTING<br />
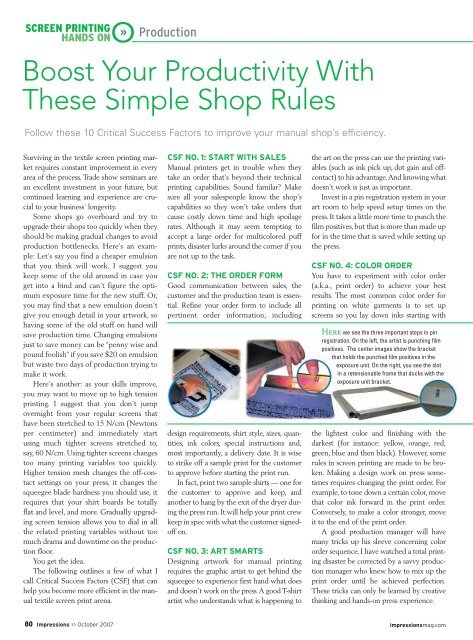
HANDS ON >> Production Here we see the three important steps in pin<br />
Boost <strong>Your</strong> <strong>Productivity</strong> <strong>With</strong><br />
<strong>These</strong> <strong>Simple</strong> <strong>Shop</strong> Rules<br />
Follow these 10 Critical Success Factors to improve your manual shop’s efficiency.<br />
Surviving in the textile screen printing market<br />
requires constant improvement in every<br />
area of the process. Trade show seminars are<br />
an excellent investment in your future, but<br />
continued learning and experience are crucial<br />
to your business’ longevity.<br />
Some shops go overboard and try to<br />
upgrade their shops too quickly when they<br />
should be making gradual changes to avoid<br />
production bottlenecks. Here’s an example:<br />
Let’s say you find a cheaper emulsion<br />
that you think will work. I suggest you<br />
keep some of the old around in case you<br />
get into a bind and can’t figure the optimum<br />
exposure time for the new stuff. Or,<br />
you may find that a new emulsion doesn’t<br />
give you enough detail in your artwork, so<br />
having some of the old stuff on hand will<br />
save production time. Changing emulsions<br />
just to save money can be “penny wise and<br />
pound foolish” if you save $20 on emulsion<br />
but waste two days of production trying to<br />
make it work.<br />
Here’s another: as your skills improve,<br />
you may want to move up to high tension<br />
printing. I suggest that you don’t jump<br />
overnight from your regular screens that<br />
have been stretched to 15 N/cm (Newtons<br />
per centimeter) and immediately start<br />
using much tighter screens stretched to,<br />
say, 60 N/cm. Using tighter screens changes<br />
too many printing variables too quickly.<br />
Higher tension mesh changes the off-contact<br />
settings on your press, it changes the<br />
squeegee blade hardness you should use, it<br />
requires that your shirt boards be totally<br />
flat and level, and more. Gradually upgrading<br />
screen tension allows you to dial in all<br />
the related printing variables without too<br />
much drama and downtime on the production<br />
floor.<br />
You get the idea.<br />
The following outlines a few of what I<br />
call Critical Success Factors (CSF) that can<br />
help you become more efficient in the manual<br />
textile screen print arena.<br />
CSF NO. 1: START WITH SALES<br />
Manual printers get in trouble when they<br />
take an order that’s beyond their technical<br />
printing capabilities. Sound familar? Make<br />
sure all your salespeople know the shop’s<br />
capabilities so they won’t take orders that<br />
cause costly down time and high spoilage<br />
rates. Although it may seem tempting to<br />
accept a large order for multicolored puff<br />
prints, disaster lurks around the corner if you<br />
are not up to the task.<br />
CSF NO. 2: THE ORDER FORM<br />
Good communication between sales, the<br />
customer and the production team is essential.<br />
Refine your order form to include all<br />
pertinent order information, including<br />
design requirements, shirt style, sizes, quantities,<br />
ink colors, special instructions and,<br />
most importantly, a delivery date. It is wise<br />
to strike off a sample print for the customer<br />
to approve before starting the print run.<br />
In fact, print two sample shirts — one for<br />
the customer to approve and keep, and<br />
another to hang by the exit of the dryer during<br />
the press run. It will help your print crew<br />
keep in spec with what the customer signedoff<br />
on.<br />
CSF NO. 3: ART SMARTS<br />
Designing artwork for manual printing<br />
requires the graphic artist to get behind the<br />
squeegee to experience first hand what does<br />
and doesn’t work on the press.A good T-shirt<br />
artist who understands what is happening to<br />
the art on the press can use the printing variables<br />
(such as ink pick up, dot gain and offcontact)<br />
to his advantage.And knowing what<br />
doesn’t work is just as important.<br />
Invest in a pin registration system in your<br />
art room to help speed setup times on the<br />
press. It takes a little more time to punch the<br />
film positives, but that is more than made up<br />
for in the time that is saved while setting up<br />
the press.<br />
CSF NO. 4: COLOR ORDER<br />
You have to experiment with color order<br />
(a.k.a., print order) to achieve your best<br />
results. The most common color order for<br />
printing on white garments is to set up<br />
screens so you lay down inks starting with<br />
registration. On the left, the artist is punching film<br />
positives. The center images show the bracket<br />
that holds the punched film positives in the<br />
exposure unit. On the right, you see the slot<br />
in a retensionable frame that docks with the<br />
exposure unit bracket.<br />
the lightest color and finishing with the<br />
darkest (for instance: yellow, orange, red,<br />
green, blue and then black). However, some<br />
rules in screen printing are made to be broken.<br />
Making a design work on press sometimes<br />
requires changing the print order. For<br />
example, to tone down a certain color, move<br />
that color ink forward in the print order.<br />
Conversely, to make a color stronger, move<br />
it to the end of the print order.<br />
A good production manager will have<br />
many tricks up his sleeve concerning color<br />
order sequence. I have watched a total printing<br />
disaster be corrected by a savvy production<br />
manager who knew how to mix up the<br />
print order until he achieved perfection.<br />
<strong>These</strong> tricks can only be learned by creative<br />
thinking and hands-on press experience.<br />
80 Impressions >> October 2007 impressionsmag.com
By James Ortolani,<br />
Contributing Writer<br />
CSF NO. 5: UNDERSTANDING<br />
OFF-CONTACT PRINCIPLES<br />
Most garments are screen printed off-contact.<br />
This simply means that the actual<br />
screen supporting the design element is suspended<br />
about 1 ⁄16-inch above the garment’s<br />
surface during the print cycle. Downward<br />
pressure from the force of the squeegee<br />
makes the screen touch the garment directly<br />
under the squeegee blade. The screen<br />
then “snaps off” the garment surface right<br />
behind the moving squeegee blade.<br />
Increasing this off-contact distance<br />
(between the garment and the screen)<br />
increases the thickness of the ink deposit,<br />
while, of course, reducing off-contact distance<br />
reduces the amount of ink printed on<br />
the surface of the shirt. There is a real art to<br />
dialing in the perfect off-contact distance to<br />
get the most out of your printed design.<br />
Opacity is not an issue when printing on<br />
white garments, so use very little offcontact<br />
for a thin ink deposit. Printing black<br />
T-shirts requires more off-contact distance<br />
to lay down more ink for better coverage.<br />
Here’s a snapshot of how to attach<br />
mesh to a retensionable frame. The inset<br />
image at top left shows the end of the frame’s side bar.<br />
Below that, an employee is using the screen tension<br />
tool and in the inset photo at bottom right, he is attaching<br />
mesh to the frame.<br />
CSF NO. 6: WHITE ON<br />
DARK PRINTING<br />
Squeegee techniques and controlling<br />
downward squeegee pressure play a major<br />
role in achieving the brightest white print<br />
on dark garments. Excess squeegee pressure<br />
will drive the ink through the garment,<br />
exposing its surface and making the<br />
ink appear washed out. Backing off<br />
squeegee pressure allows ink to sit on the<br />
surface of the garment, which yields the<br />
best ink coverage and opacity. If you can<br />
see white ink on your shirt board after you<br />
remove the garment from the press, you<br />
are pressing too hard on the squeegee.<br />
CSF NO. 7: SQUEEGEE<br />
FUNDAMENTALS<br />
Squeegee speed is instrumental in controlling<br />
the amount of ink that is delivered to<br />
the shirt’s surface. A slow squeegee stroke<br />
allows more time for the ink to flood the<br />
image area, delivering a larger volume of<br />
ink to the garment. A fast squeegee reduces<br />
the amount of ink on the garment surface.<br />
Squeegee hardness also is a major consideration.<br />
A common squeegee hardness<br />
for everyday garment printing is in the 70-<br />
durometer range. A high durometer number<br />
indicates a harder squeegee material,<br />
which is preferred by printers doing fine<br />
halftones in four-color process work. A<br />
55/60 durometer squeegee is ideal for special<br />
effect inks such as puff or suede.<br />
Finally, keep your squeegees sharp and<br />
experiment with the squeegee angle when<br />
printing. Although a 45-degree angle is the<br />
starting point for the squeegee in relationship<br />
to the screen, you can get a higher volume<br />
of ink to pass through the open areas<br />
of the screen by laying the squeegee back<br />
to a 40-degree angle.<br />
CSF NO. 8: MONOFILAMENT<br />
POLYESTER MESH<br />
This is the main screen fabric being used in<br />
today’s commercial screen printing industry.<br />
Each individual strand is extruded<br />
polyester (plastic) held to very tight tolerances<br />
in terms of controlling the thread<br />
diameter. The thread diameter is measured<br />
in microns and has a dramatic effect on<br />
print quality as it determines the amount<br />
of open area at the mesh grid cross section.<br />
In simple terms, a thicker thread blocks<br />
more ink in the mesh cross section than a<br />
thinner thread of the exact same mesh<br />
count.<br />
Warp and weft also are terms you need<br />
to learn when working with screen mesh.<br />
The warp is the length direction of the<br />
screen fabric as it comes off the bolt (roll<br />
of mesh) and the weft is the left-to-right<br />
weave between the selvedges (edge to<br />
edge). Historically, threads in the warp<br />
direction could be taken to a higher tension<br />
level due to the weave configuration<br />
and the fact that the long length of warp<br />
thread allowed for better elongation. But<br />
with today’s low-elongation mesh and<br />
improved weaving technology, the warp<br />
and weft threads have become more<br />
equal.<br />
CSF NO. 9: RETENSIONABLE<br />
FRAMES<br />
<strong>These</strong> are popular because they make it<br />
easier to control and increase screen tension.<br />
There are basically two types of retensionable<br />
frames available — roller type and<br />
square. Both systems deliver what you<br />
want, which is higher tensioned mesh.<br />
Whichever system you go with, the<br />
frame in question must be easy to retension.<br />
I see too many shop owners who<br />
don’t retension their (expensive) frames on<br />
a consistent basis. Employee turnover<br />
might be part of the problem, which is<br />
another good reason why retensionable<br />
frames should be easy for the novice to<br />
stretch and use.<br />
Once screens have been retensioned<br />
several times, they become work-hardened<br />
and are ideal to hold tight registration. In<br />
scientific terms, the phenomena of “cold<br />
flow” occurs when molecules in the polyester<br />
thread are stretched. Screen mesh<br />
that is work-hardened is very stable, making<br />
it possible to hold registration on long<br />
runs with little to no tension loss.<br />
CSF NO. 10: COOL-DOWN<br />
STATIONS<br />
When flashing plastisol inks, cooling stations<br />
provide better ink opacity. Whether<br />
you use a manual or automatic press, it is<br />
important to have multiple load stations so<br />
an open position can serve as a cool-down<br />
station. If you don’t allow for cooling<br />
directly after a print has been flashed, the<br />
inks will be tacky and stick to the next<br />
screen they come in contact with. This<br />
characteristic is referred to as “after-flash<br />
tack” and results in unnecessary downtime.<br />
Following the Critical Success Factors<br />
outlined above will allow you to make the<br />
gradual transition into becoming a topnotch<br />
screen print shop.<br />
James Ortolani has more than 25 years experience,<br />
specializing in screen printing and heat<br />
transfers. He has worked for a variety of industry<br />
suppliers, including Hix Corp., where he<br />
currently serves as national sales manager.<br />
Contact him at jortolani@hixcorp.com.<br />
impressionsmag.com October 2007