PIXUS 80i i80 - Piezas y Partes
PIXUS 80i i80 - Piezas y Partes
PIXUS 80i i80 - Piezas y Partes

Create successful ePaper yourself
Turn your PDF publications into a flip-book with our unique Google optimized e-Paper software.
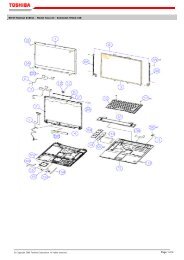
FIGURE 9<br />
CARRIAGE UNIT &<br />
PURGE UNIT<br />
See Page<br />
B - 17<br />
FIGURE 10<br />
MAIN BOARD PARTS &<br />
COIN BATTERY UNIT<br />
See Page<br />
B - 19<br />
NOTE 1 : At the first step, lower the head cap.<br />
2 : Raise the head cap, and then remove Key No. 22.<br />
3 : For Key No. 10 and 20, use a new one upon the re-installation.<br />
16<br />
17<br />
14<br />
7<br />
Raise the leading edge of the<br />
sensor arm upon the<br />
disinstallation of Key No. 14 and<br />
re-installation of Key No.17.<br />
S1<br />
S5<br />
4<br />
1<br />
S5<br />
3<br />
11 12<br />
S1<br />
8<br />
6<br />
9<br />
20<br />
10<br />
13<br />
S5<br />
15<br />
19<br />
S7<br />
5<br />
21<br />
S1<br />
18<br />
S5<br />
S7<br />
Layout of Key No. 5.<br />
S4<br />
2<br />
5<br />
S5<br />
6<br />
1<br />
4<br />
S1<br />
2<br />
S5<br />
22<br />
7<br />
Confirm the sensor arm<br />
and spring do not come off.<br />
3<br />
S6<br />
Remove three screws, and then<br />
remove Key No. 18.<br />
FIGURE 11<br />
OPTION& CONSUMABLES<br />
See Page<br />
C - 1<br />
FIGURE 12<br />
TOOL<br />
See Page<br />
E - 1<br />
5<br />
1<br />
T1<br />
T4<br />
2<br />
6<br />
3<br />
7<br />
FLOIL<br />
4<br />
T2<br />
8<br />
9<br />
T3<br />
T5<br />
10<br />
GREASE,<br />
EU-1<br />
QY9-0037-000<br />
100ml<br />
A-3