Rear Projection Cubes - Planar
Rear Projection Cubes - Planar
Rear Projection Cubes - Planar

You also want an ePaper? Increase the reach of your titles
YUMPU automatically turns print PDFs into web optimized ePapers that Google loves.
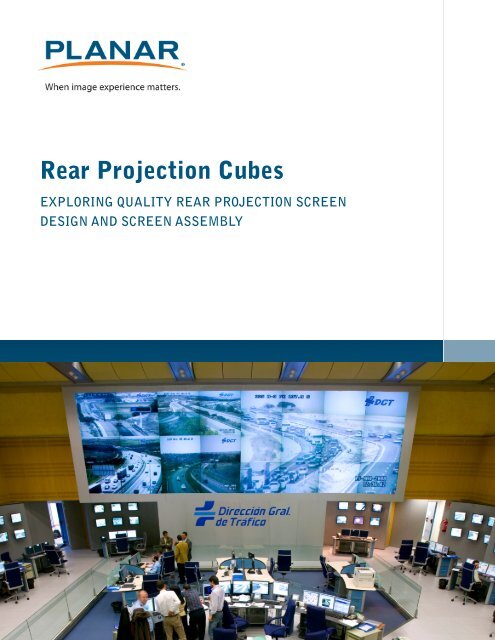
<strong>Rear</strong> <strong>Projection</strong> <strong>Cubes</strong><br />
EXPLORING QUALITY REAR PROJECTION SCREEN<br />
DESIGN AND SCREEN ASSEMBLY<br />
REAR PROJECTION CUBES | WHITE PAPER
This article briefly explores <strong>Planar</strong>’s rear projection screen<br />
design and screen assembly from the perspective of the very<br />
experienced engineering and manufacturing personnel at <strong>Planar</strong><br />
who design these high quality screens.<br />
REAR PROJECTION CUBES | WHITE PAPER
All rear projection display screens are the same, right? Without an image projected on the screen that is correct, they appear<br />
very dark and...well…the same. But in reality, not all screens are designed the same and when images are projected on different<br />
manufactures’ screens, chances are they won’t all look the same. Screens are more than just a simple piece of plastic shrouded in a<br />
frame; a great deal of engineering is injected into the design of a rear projection screen. <strong>Rear</strong> projection screens obviously come in<br />
different lengths and widths depending on screen size but did you know they come in different thicknesses? Did you know more<br />
than one layer, or section of material, is required to project an image and one of those layers is named after a French physicist from<br />
the 1800’s? Keep reading and find out.<br />
<strong>Planar</strong>’s quest for the optimal screen design was perfected over many years. The <strong>Planar</strong> PV2 screen shipping on <strong>Planar</strong>’s current LED<br />
display cubes is designed differently than a screen 10 years ago. <strong>Planar</strong> engineers constantly look to improve every aspect of cube<br />
design by questioning and evaluating current designs, and today’s PV2 screen design is a result of that constant desire to produce<br />
the best image experience in the industry. Is the PV2 screen the best screen in the industry? <strong>Planar</strong> engineers believe so but also<br />
believe in developing an even better design if it provides a better customer experience.<br />
Components of a screen<br />
Before getting into the screen design details, it’s essential to understand<br />
basic screen design. <strong>Planar</strong>’s current LED display cube screen consists of<br />
three components: a Fresnel lens, Image Screen and a Screen Frame:<br />
Fresnel: An opaque material designed to redirect the projected light from<br />
any angle and send it forward perpendicular to the Image Screen- Named<br />
after a French physicist named Augustin-Jean Fresnel.<br />
Image Screen (Lenticular): A dark material designed to dispense the image<br />
at designed viewing angles while absorbing and rejecting ambient light.<br />
Screen Frame: A 3.5 inch (8.9 cm) deep shroud surrounding and supporting<br />
the fresnel and Image Screen.<br />
Image Screen<br />
Fresnel<br />
These three elements are carefully designed and assembled forming the rear<br />
projection screen we see on the front of a rear projection cube.<br />
Screen Design<br />
An incredible amount of engineering goes in to <strong>Planar</strong>’sPV2 screen design.<br />
The frame surrounds and secures the fresnel. Placed directly against the<br />
front side of the fresnel is the image screen, held in place by, believe it or<br />
not, tape. Tape!! Can tape really hold the Image Screen in place providing<br />
years of use? Tape is the only material holding the image screen in place, but<br />
it’s not just any tape. <strong>Planar</strong>’s engineers experimented with different types<br />
of tape and chose a material providing extremely high level of adhesion to<br />
smooth surfaces along with durability over a wide range of temperature<br />
and humidity conditions. This tape is a very thin material enabling <strong>Planar</strong> to<br />
achieve that almost seamless screen gap of less than 0.1mm. But over the<br />
years, <strong>Planar</strong>’s engineers qualified a couple other designs before perfecting<br />
the screen design on today’s LED cubes.<br />
Light path entering the Fresnel<br />
and exiting the Image screen<br />
Light path entering the Fresnel and exiting the Image screen<br />
Tape<br />
Screen Frame<br />
Image Screen<br />
Fresnel<br />
Cross section view of PV2 screen design<br />
Cross section view of PV2 screen design<br />
REAR PROJECTION CUBES | WHITE PAPER
1st Generation Screen Design<br />
Through years of experience <strong>Planar</strong>’s engineers discovered screen thickness, weight,<br />
and screen material play a very influential role in screen design. The first screens from<br />
<strong>Planar</strong> consisted of a 3mm thick fresnel secured by a metal frame and a 3mm thick Image<br />
Screen secured by tape. Over time engineers discover two issues with this design:<br />
• A 6mm thick fresnel/image screen combination is too thin and could bow in or out<br />
over time, especially with larger size screens. Screens must remain flat to produce<br />
quality images.<br />
• The metal frame is very heavy and metal expands and contracts at different rates<br />
vs. the fresnel’s material, causing separation of the frame from the fresnel.<br />
Although these separation issues were rare and present only in extreme environments,<br />
cubes are designed to provide quality, consistent images for years.<br />
Tape<br />
3mm 3mm<br />
Image Screen<br />
Fresnel<br />
Screen Frame<br />
2nd Generation Screen Design<br />
In the next screen design a 3rd, very clear 6mm layer, called a neutral filter, was added<br />
behind the fresnel for greater strength and support-- bowing problem solved! To reduce<br />
weight a plastic frame replaced the metal frame. Over time <strong>Planar</strong>’s engineers discovered<br />
additional areas for improvement:<br />
• First, light hitting that extra layer of screen material (the neutral filter) caused a<br />
greater portion of light to reflect back into the cube producing a dimmer viewing<br />
image.<br />
• Second, the neutral filter material is constructed of a different material vs. the<br />
frame and fresnel, resulting in all materials expanding and contracting at different<br />
rates.<br />
• Third, the tape previously supporting just the image screen now supports the<br />
image screen and the fresnel. Its good tape but not good enough to combat the<br />
effects of 2x the weight vs. the 1st generation design.<br />
Obviously, the engineers wanted improvements to overcome these issues.<br />
Tape<br />
3mm 3mm 6mm<br />
Image Screen<br />
Fresnel<br />
Neutral Filter<br />
Screen Frame<br />
Current, PV2 Screen Design (3rd Generation)<br />
For today’s current PV2 screen design, to reduce weight, increase brightness, improve<br />
structural quality and still produce a quality image experience, <strong>Planar</strong>’s engineer’s<br />
implemented four changes:<br />
• Designed a two layer solution and increased the thickness of the fresnel from<br />
3mm to 5mm. Thick enough to prevent bowing while producing a brighter image<br />
by removing one layer.<br />
• Chose a much lighter metal composite for the frame keeping weight at a minimum.<br />
• Designed a unique frame so expansion and contraction between the frame and<br />
fresnel is not an issue.<br />
• Designed the image screen and fresnel from the same material so expansion and<br />
contraction of the two materials occurs at the same rate.<br />
Tape<br />
3mm 5mm<br />
Image Screen<br />
Fresnel<br />
Screen Frame<br />
REAR PROJECTION CUBES | WHITE PAPER
Screen Preparation<br />
Before the image screen and fresnel are assembled with the frame, both screen components need “prepping”. What is involved in<br />
the prepping process? Two key steps are soaking and cutting.<br />
Soaking<br />
After the raw, uncut fresnel and image screen material is received in the <strong>Planar</strong> factory the first preparation process is called<br />
“soaking”. What is soaking? Soaking involves storing the fresnel and image screen material from 2 to 4 weeks in an environment of<br />
75 degrees F⁰ (24 C⁰) and 50% humidity. This process ensures the image screen and fresnel are stabilized before screen assembly<br />
begins. Why 75 degrees F⁰ (24 C⁰) and 50% humidity? The specific environment stated above falls in the middle of the operating<br />
range specification for the screen. Plus, these conditions emulate a typical end user control room environment so the raw material is<br />
acclimated to that environment before it enters the manufacturing process, thus minimizing potential issues at the installation site.<br />
What is the purpose of soaking? <strong>Planar</strong> engineers discovered that sending the image screen and fresnel raw material to production<br />
immediately after delivery resulted in the two materials expanding or shrinking at different rates after the cube is placed in operation.<br />
Why does this occur? Unfortunately, <strong>Planar</strong> cannot control the environmental exposure of raw screen material before it’s received<br />
in the factory. Until raw screen material hits <strong>Planar</strong>’s manufacturing site this material is possibly exposed to very hot and dry or very<br />
wet and cold conditions, and everything in between, for several days.<br />
Cutting<br />
After the fresnel and image screen raw material finishes soaking, they are<br />
both cut to screen size specifications with a tolerance of 0.005 inches (0.127<br />
mm). To ensure both screen components are cut to specification and both<br />
screen components are cut at exactly the same dimension, two critical steps<br />
are followed.<br />
First, a CNC cutting machine makes a test cut on a sacrificial piece of material<br />
before every screen cutting session. The test material is then measured for the<br />
accuracy of the cut; length, width and square. Secondly, both pieces of raw<br />
material are secured together tightly and the CNC machine cuts both pieces<br />
at the same time. These steps guarantee screen material cut to specification<br />
and the fresnel and image screen are congruent.<br />
Fresnel and Image Screen on the cutting machine<br />
Summary<br />
Eyes are the best judge of image quality and the screen ultimately produces the images we judge. Arguably, the screen is the most<br />
important element of the rear projection cube. But designing and manufacturing world-class rear projection screens requires very<br />
experienced teams, and with over 20 years in rear projection display cube design <strong>Planar</strong> produces the industry’s best screens.<br />
During the rear projection video wall purchase decision, consider the supplier. Do they have the same high standards and<br />
expectations as <strong>Planar</strong>? Or do they prioritize cost over quality? Unfortunately, it’s difficult to determine just by looking at a screen.<br />
REAR PROJECTION CUBES | WHITE PAPER
Ask the following:<br />
• How much screen design experience does the manufacturer have?<br />
• If the manufacturer has little industry experience, chances are they don’t have enough experience to understand what works<br />
and what doesn’t work.<br />
• Is the screen designed for 24/7 operation for many years?<br />
• Screens can be produced cheaply by using very thin fresnel and image screen material. Over time they may warp and cause<br />
poor image quality. Does the manufacturer have long enough installation history to determine the long term effect on<br />
screen designs?<br />
• Is the screen designed to withstand extreme environmental conditions without impacting quality? In extreme conditions, all<br />
material expands and contracts. The screen should withstand these conditions while still producing a quality image. <strong>Planar</strong><br />
ensures both the fresnel and image screen are made of similar material to expand and contract at the same rate. In addition,<br />
soaking the screens after they arrive at <strong>Planar</strong> drastically helps minimize quality issues.<br />
• Have other manufacturers improved their screen design over time and are they still evaluating current designs, looking for<br />
further improvement? Over years of experience and with an engineering organization focused on optimization, <strong>Planar</strong> has<br />
developed a formula for producing truly world class rear projection screen designs.<br />
www.planar.com<br />
sales@planar.com<br />
1-866-475-2627<br />
<strong>Planar</strong> is a trademark of <strong>Planar</strong> Systems, Inc. All other trade and service marks<br />
are the property of their holders.<br />
Copyright© 2012 <strong>Planar</strong> Systems, Inc. All rights reserved. This document may<br />
not be copied in any form without written permission from <strong>Planar</strong> Systems, Inc.<br />
Information in this document is subject to change without notice. 7/12<br />
REAR PROJECTION CUBES | WHITE PAPER