Laguna - 2013 Guide to Water Gardening - Lagunaponds.com
Laguna - 2013 Guide to Water Gardening - Lagunaponds.com
Laguna - 2013 Guide to Water Gardening - Lagunaponds.com

Create successful ePaper yourself
Turn your PDF publications into a flip-book with our unique Google optimized e-Paper software.
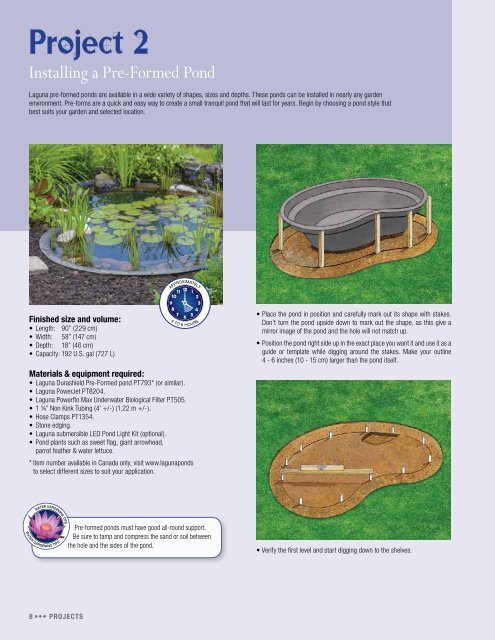
Project 2<br />
Installing a Pre-Formed Pond<br />
<strong>Laguna</strong> pre-formed ponds are available in a wide variety of shapes, sizes and depths. These ponds can be installed in nearly any garden<br />
environment. Pre-forms are a quick and easy way <strong>to</strong> create a small tranquil pond that will last for years. Begin by choosing a pond style that<br />
best suits your garden and selected location.<br />
APPROXIMATELY<br />
Finished size and volume:<br />
• Length: 90” (229 cm)<br />
• Width: 58” (147 cm)<br />
• Depth: 18” (46 cm)<br />
• Capacity: 192 U.S. gal (727 L)<br />
4 TO 6 HOURS<br />
Materials & equipment required:<br />
• <strong>Laguna</strong> Durashield Pre-Formed pond PT793* (or similar).<br />
• <strong>Laguna</strong> PowerJet PT8204.<br />
• <strong>Laguna</strong> Powerflo Max Underwater Biological Filter PT505.<br />
• 1 ¼” Non Kink Tubing (4’ +/-) (1.22 m +/-).<br />
• Hose Clamps PT1354.<br />
• S<strong>to</strong>ne edging.<br />
• <strong>Laguna</strong> submersible LED Pond Light Kit (optional).<br />
• Pond plants such as sweet flag, giant arrowhead,<br />
parrot feather & water lettuce.<br />
* Item number available in Canada only, visit www.lagunaponds<br />
<strong>to</strong> select different sizes <strong>to</strong> suit your application.<br />
• Place the pond in position and carefully mark out its shape with stakes.<br />
Don’t turn the pond upside down <strong>to</strong> mark out the shape, as this give a<br />
mirror image of the pond and the hole will not match up.<br />
• Position the pond right side up in the exact place you want it and use it as a<br />
guide or template while digging around the stakes. Make your outline<br />
4 - 6 inches (10 - 15 cm) larger than the pond itself.<br />
Pre-formed ponds must have good all-round support.<br />
Be sure <strong>to</strong> tamp and <strong>com</strong>press the sand or soil between<br />
the hole and the sides of the pond.<br />
• Verify the first level and start digging down <strong>to</strong> the shelves.<br />
8 ••• projects