LUBRICATION AND MAINTENANCE - The Rolls-Royce and Bentley ...
LUBRICATION AND MAINTENANCE - The Rolls-Royce and Bentley ...
LUBRICATION AND MAINTENANCE - The Rolls-Royce and Bentley ...

You also want an ePaper? Increase the reach of your titles
YUMPU automatically turns print PDFs into web optimized ePapers that Google loves.
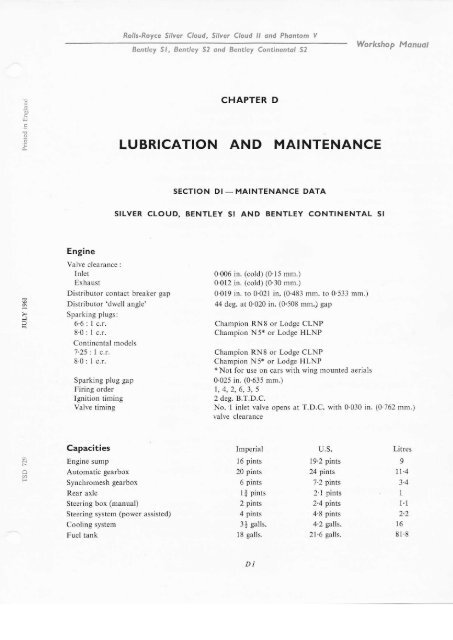
Engine<br />
<strong>Rolls</strong>-<strong>Royce</strong> Silver Cloud, Silver Cloud ll qnd Phontom Y<br />
Eentley Sl, <strong>Bentley</strong> 52 ond <strong>Bentley</strong> Continentol 52<br />
CHAPTER D<br />
<strong>LUBRICATION</strong> <strong>AND</strong> <strong>MAINTENANCE</strong><br />
SECTION DI - <strong>MAINTENANCE</strong> DATA<br />
SILVER CLOUD, BENTLEY SI <strong>AND</strong> BENTLEY CONTINENTAL SI<br />
Workshop Manuol<br />
Valve clearance :<br />
Inlet 0.006 in. (cold) (0.15 nm.)<br />
Exhaust 0.012 in. (cold) (0.30 mm.)<br />
Distributor contact breaker gap 0.019 in. to 0.021 in. (0.483 mm. to 0 533 mm.)<br />
H Oirtributor 'dwell angle' 44 deg. at 0.020 in. (0.508 n]m.) gap<br />
I Sparking plugs:<br />
! 6 6: I c.r.<br />
8'0 : 1 c.r.<br />
Continental models<br />
Champion RN8 or Lodge CLNP<br />
Champion N5* or Lodge HLNP<br />
7'25 : 7 c.r- Champion RN8 or Lodge CLNP<br />
8 0 : 1 c.r. Champion N5+ or Lodge HLNP<br />
* Not for use on cars with wing mounted aerials<br />
Sparking plug gap 0'025 in. (0.635 mm.)<br />
Firing order 1,4,2,6,3, 5<br />
Ignition timing 2 deg. B.T.D.C.<br />
Valve timing No. 1 inlet valve opens at T.D.C. with 0'030 in. (0 762 mm.)<br />
valve clearance<br />
Capacities Imperial U.S. Litres<br />
S Engine sump 16 pints 19.2 pints 9<br />
A l*.'matjc gearbox 20 pints -<br />
Synchromesh gearbox<br />
Rear axle<br />
6 pints<br />
1* pints<br />
24 pints<br />
7.2 pints<br />
2'1 pints<br />
11.4<br />
3'4<br />
1<br />
Steering box (manual) 2 pints 2 4 pints 1 1<br />
Steerjng system (power assisted) 4 pints 4 8 pints 2'2<br />
Cooling system 3| galls. 4'2 galls. 16<br />
Fuel tank 18 galls. 2l'6 galls. 8l'8<br />
D]
Chqpter D<br />
Workshop Manuol<br />
Levels<br />
--<br />
<strong>Rolls</strong>-<strong>Royce</strong> Silver Cloud, Silver Cloud ll <strong>and</strong> Phontom V<br />
u.n<br />
^*,<br />
<strong>Bentley</strong> s2 ond Bentlel continentol s2<br />
Engine sump<br />
Max mark on the dipstick<br />
Automatic gearbox F line on the dipstick<br />
Rear axle<br />
Bottom of the level plug orifice<br />
Steering box (manual) Filler plug orifice<br />
Steering system (power assisted) Full mark on the dipstick<br />
Starter motor drive Bottom of the filler plug orifice<br />
Shock dampers<br />
Bottom threads of the filler plug orifice<br />
Hydraulic fluid reservoirs Level mark on the clamping straps<br />
Chassis lubrication reservoir I in. below the top of the filler orifice<br />
Coolant level<br />
Bottom of the radiator filler orifice<br />
Battery electrolyte $ in. above the top of the separators<br />
Windscreen washer reservoir I in. below the top of the filler orifice<br />
Tyre Pressures<br />
Silver Cloud <strong>and</strong> <strong>Bentley</strong> Sl - Power assisted steering - 8'20 x 15 tyres<br />
Front 2l lb/sq.in. tl 48 kg/sq.cm ) I<br />
Rear 26 lb/sq.in. ( | '83 keAq.cm.) J "^,n -''-.<br />
Silver Cloud <strong>and</strong> <strong>Bentley</strong> Sl - Manual steering - 8'20 x l5 tyres<br />
Front lglbftq.in. {133 kg/sq.cm.) '!<br />
Rear 26 lb/sq.in. (1 83 kg/sq.cm.) J "^,, -" -<br />
Silver Cloud <strong>and</strong> <strong>Bentley</strong> 51 Long Wheelbase - Power assisted steering - 8'20 x t5 tyres<br />
<strong>Bentley</strong> Continental Sl (early) - Manual]steering<br />
- 7'60 x l5 tyres<br />
<strong>Bentley</strong> Continental Sl (late) - Manual steering<br />
- 8 00 x 15 tyres<br />
Front 22 lb/sq.in. (l'55 kg/sq.cm.) I.^,,<br />
Rear 28 lb/sq.in. (1 97 kg/sq.cm.) J '"'"<br />
Front<br />
Rear<br />
22 lb/sq.in.<br />
24 lbisq.in.<br />
(l'55 kg/sq.cm.)<br />
(1 70 kgisq.cm.)<br />
\ Cold for normal<br />
J speed running<br />
Front 30 lb/sq.in. (2.1 kglsq.cm.)<br />
] cota.tor maximum<br />
Rear 36 lbisq.in. (2 46 kg/sq.cm.) J speed running<br />
Front 20 lb/sq.in. ( l 4l kg/sq.crn.) ] Cold for normal<br />
Rear 25 lb/sq.in. (t'76 kg/sq.cm.) J speed running<br />
Front 25 lb^q.in. ( I .76 kghq.cm. ) | CotO tor maximum<br />
Rear 30 lb/sq.in. t2 l I kg/sq.cm.1 J speed running<br />
D2<br />
=.<br />
rt<br />
q3<br />
c ..<br />
e<br />
i
- !-<br />
Battery<br />
Earth<br />
rrl Generator<br />
Electrical Equipment<br />
; Starter motor<br />
. flofns<br />
Bulbs:<br />
Headlamps<br />
Sidelamps<br />
Stop/Tail lamps<br />
Rear flashers<br />
Fog lamps<br />
Reverse lamp<br />
Number plate lamp<br />
Boot lamp<br />
Roof lamp<br />
Companion lamps<br />
5<br />
9 Map lamp<br />
I<br />
tnspection lamp<br />
D<br />
i Fuses:<br />
Horn fuse<br />
Radio fuse<br />
<strong>Rolls</strong>-<strong>Royce</strong> Silver Cloud, Silver Cloud ll ond Phantom V<br />
Eentley 51, <strong>Bentley</strong> 52 ond <strong>Bentley</strong> Continentol 52<br />
Dagenite or Exide l2V 57 amplhr.<br />
Negative lo frame<br />
Lucas C-47 l2V ol C-48 l2V<br />
Lucas M-45G 12V<br />
Lucas WT 618/l Windtone<br />
12V 60/36W st<strong>and</strong>ard<br />
l2V 42136W Canada <strong>and</strong> South America<br />
l2V 45136W 'Granilux' France<br />
l2Y 45140W Europe except France<br />
l2v 6w<br />
l2v l8/6w<br />
l2v 2tw<br />
l2v 38/21W<br />
12V 2tW<br />
l2v 6w<br />
12V 6W<br />
t2v 6w<br />
12V 6W<br />
l2v 6w<br />
l2v 6w<br />
Chqpter D<br />
Workshop Monual<br />
30 amp. (one str<strong>and</strong> of No. 28 S.W.C. (0.0148 in. dia.) tinned<br />
copper wire)<br />
25 amp. cartridge type<br />
5 amp. cartridge type<br />
SECTION D2_ <strong>MAINTENANCE</strong> DATA<br />
SILVER CLOUD II, BENTLEY 52, BENTLEY CONTINENTAL 52 <strong>AND</strong> PHANTOM V<br />
Engine<br />
Distributor contact breaker gap 0'019 jn. to 0 021 in. (0'483 mm. to 0 533 mm.)<br />
R Distributor 'dwell angle' 44 deg. at 0 020 in. (0 508 mm.) gap<br />
6 Sparking plugs Champion RN8, Champion RN13P or Lodge CLNP<br />
r Sparking plr.rg gap 0.024 in. to 0.027 in. (0.609 mm. to 0.686 rnm.)<br />
Firing order Al, 81, A4,84,82,43,83, A2<br />
1,5,4,8,6,3,7,2<br />
Ignition timing 2 deg. B.T.D.C.<br />
Valve timing 5 deg. A.T.D.C.<br />
D3
Chopter D<br />
Workshop Manual<br />
Capacities<br />
Engine sump<br />
Automatic gearbox<br />
Rear axle<br />
Steering system<br />
Steering (transfer box)<br />
Cooling system<br />
Fuel tank<br />
Fuel tank (Phantom V)<br />
Levels<br />
Engine sump<br />
Automatic gearbox<br />
Rear axle<br />
Steering (transfer box)<br />
Steering system<br />
Shock dampers<br />
Hydraulic fluid reservoirs<br />
Coolant level<br />
Battery electrolyte<br />
Windscreen washer reservoir<br />
Tyre Pressures<br />
<strong>Rolls</strong>-<strong>Royce</strong> Silver Cloud, Silver Cloud ll ond Phontom V<br />
<strong>Bentley</strong> 5l,8ent/ey S-2 ond <strong>Bentley</strong> Continentol 52<br />
Imperial<br />
12 pints<br />
20 pints<br />
I f pints<br />
3 pints<br />
-,5 nin r<br />
21 pints<br />
l8 galls.<br />
23 galls.<br />
Max mark on the dipstick<br />
F line on the dipstick<br />
Bottom of the level plug orifice<br />
Bottom of the level plug orifice<br />
Full mark on the dipstick<br />
Bottom threads of the filler plug orifice<br />
Level mark on the clamping straps<br />
Bottom of the radiator filler orifice<br />
$ in. above the top of the separators<br />
I in. below the top of the filler orifice<br />
Silver Cloud lI <strong>and</strong> <strong>Bentley</strong> 52 - 8.20 x l5 tyres<br />
Front 22lblsq.in.<br />
Rear 27 lblsqJn.<br />
Silver Cloud lI <strong>and</strong> <strong>Bentley</strong> 52 Long Wheelbase - 8.20 x I5 tyres<br />
Front 23 lb/sq.in.<br />
Rear 29 lblsq.in.<br />
<strong>Bentley</strong> Continental 52 - 8.00 x 15 tyres<br />
Park Ward Convertible Coupe<br />
Phantom V-8.90 x 15 tyres<br />
Front 20 lb/sq.in.<br />
Rear 25 lbisq.in.<br />
Front 25 lb/sq.in.<br />
Rear 30 lblsq.in.<br />
Front 20 lb/sq.in.<br />
Rear 28 lb/sq.in.<br />
Front 25 lb/sq.in.<br />
Rear 33 lb/sq.in.<br />
Front 22lblsq.in.<br />
Rear 27 lb/sq.in.<br />
D4<br />
u.s.<br />
14.40 pints<br />
24 pints<br />
1.95 pints<br />
3.60 pints<br />
0.75 pint<br />
25'21 pints<br />
21.60 galls.<br />
27'62 galls.<br />
(1.55 kglsq.cm.)<br />
(1.90 kglsq.cm.)<br />
(1.62<br />
kg/sq.crn.)<br />
(2'04 kg/sq.cm.)<br />
(l'41 kg/sq.cm.)<br />
(1 76 kg/sq.cm.)<br />
(1.76 kg/sq.cm.)<br />
(2.1I kg/sq.cm.)<br />
(l'41 kg/sq.cm.)<br />
(1.97 kg/sq.cm.)<br />
(1.76 kg/sq.cm.)<br />
(2.33 kg/sq.cm.)<br />
I<br />
J cotd<br />
I<br />
J cold<br />
(l'55 kglsq.cm.)<br />
]<br />
(1.90 kg/sq.cm.) ) "o,o<br />
Litres<br />
6 81<br />
r 1.36<br />
o-92<br />
1.70<br />
0.36<br />
11.93<br />
81.82<br />
104.56<br />
] Cold.for no.mal<br />
J Speeo runmng<br />
-\<br />
L ^,,^ OrO.rOr<br />
I maxrmum<br />
J Speec runnlng<br />
] Cold.for normal<br />
J Speeo runnlng<br />
] Cold for maximum<br />
J speed running<br />
:<br />
ril<br />
-l<br />
-<br />
e<br />
.l
I!<br />
'J<br />
a<br />
Electrical Equipment<br />
Battery<br />
Earth<br />
Generator<br />
Starter motor<br />
Horns<br />
Butbs:<br />
Headlamps<br />
Side lamps<br />
Fog lamp/front flasher<br />
Fog lamp (Switzerl<strong>and</strong>)<br />
Front fl asher (Switzerl<strong>and</strong>)<br />
Stop/Tail lamps<br />
<strong>Rolls</strong>-<strong>Royce</strong> Silver Cloud, Silver Cloud lt ond Phqntom V<br />
Stop/Rear flasher (Switzerl<strong>and</strong>)<br />
Reverse lamp<br />
Number plate lamp<br />
Boot lamp<br />
Roof lamp<br />
Companion lamp<br />
Inspection lamp<br />
Rear flasher<br />
Map lamp<br />
Fuses:<br />
Horn fuse<br />
Radio fuse<br />
<strong>Bentley</strong> Sl, <strong>Bentley</strong> 52 ond <strong>Bentley</strong> Continentol 52<br />
Dagenite or Exide 12V 67 amplhr.<br />
Negative to frame<br />
Lucas C48 l2V<br />
Lucas M-45G l2V<br />
Lucas WT 618/l<br />
12V 60136W<br />
l2y 42136W Canada <strong>and</strong> South America<br />
l2Y 45136W<br />
'Granilux' France<br />
lzV 45140W Europe except France<br />
r2v 6w<br />
t2y 38121W<br />
lzv 2lw<br />
12V 2tW<br />
12v 2tl6w<br />
12V 2tl6w<br />
rzY 2tW<br />
l2v 6w<br />
l2v 6w<br />
12V 6W<br />
12y 6W<br />
l2v 6w<br />
l2v 2tw<br />
12V 3W<br />
30 amp. (one str<strong>and</strong> of No. 28 S.W.G.<br />
copper wire)<br />
25 amp. cartridge type<br />
5 amp. cartridge type<br />
D5<br />
Chapter D<br />
tl{orkshop Monual<br />
(0.0148 in. dia.) tinned
Citapter D<br />
Workshop Mdnual<br />
<strong>Rolls</strong>-<strong>Royce</strong> Silver Cloud, Silver Cloud ll ond Phontom Y<br />
<strong>Bentley</strong> SI, <strong>Bentley</strong> 52 <strong>and</strong> <strong>Bentley</strong> Continentol 52<br />
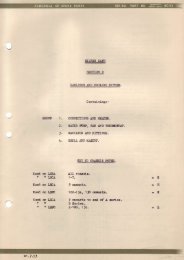
SECTION D3- PERIODIC <strong>LUBRICATION</strong> <strong>AND</strong> ADJUSTMENT SCHEDULES<br />
A system of periodic lubrication <strong>and</strong> maintenance<br />
has been established to assist retailers with the<br />
mainteuance of <strong>Rolls</strong>-<strong>Royce</strong> <strong>and</strong> <strong>Bentley</strong> cars in their<br />
area.<br />
Retailers are advised to institute this systcm<br />
as a normal routine <strong>and</strong> to make appropriate<br />
Schedule A<br />
SILVER CLOUD, BENTLEY SI<br />
To be carried out evcry 5000 miles, covers all the<br />
itcns associated with the engine, chassis <strong>and</strong> coachwork<br />
requiring lubrication, cleaning <strong>and</strong> adjustment.<br />
Schedule B<br />
To be carricd out every 10,000 ntiles. lr addition to<br />
the repetition of the whole of Schedule A, it covers the<br />
complcte charge of lubricant of all the main components,<br />
together with the inspection <strong>and</strong> rectification<br />
of those items not included at the lower mileage.<br />
Schedule C<br />
To be carried out every 20,000 miles. This schedule<br />
repeats Schedule B <strong>and</strong> principally covers the<br />
change of lubricant for the automatic gcarbox, rear<br />
axle <strong>and</strong> propeller shalt b ll <strong>and</strong> rrunnion joint.<br />
Lubrication<br />
SCHEDULE A<br />
EYERY 5OOO MILES<br />
L lgnition distributor shaft, contact breaker pivots<br />
<strong>and</strong> cam.<br />
2. Cear range selector controls <strong>and</strong> accelerator<br />
linkage.<br />
J. Brakc system pivot pins <strong>and</strong> bearings.<br />
arrangements with any owncrs wishing to avail<br />
themselves of this service.<br />
Should some owners desire to carry out their own<br />
maintenance inspections, it should be noted that this<br />
system does not in any way supersede the instructions<br />
giverr in Owners' H<strong>and</strong>books.<br />
<strong>The</strong> following schedules cover the whole car.<br />
<strong>AND</strong> BENTLEY CONTINENTAL 5I<br />
D6<br />
Oil Level Checks<br />
t.<br />
2.<br />
3.<br />
n<br />
5.<br />
Steering box.<br />
Chassis lubrication tank.<br />
Clean carburetter air valves <strong>and</strong> check oil level in<br />
hydraulic damper chambers,<br />
Brake mastcr cylinder reservoirs.<br />
Automatic gearbox. (Check with engine runnirg<br />
as described in Automatic Gearbox Manual).<br />
6. Rear axle.<br />
7. Drain <strong>and</strong> re-fill the crankcasc surrp. Rcnew thc<br />
oil lilter elemcnt.<br />
8. Poucr sreering pump (if firred).<br />
Engine <strong>and</strong> Chassis Adjustments<br />
1. Check the coolant level <strong>and</strong> top-up if required.<br />
(Check the specific gravity of the coolant <strong>and</strong><br />
advise the owner if additional anti-freeze is<br />
required). Maintain anti-freeze in the system all<br />
the year round.<br />
2. Check the tension of the driving belts <strong>and</strong> adjust<br />
if neccssary. II indiridual tension i' uneven il<br />
new matched pair of belts should be fitted.<br />
3. Check <strong>and</strong> re-set tlre inlet clearances.<br />
4. Clean the sparking plugs. Check <strong>and</strong> re-set the<br />
gaps.<br />
5. Clean the contact breaker points. Re-set the gaps,<br />
check <strong>and</strong> re-set the ignition timing.<br />
-<br />
-<br />
a<br />
U<br />
\)
Ro/ls-<strong>Royce</strong> Silver Cloud, Silver Cloud tl ond Phontom V<br />
Eent/ey Sl, <strong>Bentley</strong> 52 <strong>and</strong> <strong>Bentley</strong> Continentol 52<br />
6. Check the functioning of the fuel punrps (disconnect<br />
the electrical leads <strong>and</strong> check each punrp<br />
independently).<br />
7. Adjust the rear brakes.<br />
8. Check for excessive leakage at any point in thc<br />
central chassis lubrication system.<br />
9. Check <strong>and</strong> adjust tl're tyre pressures.<br />
10. Clean the oil bath air filter elemcnt (if fitted) <strong>and</strong><br />
re-fill with oil.<br />
11. Clean the'Vokes'air lllter element (Contincntal<br />
modcJs).<br />
12. Inspect the condition of the propeJler shaft<br />
seaiing boot. Check the torque tightness of thc<br />
four bolts securing the universal joint to 1he<br />
gearbox output flangc.<br />
Electrical System<br />
1. Check the battery electrolyte level. Top-up witl.r<br />
distilled water if required. Clean, apply a coat of<br />
petroleum jclly <strong>and</strong> tighten thc battery terninals.<br />
2. Check the complete electrical system for corrcct<br />
functioning.<br />
Road Test<br />
l. Test the car on thc road.<br />
l. Repeat Schedule A.<br />
SCHEDULE B<br />
EVERY t0,000 MTLES<br />
2. Lubricate the three grease nipplcs on the rear<br />
propeller shaft.<br />
3. Check the starter notor reductioi'l gear oil lcvcl<br />
<strong>and</strong> re-lill if required.<br />
4. Check the oil level in thc front <strong>and</strong> rear shock<br />
dampers.<br />
5. Remove the carburetter air filter elentent <strong>and</strong><br />
wash ir petrol or paraffln <strong>and</strong> then oil with cnginc<br />
oil. Allow to thoroughly drain bcfore re-fitting.<br />
6. Clean the fuel strainers.<br />
(i) <strong>The</strong> main fuel lllter on the chassis closs<br />
member just forward of the fuel tank.<br />
(ii) <strong>The</strong> lilter gauzes in each carburetter float<br />
chamber feed connection.<br />
(iii) <strong>The</strong> filter gauzes<br />
in the fuel pumps.<br />
7. Change the filter in the power steering pump<br />
reservoir (where fitted).<br />
D7<br />
Chaqter D<br />
Workshop Manuol<br />
8. Check <strong>and</strong> if necessary adjust the brake servo.<br />
9. Grease tlle master cylinder balance lever bearing<br />
(where applicable).<br />
10. On cars fitted with <strong>Rolls</strong>-<strong>Royce</strong> Car Interior<br />
Cooling System, grease the coolant pump bearing<br />
using Retinax 'A' or similar type of grease.<br />
ll. Grease the steering points using Molyspring<br />
Lubricant 204G, ot a good quality grease containing<br />
20 per cent molybdenum disulphide.<br />
t.<br />
2.<br />
Rcpeat Schedule B.<br />
SCHEDULE C<br />
EVERY 2O,OOO MILES<br />
Drain <strong>and</strong> re fill the automatic gearbox. Clean thc<br />
oil breather in the top of the dipstick.<br />
3. Drain <strong>and</strong> re-fill the rear axle.<br />
4. Dismantle the front ball <strong>and</strong> trunnion joint on the<br />
propeller shaft, inspect <strong>and</strong> re-fill with I ] oz. of<br />
Mobilgrease No.2. This should not be carried out<br />
if the joint shows ro sign of leakage.<br />
5. Rernove the front drums <strong>and</strong> inspect the brake<br />
linings for wear. (Lining face should not be less<br />
than 32r in. (0.8 mm.) above the rivets).<br />
Renew the oil filter pad ir the chassis lubrication<br />
pump.<br />
7. Renew the 'Vokcs' air filter element (Continental<br />
models).<br />
EVERY 60,@0 MTLES<br />
l. Examine the wheel bearings, if they are in a<br />
serviceablc condition, re pack with the correct<br />
grcase.<br />
2. Exanrine thc propeller shaft centre bearing <strong>and</strong><br />
re-pack with the correct grease<br />
AN N UALLY<br />
I . Drain <strong>and</strong> flush the cooling system; re-lill with the<br />
con ect anti-freeze rnixture.<br />
SPECIAL PRECAUTIONS<br />
Should the car be operating in a sustained<br />
temp€rature of 0 deg. F. <strong>and</strong> below:<br />
l. Drain the crankcase sump when thoroughly warm<br />
<strong>and</strong> re-fill with SAE l0 oil; the carburetter air<br />
valve guide should also be drained <strong>and</strong> re-filled<br />
with this oil.
Chapter D<br />
tfforkshop Manual<br />
<strong>Rolls</strong>-<strong>Royce</strong> Silver Cloud, Silver Cloud ll ond Phontam V<br />
<strong>Bentley</strong> 51, <strong>Bentley</strong> 52 ond <strong>Bentley</strong> Continentol 52<br />
SECTION D4- PERIODIC <strong>LUBRICATION</strong> <strong>AND</strong> ADJUSTMENT SCHEOULES<br />
SILVER CLOUD II. BENTLEY 52. BENTLEY CONTINENTAL 52 <strong>AND</strong> PHANTOM V<br />
2500 Miles Schedule<br />
To be carried out cvery 2500 milcs covers cttgine<br />
oil change, oil levcl checks, cngine <strong>and</strong> chassis adjustrrents,<br />
electrical system checks al-Id road test.<br />
Schedule A<br />
To be carlied out cvery 5000 miles-covers all the<br />
items associated with engine, chassis <strong>and</strong> coacltwork<br />
requiring lubrication, cleaning <strong>and</strong> adjustment.<br />
Schedule B<br />
To be carricd out every 10,000 rniles. ln addition to<br />
the repetition of tlre whole of Schedulc A, it covers<br />
the complete change of lubricant of all the rnail<br />
components, together with the jnspection <strong>and</strong><br />
rectification of thosc items not included at thc lower<br />
mileagc.<br />
Schedule C<br />
To be carried out every 20,000 niles. This Schedulc<br />
repeats Schedule B <strong>and</strong> principally covers the change<br />
of Iubricant for the automatic gearbox, rear axle <strong>and</strong><br />
the propellcr shaft ball <strong>and</strong> trunnion joint.<br />
Road Test<br />
Schedule D<br />
To bc carried out at the conclusion of cvery 30,000<br />
miles. This Schedule repeats Schedulc B or C as<br />
lequircd <strong>and</strong> covcrs renewal of thc liltel elc]rent in<br />
the steering pump rcservoir.<br />
Oil Changes<br />
25OO MILES SCHEDULE<br />
l. Drain <strong>and</strong> re-fill the crtlnkcasc sump.<br />
Oil Level Checks<br />
l. Carburetter air valve damper.<br />
2. Steering pump reservoir.<br />
3. Brake fluid reservoirs.<br />
4. Automatic gearbox. (Check with the cngine<br />
running as described in the Automatic Gearbox<br />
Manual).<br />
D8<br />
Engine <strong>and</strong> Chassis Ad justments<br />
1. Check the coolant level (chcck thc specific gravity<br />
of the coolant <strong>and</strong> advise thc owncr if additional<br />
anti-freeze is required). Maintain anti-frecze in<br />
the system all the year round.<br />
2. Check the tension of tlre driving belts <strong>and</strong> adjust if<br />
necessary. If individual belt tension is uneven a<br />
ncw matched pair of belts should be fitted.<br />
3. Check <strong>and</strong> if nccessary adjust the rear brakes.<br />
4. Check <strong>and</strong> adjust thc tyre pressures (including<br />
spare).<br />
Electrical System Checks<br />
l. Check thc battery electrolyte lcvcl <strong>and</strong> top-up with<br />
distilled water if requircd.<br />
2. Chcck ard if necessary top-up the windscreen<br />
washer reservoir with the correct mixturc of<br />
distilled watcr arrd <strong>Rolls</strong>-Roycc Windscreen<br />
Washer Fluid.<br />
3. Check thc conrpletc clectrical systenl for correct<br />
functioning.<br />
l. Test thc car or the road.<br />
SCHEDULE A<br />
EVERY sfl'O MILES<br />
1. Repeat the 2500 Miles Schcdule.<br />
2. Renew thc oil lilter clement.<br />
3. Check <strong>and</strong> i[ necessary top-up tl]c rcar axle oil<br />
Ievel.<br />
4. Lubricate thc jgnition distributor automatic<br />
advancc nrecltar:isnt. slraft bearings. governor<br />
spindle, contact breaker rocker arm pivots <strong>and</strong><br />
cam.<br />
5. Lubricate thc gear range selector controls <strong>and</strong><br />
accclerator linkage. Do not lubricate the<br />
automatic starting dcvice controls.<br />
6. Lubricate the brake system pivot pins <strong>and</strong><br />
bearings.<br />
cla<br />
k<br />
-.1<br />
-lJ
'J<br />
.t<br />
<strong>Rolls</strong>-<strong>Royce</strong> Silver Cloud, Silver Cloud ll ond Phdntom V<br />
Eertley Sl, Eentley 52 ond <strong>Bentley</strong> Continental 52<br />
7. Clean the contact breaker points <strong>and</strong> re-set the<br />
gaps. Check <strong>and</strong> re-.et thc ignition riming.<br />
8. Check the functioning of the fuei pumps (disconnect<br />
the clectrical leads <strong>and</strong> check each puntp<br />
independently).<br />
9. Remove any foreign matter from the refrigeration<br />
condenser matrix (if fitted).<br />
I0. Clean the air valves in the carburetters.<br />
11. Check the torque tightness of the four bolts<br />
securing the universal joint to the gearbox output<br />
flange. Inspect the condition of the rubber<br />
boot.<br />
12. Check the static <strong>and</strong> dynarric balance of the<br />
whcels <strong>and</strong> rcctify if necessafy. Interchange thc<br />
f'ront <strong>and</strong> rear wheels to cqualise tyre wear.<br />
Check the front brake linings for wear (see Section<br />
13. Clean <strong>and</strong> tighten the battery terminals. Apply<br />
them with a light coat of petroleum jelly.<br />
l. Repeat Schcdule A.<br />
SCHEDULE B<br />
EVERY t0,000 MTLES<br />
2. Check the oil level in tl.le front <strong>and</strong> rear shock<br />
dampers. This should not be carried out if the<br />
dampcrs show no sign of leakage.<br />
3. Lubricate the grease nipple ofthe master cylinderc<br />
balance lever pivot.<br />
4. Lubricate the thi.tcen grcase nipples on the<br />
steering mechanism.<br />
5. Lubricate the eight grease nipples on the front<br />
suspension.<br />
6. Lubricate the lhree grease nipples on tlte rear<br />
propeller shaft.<br />
7. Clean the sparking plugs, test <strong>and</strong> if necessary<br />
8.<br />
9.<br />
Check <strong>and</strong> if necessary adjust the brake servo.<br />
Remove the front drums <strong>and</strong> inspect the brake<br />
linings for wear. (Lining face should not be less<br />
than ""! in. (0.8 mm.) above the rivets).<br />
10. Renew the carburetter air lilter element.<br />
ll. Clean the main fuel filter (adjacent to the fuel<br />
tank), both filter gauzes in the fuel pump <strong>and</strong> the<br />
filter gauze in each float chantber feed connection.<br />
D9<br />
SCHEDULE C<br />
EVERY 20,000 MTLES<br />
Cholrler D<br />
Workshop Monuol<br />
1. Rcpeat Schedule B.<br />
2. Drain <strong>and</strong> re-fill the automatic gearbox <strong>and</strong> fluid<br />
coupling - clean the oil breather in the top of the<br />
dipstick.<br />
3. Drain <strong>and</strong> re-fill the rear axle.<br />
4. Disrrantle the front ball atnd trunnion joint of the<br />
propeller shaft, inspect <strong>and</strong> re-llll with I I oz. of<br />
Mobilgrease No. 2. This should not be c?rrried out<br />
if the joint shows no sign of leakage.<br />
5. Inspect the generator commutator <strong>and</strong> brushes for<br />
wear, urlso the brushes for freedom in their holders.<br />
6. Releasc-but do not renlove-the fuel tank<br />
drain plug to allow any accumulated water to<br />
escape.<br />
7. Renrove the fuel purnps <strong>and</strong> bench test thcrn.<br />
SCHEDULE D<br />
EVERY 30,000 MILES<br />
l. Repeat Schedule B or C as required.<br />
2. Renew the nlter elemcnt in thc steering pump<br />
rcservoir,<br />
EVERY 60,000 MILES<br />
l. Examine the wheel bearings; if they are in a<br />
serviceable condition re-pack with the correct<br />
grease.<br />
2. Examine the propeller shaft centre bearing <strong>and</strong><br />
re pack with the correct grease.<br />
ANNUALLY<br />
l- Drain <strong>and</strong> flush the cooling system; re fill with the<br />
correct anti-freeze mixture.<br />
SPECIAL PRECAUTIONS<br />
Should the car be operating in a sustained<br />
temperature of 0 deg. F. <strong>and</strong> below:<br />
1. Drain the crankcase sump when thoroughly warm<br />
<strong>and</strong> re-fill with a viscosity SAE l0 oil; the carburetter<br />
air valve guides should also be drained<br />
<strong>and</strong> re-filled witl:L this oil.
Chapter D<br />
Workshop Monuol<br />
<strong>Rolls</strong>-<strong>Royce</strong> Silver Cloud, Silver Cloud ll ond Phontom V<br />
<strong>Bentley</strong> Sl, Eentley 52 ond <strong>Bentley</strong> Continento, 52<br />
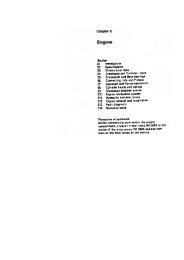
SECTION D5- <strong>LUBRICATION</strong> OF THE STEERING <strong>AND</strong> SUSPENSION POINTS-4 STAGES<br />
Stage I<br />
When production of Sl cars commenced, lubrication<br />
was provided for by the Centralised Chassis<br />
Lubrication System.<br />
This systen.r supplies oil to all front suspension <strong>and</strong><br />
steering joints (see Figs. DIA <strong>and</strong> DIB).<br />
<strong>The</strong> rear springs on both Sl <strong>and</strong> 52 cars are prepacked<br />
with grease.<br />
t.<br />
2.<br />
3.<br />
CROSS BEAI1 CENTRE<br />
STEERING EALL ]O]NTS<br />
CENTRE STEERING<br />
IEVER PIVOTS<br />
IOWER TRIANGI.E I.EVER<br />
FULCRUI,I EEARINGS<br />
A<br />
Stage 2 'l<br />
Fig. DIA Chassis lubrication system, right-h<strong>and</strong> a$angement<br />
,I, IYETER VALVE RATE 2<br />
5. SWIVEL PIN<br />
6, YOKE BEARINGS<br />
7, PENDUTUM LEVER/ORAG<br />
LINK BALL IOINT<br />
DI0<br />
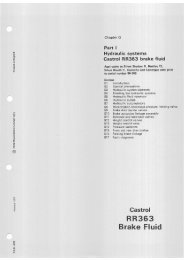
During the production of Sl cars, grease lubrication<br />
was introduced on the steering mechanism.<br />
At this (rage.the track rod ends only were adapted<br />
for ^ grease. lhis modificarion (shown in Fig. D21 uas<br />
inrroduced on the follouing chassis:<br />
<strong>Bentley</strong> St B-FA.48, 208, 386,394,<br />
398, 516, 526, 532, 544,<br />
552,556 650 onwards<br />
CENTRE STEERING<br />
OPERATING LEVER/DRAG<br />
LINK BALL JOINT<br />
SIOE STEERING LEVER-CROSS-<br />
STEERING<br />
TUBE SALL.IOINT<br />
i<br />
-<br />
ln
F<br />
ul<br />
<strong>Rolls</strong>-<strong>Royce</strong> Silver Cloud, Silver Cloud ll ond Phontom V<br />
Eentley 51, Benttey 52 ond <strong>Bentley</strong> Continentol 52<br />
<strong>Bentley</strong> Continental Sl F series onwards<br />
<strong>Bentley</strong> Sl L.W.B. ALB.l4-18.20 onwards<br />
Silver Cloud<br />
F series onwards<br />
Silver Cloud L.W. B. BLC.f8, t9, 2t. 23 35.<br />
17-46. 50, 5l onwards<br />
Stage 3<br />
At a later stage in the production of Sl cars, grease<br />
lubrication was used more extensively. While the<br />
Centralised Chassis Lubrication System was still<br />
retained on the suspension, all the steering joints,<br />
except the centre steering lever pivot points, were<br />
changed to grease lubrication as illustrated in<br />
Figure D3.<br />
B<br />
Chapter D<br />
Workshop Manuol<br />
This modification was introduced on the followins<br />
chassis:<br />
<strong>Bentley</strong> S I<br />
B-FA.644 onwards<br />
<strong>Bentley</strong> Continental Sl BC-FM.l onwards<br />
tsentley Sl L.W.B. ALB.l7,2l 24 onwards<br />
Silver Cloud<br />
F series onwards<br />
Silver Cioud L.W.B. BLC.28+0, 42 onwards<br />
Stage 4<br />
Fig. D1B Chassis lubricstion system, l€ft-h<strong>and</strong> afiangement<br />
2.<br />
CROSS BEAIj CENTRE<br />
STEER|NG BALL TO|NTS<br />
CENTRE<br />
'_<br />
STEERING<br />
- " "..<br />
iivrn pruors<br />
,I- I',IETER VALVE RATE 2<br />
5. SWIVEL PrN<br />
6. YoKE EEARTNGS<br />
3, LOWER -- - TRTANGLE LEVER<br />
iilLcruV<br />
-E-eliir.rcs<br />
7. CENTT^E, SlrrRtNG<br />
oPERATINGK LEVER/Df1AG<br />
D11<br />
At the commencement of the production of 52 cars<br />
the Centralised Chassis Lubrication System was<br />
omitted <strong>and</strong> ail suspension <strong>and</strong> steering joints were<br />
ntted with grease points (see Fig. D4).<br />
a.<br />
L<br />
PENDUTUM TEVER/DRAG<br />
LINK BALL JOINT<br />
srDE STEERtNG LEVER/CROSS<br />
STEERING<br />
TUBE AALL JOINT
Chapter D<br />
Workshop Monual<br />
I<br />
}}<br />
fl<br />
<strong>Rolls</strong>-Rovce Silver Cloud, Silver Cloud ll <strong>and</strong> Phontom Y<br />
<strong>Bentley</strong> 5l, Eentley 52 ond <strong>Bentley</strong> Continentol 52<br />
rorr.trs LUBRICATED By rHE EARLY TYPE oNE-sHor LUBRtcarloN sYsrEfl<br />
cneese LUBRICATEo PolNTs<br />
Fig. D2 Early type one-shot oil lubrication system <strong>and</strong> grease lubaicated track rods only<br />
eorrrs LUoRLcATED ay rHE LATE TypE oNE'sHor LUBRICATIoN sYsrEM<br />
* cREAsE LUBRTCATED PotNis<br />
Fig, D3 Lafe type one-shot oil lubrication system <strong>and</strong> grease lubaicated steering joints<br />
D 12<br />
:,<br />
o
=<br />
:<br />
E<br />
<strong>Rolls</strong>-<strong>Royce</strong> Silver Cloud, Silver Cloud ll ond Phontom V<br />
Eentley Sl, Eentley 52 ond <strong>Bentley</strong> Continentol 52<br />
SECTION D6-THE CENTRALISED<br />
<strong>The</strong> Luvax Bijur foot-operated pump <strong>and</strong> combined<br />
oil reservoir is fitted on the front of the bulkhead <strong>and</strong><br />
supplies oil through brass tubing to the front chassis<br />
lubrication points as shown in Figures DIA <strong>and</strong> B,<br />
D2 <strong>and</strong> D3.<br />
<strong>The</strong> rear springs are interleaved <strong>and</strong> pre-packed<br />
with grease. <strong>The</strong>y <strong>and</strong> the rubber-bushed shackle<br />
pins require no additional lubrication.<br />
CHASSIS <strong>LUBRICATION</strong> SYSTEM<br />
Chapter D<br />
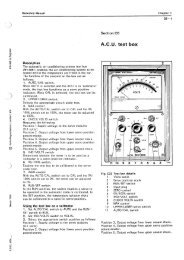
tl{orkshop Monual<br />
Figure D5. Pressure on the loot pedal raises the piston<br />
<strong>and</strong> compresses the return spring. Oil is drawn<br />
through a non-return ball valve in the centre of the<br />
piston to the underside of the piston. On releasing<br />
the pressure from the pedal, the piston is forced<br />
downward by the return spring <strong>and</strong> oil is forced<br />
through the filter pad to the outlet pipe.<br />
Fig. D4 Steering <strong>and</strong> front suspension ioints, grease lubrication points<br />
<strong>The</strong> oil delivered is not metered by drip plugs <strong>and</strong><br />
each bearing point is designed to ensure that correct<br />
lubrication is effected. As this is a total loss system,<br />
oil leakage from the points is desirable but excessive<br />
individual leakage should be rectified. Joints <strong>and</strong><br />
connections in the piping are made by cap nuts <strong>and</strong><br />
olives.<br />
<strong>The</strong> construction of the pump is shown in<br />
D t3<br />
<strong>The</strong> spring is so rated that the plessure is practically<br />
constant throughout the stroke <strong>and</strong> the rate of<br />
discharge depends upon the viscosity of the oil.<br />
Normally it should take approximately five minutes<br />
for the pedal to return to its original position. At the<br />
end of its stroke the piston seals the hole in the filter<br />
retaining plate, preventing oil leakage by gravity.<br />
<strong>The</strong> pedal should be depressed four times cvery<br />
200 rniles to ensure adequate lubrication.
Chapter D<br />
Vlorkshop Manuol<br />
I, COVER<br />
<strong>Rolls</strong>-<strong>Royce</strong> Silver Cloud, Silver Cloud Il ond Phontom Y<br />
<strong>Bentley</strong> Sl, <strong>Bentley</strong> 52 ond <strong>Bentley</strong> Continentol 52<br />
Pump Filter<br />
lf, with the pump unit correctly coupled to the pipe<br />
lines, the punp pedal does not return to its normal<br />
position within four to five minutes afler being pressed<br />
down, it is probable that the filter is clogged.<br />
Disconnect the chassis oil line at the pump outlet<br />
<strong>and</strong> unscrew tbe cap nut below the reservoir. Note<br />
the positioning of the filter retaining plate <strong>and</strong> gaskets<br />
to ensure correct re-assembly. Discard the felt disc<br />
<strong>and</strong> replace with a new one. Re-assemble <strong>and</strong> reconnect,<br />
P me the system until oil is exuding from<br />
each bearing.<br />
Pump - to test<br />
Disconnect the chassis oil feed pipe from the<br />
connection at the bottom of the pump, <strong>and</strong> seal the<br />
outlet with a plug or re-connect a short piece of tubc<br />
with its end hamnrered flat. Press down the pedal.<br />
lf the pedal shows any upward movement during a<br />
period of two minutes a leak past the piston is<br />
indicated either at the leather cups or at the ball valve.<br />
Check that the reservoir is filled with the correct<br />
viscosity oil as too thin an oil will give the sanre effect.<br />
lf a leak is evidenl replace the nump unil.<br />
<strong>The</strong> approved oils are:<br />
Castrol Hi-press S/C<br />
Energol SAE 90 EP<br />
Spirax 90 EP<br />
Mobilube CX 90<br />
Pump -- to dismantle<br />
Normally, reconditioning of an oil pump is<br />
Fig. D5 Chassis lubrication pump<br />
only undertaken by the Manufacturers <strong>and</strong> it is<br />
advisable to fit a replacement unit <strong>and</strong> to return the<br />
original for repair. <strong>The</strong> following instructions are<br />
:n<br />
2- PEDAT SPRINC<br />
3. PEDAL PIN<br />
4, PISTON ROD PIN<br />
5. PEDAI-<br />
6, PISTON ASSE14BLY<br />
7, STRAINER PLATE<br />
8. FELT STRAINER<br />
9, STRAINER SUPPORT<br />
IO- CAP NUI<br />
II. IOINT WASHERS<br />
I2, fILLER CAP<br />
Dt4<br />
given for occasions when this is impracticable.<br />
Disconnect the chassis feed pipe from the pump.<br />
Remove the three nuts, bevelled <strong>and</strong> plain washers<br />
situated under the carpet <strong>and</strong> insulating material at<br />
the front ofthe bulkhead. <strong>The</strong> stirrup, which acts as a<br />
travel limiter, must be removed from the pedal because<br />
rn
.-l<br />
f<br />
a<br />
lrJ<br />
<strong>Rolls</strong>-<strong>Royce</strong> Silver Cloud, Silver Cloud ll ond Phontom V<br />
<strong>Bentley</strong> Sl, <strong>Bentley</strong> 52 ond <strong>Bentley</strong> Continentql 52<br />
there is insufficient room for the pedal assembly to<br />
pass through the bulkhead. <strong>The</strong> pump may now be<br />
removed. Collect the three plain washers fitted<br />
between the pump <strong>and</strong> the bulkhead.<br />
Remoye the filler cap. Remove the nut <strong>and</strong> spring<br />
washer from the cheese-headed pedal pin. Slide the<br />
pedal spring cover forward <strong>and</strong> remove.<br />
Tap out the pedal pin, collect the hairpin spring.<br />
Slide the pedal off the flats on the piston rod pin,<br />
remove the pin from the piston rod.<br />
Remove the cap nut <strong>and</strong> remove the piston valve<br />
assembly downward.<br />
Pump - to assemble<br />
Thoroughly clean all parts.<br />
Oil the piston cup. With the leather joint washer in<br />
position on the collar near the top of thc piston rod,<br />
fit tlre piston assembly to the tank. Fit the piston rod<br />
pin to the piston rod <strong>and</strong> slide the pedal on to the flats<br />
on tne prn.<br />
Fit the pedal pin <strong>and</strong> pedal spring, rhe shorter leg in<br />
the pedal notch <strong>and</strong> the longer leg under the small<br />
projecting pin (see FJg. D5). Fit the pedal spring<br />
cover. Push it fully home against the pedal pin <strong>and</strong><br />
tighten the pedal pin nut.<br />
With the strainer support, strainer, strainer plate<br />
<strong>and</strong> two washers in position in the cap nut, fit the nut<br />
to the tank aod fully screw up,<br />
Re-fit the pump to the bulkhead <strong>and</strong> connect the<br />
feed pipe.<br />
Gravity Leakage from the Pump<br />
A gravity leakage from the pump, due to the piston<br />
sealing disc not seating correctly on the raised face of<br />
the brass strainer plate, will be noticeable by excessive<br />
oiling at the joints.<br />
Incorrect sealing of the piston discs may be due<br />
to the cylinder cap nut (see 6, Fig. D6) not being<br />
sufficiently tightened, or to foreign matter between tlte<br />
piston valve disc <strong>and</strong> strainer plate.<br />
D15<br />
Chapter D<br />
Workshop Manuat<br />
To check for leakage disconnect the chassis feed pipe<br />
from the connection at the bottom of the pump <strong>and</strong><br />
leave a piece ofpaper beneath the connection. lnspect<br />
after approximately half an hour.<br />
If tightening the cap nut, or dismantling <strong>and</strong><br />
cleaning does not effect a cure, a new pump should be<br />
fitted.<br />
Fig. D6 Exploded vi€w of pump<br />
I. PISTON ROD 5. STRAINER PLATE<br />
2. PISTON ROD VATVE NUT 6. CYLINDER CAP NUT<br />
3. PISTON VALVE EALL 7. FELT STRA|NER<br />
4. PISTON CUP 8, PISTON VALVE DISC
Engine<br />
Summer<br />
Multi-grade<br />
Carburettcr air valvc damper h<strong>and</strong><br />
oiling points<br />
Contact breaker pivots (Sl <strong>and</strong> 52 cars)<br />
Contact breakcr can (Sl cars only)<br />
Contact breaker cnm (52 cars)<br />
Automatic gerrbox-f<br />
Shock dnmpers i<br />
Stccring pump P.A.S.+<br />
Synchrofiesh gearbox<br />
Rear axle<br />
Steering transfer box (S2 cars only)<br />
Propeller shaft centre bearing<br />
Waterpump (Sl refrigerated cars only)<br />
Front hubs<br />
Rear hubs<br />
Propeller shaft sliding <strong>and</strong> rear unive6ill<br />
JolntS<br />
Propeller shaft front ball <strong>and</strong> trunnion<br />
Jornt<br />
Sleering box (manual)<br />
Starter motor gears (Sl cars only)<br />
Chassis oil pump (Sl cars only)<br />
Distributor lubricator (Sl cars only)<br />
Distriburor lubricctor (S2 cars)<br />
Encrgol SAE 20W<br />
Energo) SAE 30<br />
Energol Viscoslatic<br />
(10w30)<br />
Energrcitse Ll I Castrolcase LM<br />
Encrgol ATF Type A I Castrol TQ<br />
Encrsol SAf 80 tP I C:,.trol Hlpoy Light<br />
Energol SAE 90 fP I Cusrrol Hi-press S/C+<br />
or Costrol l-Iypoy<br />
CASTROL I SHELL H OBIL ESSO<br />
X-100 20/20W<br />
x-r00 30<br />
x- r00 r0w30<br />
x-100 20/20w<br />
x-l00 30<br />
Mobiloil Arctic<br />
Mobiloil A<br />
Mobiloil Splcarl<br />
(r0wr0)<br />
Mobiloil Arctic<br />
Esso Extril Motor Oil<br />
20wi 30<br />
Esso Extra Moto. Oil<br />
20w30<br />
Esso Multi-purpose<br />
Crcasc H<br />
Esso Automatic<br />
Transn'rission Fluid 55<br />
Esso Ccrr Oil CP 80<br />
Esso Cear Oil GP 90<br />
Spirax 90 EP Mobilube GX 90 Esso Ce r Oil CP 90<br />
M.islerc)linder reser\oir(st I Clstrol Cirling Brilke Fluid 16291)- Ctimson<br />
Mxster cylinder bilance levcr (S2 cars) | Energrea5e L: Castrolcase LM I Retinax 'A'*<br />
Steering joints <strong>and</strong> suspension pivots<br />
Rcfrigeration compressor<br />
(Tecumseh or Lehigh)<br />
Refrigeration compressor (York A209)<br />
* First aPproval.<br />
Rocol Moly Snring Crease 104 C or Shell Crelsc S5t66<br />
Icen) tic He \y I Shell Clavui .11 Gnrgoyle Afctic 155<br />
Regcnt Texaco Capell:r E<br />
t Also approvcd is: Cencral Motors H)'drrmatic Fluid Type AQ A-tF.<br />
Esso Multi-purposc<br />
Grcase H<br />
alal als^<br />
I l96t A.Inf lulrllrul<br />
rr pltl| J(i<br />
lrl<br />
o<br />
I<br />
o zI{<br />
I<br />
.o<br />
-g<br />
v<br />
o<br />
El<br />
o<br />
|c<br />
E<br />
=<br />
z<br />
-{<br />
n<br />
o<br />
2<br />
z<br />
1A<br />
tJ<br />
o<br />
(t<br />
q€<br />
FR<br />
6u<br />
!<br />
3<br />
o<br />
n<br />
o<br />
3
Rollr-Roycc Silvcr Cloud lll, <strong>and</strong> Phontom V<br />
Ecntfcy 53 ond Scntby Contlncntol 53<br />
CHAPTER D<br />
<strong>LUBRICATION</strong> <strong>AND</strong> <strong>MAINTENANCE</strong><br />
SECTION Dl _ <strong>MAINTENANCE</strong> DATA<br />
lYorkrhop Monuol<br />
Supplcmcnt<br />
SILVER CLOUD III, BENTLEY 53, BENTLEY CONTINENTAL 53 <strong>AND</strong> PHANTOH V<br />
Engine<br />
Silver Cloud lll, tlentley53<strong>and</strong><br />
Continental Sl<br />
Distributor contact breaker gap 0 014 in. -- 0.016 in.<br />
Distributor 'dwell' angle<br />
Sparking plugs<br />
3l' to 37" at 0015 in. gap<br />
9: I compression ralio Champion RN.&.<br />
8: I compression ratio Champion RN.8, Champion RN.I3P, Lodge CLNP.<br />
Sparking plug gap 0.025 in.<br />
Firing ordcr Al. Bl, A4, 84, 82, A3, 83, A2.<br />
( r, 5, 4, 8, 6, 3, 7, 2.\<br />
lgnition timing 2'B.T.D.C.<br />
Valve timing 5' A.'I'.D.C.<br />
Engine<br />
Phantom V<br />
Distributor contact br€akcr gap 0 019 in. - 0 021 in.<br />
Distributor 'dwcll' angle<br />
Sparking plugs<br />
1l ro -12|' at 0 02O in. gap<br />
9 : I compression ratio Champion RN.8.<br />
8: I compression ratio Champion RN.8, Champion RN.I3P, todge CLNP.<br />
Sparking plug gap 0.025 in.<br />
Firing order Al, Bl, A4, 84, 82, A3, 83, 42.<br />
( r, 5, 4, 8, 6, 3, 7, 2.)<br />
lgnition timing 2" ll.T.D.C.<br />
Valve timing 5' A.T.D.C.<br />
Dl (s)
Clraptcr D<br />
llorkhop Manual<br />
Supplomcnt<br />
Cepeciticr<br />
Enginc<br />
Automatic gcarbox<br />
Rcar axlc - Sitver Cloud llI l<br />
Bcntlcy 53 |<br />
Contincntal 53 J<br />
Phantom V<br />
Stcering sysicm<br />
Stecring (transfer box)<br />
Cooling system<br />
Fucl tsnk - Silver Cloud<br />
Bcntlcy 53<br />
Continental<br />
Phantom V<br />
Lcvclr<br />
Engi|re sump<br />
Automatic gearbox<br />
Rcar axle<br />
Stecring system<br />
Stcering (transfer box)<br />
Shock dampers<br />
Hydraulic brake fluid rescrvoirs<br />
Coolant lcvel<br />
Battery electrolyte<br />
wind3crecn washer rcscrvoir<br />
Tyrc presrures<br />
nrI<br />
srJ<br />
P,ollrRoyct Sllvv Cloud lll, ond Phontom V<br />
Ernrhy 5l ond E.niray Cordra.nto, SJ<br />
Inpcrhl<br />
l2 pints<br />
20 pints<br />
li pints<br />
ll prnts<br />
I pints<br />
i pints<br />
22 pints<br />
I tl ga<br />
l ls.<br />
23 galls.<br />
u.s.<br />
14.4 pjnts<br />
14 pints<br />
1.95 pints<br />
2 | prnls<br />
.1.6 pints<br />
0 75 pints<br />
26 4| prnts<br />
2 | '6 galls.<br />
21 62 galls.<br />
Maximrrnr rrrl rk on rlipstick<br />
F line on drpstrck<br />
Bottom of lcvcl plug orrlice<br />
Just covering thc filler<br />
Bottom (,l lcvel plug oriticc<br />
Bottom thrra(ls of filler plug nrilicc<br />
l.cvel murls on clamping straps<br />
Boltom ol rudiator fillcr orilicc<br />
I in. abovc thc top of separalors<br />
I in. below thc top ol filler orilicc<br />
Lltrc3<br />
6.E I<br />
n .36<br />
Silver Cloud III <strong>and</strong> <strong>Bentley</strong> Sl - 8 20 in. , l5<br />
Phantom V - E 90 in. x 15 in. tyres<br />
Note <strong>The</strong> lyre Prcssurcs qu('ted<br />
in. lyres<br />
Front 22 lb'sr1 rr) ( 1 55 kg,sq.ctn.)<br />
Rear 27 lh;sr.1 rn. ( | 90 kg sq.cm.) j<br />
Cold<br />
Silvcr Cloud lll <strong>and</strong> Bcntley 53 Long Wheclhasc 8 2(l In 15. In. tyre\<br />
l:ront 2-l lhirq.rt. (l 62 kgisq cnt.,<br />
Rear 29 lb.'sq.tn. (2 04 kg sq.cm. i<br />
Ilcntlcy Continental Sl - E 0O in. < l5 in. tyres Iiront 2() lh'\(l trr. (l )<br />
4l kg,rsq.cm.)<br />
Cold<br />
( rrld lirr normal<br />
Rear 15 lb7sq.rn. (1 76 kg,/sq.cm.1 speeo runnlnS.<br />
Front 25 lb/sq.in. (l 76 k8/sq.cft.) Cold for maximum<br />
Rear J0 lb/sq.in. (2 1| kg/sq.cm.) speeo runnrng.<br />
Park Ward Convertible Coupe -- 8'0O in. l5 in. tyres<br />
Front 20 lbTsq rn. (l'41 kg/sq.em.)<br />
\<br />
Rcar 28 lb/sq.in. (1 97 kg/sq.cm.) I<br />
C
Electrlcel GquipmGnt<br />
Battcry<br />
Earth<br />
Generatot<br />
Starter motor<br />
Horns<br />
Headlamps<br />
Rollr.Rotco Sllvcr Cloud lll, ond Phantom V<br />
Headlamp type <strong>and</strong> ratings<br />
U.K.<br />
Eufope, except France<br />
France<br />
Srntlry 53 ond Smtloy Contlnontol t3<br />
Middle <strong>and</strong> Far East I<br />
Canada, South <strong>and</strong> Amcrica U.S.A./<br />
Bulbs<br />
Foglamps<br />
All countries €xcept U.S.A. <strong>and</strong> Canada<br />
U.S.A. <strong>and</strong> Canada<br />
Front side lamp<br />
Front flasher lamp<br />
Rear stop/tail lamp<br />
Rear flasher Iamp<br />
Reversing lamp<br />
Number plate lanp<br />
Boot lamp<br />
Inspection lamp<br />
Companion lamp<br />
Map lamp<br />
Roof lamp<br />
Capping rail lamp<br />
Sp€edometer<br />
Illumination<br />
Flasher warning lamps<br />
Headlamp main beam<br />
'4' in 'l'instrument lamp<br />
Clock illumination<br />
H<strong>and</strong> brake warning larnp<br />
Switchbox<br />
Cenerator warning lamp<br />
Fuel level warning lamp<br />
Fuses<br />
Horn fuse<br />
Headlamp flasher relay<br />
Radio fuse<br />
Dagenite or Exide l2v. 67 amp/hr.<br />
Negal.ive to frame<br />
Lucrs C48 l2v.<br />
Lucas M-45 G l2v.<br />
Lucas WT 618/ I<br />
Twin sealed-be8m type<br />
Type Rrtlng Colour<br />
|A<br />
2A<br />
lA<br />
12\ 3'l r\t<br />
l2v 37|/50w<br />
. l2v 31lw<br />
Clcar<br />
Clcar<br />
Clear<br />
European l2v 45140\^t<br />
lA ,l2v 31!w<br />
Clear<br />
Yellow<br />
2A l2v 45140w Yellow<br />
lA l2v 37|w Clcar<br />
2 or 2A l2v 37l2l50w Clear<br />
l2v 48w<br />
| 2v 4tiw<br />
l2v 6w<br />
l2v zlw<br />
l2v 2ll6w<br />
t2v ?.lw<br />
l2y 2lw<br />
l2v 6w<br />
l2v 6w<br />
l2v 6w<br />
l2v 6w<br />
l2v 6w<br />
l2v 6w<br />
lzv Jw<br />
l2v 2.2w<br />
l2v 2'2w<br />
l2v 2'2w<br />
lzv z zw<br />
t2y 2'2w<br />
tzv z zw<br />
i6v 3w<br />
l6v 3rv<br />
30 amp. (one str<strong>and</strong> of<br />
copper wtre).<br />
25 amp. cartridge lype<br />
25 amp. cartridge iype<br />
5 amp. cartridge type<br />
D3 (S)<br />
Yellow<br />
Clear<br />
Clear<br />
Clear<br />
Clear<br />
Clear<br />
Clear<br />
Clear<br />
Clear<br />
Clear<br />
Clear<br />
Clear<br />
Clear<br />
Clear<br />
Clear<br />
Clear<br />
Clcar<br />
Clear<br />
Clear<br />
Clear<br />
Clear<br />
Clear<br />
Lhopler D<br />
tllorkthop hlonuol<br />
Soppbrncnt<br />
flttlng<br />
Push-in two blade<br />
Push-in thr€e bladc<br />
Push-in two blade<br />
Push-in threc blade<br />
Push-in two blade<br />
Push-in thr€e blede<br />
Push-in two bladc<br />
Push-in thre€ blcde<br />
B.P,F.<br />
B,P.F.<br />
M.C.C. bayonet<br />
S.C.C. bayonet<br />
S.B.C. bayonet<br />
S.C.C. bayonet<br />
S.C.C. bayonet<br />
M.C.C. bayonet<br />
M.C.C. bayonet<br />
M.C.C. bayonet<br />
M.C.C. bayonet<br />
M.C.C. bayonet<br />
Double-ended festoon<br />
Double-ended festoon<br />
M.E.S. screw<br />
M,E.S. screw<br />
M.E.S. screw<br />
M.E.S, screw<br />
M.E.S. scrcw<br />
M.E.S. screw<br />
M.E,S. screw<br />
M.E.S, screw<br />
No. 28 SWG (0.0148<br />
in. dia.) tinncd
Chaprcr D<br />
Vlorkshop lllonual<br />
Supplcrncnt<br />
flollr-Roycc Sllver Cloud lll, ond Phqntom Y<br />
Bcntlcy Sl <strong>and</strong> Bcnal.f Contln.naot Si<br />
PERIODIC <strong>LUBRICATION</strong> <strong>AND</strong> <strong>MAINTENANCE</strong><br />
SCHEOULES FOR<br />
stLvER cLouD l, aENTLEYISI, AENTLEY CONTTNENiTAL 53 ANO PHANTOH V<br />
<strong>The</strong> following periodic servicc sclrccjulcs lrirrc bcctt<br />
rirawn up to u5srst retailcrs <strong>and</strong> servicc pcrs,,rtncl wrllt<br />
lhe maintenance of <strong>Rolls</strong>-<strong>Royce</strong> an(l Bcrrtlcy nr()t()f<br />
cars.<br />
Rctailers arc atlviscrl trr adool lhc\c \rlrr(ltrlcs irs<br />
normal scrricc ptocc
Rollr-Roycc Sllver Cloud lll, ond Phontom V<br />
Ecntlcy 53 ond Bantl.y Contincntal SJ<br />
6000 i{lLE (10,0@ K},t.) SCHEDULE<br />
I Repeat the 3000 mile schedule.<br />
Oil changes<br />
I Drain <strong>and</strong> refiil the crankcasc.<br />
lf the car is used regularly for town wrrrk untl rs<br />
subJectcd to a considerablc amount of.stop-\tart,<br />
operatton, the engine crankcase should be drained<br />
<strong>and</strong> refillcd cvery 3000 miles (5000 Kms.).<br />
Engine adiustments <strong>and</strong> checks<br />
I Renew thc oil fllter.elcmert,<br />
2 Clcan lhc air valves in thc crrhurctters.<br />
Check thc tril ievel in thc air valve danrpcrs lnrl<br />
top-up if ncccssary to the c.)rrcct lcvel.<br />
I Lubricatc thc ignilion dislributor autornatr(. ;r(tvance<br />
mcchanism, shaft bearirrgr, governor spindle<br />
<strong>and</strong> cam.<br />
4 Clcan thc couracl breakcf pornrs, check thc gap<br />
anrl apply onc drop o[ cngrnc oil lo the pivot prn<br />
of cach rtrckcr arnr.<br />
Chcck an,J rf rteccssary, rc\ct ihc ignit,on tinltirg.<br />
5 Clean spark plugs <strong>and</strong> set gaps as necessary.<br />
6 Remove, clean <strong>and</strong> re-oil tltc rvire mesh arr liltr:r<br />
ele men t,<br />
Chasris adiustm€nts <strong>and</strong> checks<br />
I Removc any foreign mallrr ll,)nr llrc rcfrigcr t0r<br />
condcnser nratrix (if ljlted I<br />
2 Lubricate the gear rangr. rck:r.trrr r:ontrol., rrrrrt<br />
accelerator linkagc.<br />
J Lubricatc the brakc sysletn lji!ot pin\ an.l bcifin),\.<br />
4 Remove thc brake drunr' rrrtl Inspcct th(. hrnlc<br />
linings for wear. 'fhc facc of 1 1ia1n, shoukl nr,l<br />
be less than fi in. above thr: rrvcts.<br />
-5 lntcrchangc the whecls lo rlrnrrrr\c vanilt()ns rn<br />
ryre wear.<br />
6 Chcck <strong>and</strong> il'neccssary balancc the whecls,<br />
Electrical system<br />
I Check that lhe heater con(r(,ls arc ()peritting<br />
satisfactorily.<br />
2 Check that all lights, fi:rshcr unils <strong>and</strong> jnslrurrrr:rrts<br />
are operating satisfactorily.<br />
Ds (s)<br />
Chapter I)<br />
Workrhop Monuol<br />
Supplcmcnt<br />
t 2,0110 lrtlLE (20,000 KM.) SCHEDULE<br />
I Repcat the 6000 mile schrdulc.<br />
Oi ll level checks<br />
I Chcck :hc shock absorhers for srgns of leakage.<br />
rf uppaf.nt, inspect the oil level anci top-up rt'<br />
ncccssarv with the recommendcd oil.<br />
2 (-hcrk lnd rf necessary. top-up lhe rcar axlc *.ith<br />
o rl.<br />
Engine adjustment$ <strong>and</strong> ch€ck3<br />
I Rcrrcw ihc sparkirrg plugs.<br />
2 Rcnew the 6q1bg1qg19r air filter elcment--this<br />
only applics \r'here the IJ pcr tyFe air filter clcment<br />
il litlcd (crrtain overscas counlries orrly).<br />
3 (lcan lltc g|uzc liltcrs thc carburctter Roat<br />
clrrtmhcr tied conncctii'ns ^nrl<br />
Chassis ad justmentJ <strong>and</strong> chccks<br />
I Lubrr,.:rrr rhc grease nipple on lhe nlaster cylrndcr<br />
ldlancc ;r<br />
'<br />
er.<br />
2 l-||hricatc thc ihirtccn greasc nipples oo {hr sleerin!:<br />
mr-chanrsm<br />
-l l-uhric::rc rhe eight grease nipplcs on the f.ont<br />
\u\l)cn\ron.<br />
4 l-utricsrr the (hree grease nipples on (he rear<br />
propeilcr'shafl.<br />
5 CIr.'irn our the rnatn fiicl line filter <strong>and</strong> tiltcr bowl<br />
<strong>and</strong> the fiircr gauzcs in the luel pump. Clean thc<br />
clc!-ir|(;tl (otltact points anrl chcck thc functioning<br />
r)l- Ilrc l,,ci punlp\. I IiN( ti prrmp shr,ulr j be tcsted<br />
In(l!" ir( n(lcriIry.)<br />
Electrical system checks<br />
| ( lerrr. .rppi] va\rlinc tnd lrglrten thc ha{tery<br />
lcrnlrlal\.<br />
Heater (recirculatory)<br />
I ('lrnn thc filtcr gauze In the rnlakc beneath the<br />
rrght-fanti<br />
lr(int scat. Tcst the car oo thc r.lad.<br />
14,000 MtLE (10,0(n Kl4.) SCHEDULE<br />
I t{cpr.rt thc I :,@O nrile schedulc.<br />
Oil changes<br />
I Dtarn thc gearbox <strong>and</strong> fluid coupling; rclill with<br />
lhc rccornmendcd fluid.<br />
2 l)rain <strong>and</strong> refill thc rear axle.<br />
Oil level checks<br />
I Clhcck thc oii level rn thc transfer \teering box <strong>and</strong><br />
top-up if nice5sa.y.
Clwr.r D<br />
Workhop lllonuol<br />
Supplomcnt<br />
Englnc ediu*mGntt .nd chGcks<br />
I Clcan thc flarnc traps in thc crankcasc brcathcr<br />
tubc.<br />
Chlrrb .diustmcntr end chcckr<br />
I Rencw lhc filter el€mcnt in thc stcering pump<br />
rcservoir.<br />
2 Relcssc, but do noa rcmovc thc fuel tank drain plug<br />
to allow any accumulated water to cscape.<br />
Elcctrical ry3tGm chcckl<br />
I Inspcct the generator commulator <strong>and</strong> brushes for<br />
wcar <strong>and</strong> for frccdom in their holdcrs.<br />
SEASONAL SCHEDULES<br />
Every 12 month3<br />
Enginc cooling iy3tem<br />
I Drain the anli-freeze from lhe radiator <strong>and</strong> both<br />
cylinder blocks. Thoroughly flush oui the coolant<br />
passages with a continuous flow of water. This<br />
should be carried out just prior to lhc Autumn<br />
(In thc U.K. prior to Scptember 2lst.)<br />
Refill thc system with the correct anti-freeze<br />
mrxqure.<br />
Rollr-Roycc Slfvcr Cloud lll, ond Phcntom V<br />
Eontlty 53 ond Elnarcy Conlrn.nto, 53<br />
D6 (S)<br />
Refrigcration 3y3tem (lf fitted)<br />
<strong>The</strong>se opcntlons sbould only bo crrled out by rn<br />
cxperlanced lcfrigcrrlion cnglftcr.<br />
Ch€ck that thc rcfrigeration system is functioning<br />
correctly <strong>and</strong> if necessary top-up the system with<br />
refrigerant. lf loss of refrigerant is evident, check the<br />
system for leaks.<br />
Check thc level of oil in the refrigerant comprcssor.<br />
Clean the 6ltcr gauze fitled over the evaporator air<br />
intake (boot units only),<br />
Every 24 months<br />
Rcpetition of l2 months schedule plus '*<br />
Rcncwal of heater <strong>and</strong> coolant hoses.<br />
SPT],CIAt. PRECAUT'IONS<br />
Should thc car be uscd in constant temDcralurcs o[<br />
0 F. <strong>and</strong> below<br />
(hrbrrctters<br />
l)rain <strong>and</strong> refill the carburetter air valve dampcr\ \,rith<br />
oil of viscosity S.A.E. 10.<br />
Engine<br />
f)rain the engine sump when thoroughly wartn ard<br />
rcfill with oil of viscosrtl' S.A.E. 10.