Dual Digital Clock Bracket Kit XR-SNSBRK-INST ... - Primex Wireless
Dual Digital Clock Bracket Kit XR-SNSBRK-INST ... - Primex Wireless
Dual Digital Clock Bracket Kit XR-SNSBRK-INST ... - Primex Wireless

Create successful ePaper yourself
Turn your PDF publications into a flip-book with our unique Google optimized e-Paper software.
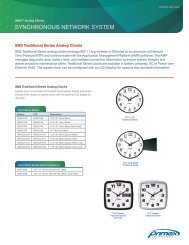
Installation Instructions<br />
<strong>Dual</strong> <strong>Digital</strong> <strong>Clock</strong> <strong>Bracket</strong> <strong>Kit</strong><br />
part # SNS24WBRK / CBRK, SNS26WBRK / CBRK, SNS4XBRK<br />
<strong>XR</strong>A24WBRK / CBRK, <strong>XR</strong>A26WBRK / CBRK, <strong>XR</strong>A4XBRK<br />
READ AND FOLLOW ALL SAFETY <strong>INST</strong>RUCTIONS.<br />
1. The digital clock is to be installed by a certified electrician.<br />
2. The installation of the digital clock must conform to state or local<br />
building codes and ordinances.<br />
3. The digital clock must be connected to a properly grounded outlet<br />
or wired into a junction box.<br />
4. The digital clock is designed for indoor use only. Operating<br />
outdoors, or in wet areas, is an electrical hazard and may damage<br />
the equipment while nullifying the warranty.<br />
Safety Information<br />
5. To avoid possible electric shock or damage to the digital clock,<br />
disconnect power source before installation or servicing.<br />
6. For healthcare facilities, clocks are not intended for patient use<br />
and must not be installed within 6ft (2m) of patient contact.<br />
7. <strong>Clock</strong>s are cleanable with a cloth moistened with water or a<br />
common disinfectant. Be sure to test any cleaning solutions on a<br />
small area of the clock before using it on the entire clock.<br />
8. Mount in location where equipment will not readily be subject to<br />
tampering.<br />
A<br />
<strong>Kit</strong> Contents<br />
The <strong>Dual</strong> <strong>Digital</strong> <strong>Clock</strong> <strong>Bracket</strong> kit is a flange (mounts<br />
to ceiling or wall), a bracket (bolts to flange and<br />
mounts two clocks), and hardware necessary to install<br />
dual digital clocks.<br />
This kit is included when ordering any dual digital<br />
clock and can also be purchased as an accessory to<br />
combine two existing single-sided digital clocks into a<br />
dual sided clock.<br />
Remove <strong>Clock</strong>s from <strong>Bracket</strong><br />
• (2.5”x4 and 2.5”x6) From the top of the bracket, using a<br />
screwdriver press each hook down to release the clock. Then pull<br />
out to unsnap bottom hinges.<br />
• (4”x4 and 4”x6) From the top of the bracket, insert a thin<br />
screwdriver into each notch and gently move screwdriver sideways<br />
to unhook the clock. Then pull clock forward and up to unsnap.<br />
Lift out.<br />
Figure 1 Flange Installation<br />
Installation Instructions<br />
1. On the wall or ceiling, measure and drill holes with the correct spacing<br />
to mount the flange over the junction box. (Figure 1). Refer to Figure<br />
3 and 4 for clock overall dimensions.<br />
2. Attach the flange to the wall or ceiling using the toggle anchors and<br />
the longer machine screws provided. Note: If wall mounting to location<br />
outside of the junction box, break off or cut openings in flange to<br />
route power cords.<br />
3.0”<br />
B<br />
5.0 5.00 in. (12.7 cm)<br />
FLANGE<br />
AREA<br />
4.0 in. 4.0 (10.16 cm)<br />
6.0 in.<br />
(15.24 6.0 cm)<br />
7.0 in.<br />
(17.78 7.00 cm)<br />
FLANGE<br />
AREA<br />
3. Attach the bracket to the flange using the shorter machine screws, nuts,<br />
and washers provided. For 4”x4 wall mounting, ensure the bracket tabs<br />
are on the bottom. (Figure 2)<br />
.50.5 <strong>INST</strong>ALL in. (1.27 cm) <strong>INST</strong>ALL<br />
4 ANCHORS<br />
4. For wall mount, knock out power cord break. (Figure 2)<br />
5. Wire clocks to main power, using cord retaining clips to dress wires.<br />
6. Align the clocks to the bracket’s hooks and hinges and snap into place.<br />
DRY WALL OPENING<br />
AND HOLE PATTERN<br />
FROM CENTER
Figure 2 <strong>Dual</strong> <strong>Digital</strong> Mounting Diagram<br />
DryWall<br />
install 4 anchors<br />
Flange<br />
4x4 <strong>Bracket</strong><br />
Electrical<br />
Junction Box<br />
4x4 LED clock<br />
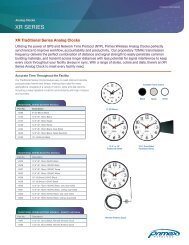
SNS <strong>Digital</strong> <strong>Clock</strong> Series <strong>Dual</strong> Mount <strong>Bracket</strong> <strong>Kit</strong><br />
Part # Mounting Method <strong>Digital</strong> <strong>Clock</strong> Dimension<br />
SNS24WBRK Wall Mount 2.5” x 4<br />
SNS24CBRK Ceiling Mount 2.5” x 4<br />
SNS26WBRK Wall Mount 2.5” x 6<br />
SNS26CBRK Ceiling Mount 2.5” x 6<br />
SNS4XBRK Wall Mount 4” x 4<br />
SNS4XBRK Ceiling Mount 4” x 4<br />
SNS4XBRK Ceiling Mount * 4” x 6<br />
<strong>XR</strong> <strong>Digital</strong> <strong>Clock</strong> Series <strong>Dual</strong> Mount <strong>Bracket</strong> <strong>Kit</strong><br />
Part # Mounting Method <strong>Digital</strong> <strong>Clock</strong> Dimension<br />
<strong>XR</strong>A24WBRK Wall Mount 2.5” x 4<br />
<strong>XR</strong>A24CBRK Ceiling Mount 2.5” x 4<br />
<strong>XR</strong>A26WBRK Wall Mount 2.5” x 6<br />
<strong>XR</strong>A26CBRK Ceiling Mount 2.5” x 6<br />
<strong>XR</strong>A4XBRK Wall Mount 4” x 4<br />
<strong>XR</strong>A4XBRK Ceiling Mount 4” x 4<br />
<strong>XR</strong>A4XBRK Ceiling Mount * 4” x 6<br />
* 4" x 6 is not available as a wall mount.<br />
Screw<br />
washer<br />
2.5” x 6 bracket displayed.<br />
2.5” x 4 bracket shape differs slightly.<br />
power cord<br />
break area<br />
*Both wall and ceiling mounting displayed for diagram purposes only.<br />
**Power cord break only applicable to wall mounting.<br />
Figure 3 <strong>Dual</strong> <strong>Digital</strong> overall Dimension 4” x 4 Figure 4 <strong>Dual</strong> <strong>Digital</strong> Overall dimension 2.5” x 6<br />
3 3.0 in.<br />
(7.6 cm)<br />
11.0 in.<br />
TO<br />
CEILING<br />
(27.9 cm)<br />
TO CEILING<br />
8.0 8.0 in.<br />
(20.3 cm)<br />
3.0 in. (7.6 cm)<br />
3.0 TO TO CEILING<br />
5.0 in.<br />
5.0<br />
(12.7 cm)<br />
18.0 in. (45.7 18.0 cm)<br />
21.0 in. (53.321.0 cm) TO WALL<br />
2 CLOCKS CAN BE USED:<br />
* 2.5 x 6 LED CLOCK=13.8<br />
in. (35.0 cm)<br />
* 2.5 x 4 LED CLOCK=10.75<br />
in. (27.3 cm)<br />
(NOT SHOWN)<br />
2 CLOCKS CAN BE USED:<br />
* 2.5 x 6 LED CLOCK=16.8<br />
in. (42.7 cm)<br />
* 2.5 x 4 LED CLOCK=13.75<br />
in. (34.9 cm)<br />
(NOT SHOWN)<br />
Document Part # <strong>XR</strong>-<strong>SNSBRK</strong>-<strong>INST</strong><br />
<strong>Primex</strong> <strong>Wireless</strong><br />
US / CAN (800) 404-8112<br />
UK 0800-3896996<br />
www.primexwireless.com<br />
info@primexwireless.com<br />
April 2012