Greasing the molecular drag pump MDP 5011/5006 HDS - PTB Sales
Greasing the molecular drag pump MDP 5011/5006 HDS - PTB Sales
Greasing the molecular drag pump MDP 5011/5006 HDS - PTB Sales

You also want an ePaper? Increase the reach of your titles
YUMPU automatically turns print PDFs into web optimized ePapers that Google loves.
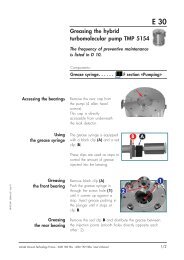
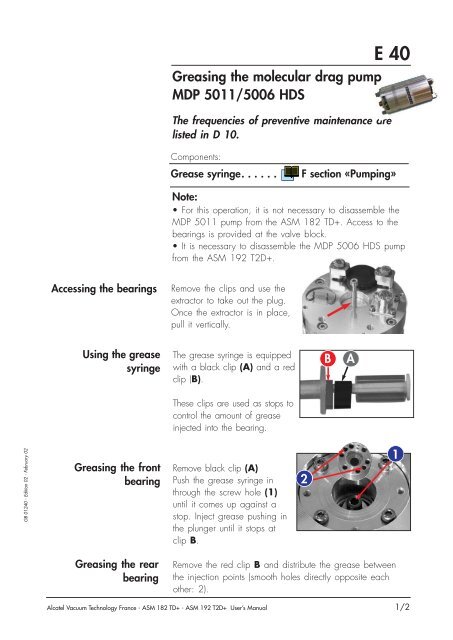
<strong>Greasing</strong> <strong>the</strong> <strong>molecular</strong> <strong>drag</strong> <strong>pump</strong><br />
<strong>MDP</strong> <strong>5011</strong>/<strong>5006</strong> <strong>HDS</strong><br />
The frequencies of preventive maintenance are<br />
listed in D 10.<br />
E 40<br />
Components:<br />
Grease syringe. . . . . .<br />
F section «Pumping»<br />
Note:<br />
• For this operation, it is not necessary to disassemble <strong>the</strong><br />
<strong>MDP</strong> <strong>5011</strong> <strong>pump</strong> from <strong>the</strong> ASM 182 TD+. Access to <strong>the</strong><br />
bearings is provided at <strong>the</strong> valve block.<br />
• It is necessary to disassemble <strong>the</strong> <strong>MDP</strong> <strong>5006</strong> <strong>HDS</strong> <strong>pump</strong><br />
from <strong>the</strong> ASM 192 T2D+.<br />
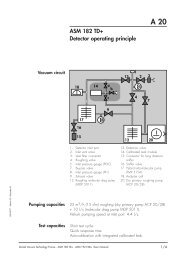
Accessing <strong>the</strong> bearings<br />
Remove <strong>the</strong> clips and use <strong>the</strong><br />
extractor to take out <strong>the</strong> plug.<br />
Once <strong>the</strong> extractor is in place,<br />
pull it vertically.<br />
Using <strong>the</strong> grease<br />
syringe<br />
The grease syringe is equipped<br />
with a black clip (A) and a red<br />
clip (B).<br />
B<br />
A<br />
These clips are used as stops to<br />
control <strong>the</strong> amount of grease<br />
injected into <strong>the</strong> bearing.<br />
GB 01240 - Edition 02 - February 02<br />
<strong>Greasing</strong> <strong>the</strong> front<br />
bearing<br />
Remove black clip (A)<br />
Push <strong>the</strong> grease syringe in<br />
through <strong>the</strong> screw hole (1)<br />
until it comes up against a<br />
stop. Inject grease pushing in<br />
<strong>the</strong> plunger until it stops at<br />
clip B.<br />
2<br />
1<br />
<strong>Greasing</strong> <strong>the</strong> rear<br />
bearing<br />
Remove <strong>the</strong> red clip B and distribute <strong>the</strong> grease between<br />
<strong>the</strong> injection points (smooth holes directly opposite each<br />
o<strong>the</strong>r: 2).<br />
Alcatel Vacuum Technology France - ASM 182 TD+ - ASM 192 T2D+ User’s Manual<br />
1/2
<strong>Greasing</strong> <strong>the</strong> <strong>molecular</strong> <strong>drag</strong> <strong>pump</strong><br />
<strong>MDP</strong> <strong>5011</strong>/<strong>5006</strong> <strong>HDS</strong><br />
E 40<br />
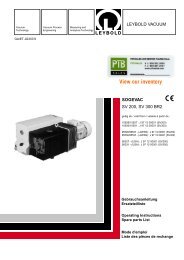
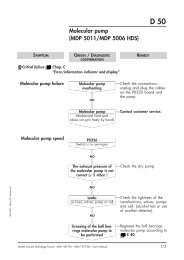
Running in <strong>the</strong> <strong>pump</strong><br />
after relubrication<br />
After relubricating <strong>the</strong> <strong>MDP</strong> <strong>5011</strong>/<strong>5006</strong> <strong>HDS</strong>, <strong>the</strong> grease must<br />
be distributed in <strong>the</strong> bearings ("Running in").<br />
This is performed by limiting <strong>the</strong> speed of <strong>the</strong> <strong>pump</strong> for a short<br />
period.<br />
For this, on <strong>the</strong> P0326 converter board, set <strong>the</strong> running in<br />
switches; switch 1 to ON (detector off).<br />
Start up <strong>the</strong> detector and let it operate for approximately 10<br />
minutes in this position.<br />
After 10 minutes, switch off <strong>the</strong> detector and reset switch 1 to OFF.<br />
Start <strong>the</strong> detector up again and check that <strong>the</strong> <strong>MDP</strong><br />
<strong>5011</strong>/<strong>5006</strong> <strong>HDS</strong> reaches its synchronization speed correctly. If<br />
this time is too long, repeat <strong>the</strong> running in procedure a second<br />
time.<br />
P0326 board<br />
ON<br />
ON<br />
GB 01240 - Edition 02 - February 02<br />
1 2<br />
Normal<br />
position<br />
1 2<br />
Running-in<br />
position<br />
2/2<br />
Alcatel Vacuum Technology France - ASM 182 TD+ - ASM 192 T2D+ User’s Manual