English - QlockTwo
English - QlockTwo
English - QlockTwo
Create successful ePaper yourself
Turn your PDF publications into a flip-book with our unique Google optimized e-Paper software.
I<br />
T L i s B F A M P M<br />
A<br />
C<br />
Q<br />
U<br />
A<br />
R<br />
T<br />
E<br />
R<br />
D<br />
C<br />
T<br />
W<br />
1<br />
e<br />
N<br />
T<br />
Y<br />
F<br />
I<br />
V<br />
1<br />
e<br />
X<br />
H<br />
A<br />
L<br />
f<br />
B<br />
T<br />
E<br />
n<br />
F<br />
T<br />
O<br />
P<br />
a<br />
S<br />
T<br />
E<br />
R<br />
U<br />
N<br />
I<br />
n<br />
E<br />
O<br />
N<br />
E<br />
s<br />
I<br />
X<br />
T<br />
H<br />
R<br />
e<br />
E<br />
F<br />
O<br />
U<br />
R<br />
F<br />
I<br />
V<br />
E<br />
T<br />
W<br />
O<br />
E<br />
I<br />
G<br />
h<br />
T<br />
E<br />
l<br />
E<br />
V<br />
E<br />
N<br />
s<br />
E<br />
V<br />
E<br />
N<br />
T<br />
W<br />
E<br />
L<br />
1 1<br />
V<br />
E<br />
T e N S E O‘<br />
C<br />
L<br />
O<br />
C<br />
K<br />
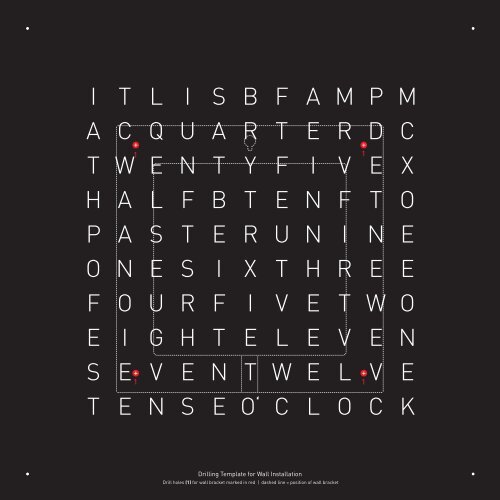
Drilling Template for Wall Installation<br />
Drill holes (1) for wall bracket marked in red | dashed line = position of wall bracket
TIP<br />
The drilling template can also be used as a positioning aid<br />
for determining the optimum position of your QLOCKTWO in<br />
the room.<br />
Installation Instructions<br />
– only for wall installation –<br />
Required materials<br />
Adhesive tape or thumb tacks<br />
Pencil or punch<br />
Spirit level<br />
Electric drill with appropriate drill bits<br />
Cordless or manual screwdriver<br />
Suitable screws and anchors, depending on wall condition<br />
Long ruler<br />
Metal rod<br />
Retaining screw for the threaded opening (B) on the<br />
back of the QLOCKTWO (included)<br />
Finding the correct position<br />
Please use the drilling template on the front to determine the<br />
position of the QLOCKTWO with the wall bracket. Make sure<br />
that no power supply cables etc. are routed in the area of the<br />
marked drill holes. Align the drilling template with the spirit<br />
level and fix it in place with adhesive tape or thumb tacks.<br />
Drilling<br />
Mark the drill holes (1) through the drilling template on the<br />
wall with a sharp pencil or punch. Comply with the spacing<br />
exactly as marked on the drilling template. Remove the drilling<br />
template. Drill the mounting holes at the marked points.<br />
Now insert the correct anchors in the drill holes depending on<br />
the wall condition.<br />
Drawing ”Wall bracket“<br />
1<br />
E<br />
1<br />
Power supply<br />
Variant 1: Direct power outlet on the wall.<br />
The cable socket (I) must be connected to the mains power<br />
supply by a trained electrician. Connect the short USB cable<br />
provided to the power plug (H) and insert it into the cable<br />
socket (I). Plug the narrow USB connector (G) into the USB<br />
socket (C). Then hang the QLOCKTWO in the keyhole slot (E)<br />
with the retaining screw. Be sure to observe the information<br />
below in ”Hanging in wall bracket“!<br />
Drawing of Variant 1 ”Direct power outlet on wall“<br />
I<br />
H<br />
E<br />
G<br />
Fastening<br />
Screw the included retaining screw into the threaded<br />
opening (B) provided for this purpose (see ”Back of<br />
QLOCKTWO“ drawing) so that it only protrudes 6 mm.<br />
Drawing ”Back of QLOCKTWO“<br />
A<br />
B<br />
C<br />
G<br />
C<br />
CAUTION! Work on electrical systems and<br />
electrical equipment may only be carried out<br />
by trained electricians. Be sure to deenergise<br />
electrical wiring before beginning installation.<br />
Biegert & Funk Product GmbH & Co. KG shall<br />
not be liable for either improper connection or for<br />
incorrect installation of the QLOCKTWO.<br />
WARNING! Please be sure to observe the<br />
information in the operating instructions on the<br />
topic of safety, use and connection.<br />
Variant 2: Power supply via a wall socket.<br />
Using the long USB cable provided or the optional<br />
colored textile cable connect the USB plug (G) into the USB<br />
socket (C). Connect the other USB plug to the power plug (H)<br />
and then insert into a wall socket located nearby. Then hang<br />
the QLOCKTWO in the keyhole slot (E) with the retaining screw.<br />
The cable is routed through the cable duct (F) as shown in the<br />
drawing ”Cable Routing“. Be sure to observe the information<br />
below in ”Hanging in wall bracket“!<br />
Drawing of Variant 2 ”Cable routing with power supply<br />
via wall socket“<br />
E<br />
1 5 60<br />
D<br />
Screw the retaining screw into the threaded opening (B) until it<br />
still protrudes 6 mm.<br />
G<br />
F<br />
1<br />
Cable duct for cable routing with power supply<br />
F<br />
1<br />
via a wall socket/Variant 2<br />
H<br />
Note on hanging in wall bracket<br />
Hanging the connected QLOCKTWO in the wall bracket<br />
requires a little skill and is best when carried out by two people.<br />
While the first person aligns and hangs the clock, the assisting<br />
person can make sure that no cable loops get caught between<br />
the wall bracket and the clock body. Any cable loops can be<br />
pushed back into the wall bracket and aligned with a ruler.<br />
CAUTION! If you feel resistance due to a poorly positioned<br />
cable, you should never use force to press or turn the clock<br />
into the correct position, as otherwise the USB plug (G) can<br />
be bent or damaged.


