Track Buckling Hazard Detection and Rail Stress Management
Track Buckling Hazard Detection and Rail Stress Management
Track Buckling Hazard Detection and Rail Stress Management

Create successful ePaper yourself
Turn your PDF publications into a flip-book with our unique Google optimized e-Paper software.
Challenge C: Increasing Freight capacity <strong>and</strong> services<br />
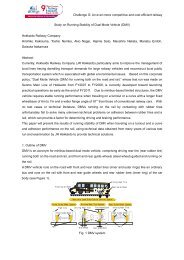
Figure 3 – Five Years of RSM Data on the Union Pacific<br />
50<br />
40<br />
Neutral Temperature (°F)<br />
RB1<br />
A<br />
RB2<br />
B<br />
30<br />
20<br />
Neutral Temperature (°C)<br />
2°(875m) Curve<br />
Low <strong>Rail</strong><br />
10<br />
High <strong>Rail</strong><br />
0<br />
Calendar Days<br />
Figure 4 – RNT Behavior in <strong>Rail</strong> Breaks<br />
4.0 <strong>Rail</strong> Break Mechanics, Repair <strong>and</strong> Restressing<br />
A major reason for the reduced <strong>and</strong> possibly unsafe neutral temperatures is the difficulty in resetting the<br />
RNT to the desired target value after a rail break or after a rail defect removal. The fundamentals of rail<br />
break mechanics are discussed in [4, 5], while Figure 5 illustrates the basics. It is a well known that when<br />
the rail is broken or cut for defect removal the RNT drops to the temperature of the rail when the break/cut<br />
occurs. For example, in Figure 5 when the rail breaks at 40°F(4°C) its RNT is 40°F (4°C) at that location.<br />
Additionally in this case, the rail break/cut influence is experienced for a track length exceeding 635 ft<br />
(194m) on either side of the break/cut as indicated by L d . As shown in [4, 5], these L d ’s can be on the<br />
4