RAM-VB-109 Installation Instructions - RAM Mounts
RAM-VB-109 Installation Instructions - RAM Mounts
RAM-VB-109 Installation Instructions - RAM Mounts

You also want an ePaper? Increase the reach of your titles
YUMPU automatically turns print PDFs into web optimized ePapers that Google loves.
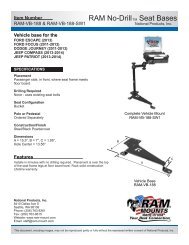
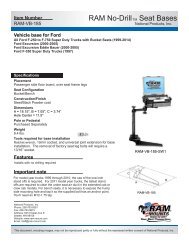
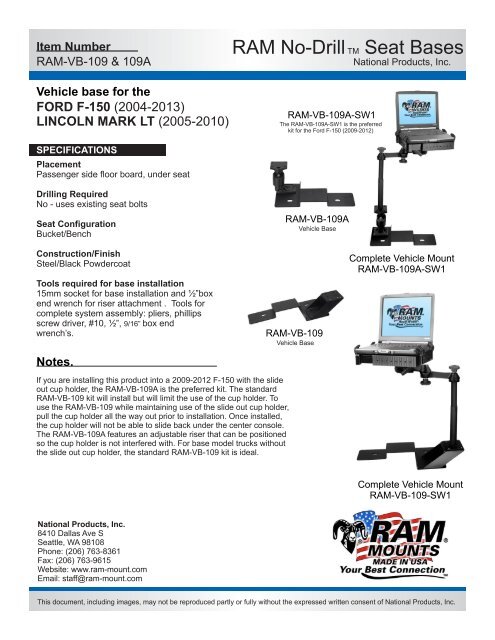
Item Number<br />
<strong>RAM</strong>-<strong>VB</strong>-<strong>109</strong> & <strong>109</strong>A<br />
Vehicle base for the<br />
FORD F-150 (2004-2013)<br />
LINCOLN MARK LT (2005-2010)<br />
<strong>RAM</strong> No-Drill TM Seat Bases<br />
National Products, Inc.<br />
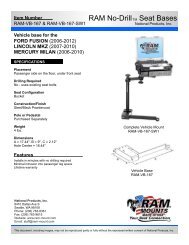
<strong>RAM</strong>-<strong>VB</strong>-<strong>109</strong>A-SW1<br />
The <strong>RAM</strong>-<strong>VB</strong>-<strong>109</strong>A-SW1 is the preferred<br />
kit for the Ford F-150 (2009-2012)<br />
SPECIFICATIONS<br />
Placement<br />
Passenger side floor board, under seat<br />
Drilling Required<br />
No - uses existing seat bolts<br />
Seat Configuration<br />
Bucket/Bench<br />
Construction/Finish<br />
Steel/Black Powdercoat<br />
Tools required for base installation<br />
15mm socket for base installation and ½”box<br />
end wrench for riser attachment . Tools for<br />
complete system assembly: pliers, phillips<br />
screw driver, #10, ½”, 9/16” box end<br />
wrench’s.<br />
Notes.<br />
<strong>RAM</strong>-<strong>VB</strong>-<strong>109</strong>A<br />
<strong>RAM</strong>-<strong>VB</strong>-<strong>109</strong><br />
Vehicle Base<br />
Vehicle Base<br />
Complete Vehicle Mount<br />
<strong>RAM</strong>-<strong>VB</strong>-<strong>109</strong>A-SW1<br />
If you are installing this product into a 2009-2012 F-150 with the slide<br />
out cup holder, the <strong>RAM</strong>-<strong>VB</strong>-<strong>109</strong>A is the preferred kit. The standard<br />
<strong>RAM</strong>-<strong>VB</strong>-<strong>109</strong> kit will install but will limit the use of the cup holder. To<br />
use the <strong>RAM</strong>-<strong>VB</strong>-<strong>109</strong> while maintaining use of the slide out cup holder,<br />
pull the cup holder all the way out prior to installation. Once installed,<br />
the cup holder will not be able to slide back under the center console.<br />
The <strong>RAM</strong>-<strong>VB</strong>-<strong>109</strong>A features an adjustable riser that can be positioned<br />
so the cup holder is not interfered with. For base model trucks without<br />
the slide out cup holder, the standard <strong>RAM</strong>-<strong>VB</strong>-<strong>109</strong> kit is ideal.<br />
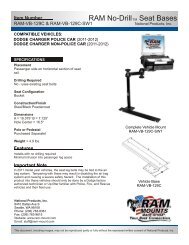
Complete Vehicle Mount<br />
<strong>RAM</strong>-<strong>VB</strong>-<strong>109</strong>-SW1<br />
National Products, Inc.<br />
8410 Dallas Ave S<br />
Seattle, WA 98108<br />
Phone: (206) 763-8361<br />
Fax: (206) 763-9615<br />
Website: www.ram-mount.com<br />
Email: staff@ram-mount.com<br />
This document, including images, may not be reproduced partly or fully without the expressed written consent of National Products, Inc.
Item Number<br />
<strong>RAM</strong>-<strong>VB</strong>-<strong>109</strong> & <strong>109</strong>A<br />
<strong>RAM</strong> No-Drill TM Seat Bases<br />
National Products, Inc.<br />
Vehicle base for the<br />
FORD F-150 (2004-2013)<br />
LINCOLN MARK LT (2005-2010)<br />
INSTALLATION INSTRUCTIONS<br />
Tools required for installation of No-Drill base are a 15mm socket and socket wrench, ½” box end wrench.<br />
Note: It is recommended that you attach the riser to the No-Drill base prior to installation. Use the provided hardware<br />
and your ½” box end wrench to fully tighten the hardware joining these two parts. Insert the carriage bolts from the top<br />
so that the rounded head is up and the nuts are on the bottom.<br />
1. Move the passenger seat back to its rearmost position and remove the front seat leg bolts on the passenger side<br />
using the 15mm socket.<br />
2. Move the passenger seat to its most forward position and only loosen the two rear seat leg bolts.<br />
3. Now, move the passenger side seat all the way back again and gently raise the front seat legs off the floor board.<br />
4 Place the No-Drill base between the seat frame legs and floor board.<br />
5. For trucks 2008 and earlier, use the set of holes closest to the front of the base. For 2009 and newer models, use<br />
rear set of mounting holes.<br />
6. Align the holes in the base with those of the seat frame legs. The pedestal platform should be near the console.<br />
7. Lower the seat down over the base, check alignment of the holes, and re-install the front seat bolts starting the<br />
thread by hand. Fully tighten and torque all 4 seat bolts previously loosened or removed to 30 ft lbs.<br />
Note:<br />
If you are installing this product into a 2009-2010 F-150 with the slide out cup holder, the <strong>RAM</strong>-<strong>VB</strong>-<strong>109</strong>A is the preferred<br />
kit. The standard <strong>RAM</strong>-<strong>VB</strong>-<strong>109</strong> kit will install but limit the use of the cup holder. To use the <strong>RAM</strong>-<strong>VB</strong>-<strong>109</strong> with the slide<br />
out cup holder, pull the cup holder all the way out if you plan to use it prior to installation. Once installed, the cup holder<br />
will not be able to slide back under the center console. The <strong>RAM</strong>-<strong>VB</strong>-<strong>109</strong>A has an adjustable riser that can be<br />
positioned so that the cup holder is not interfered with. For base model trucks without the slide out cup holder, the<br />
standard <strong>RAM</strong>-<strong>VB</strong>-<strong>109</strong> kit is ideal.<br />
National Products, Inc.<br />
8410 Dallas Ave S<br />
Seattle, WA 98108<br />
Phone: (206) 763-8361<br />
Fax: (206) 763-9615<br />
Website: www.ram-mount.com<br />
Email: staff@ram-mount.com<br />
This document, including images, may not be reproduced partly or fully without the expressed written consent of National Products, Inc.