CommandCenter NOC - Raritan
CommandCenter NOC - Raritan
CommandCenter NOC - Raritan

You also want an ePaper? Increase the reach of your titles
YUMPU automatically turns print PDFs into web optimized ePapers that Google loves.
I. Planning and Preparation<br />
<strong>CommandCenter</strong> ® <strong>NOC</strong><br />
Quick Installation and Setup Guide<br />
Thank you for purchasing <strong>Raritan</strong>’s <strong>CommandCenter</strong> <strong>NOC</strong> (CC-<strong>NOC</strong>). The primary function of a CC-<strong>NOC</strong> is to manage<br />
nodes in your network. Nodes are discovered automatically if their IP address is within the<br />
managed range of addresses. In addition to network discovery, a CC-<strong>NOC</strong> also provides service management, a database<br />
of network information, a rules engine, a notification engine, and a web server. A CC-<strong>NOC</strong> can also be instructed<br />
to collect statistics from your Windows systems, monitor network traffic for intrusion attempts and bandwidth performance,<br />
and scan your systems for vulnerabilities.<br />
Identify Hardware and Software in Your Network<br />
You may need to identify the software and hardware in your network for software auditing or compliance reporting. With<br />
CC-<strong>NOC</strong>, you can. With a few clicks, you can find out the number of Microsoft Office XP Professional licenses that have<br />
been installed or the manufacturer of all your equipment.<br />
Monitor Outage and Network Availability<br />
A CC-<strong>NOC</strong> continuously monitors your dynamic network and keeps the people (admins) who need to know informed of<br />
important network changes and events. DBAs want to know if mission critical database servers go down. A notification<br />
will go out only to the pertinent DBAs. Therefore, a network event is closely mapped to relevant IT expertise.<br />
Identify Security “Hot Spots” and Improve Network Security<br />
To help you plan for improved security or assist in compliance activities (for example, Sarbanes-Oxley), you can run<br />
intrusion detection reports to identify potential “hot spots” in your network or to ensure that your most mission-critical or<br />
key infrastructure machines (those with financial data) have not been attacked. Once identified, you can then increase<br />
security by adding firewall rules to those machines or changing the settings to be more restrictive.<br />
Identify Vulnerabilities on Your Systems<br />
Once configured, a CC-<strong>NOC</strong> looks for vulnerabilities on specified nodes in the network and works in conjunction with<br />
the authentication credentials used by Windows Management. Using the Vulnerability Browser, trends can be identified.<br />
Links to the public Common Vulnerabilities and Exposure List database http://www.cve.mitre.org are provided to provide<br />
more information about the vulnerabilities. With a few clicks, you can install Microsoft patches on machines that<br />
have vulnerabilities.<br />
Capacity Planning and Traffic Analysis<br />
With CC-<strong>NOC</strong>, you can analyze your traffic to help with capacity planning of your networks or to determine the reason<br />
for spikes in your network. Using traffic analysis will help in identifying the source host if you are experiencing a slowdown<br />
in your network. Traffic summaries can be analyzed to identify potential problems in your network or to prevent<br />
problems from ever occurring.<br />
Access <strong>CommandCenter</strong> Secure Gateway (CC-SG)<br />
Associating a <strong>CommandCenter</strong> Secure Gateway (CC-SG) with a CC-<strong>NOC</strong> allows your users more flexibility when solving<br />
issues by giving them direct KVM (Keyboard, Video, Mouse) access to problem devices. CC-<strong>NOC</strong> users can be<br />
authenticated remotely by CC-SG to provide an enhanced seamless mode of operation and Single Sign-on (SSO)<br />
access to CC-SG targets. With one-click access to CC-SG and SSO access to targets, a CC-<strong>NOC</strong> user can move easily<br />
between systems.<br />
View Syslog Events on CC-<strong>NOC</strong><br />
Client PC Planning<br />
Access CC-<strong>NOC</strong> through a serial port on a<br />
PC with a terminal emulation program<br />
(Hyper Terminal, Tera Term, etc.) for initial<br />
setup. Additional configuration is carried out<br />
through a web browser. The browser must<br />
have Javascript enabled to function correctly.<br />
These browsers and operating systems<br />
are supported on the client PC:<br />
Browser<br />
OS<br />
IE 6.0<br />
Win2K<br />
Mozilla 1.7 Win 2K, Win XP, Solaris 10<br />
Mozilla 1.7 RedHat9<br />
Mozilla Firefox 1.0 Win 2K, Win XP, Solaris 10<br />
Mozilla Firefox 1.0 RedHat9<br />
Netscape 7.2 Win 2K, Win XP, Solaris 10<br />
Netscape 7.2 RedHat9<br />
Primary Information<br />
Prior to setup, collect this information:<br />
- IP address of CC-<strong>NOC</strong>: CC-<strong>NOC</strong> must<br />
have a static IP.<br />
- IP address of Discovered Devices:<br />
Identify the addresses (or range) that<br />
should be managed by a CC-<strong>NOC</strong>.<br />
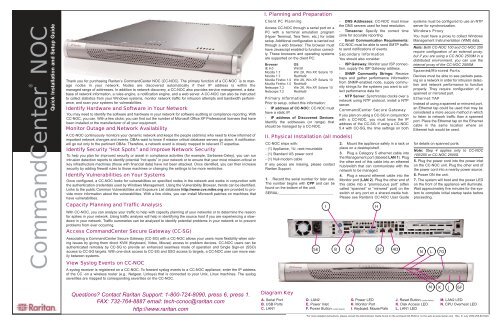
II. Physical Installation (all models)<br />
CC-<strong>NOC</strong> ships with:<br />
- (1) Appliance, 1U, rack-mountable<br />
- (1) Standard US power cord<br />
- (1) Null-modem cable<br />
If any pieces are missing, please contact<br />
<strong>Raritan</strong> Support.<br />
1. Record the serial number for later use.<br />
The number begins with CPP and can be<br />
found on the bottom of the unit.<br />
SERIAL:___________________________<br />
I<br />
- DNS Addresses: CC-<strong>NOC</strong> must know<br />
the DNS servers used for host resolution.<br />
- Timezone: Specify the correct time<br />
zone for accurate reporting.<br />
- Email Communication Requirements:<br />
CC-<strong>NOC</strong> must be able to send SMTP traffic<br />
to send notifications of events.<br />
Secondary Information<br />
You should also consider:<br />
- ISP Gateway: Monitor your ISP connection,<br />
supply the ISP Gateway address.<br />
- SNMP Community Strings: Receive<br />
traps and gather performance information<br />
from SNMP-enabled node, supply community<br />
strings for the systems you want to collect<br />
performance data for.<br />
- NTP Server: Synchronize clocks over a<br />
network using NTP protocol, install a NTP<br />
server.<br />
<strong>CommandCenter</strong> Secure Gateway<br />
If you plan on using a CC-SG in conjunction<br />
with a CC-<strong>NOC</strong>, you must know the IP<br />
address of the CC-SG. If using a CC-<strong>NOC</strong><br />
5.4 with CC-SG, the time settings on both<br />
2. Mount the appliance safely in a rack or<br />
place on a desktop/shelf.<br />
3. Plug a Category 5 ethernet cable into<br />
the Management port (labeled LAN 1). Plug<br />
the other end of this cable into an ethernet<br />
hub/switch that can communicate with the<br />
network to be managed.<br />
4. Plug a second ethernet cable into the<br />
Monitor port (LAN 2). Plug the other end of<br />
this cable into a “promiscuous port” (often<br />
called “spanned” or “mirrored” port) on the<br />
switch or any port on a shared-media hub.<br />
Please see <strong>Raritan</strong>’s CC-<strong>NOC</strong> User Guide<br />
H<br />
5E B A 3C 4D<br />
systems must be configured to use an NTP<br />
server for synchronization.<br />
Windows Proxy<br />
You must have a proxy to collect Windows<br />
Management Instrumentation (WMI) data.<br />
Note: Both CC-<strong>NOC</strong> 100 and CC-<strong>NOC</strong> 250<br />
require configuration of an external proxy,<br />
but if you are using a CC <strong>NOC</strong> 2500M in a<br />
distributed environment, you can use the<br />
internal proxy of the CC-<strong>NOC</strong> 2500M.<br />
Spanned/Mirrored Ports<br />
Devices must be able to see packets passing<br />
on a network in order for intrusion detection<br />
and network performance to function<br />
properly. They require configuration of a<br />
spanned or mirrored port.<br />
Ethernet TAP<br />
Instead of using a spanned or mirrored port,<br />
an Ethernet tap could be used that may be<br />
considered a more secure method in which<br />
to listen to network traffic than a spanned<br />
port. Place the Ethernet tap on the Ethernet<br />
cable in the same location where an<br />
Ethernet hub would be used.<br />
for details on spanned ports.<br />
Note: Step 4 applies only to CC-<strong>NOC</strong><br />
100/250 or CC-<strong>NOC</strong> 2500S.<br />
5. Plug the power cord into the power inlet<br />
on the CC-<strong>NOC</strong> unit. Plug the other end of<br />
the power cord into a nearby power source.<br />
6. Power ON the unit.<br />
7. The system will boot and the power LED<br />
on the front of the appliance will illuminate.<br />
Wait approximately five minutes for the system<br />
to complete initial startup tasks before<br />
proceeding.<br />
N L 7G<br />
A syslog receiver is registered on a CC-<strong>NOC</strong>. To forward syslog events to a CC-<strong>NOC</strong> appliance, enter the IP address<br />
of the CC -on a wireless router (e.g., Netgear, Linksys) that is connected to your Unix, Linux machines. The syslog<br />
severities are mapped to corresponding severities on the CC-<strong>NOC</strong>.<br />
Questions? Contact <strong>Raritan</strong> Support: 1-800-724-8090, press 6, press 1.<br />
FAX: 732-764-8887 email: tech-ccnoc@raritan.com<br />
http://www.raritan.com<br />
Diagram Key<br />
A. Serial Port<br />
B. USB Ports<br />
C. LAN1<br />
D. LAN2<br />
E. Power Inlet<br />
F. Power Button (under bezel)<br />
G. Power LED<br />
H. Monitor Port<br />
I. Keyboard, Mouse Ports<br />
J. Reset Button (under bezel)<br />
K. Disk Access LED<br />
L. LAN1 LED<br />
M K J 6F<br />
M. LAN2 LED<br />
N. CPU Overheat LED<br />
For more detailed instructions, please consult the Administrator Guide found on the enclosed CD-ROM or on the web at www.raritan.com. Rev. D July 2006 255-80-5320
<strong>CommandCenter</strong> ® <strong>NOC</strong><br />
III. Network Configuration for CC-<strong>NOC</strong> 100/250/2500N<br />
1. Connect a keyboard and mouse<br />
to the keyboard and mouse ports on<br />
the back of the CC-<strong>NOC</strong>.<br />
Note: to use with a null-modem serial<br />
cable instead, use the following<br />
settings: Mode: VT100, Speed:<br />
9600bps, Data Bits: 8, Parity: none,<br />
Stop Bits: 1, Flow Control: none.<br />
IV. Licensing for CC-<strong>NOC</strong> 100/250/2500N<br />
Each CC-<strong>NOC</strong> unit requires a device-specific license to operate. Your <strong>Raritan</strong> Regional Channel Manager will provide<br />
you with a license file. If you do not have a license, contact <strong>Raritan</strong> Support. Be sure to have your appliance<br />
serial number (see Section II. Physical Installation) and the appliance identification code as shown in Figure 4.<br />
1. Type the URL<br />
http://<br />
in your Web browser’s address line<br />
where <strong>CommandCenter</strong>_<strong>NOC</strong>_IP is the<br />
TCP/IP address you used in Section<br />
2. Press the Enter key several times<br />
to display the login prompt.<br />
3. Type config (case-sensitive) to<br />
log in. A password is not required.<br />
4. In the Main Menu, select Setup<br />
Network Port from the menu to<br />
administer network settings including<br />
TCP/IP address, network mask,<br />
default gateway, and DNS server<br />
III. Network Configuration.<br />
2. The License Agreement page<br />
appears (see Figure 3). Read the<br />
agreement and click I Agree to continue.<br />
(see Figure 1).<br />
Figure 1 Figure 2<br />
5. Provide appropriate values for the<br />
fields indicated (see Figure 2), then<br />
select Continue, Done, and OK to<br />
save and exit the serial configuration.<br />
3. The license installation screen<br />
appears (Figure 4).<br />
IV. Licensing for CC-<strong>NOC</strong> 100/250/2500N (cont)<br />
4. To upload the license file, click Browse<br />
and navigate to the license file provided by<br />
<strong>Raritan</strong>.<br />
5. Once you have linked to the file, click load<br />
this license file. If your current license is<br />
invalid or expired, you must provide a new<br />
file.<br />
6. If the license file is correct, click install<br />
this license under the New License information<br />
box.<br />
Note: If a license is already installed and you<br />
want to continue using it, an information box<br />
labeled Current License appears (in place<br />
of New Licence, shown here). Click keep<br />
this license below the information box.<br />
V. Network Configuration and Licensing for CC-<strong>NOC</strong> 2500M and CC-<strong>NOC</strong> 2500S<br />
In a distributed environment, a CC-<strong>NOC</strong> 2500M and CC-<strong>NOC</strong> 2500S (remote appliances) report to a CC-<strong>NOC</strong> 2500N (central server). You<br />
must configure the IP address of the CC-<strong>NOC</strong> 2500N on the remote appliance, configure a static IP address, generate an activation code<br />
on the remote appliance, upload a license file for the remote appliance, and enter the activation code on the CC-<strong>NOC</strong> 2500N. If you do not<br />
have a license file, contact <strong>Raritan</strong> Support. Be sure to have your appliance serial number (see Section II. Physical Installation).<br />
Network Settings<br />
1. Connect a keyboard and monitor to the<br />
keyboard and monitor ports on the back of<br />
the CC-<strong>NOC</strong>.<br />
Note: to use with a null-modem serial cable<br />
instead, use the following settings: Mode:<br />
VT100, Speed: 9600bps, Data Bits: 8,<br />
Parity: none, Stop Bits: 1, Flow Control:<br />
none.<br />
2. Press the Enter key several times to display<br />
the login prompt.<br />
3. Type config (all lower case) to login and<br />
press Enter. A password is not required.<br />
4. Select Setup IP Addresses and type the<br />
IP address of the CC-<strong>NOC</strong> 2500N Server.<br />
5. Type an IP address, Network Mask,<br />
Gateway Address and DNS address for the<br />
CC-<strong>NOC</strong> 2500 Appliance in the appropriate<br />
fields (see Figure 5).<br />
4<br />
6. Select Setup IP Addresses to save the<br />
configuration changes and establish a connection<br />
with the CC-<strong>NOC</strong> 2500N.<br />
Connect to CC <strong>NOC</strong> 2500N<br />
1. From the main menu, select License &<br />
Update Software to license this appliance.<br />
2. Follow the onscreen prompts and note<br />
your appliance number and activation code.<br />
3.From the PC used to save the license file,<br />
open a web browser and point it to<br />
http://<br />
(the IP address of the CC-<strong>NOC</strong> 2500N).<br />
4. Login with your username and password<br />
(default: admin, raritan).<br />
5. In the home page, click on the Admin tab<br />
and then click Upload Appliance<br />
Licenses.<br />
6. Click load new appliance license.<br />
5<br />
Figure 4<br />
6<br />
7. Click Browse and navigate to the license<br />
file. Then click load this license.<br />
8. Locate your newly added CC-<strong>NOC</strong><br />
Appliance and click new activation code.<br />
9. Type the code that you recorded in step 2<br />
of this section. Click OK.<br />
9. Return to the CC-<strong>NOC</strong> Appliance and<br />
select License This Appliance (see Figure<br />
6).<br />
10. Reboot the CC-<strong>NOC</strong> Appliance when<br />
prompted and wait for approximately five<br />
minutes for it to initialize.<br />
Figure 3<br />
Figure 5 Figure 6