TN002 - Scalpel Frog Rear Shock Link.fm - Pedros Bikeshop
TN002 - Scalpel Frog Rear Shock Link.fm - Pedros Bikeshop
TN002 - Scalpel Frog Rear Shock Link.fm - Pedros Bikeshop

Create successful ePaper yourself
Turn your PDF publications into a flip-book with our unique Google optimized e-Paper software.
Service Tech Diagram Notes<br />
Publication Title<br />
<strong>Scalpel</strong> -“<strong>Frog</strong>” <strong>Rear</strong> <strong>Shock</strong> <strong>Link</strong><br />
Publication No.<br />
<strong>TN002</strong>.PDF<br />
Page 1 of 3<br />
August 2003<br />
This document online at: http://www.cannondale.com/bikes/tech/<br />
©2003CannondaleBicycleCorporation-AllRightsReserved
Service Tech Diagram Notes<br />
Publication Title<br />
<strong>Scalpel</strong> -“<strong>Frog</strong>” <strong>Rear</strong> <strong>Shock</strong> <strong>Link</strong><br />
Publication No.<br />
<strong>TN002</strong>.PDF<br />
Page 2 of 3<br />
August 2003<br />
Information<br />
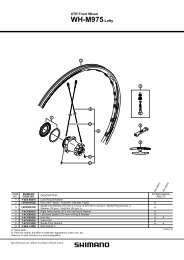
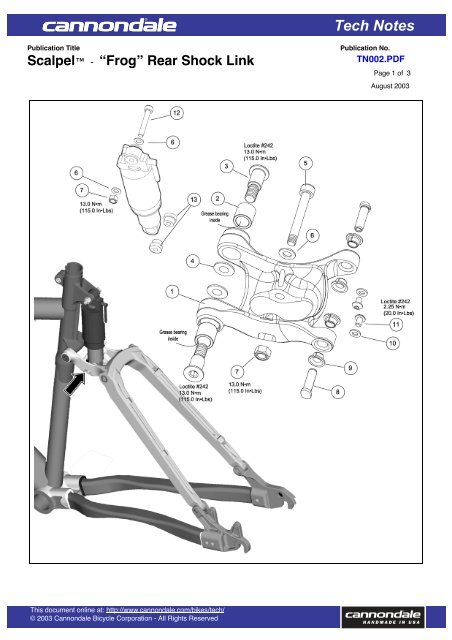
1. The one-piece “<strong>Frog</strong>” link is a forged rear shock link design compatible with <strong>Scalpel</strong> aluminum or composite seatstays.<br />
It is shown in the graphic above with a composite seatstay.<br />
2. The one-piece shock link assembly received its nickname from its frog-like appearance. When turned upside<br />
down on a table, it looks much like a frog. Early model <strong>Scalpel</strong>s using the 3-piece design link system and aluminum<br />
seatstays can be upgraded to the “<strong>Frog</strong>” link.<br />
3. The acetate washers item (4) fitted between the front part of the link and the seattube mounting point should be<br />
inspected often for damage or wear. Neglect can result in excessive play detected in the seatstay assembly.<br />
Replace them with new ones when necessary.<br />
4. The inside of the link pivot bearings (2) should be greased regularly.<br />
CAUTION: Pressure washing can force dirt and water into the link bearings which will result in rapid damage.<br />
Don’t pressure wash.<br />
5. When installing the pivot bolts (3), be sure to use Loctite #242 on the bolt threads. Apply a high quality bike<br />
grease to the inner pivot bearing (2) in the link. Take care to not contaminate the bearings during installation of the<br />
bolts. Make sure the washers (4) are in place.<br />
6. The T-shafts (8) are Teflon coated and should not be lubricated. If any creaking or noise is detected either the T-<br />
shafts or link bushing may be damaged.<br />
CAUTION: Do not apply grease or other lubricants to the T-shafts. Grease or lubricants can collect contaminants<br />
resulting in damage and accelerated wear of the parts. Always install the parts clean and dry.<br />
7. The flange bushings (9) are a press fit into the bonded seatstay inserts. They can be removed to install replacements.<br />
To remove, carefully locate the punch and drive out. These flange bushings should be inspected often and<br />
replaced when necessary. The seatstay inserts are bonded in place during manufacture and are non-removable.<br />
8. The T-shaft screws (11) should be checked for tightness periodically. Loose screws can result in play detected in<br />
the seatstay. When installing the screws, be sure to apply Loctite #242 to the threads and tighten to 2.25 N•m<br />
(20.0 In•Lbs).<br />
CAUTION: Do not over-tighten the T-shaft screws. Over-tightening will result in damage to the flange bushings<br />
9. Notice that the lower shock bushings (13) are thicker that the upper shock bushings. The thicker bushings won’t<br />
fit in the upper shock seattube mounts.
Service Tech Diagram Notes<br />
Publication Title<br />
<strong>Scalpel</strong> -“<strong>Frog</strong>” <strong>Rear</strong> <strong>Shock</strong> <strong>Link</strong><br />
Publication No.<br />
<strong>TN002</strong>.PDF<br />
Page 3 of 3<br />
August 2003<br />
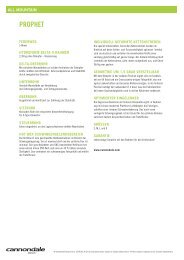
Parts<br />
The following table is for reference only.<br />
REF QTY BPCS DESC<br />
REF QTY BPCS DESC<br />
114704B Composite seatstay<br />
1 1 113789 <strong>Link</strong><br />
4 112636 NUT,T-Shaft,for <strong>Scalpel</strong><br />
2 2 112679 Bearing<br />
4 112677 BUSHING,Flanged,6mmIDx5.5mmL<br />
3 2 112502 Pivot bolt<br />
REF QTY 4 103218 BPCS SCREW,M4x.7x8mmSOC DESC<br />
HEA<br />
14 12 114704B 114668 WASHER,Acetal,.551x.394x.04<br />
Composite seatstay<br />
2 4 113032 112636 WASHER,SS,.162IDx.308O<br />
5 1 114707 SCREW,M6x1.0x45mm, NUT,T-Shaft,for <strong>Scalpel</strong> SHCS<br />
36 42 113856 112677 BUSHING,Flanged,6m THRU-ADAPTER ANGLE,CAB<br />
m IDx5.5m m L<br />
6 3 1352R WASHER,12.5ODx6.5IDx1.6MMTHKSS<br />
7 1 1352S Lock nut (nyloc)<br />
8 2 112636 NUT,T-Shaft,for <strong>Scalpel</strong><br />
9 4 112677 BUSHING,Flanged,6mmIDx5.5mmL<br />
10 2 103218 SCREW,M4x.7x8mmSOCHEADCAP,SS<br />
11 2 113032 WASHER,SS,.162IDx.308ODx.040<br />
12 1 114876 Bolt,M6x1x37 SOC CAP<br />
13 2 114708 BUSHING,FOX,SCALPEL<br />
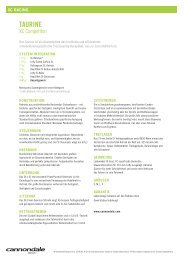
Replacement/Renewal Kits<br />
The following replacement parts and kits are available only through an authorized Cannondale Dealer.<br />
CANNONDALE<br />
KIT #<br />
REF(QTY)<br />
KF070/<br />
1, 2(2), 3(2), 4(2), 5,6,7,<br />
9(4), 13(2), Kit, <strong>Link</strong> <strong>Frog</strong>,<strong>Scalpel</strong><br />
Kit, Washers-Teflon, Pivot<br />
KF068/ 4(10)<br />
Lin<br />
2(2), 3(2), 4(2), 8(4), 9(8), Kit, Rebuild HW - <strong>Link</strong>s,<br />
KF043/<br />
10(4), 11(4)<br />
Scalp<br />
Kit, <strong>Shock</strong> Mnt. HWare -<br />
KF044/ 12, 6(2), 7<br />
Upper<br />
Kit, Screws/washers,10 -<br />
KF056/ 10(10), 11(10)<br />
Scalp<br />
Kit, Rebuild <strong>Scalpel</strong> seat<br />
KF035/ 10(4), 8(4), 9(8), 11 (4)<br />
stay<br />
DESCRIPTION<br />
This kit is a complete link with lower<br />
shock mounting hardware and<br />
bushings for compatible Fox rear<br />
shock