HL670 - TAG Heuer Timing Systems
HL670 - TAG Heuer Timing Systems
HL670 - TAG Heuer Timing Systems

You also want an ePaper? Increase the reach of your titles
YUMPU automatically turns print PDFs into web optimized ePapers that Google loves.
1. Functions<br />
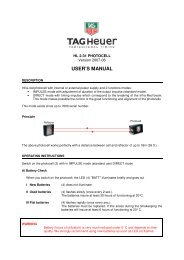
The Transmitter :<br />
9<br />
10<br />
6<br />
7<br />
5<br />
4<br />
8<br />
3<br />
2<br />
1<br />
11<br />
1. IMPULSE Input for timing Impulse (Start gate, photocell – working / closing contact). Respect the polarities.<br />
2. DATA Male Sub-D 9: RS232 input for DATA transfer<br />
3. POWER To switch on the receiver (press for 3 seconds on POWER). The green LED is on.<br />
To switch off the receiver, hold down SET and press POWER.<br />
4. SET To program the TEAM (A, B, C, D) and to switch off the receiver. Hold down SET during the changes.<br />
5. TEAM To check the programmed TEAM.<br />
To change the code, hold down SET and press TEAM.<br />
6. CHANNEL To check the programmed CHANNEL.<br />
To change the CHANNEL, hold down SET and press CHANNEL.<br />
7. TEST For testing the Impulse transmission only. The reception level will be displayed for 0.2 seconds on the<br />
receiver. You’ll also get an Impulse on the programmed output.<br />
8. TEST BATT To check the state of the battery. Press TEST BATT : The Battery level will be displayed with the 4 LED’s<br />
for 2 seconds.<br />
9. LED LED control panel which shows the programmed TEAM or CHANNEL. Also shows the transmitted Impulse.<br />
10. LED Shows the transmission mode : IMPULSE or DATA<br />
11. CHARGE Charging status Leds. The red led indicates that the Accu is charging. The charge is completed as soon as<br />
the green LED in on.