Let's make a gingerbread house!
Let's make a gingerbread house!
Let's make a gingerbread house!

You also want an ePaper? Increase the reach of your titles
YUMPU automatically turns print PDFs into web optimized ePapers that Google loves.
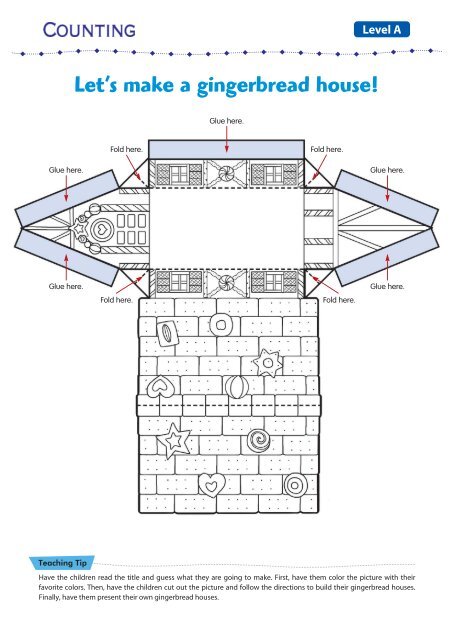
Level A<br />
Let’s <strong>make</strong> a <strong>gingerbread</strong> <strong>house</strong>!<br />
Glue here.<br />
Fold here.<br />
Fold here.<br />
Glue here.<br />
Glue here.<br />
Glue here.<br />
Fold here.<br />
Fold here.<br />
Glue here.<br />
Teaching Tip<br />
Have the children read the title and guess what they are going to <strong>make</strong>. First, have them color the picture with their<br />
favorite colors. Then, have the children cut out the picture and follow the directions to build their <strong>gingerbread</strong> <strong>house</strong>s.<br />
Finally, have them present their own <strong>gingerbread</strong> <strong>house</strong>s.
Level A<br />
Let’s <strong>make</strong> a birthday box!<br />
Glue here.<br />
Glue here.<br />
Glue here.<br />
Cut to here.<br />
Cut to here.<br />
Cut to here.<br />
Cut to here.<br />
Glue here.<br />
Glue here.<br />
Glue here.<br />
Teaching Tip<br />
Have the children read the title and guess what they are going to <strong>make</strong>. First, have them color the picture with their<br />
favorite colors and cut it out. Then, have the children follow the directions to <strong>make</strong> a birthday box. Finally, have them<br />
present their own birthday boxes.
Level A<br />
Let’s <strong>make</strong> a food strip!<br />
My favorite food is<br />
chocolate ice cream pie<br />
Teaching Tip<br />
Have the children read the title and guess what they are going to <strong>make</strong>. First, have them cut out the pictures, draw their<br />
favorite food in the empty space, and color the food. Then, have the children cut along the two lines on the plate and<br />
put the food strip through the slits. Finally, encourage the children to say the sentence on the plate with their favorite<br />
food: My favorite food is ___________.
Level A<br />
Let’s <strong>make</strong> Little Bo Peep!<br />
What you need: a toilet paper tube<br />
(Final Crafts)<br />
Teaching Tip<br />
Have the children read the title and guess what they are going to <strong>make</strong>. First, have them cut out the pictures and glue<br />
them around the toilet paper tube in the following order: the body, the head, the apron, the arms, the feet, the cane, and<br />
the ribbons. Then, have them glue the sheep by Little Bo Peep’s feet. Finally, have them present their own Little Bo<br />
Peeps.
Level B<br />
Let’s <strong>make</strong> a sailboat!<br />
What you need: a colored paper<br />
Teaching Tip<br />
Have the children read the title and guess what they are going to <strong>make</strong>. First, have them prepare a colored paper of<br />
square shape. Then, have the children follow the directions to fold a sail boat. Finally, encourage the children to name<br />
their own boats and present them.
Level B<br />
Let’s <strong>make</strong> monkeys on the tree!<br />
Teaching Tip<br />
Have the children read the title and guess what they are going to <strong>make</strong>. First, have them color the monkeys and the tree<br />
and cut out the pictures. Then, have the children fold along the dotted line to <strong>make</strong> the tree stand and hang the<br />
monkeys on the branches. Finally, have them present their monkeys on the trees.
Level A<br />
Let’s <strong>make</strong> a paper clock!<br />
What you need: a pin<br />
(Final Crafts)<br />
Teaching Tip<br />
Have the children read the title and guess what they are going to <strong>make</strong>. First, have them cut out the pictures and write<br />
the numbers from 12 to 11 on the face of the clock. Then, have the children push a pin through the clock hands on the<br />
clock and the mouse pendulum behind the clock. Finally, have them present their own clocks and show what time it is<br />
by moving the clock hands.
Level C<br />
Let’s <strong>make</strong> a monster!<br />
What you need: a paper cup<br />
(Final Crafts)<br />
Cut here.<br />
Cut here.<br />
Cut here.<br />
Teaching Tip<br />
Have the children read the title and guess what they are going to <strong>make</strong>. First, have them color the patterns, cut them<br />
out, and glue the body of the monster on the front of the paper cup. Then, have the children cut the slits on both sides<br />
of the paper cup for the hands of the monster and on the bottom for the strip. Then, slide the strip through the slits on<br />
the paper cup and say “BOO!”
Level A<br />
Let’s <strong>make</strong> Carlo!<br />
(Final Crafts)<br />
Fold here.<br />
Fold here.<br />
Teaching Tip<br />
Have the children read the title and guess what they are going to <strong>make</strong>. First, have them color Carlo with their favorite<br />
colors and cut out the pictures. Then, have the children fold the body and legs, glue the insides, and slide the legs into<br />
the slits on the body to <strong>make</strong> Carlo stand. Finally, have the children present their own Carlos.
Level B<br />
Let’s <strong>make</strong> a monkey mask!<br />
(Final Crafts)<br />
Glue here.<br />
Glue here.<br />
Teaching Tip<br />
Have the children read the title and guess what they are going to <strong>make</strong>. First, have them cut out the pictures and glue<br />
the ears onto the face as they see in the picture above. Then, cut out the dotted lines for the eyes. Then, have the<br />
children attach the rubber bands to either side of the mask. Finally, have the children name their own monkeys and wear<br />
them on the face.
Level B<br />
Let’s <strong>make</strong> a crab!<br />
(Final Crafts)<br />
Teaching Tip<br />
Have the children read the title and guess what they are going to <strong>make</strong>. First, have them cut out the pictures: the crab’s<br />
body, ten feet, and two eyes. Then, have the children glue the crab’s feet and eyes onto the body. Finally, have the<br />
children present their own crabs and count how many feet they have.
Level B<br />
Let’s <strong>make</strong> a farm!<br />
: Cut here.<br />
: Fold here.<br />
Teaching Tip<br />
Have the children read the title and guess what they are going to <strong>make</strong>. First, have them color the barn and the animals<br />
with their favorite colors. Then, have the children cut along the bold lines on the pictures and fold along the dotted lines<br />
to <strong>make</strong> the barn and the animals stand. Encourage the children to open the door of the barn and put the animals either<br />
inside or outside the barn.
Level A<br />
Let’s <strong>make</strong> a bookmark!<br />
What you need: a ribbon<br />
(Final Crafts)<br />
Glue here.<br />
Fold here.<br />
Teaching Tip<br />
Have the children read the title and guess what they are going to <strong>make</strong>. First, have them cut out the pictures and glue<br />
the shapes onto the rectangle. Then, have the children fold the pattern along the dotted line to <strong>make</strong> a bookmark. Then,<br />
have them attach a ribbon on top of the roof. Finally, have the children present their own bookmarks and find what<br />
kinds of shapes they can see in their bookmarks.
Level A<br />
Let’s <strong>make</strong> a giraffe frame!<br />
Teaching Tip<br />
Have the children read the title and guess what they are going to <strong>make</strong>. First, have them color the picture frame and cut<br />
it out. Then, have the children cut the inside of the frame. Then, have them prepare their favorite photo and tape the<br />
photo inside the frame. Finally, have them present their own picture frames.
Level B<br />
Let’s <strong>make</strong> a cat mask!<br />
Teaching Tip<br />
Have the children read the title and guess what they are going to <strong>make</strong>. First, have them color the picture and cut it out.<br />
Then, cut out the dotted lines for the eyes. Then, have the children attach the rubber bands to either side of the mask.<br />
Finally, have the children name their cat mask and wear their own mask on the face.
Level B<br />
Let’s <strong>make</strong> an insect!<br />
Teaching Tip<br />
Have the children read the title and guess what they are going to <strong>make</strong>. First, have them fold the paper along the dotted<br />
line and cut out the pattern. Then, have them unfold the pattern and color the winged termite with their favorite colors.<br />
Finally, have them present their own insects.