Christmas Hudson Jr. Steam Locomotive Owner's Manual ... - Lionel
Christmas Hudson Jr. Steam Locomotive Owner's Manual ... - Lionel
Christmas Hudson Jr. Steam Locomotive Owner's Manual ... - Lionel

Create successful ePaper yourself
Turn your PDF publications into a flip-book with our unique Google optimized e-Paper software.
73-8649-250<br />
10/08<br />
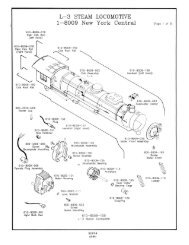
<strong>Christmas</strong> <strong>Hudson</strong> <strong>Jr</strong>.<br />
<strong>Steam</strong> <strong>Locomotive</strong><br />
Owner’s <strong>Manual</strong><br />
with
Congratulations!<br />
You purchased a tough, durable legendary locomotive—the <strong>Lionel</strong> <strong>Hudson</strong> <strong>Jr</strong>. steam<br />
locomotive. From the crisp die-cast detail and the authentic decoration outside to the<br />
advanced technology and brute power within the boiler, your steam locomotive is ready for<br />
duty on your model railroad.<br />
Features of this locomotive<br />
• Powerful maintenance-free motor with momentum flywheel<br />
• Die-cast metal locomotive and tender<br />
• TrainSounds sound system<br />
• Transformer controlled forward, neutral and reverse operation<br />
• Operating coupler on rear of tender<br />
• Puffing smoke unit<br />
• Operating headlight<br />
The following <strong>Lionel</strong> marks may be used throughout this instruction manual and are protected under law. All<br />
rights reserved.<br />
<strong>Lionel</strong> ® , TrainMaster ® , Odyssey ® , RailSounds ® , CrewTalk , TowerCom , DynaChuff , StationSounds ,<br />
Pullmor ® , ElectroCoupler , Magne-Traction ® , CAB-1 ® Remote Controller, PowerMaster ® , <strong>Lionel</strong> ZW ® ,<br />
ZW ® , PowerHouse ® , TMCC ® , <strong>Lionel</strong>ville, Lockon ® , Wireless Tether , LionMaster ® , FatBoy , American<br />
Flyer ® , TrainSounds , PowerMax , LEGACY , PowerMax Plus, Odyssey II , LEGACY RailSounds <br />
The name FasTrack ® is used with permission from Pitsco, Inc.
Table of Contents<br />
Transformer operations<br />
Running your locomotive with a <strong>Lionel</strong> transformer 4<br />
Installing the <strong>Lionel</strong> sound activation button 5<br />
Your locomotive’s reverse unit operation 6<br />
Using your locomotive’s magnetic coupler 7<br />
Experiencing the range of your locomotive’s TrainSounds sound system 7<br />
TrainSounds sound system<br />
Operating the TrainSounds sound system 8<br />
Maintaining and servicing your locomotive<br />
Tire-Traction 9<br />
Adding fluid to your locomotives smoke generator 10<br />
Lubricating your locomotive 11<br />
Replacing your locomotive's headlamp 11<br />
Limited Warranty/<strong>Lionel</strong> Service 12
Transformer operations<br />
Running your steam locomotive with a <strong>Lionel</strong> transformer<br />
1<br />
Place your steam locomotive on <strong>Lionel</strong> or <strong>Lionel</strong>-compatible<br />
O gauge track.<br />
2<br />
Add smoke fluid to the engine or switch the smoke generator<br />
off.<br />
• See page 10 for more information.<br />
3<br />
Note!<br />
Power up your steam locomotive with your transformer.<br />
• Your locomotive is designed to operate on 8-16 volts alternating<br />
current. Virtually all <strong>Lionel</strong> and <strong>Lionel</strong>-compatible alternating-current transformers<br />
are suitable.<br />
• Do not power your locomotive with direct current (DC). Damage to<br />
sensitive electronic components may occur.<br />
• When you first power up your track, your locomotive’s headlights will<br />
illuminate. At this point, the locomotive is in neutral. When your train is first<br />
powered up, the default state will be neutral and the default direction is forward.<br />
This means whenever you power up your engine the engine will remain in<br />
neutral, and when the power is removed and again applied, the train will move<br />
forward. This condition holds true if the engine is being powered up for the first<br />
time or if the engine has been powered down longer than five seconds.<br />
4<br />
Move ‘em out!<br />
• Get your locomotive moving. Press the DIR button on your transformer .to<br />
sequence your locomotive through the repeating pattern of operations: forward,<br />
neutral, reverse, neutal, and so on.<br />
• See page 6 for information on locking your locomotive in a single<br />
operating state
Transformer operations<br />
Installing a <strong>Lionel</strong> Sound Activation Button for conventional operation<br />
If your transformer lacks HORN and BELL buttons, you will need to install <strong>Lionel</strong><br />
no. 610-5906-001 Sound Activation Buttons (available separately) to activate the locomotive’s<br />
horn and bell sounds.<br />
Connect the buttons as shown below. Be sure that all track power passes through the Sound<br />
Activation Button(s). Do not bypass the buttons.<br />
For AC transformers lacking a bell button<br />
Black wire<br />
1 2<br />
Existing wire<br />
Red wire<br />
Common/Ground/U<br />
Power/A<br />
POWER<br />
SUPPLY<br />
<strong>Lionel</strong> no. 610-5906-001<br />
Sound Activation Button for<br />
activating the bell<br />
For AC transformers lacking bell and horn/whistle buttons<br />
Red wire<br />
Wire nut<br />
Existing wire<br />
Red wire<br />
Common/Ground/U<br />
POWER<br />
SUPPLY<br />
<strong>Lionel</strong> no. 610-5906-001<br />
Sound Activation Button<br />
for activating the<br />
horn<br />
Black wire<br />
Power/A<br />
Black wire<br />
<strong>Lionel</strong> no. 610-5906-001<br />
Sound Activation Button for<br />
activating the bell
Transformer operations<br />
Your locomotive’s reverse unit<br />
The reverse unit inside your <strong>Lionel</strong> locomotive is an electronic device that acts like the transmission<br />
in your car. When you apply power to the track, the locomotive moves in the direction<br />
specified by the reverse unit—or it sits in neutral, awaiting another power interruption. Power<br />
interruptions are the signal that tells the reverse unit to sequence to the next operational state.<br />
To interrupt power and sequence the locomotive’s reverse unit, press the direction control button<br />
or turn the throttle to the Off position and On again. The reverse unit alternates between three<br />
states: forward, neutral, and reverse.<br />
Also, the locomotive can be “locked” into a certain mode of operation by throwing the switch<br />
located on the underside of the frame (see illustration below). When the switch is thrown to the Off<br />
position, the locomotive will be locked in the next mode of operation in the sequence. For instance,<br />
if the locomotive is moving forward, then is stopped and the switch is thrown back, the locomotive<br />
will be “locked” in neutral. If the switch is thrown back while the locomotive is under power, the<br />
locomotive will remain in the mode it was in when the switch was thrown. The controller direction<br />
control will then have no affect on the direction of the locomotive.<br />
Additionally, this reverse unit has a “power-up reset” feature, which means that should the locomotive<br />
sit without power for a short period of time, the reverse unit will automatically reset and<br />
start in the forward direction when the transformer is turned on or “powered up,” regardless of the<br />
locking switch position. If the locking switch is in the Off position, the locomotive will start in the<br />
forward direction and be “locked” there.<br />
Pressing the whistle button on your controller will produce a realistic whistle sound from the tender.<br />
If the whistle fails to operate, remove the wires from the lockon and reinsert each one into the<br />
opposite clip to reverse polarity.<br />
If your controller doesn’t have a whistle button, you may use the <strong>Lionel</strong> Sound Activation Button<br />
#10-5906-001, available separately.<br />
OFF<br />
ON<br />
Reverse<br />
unit lockout<br />
Rear of locomotive<br />
OFF<br />
ON<br />
Smoke on/off<br />
switch<br />
With your reversing unit, positioning the switch in the ON position locks your engine into its last moving<br />
direction. Positioning the switch in the OFF position resumes normal sequencing operation.
Transformer operations<br />
Using your locomotive’s magnetic coupler<br />
he rear of your <strong>Lionel</strong> locomotive’s tender is<br />
T equipped with an operating magnetic knuckle<br />
coupler, a revolutionary design first introduced<br />
by <strong>Lionel</strong> in 1945.<br />
<strong>Lionel</strong> magnetic couplers react to the magnetic<br />
field generated by a <strong>Lionel</strong> remote-control<br />
track section (available separately).<br />
Place your locomotive’s coupler trigger<br />
disc over the central coil of a remote-control<br />
track section and press Uncouple on the controller.<br />
The magnetic field pulls the disc downward,<br />
and the knuckle opens.<br />
One operating technique favored by <strong>Lionel</strong><br />
railroaders is the “moving uncouple.” Press the<br />
Uncouple button as the locomotive passes over a<br />
Position your locomotive’s trigger disc<br />
over the remote-control section, then press<br />
“uncouple.” The coupler opens.<br />
remote-control section. The magnetic field will open the coupler; the consist remains behind as the<br />
locomotive moves on. But be careful—the speed of a newly uncoupled and moving locomotive can<br />
increase dramatically.<br />
Experiencing the range of your locomotive’s TrainSounds sound system<br />
With TrainSounds, you experience the sounds of real railroading. Simply put, it delivers realistic,<br />
and authentic sounds to your model railroad. Turn the volume set screw clockwise or<br />
counter clockwise to adjust sound output (located on the bottom/side of the tender frame). Slide the<br />
switch from Sounds to No Sounds to turn off the sounds altogether.<br />
• <strong>Steam</strong> Whistle. Press whistle to produce an authentic steam whistle blast.<br />
• Mechanical bell. Press BELL on your transformer to begin the effect; again to discontinue.<br />
• Automatic ‘Chuffing’ as the train moves.<br />
• Background sounds at idle.
TrainSounds sound system operation<br />
Operating the TrainSounds sound system<br />
Your TrainSounds Tender was designed to operate at approximately 6 to 18 volts (AC). When you<br />
power up the locomotive on the track, you will hear the sounds of the idling steam locomotive.<br />
The chuffing will increase proportionally with the locomotive’s speed.<br />
Note!<br />
Always operate the TrainSounds sound system with a lighted locomotive, an illuminated<br />
car, or lighted track bumpers. This power draw will prevent the whistle from sounding<br />
erratically.<br />
Whistle<br />
Press the WHISTLE button on your transformer to sound the whistle. The sound will play for as long<br />
as you hold the button.<br />
Brake squeal<br />
To activate the sound of squealing brakes, operate your locomotive at a rapid rate of speed for at least<br />
ten seconds, and then throttle down to a lower speed. The brake sounds will discontinue automatically<br />
after a few moments,<br />
Note!<br />
If you are unable to activate the brake sounds, your locomotive’s speed may be too low.<br />
Increase the speed of the locomotive, operate for at least tens seconds, and then reduce the<br />
throttle by half.<br />
Crew dialogue<br />
When the car is not in motion, you may activate random crew dialogue using the WHISTLE button<br />
on your controller.<br />
Note!<br />
The car must be powered up on the track and not in motion (in neutral) for the dialogue<br />
to play. Do not turn off track power.<br />
Press the WHISTLE button<br />
Stop/Power-up to about 35 seconds<br />
After 35 seconds<br />
After 60 seconds<br />
Dialogue<br />
“Stand by” dialogue<br />
“Clear for departure” dialogue<br />
Random, automatic crew dialogue<br />
Note!<br />
If you activate multiple “stand by” dialogues during the first 35 seconds, the length<br />
of time before the “clear for departure” dialogue becomes 35 seconds, plus the<br />
length of the dialogue.
Maintaining your locomotive<br />
Tire-Traction<br />
our locomotive is equipped with Tire-Traction. This means that two of the drive wheels are fitted<br />
with rubber traction tires to enhance tractive effort so your locomotive can pull many cars<br />
Y<br />
at once.<br />
<strong>Lionel</strong> locomotives with Tire-Traction grip the track, enabling them to pull heavy loads at<br />
higher speeds.<br />
To replace the traction tires, simply unscrew the drive rod nut from the wheel and slip off the old<br />
traction tire and remove it from under the drive rod. Place the new one on the wheel in the reverse<br />
of this step and tighten the drive rod nut.
Maintaining your locomotive<br />
Adding fluid to your locomotive’s smoke generator<br />
Y<br />
our locomotive is equipped with a smoke generator that produces safe, clean white smoke during<br />
operation.<br />
The smoke generator requires the periodic addition of <strong>Lionel</strong> smoke fluid in order to function.<br />
Pierce the tube end with a pin, then add four to eight drops of fluid directly into the locomotive’s<br />
stack. Smoke production will commence momentarily, faster if you run your locomotive at speed.<br />
When smoke production wanes, add more fluid (four to eight drops).<br />
If you prefer to have a smoke free locomotive, there is a switch located on the bottom of the<br />
engine under the cab (see page 6 for location). Move the switch to off and your locomotive will stop<br />
smoking.<br />
When the smoke unit is on always keep a small amount of smoke fluid in the locomotive’s<br />
smoke generator; the generator’s element can become damaged if operated without fluid. Smoke<br />
production is greater at higher voltages and when the locomotive is pulling a heavy load or long<br />
consist.<br />
10
Maintaining your locomotive<br />
Lubricating your steam locomotive<br />
Help your <strong>Lionel</strong> steam locomotive lead a long and productive life on your railroad by maintaining<br />
it properly. We recommend you purchase a <strong>Lionel</strong> Lubrication and Maintenance Kit<br />
(no. 6-62927), available from your <strong>Lionel</strong> dealer. Two basic rules to keep in mind: never over-lubricate<br />
(a small amount will do), and avoid getting grease or oil on the locomotive’s wheels, contact<br />
rollers or your track.<br />
You’ll know your steam locomotive requires lubrication when visual inspection reveals dryness<br />
on the parts indicated in the illustration. Remove accumulated dirt and dust before lubricating, and<br />
always lubricate any locomotive emerging from prolonged storage. Also, lightly lubricate the steam<br />
locomotive’s side rods after each 10 hours of operation.<br />
Do not lubricate your locomotive’s electric motor.. It has been pretested and all the necessary<br />
moving parts have been sufficiently lubricated for life at the factory and should run smoothly for<br />
many years to come. If you have any difficulty in the operation of your engine see the Warranty and<br />
service section at the end of the instruction sheet for more information.<br />
Lubricate with <strong>Lionel</strong><br />
oil sparingly<br />
Cab screws<br />
Cab screws<br />
Lubricate axle ends with<br />
<strong>Lionel</strong> oil sparingly<br />
Lubricate rod ends, both sides<br />
with <strong>Lionel</strong> oil sparingly<br />
Lubricate axle ends with<br />
<strong>Lionel</strong> oil sparingly<br />
Replacing your locomotive's headlamp<br />
Your locomotive is equipped with an LED style headlight for longer life. Please contact your<br />
nearest <strong>Lionel</strong> Service Center or <strong>Lionel</strong> Service if this needs replacing.<br />
11
<strong>Lionel</strong> Limited Warranty Policy & Service<br />
This <strong>Lionel</strong> product, including all mechanical and electrical components, moving parts, motors and structural components,<br />
with the exception of LIGHT BULBS & LED’s are warranted to the original owner-purchaser for a period of one<br />
year from the original date of purchase against original defects in materials or workmanship when purchased<br />
through a <strong>Lionel</strong> Authorized Retailer*.<br />
This warranty does NOT cover the following: Normal wear and tear, Light bulbs or LED’s, Defects appearing in the course of<br />
commercial use, or Damage resulting from abuse/misuse of the product.<br />
Transfer of this product by the original owner-purchaser to another person voids this warranty in its entirety. Modification of<br />
this product in any way; visually mechanically or electronically, voids the warranty in its entirety.<br />
Any warranted product which is defective in original materials or workmanship and is delivered by the original ownerpurchaser<br />
(this warranty is non-transferrable) to <strong>Lionel</strong> LLC or any <strong>Lionel</strong> Authorized Service Station MUST be accompanied<br />
by the original receipt for purchase (or copy) from an <strong>Lionel</strong> Authorized Retailer*, will at the discretion of <strong>Lionel</strong> LLC,<br />
be repaired or replaced, without charge for parts or labor. In the event the defective product cannot be repaired, and a suitable<br />
replacement is not available, <strong>Lionel</strong> will offer to replace the product with a comparable model (determined by <strong>Lionel</strong><br />
LLC), if available. In the event a comparable model is not available the customer will be refunded the original purchase<br />
price (requires proof of purchase from the <strong>Lionel</strong> Authorized Retailer* it was originally purchased). Any products on<br />
which warranty service is sought must be sent freight or postage prepaid (<strong>Lionel</strong> will refuse any package when postage is due).<br />
Transportation and shipping charges are not covered as part of this warranty.<br />
NOTE: Products that require service that do not have a receipt from an LIONEL AUTHORIZED<br />
RETAILER* will be required to pay for all parts required to repair the product (labor will not incur<br />
a charge) providing the product is not older than 5 years from date of manufacture and is within 1<br />
year from date of purchase. A copy of the original sales receipt is required.<br />
In no event shall <strong>Lionel</strong> LLC be held liable for incidental or consequential damages.<br />
Some states do not allow the exclusion or limitation of incidental or consequential damages, so the above exclusion may not<br />
apply to you.<br />
This warranty gives you specific legal rights and you may have other rights which vary from state to state.<br />
Instructions for Obtaining Service<br />
If service for this <strong>Lionel</strong> LLC product is required; bring the item, along with your DATED sales receipt and completed warranty<br />
information (at the bottom of this page) to the nearest <strong>Lionel</strong> Authorized Service Station. Your nearest <strong>Lionel</strong> Service Station<br />
can be found by calling 1-800-4-LIONEL or by accessing the website at www.lionel.com.<br />
If you prefer to send your <strong>Lionel</strong> product directly to <strong>Lionel</strong>, for repair you must FIRST call 586-949-4100 extension 9105 or<br />
FAX <strong>Lionel</strong> at 586-949-5429 or write to Customer Service, 50625 Richard W. Blvd, Chesterfield, MI 48051-2493. Please have the<br />
6-digit <strong>Lionel</strong> product number, the date of original purchase, the dealer where the item was purchased and what seems to be<br />
the problem. You will receive a Verbal return authorization (RA) number to ensure your merchandise will be properly tracked<br />
and handled upon receipt at <strong>Lionel</strong> LLC.<br />
Once you have your Return Authorization (RA) number, make sure the item is packed in its original Styrofoam inner container<br />
which is placed inside the original outer display box (this will help prevent damage during shipping and handling).<br />
This shipment MUST be prepaid and we recommend that it be insured with the carrier of your choice.<br />
Please make sure you have followed all of the above instructions carefully before returning any merchandise for service. You<br />
may choose to have your product repaired by one of <strong>Lionel</strong> LLC’s Authorized Service Stations after its warranty has expired. A<br />
reasonable service fee should be expected once the product warranty has expired.<br />
Warranty Information<br />
Please complete the information below and keep it, along with your DATED ORIGINAL SALES RECEIPT. You MUST<br />
present this form AND your DATED SALES RECEIPT when requesting warranty service.<br />
*A complete listing of <strong>Lionel</strong> Authorized retailers can be found by calling 1-800-4-LIONEL or by visiting our website at<br />
www.lionel.com.<br />
Products that are more than 5 years old, from date of manufacture, are not applicable for warranty coverage, even<br />
if they have never been sold prior to this date. (Under no circumstance shall any components or labor be provided free<br />
of charge.)<br />
Name<br />
Address<br />
Place of Purchase <br />
Date of Purchase<br />
Product Number<br />
Product Description<br />
©2008 LIONEL L.L.C., CHESTERFIELD, MI 48051-2493<br />
UNITED STATES OF AMERICA<br />
PRINTED IN CHINA