OPERATING MANUAL R410A - Fujitsu General
OPERATING MANUAL R410A - Fujitsu General
OPERATING MANUAL R410A - Fujitsu General

Create successful ePaper yourself
Turn your PDF publications into a flip-book with our unique Google optimized e-Paper software.
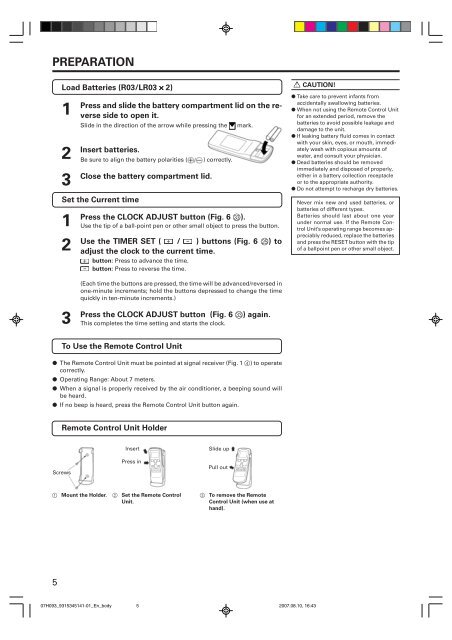
PREPARATION<br />
Load Batteries (R03/LR03 × 2)<br />
1<br />
2<br />
3<br />
Press and slide the battery compartment lid on the reverse<br />
side to open it.<br />
Slide in the direction of the arrow while pressing the<br />
Insert batteries.<br />
Be sure to align the battery polarities (<br />
Close the battery compartment lid.<br />
Set the Current time<br />
1<br />
2<br />
) correctly.<br />
mark.<br />
Press the CLOCK ADJUST button (Fig. 6 W).<br />
Use the tip of a ball-point pen or other small object to press the button.<br />
Use the TIMER SET ( / ) buttons (Fig. 6 O) to<br />
adjust the clock to the current time.<br />
button: Press to advance the time.<br />
button: Press to reverse the time.<br />
CAUTION!<br />
● Take care to prevent infants from<br />
accidentally swallowing batteries.<br />
● When not using the Remote Control Unit<br />
for an extended period, remove the<br />
batteries to avoid possible leakage and<br />
damage to the unit.<br />
● If leaking battery fluid comes in contact<br />
with your skin, eyes, or mouth, immediately<br />
wash with copious amounts of<br />
water, and consult your physician.<br />
● Dead batteries should be removed<br />
immediately and disposed of properly,<br />
either in a battery collection receptacle<br />
or to the appropriate authority.<br />
● Do not attempt to recharge dry batteries.<br />
Never mix new and used batteries, or<br />
batteries of different types.<br />
Batteries should last about one year<br />
under normal use. If the Remote Control<br />
Unit’s operating range becomes appreciably<br />
reduced, replace the batteries<br />
and press the RESET button with the tip<br />
of a ballpoint pen or other small object.<br />
(Each time the buttons are pressed, the time will be advanced/reversed in<br />
one-minute increments; hold the buttons depressed to change the time<br />
quickly in ten-minute increments.)<br />
3<br />
Press the CLOCK ADJUST button (Fig. 6 W) again.<br />
This completes the time setting and starts the clock.<br />
To Use the Remote Control Unit<br />
● The Remote Control Unit must be pointed at signal receiver (Fig. 1 4) to operate<br />
correctly.<br />
● Operating Range: About 7 meters.<br />
● When a signal is properly received by the air conditioner, a beeping sound will<br />
be heard.<br />
● If no beep is heard, press the Remote Control Unit button again.<br />
Remote Control Unit Holder<br />
Screws<br />
Insert<br />
Press in<br />
Slide up<br />
Pull out<br />
1 Mount the Holder. 2 Set the Remote Control<br />
Unit.<br />
3 To remove the Remote<br />
Control Unit (when use at<br />
hand).<br />
5<br />
07H093_9315345141-01_En_body 5<br />
2007.08.10, 16:43