New Zealand Rolls-Royce & Bentley Club Inc - KDA132
New Zealand Rolls-Royce & Bentley Club Inc - KDA132
New Zealand Rolls-Royce & Bentley Club Inc - KDA132

You also want an ePaper? Increase the reach of your titles
YUMPU automatically turns print PDFs into web optimized ePapers that Google loves.
Restoring <strong>Rolls</strong>-<strong>Royce</strong> Grille Shutters, by Eddie Riddle<br />
The shutters on my 20/25 were frozen up solid. The following<br />
are the details of dismantling and repairing the shutters.<br />
This task is best attempted with the radiator removed from the<br />
chassis. Place the radiator face up on the workbench so that the<br />
top of the radiator rests on the inlet pipe to the top tank. (You can<br />
get the linkage out this way)<br />
The shutters are in three sections.<br />
Remove the two centre most bolts from the bottom of the<br />
radiator. This will let you remove the centre two shutters and<br />
the operating link from the radiator. (These are the ones with the<br />
cutout in them to let the crank handle pass)<br />
Now remove the remaining four bolts from the bottom of the<br />
radiator. There are four cheese head screws in the upper shutter<br />
mountings (two on each side) They are most likely to either be<br />
corroded away or will break off when you attempt to remove<br />
them. Don’t worry; this problem is easy to rectify. You can now<br />
remove the remaining left and right sections of the shutters while<br />
still assembled. Mark the top and bottom shutter mountings as<br />
you remove them.<br />
(i) So that you can identify the left and right hand sides<br />
when you replace them and<br />
So that you know in which direction to refit them. (they<br />
will fit either way but the link bars will not operate)<br />
At the bottom of each shutter you will find a mark X1---X6.<br />
(ii)<br />
Each set of shutters has the same markings but are left and right<br />
handed. It will save a lot of time on reassembly if you mark them<br />
carefully at this stage. The two centre shutters are marked X88<br />
and are obviously left and right-handed. There are no shutters<br />
marked X7.<br />
The shutters are numbered from the outer edges of the radiator.<br />
You can now remove shutters 2, 3, and five from the top mount<br />
and the coupling link.<br />
To remove shutters 1, 4 and 6 you will need to remove the split<br />
pins from each shutter and the tension spring if it still exists.<br />
The operating links can now be removed from the inside of the<br />
radiator.<br />
Now clean the mounting points of each shutter carefully. Each<br />
shutter must be free to rotate on is upper mounting pin and the<br />
ball mounting at its bottom end.<br />
Likewise, clean the brass coupling links and ensure each shutter<br />
is free to rotate in the link.<br />
The tension springs if they still exist should also be cleaned and<br />
checked for distortions.<br />
I needed to make new springs. The tension is not all that critical,<br />
but must be sufficient to return each set of shutters to the closed<br />
position. I wound suitable springs using phosphor bronze wire<br />
of about 21 SWG and wound on a 0.125” diameter mandrel.<br />
This will give a finished spring of about 0.25” in diameter. Be<br />
very careful when you let the spring go after you have wound<br />
it. It will cut fingers very easily. I found a length of about 2.5”<br />
stretched slightly was satisfactory. Shape up loops at each end of<br />
the spring to fit the mounting points.<br />
You will need to drill out the top mounting pin of shutters 1,<br />
4 and 6 to take 1.6mm split pins. (Don’t forget the collars as<br />
well). (The original pins were 1/16, which are no longer readily<br />
available)<br />
If you need to remove the broken top mounting screws, proceed<br />
as follows:<br />
(i)<br />
(i)<br />
Using a sharp centre punch mark the centres of the<br />
screws<br />
Use a small drill of about 2mm and carefully drill down<br />
to the end of the screw. The holes on the top tank are<br />
NZRR&BC Issue 10-5 19<br />
(ii)<br />
(iii)<br />
(iv)<br />
(v)<br />
(vi)<br />
blind so don’t drill down too far. You will feel when you<br />
reach the end of the screw, BEFORE you drill into the<br />
radiator top tank. Make sure that you drill the screw out<br />
squarely.<br />
Drill out with a 4mm drill and re-tap 2BA.<br />
Assemble up shutters 1, 4 and 6 for one side on to the<br />
top mount and the link bar and fit the split pins.<br />
Lubricate all moving points with light grease.<br />
Fit the tension spring and mount the whole assembly<br />
back into the radiator, including the bottom mount,<br />
and check that the spring will return the assembly to<br />
the closed position. If all is well remove the bottom<br />
mounting again and add shutters 2, 3 and 5. Refit the<br />
bottom mounting.<br />
Check that the whole assembly will still open freely,<br />
and shut completely with the tension of the spring.<br />
Repeat these seven steps for the other set of shutters.<br />
Pass the operating linkage through the radiator core from the<br />
back side and fit the centre bars to the linkage and the link bars.<br />
This is a bit of a fiddle and is best done one side at a time.<br />
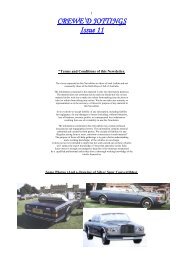
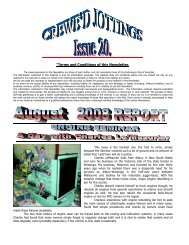
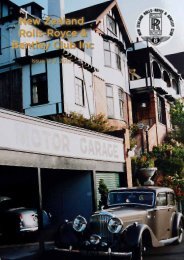
(Left) Peter and Rita Atkinson’s Chassis GCB60, and (Right) Chris<br />
and Frances Shaw’s GRL68, both 1934 20/25 Hooper Sports Saloons,<br />
photographed during the “25 Tour” last year.<br />
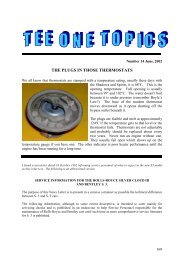
Philip and Carol Baron’s 1930 Thrupp & Maberly Sports Saloon GDP36, a very<br />
early 20/25 still subject to the 20 h.p. Parts Book for some of its transmission<br />
components. This car also visited us last year with the “25 Tour.”