High Resolution 37X Zoom Color Camera SDZ-370User Guide
High Resolution 37X Zoom Color Camera SDZ-370User Guide
High Resolution 37X Zoom Color Camera SDZ-370User Guide
You also want an ePaper? Increase the reach of your titles
YUMPU automatically turns print PDFs into web optimized ePapers that Google loves.
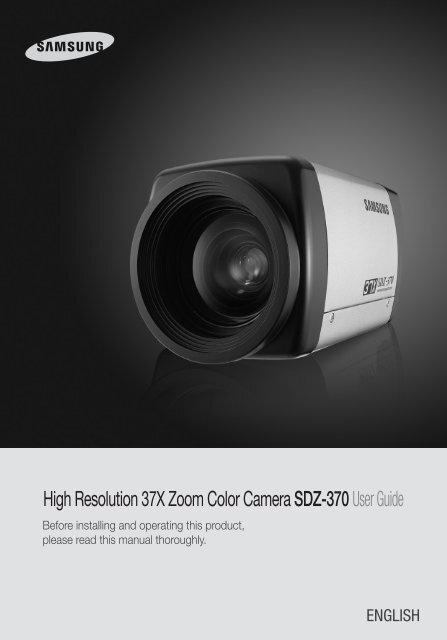
<strong>High</strong> <strong>Resolution</strong> <strong>37X</strong> <strong>Zoom</strong> <strong>Color</strong> <strong>Camera</strong> <strong>SDZ</strong>-370 User <strong>Guide</strong><br />
Before installing and operating this product,<br />
please read this manual thoroughly.<br />
ENGLISH
Thank you for purchasing a SAMSUNG CCD CAMERA.<br />
Before operating the camera, confirm the camera model and proper input<br />
power voltage. In order to that you can understand this manual thoroughly,<br />
we'll introduce our model description.<br />
n <strong>SDZ</strong>-370 SERIES<br />
• NTSC MODEL<br />
<strong>SDZ</strong>-370N<br />
• PAL MODEL<br />
<strong>SDZ</strong>-370P<br />
n MODEL DESCRIPTION<br />
• <strong>SDZ</strong>-370X _<br />
The lightning flash with an arrowhead symbol, within an equilateral triangle is<br />
intended to alert the user to the presence of uninsulated “dangerous voltage”<br />
within the product's enclosure that may be of sufficient magnitude to constitute<br />
a risk of electric shock to persons.<br />
• SIGNAL SYSTEM<br />
N → NTSC MODEL<br />
P → PAL MODEL<br />
SIGNAL SYSTEM<br />
The exclamation point within an equilateral triangle is intended to alert the user<br />
to the presence of important operating and maintenance (servicing) instructions<br />
in the literature accompanying the appliance.<br />
INFORMATION -This equipment has been tested and found to comply with<br />
limits for a Class A digital device, pursuant to part 15 of the FCC Rules. These<br />
limits are designed to provide reasonable protection against harmful<br />
interference when the equipment is operated in a commercial environment.<br />
This equipment generates, uses, and can radiate radio frequency energy and,<br />
if not installed and used in accordance with the instruction manual, may<br />
cause harmful interference to radio communications.<br />
Operation of this equipment in a residential area is likely to cause harmful<br />
interference in which case the user will be required to correct the interference<br />
at his own expense.<br />
WARNING - Changes or modifications not expressly approved by the<br />
manufacturer could void the user’s authority to operate the equipment.<br />
WARNING - To prevent electric shock and risk of fire hazards:<br />
◆ Do NOT use power sources other than that specified.<br />
◆ Do NOT expose this appliance to rain or moisture.<br />
This installation should be made by a qualified service person and<br />
should conform to all local codes.
Contents<br />
Features<br />
• Features…………………………………………………………… 5<br />
• Warnings & Cautions… ………………………………………… 6<br />
• Components and Accessories… ……………………………… 8<br />
• Overview………………………………………………………… 9<br />
• Connection……………………………………………………… 11<br />
■ Connecting to Monitor… ……………………………………………… 11<br />
■ Connecting to Power………………………………………………… 12<br />
■ Connecting to 8P Control Terminal……………………………………… 12<br />
• Operating Your <strong>Camera</strong>… ……………………………………… 14<br />
■ Menu Configuration… ………………………………………………… 14<br />
■ Menu Setup…………………………………………………………… 14<br />
- WHITE BALANCE… ……………………………………………………… 15<br />
- BACK LIGHT……………………………………………………………… 16<br />
- MOTION DETECTION……………………………………………………… 19<br />
- FOCUS…………………………………………………………………… 20<br />
- EXPOSURE… …………………………………………………………… 25<br />
- SPECIAL… ……………………………………………………………… 29<br />
- RESET…………………………………………………………………… 37<br />
- EXIT……………………………………………………………………… 37<br />
• Troubleshooting………………………………………………… 37<br />
• Specifications… ………………………………………………… 39<br />
• STW Protocol Command Description… ……………………… 40<br />
37x Optical <strong>Zoom</strong><br />
The built-in <strong>SDZ</strong>-370 optical zoom lens is a<br />
highly durable component. It features auto<br />
focus, auto iris, and zoom functions.<br />
SSNR (Samsung Super Noise<br />
Reduction)<br />
The high performance W-IV DSP chip<br />
dramatically reduces the gain noise in digital<br />
image precessing, producing clear, sharp<br />
images in low lighting environments.<br />
Fine Picture Quality under Ultra Low<br />
Lighting<br />
1/4" high density CCD allows the user to<br />
capture bright, high-quality images under ultra<br />
low lighting conditions.<br />
<strong>High</strong> <strong>Resolution</strong><br />
Featuring 550TV line horizontal resolution in<br />
color mode and 680TV line horizontal resolution in<br />
BW mode, the camera features Sony's 410,000<br />
pixel CCD and captures clean, noiseless, highquality<br />
images.<br />
Control via OSD Menu and RS-485<br />
The OSD menu and RS-485 pins allow for<br />
remote control of the camera.<br />
The user can also directly control the lens<br />
using external control connection.<br />
Day & Night<br />
The camera automatically determines whether<br />
it is night time or day time, selecting operating<br />
mode automatically. The camera operates in<br />
color mode during day light conditions and BW<br />
mode in night conditions for clearer identification.<br />
DIS(Digital Image Stabilizer)<br />
The DIS function can compensate for vibration of<br />
the camera. so it helps you obtain more<br />
stabilized image under the shaking conditions.<br />
Motion Detection<br />
Once motion is detected, the camera sends an<br />
alert signal to the processing unit, which, if<br />
used in conjunction with an optional alarm, can<br />
provide effective surveillance of your property.<br />
Miscellaneous Functions<br />
SENS-UP, FLIP(H/V-REV), D-ZOOM, SHARPNESS,<br />
MOTION DETECTION and PRIVACY functions<br />
are provided.<br />
COLOR CCD CAMERA<br />
4 User <strong>Guide</strong><br />
COLOR CCD CAMERA 5 User <strong>Guide</strong>
Samsung Techwin cares for the environment at all product manufacturing<br />
stages to preserve the environment, and is taking a number of steps to provide<br />
customers with more environment-friendly products.The Eco mark represents<br />
Samsung Techwin's will to create environment-friendly products, and indicates<br />
that the product satisfies the EU RoHS Directive.<br />
Warnings & Cautions<br />
This information is provided to ensure your safety and to prevent any losses, financial or<br />
otherwise. Please read it carefully and use the product accordingly.<br />
* For product inquiries, please contact the retail shop where you bought the camera. The use of equipment such as<br />
an aerial ladder while providing after-sales service shall be at your expense.<br />
* Separate the power plug when thunder crashes or lighting flashes.<br />
* This product is support equipment for surveillance system. Therefore, we can't compensate for material loss and/or<br />
personal injuries by robbery, fire, natural disaster or something like this type.<br />
Warning/Attention/Special Mark Messages<br />
Do not install under extreme<br />
temperature conditions.<br />
Use only under temperature conditions between<br />
-10ºC and +50ºC. Provide good ventilation when<br />
using in high temperature conditions.<br />
Do not install under unstable<br />
lighting conditions.<br />
Precautions<br />
Do not install in high humidity<br />
environment.<br />
May lower image quality.<br />
Avoid touching the camera lens.<br />
Ignoring this information may<br />
result in material loss and/or<br />
serious personal injuries including<br />
death.<br />
Ignoring this information may<br />
result in material loss and/or a<br />
slight injuries.<br />
Indicates “Never Allowed.”<br />
Indicates “No Disassembling.”<br />
Severe lighting changes or flickering may hinder<br />
normal camera operation.<br />
The lens is the most important component of<br />
the camera. Be careful not to smear it with<br />
fingerprints.<br />
Do not drop the camera or subject<br />
it to physical shock.<br />
Never keep the camera face to<br />
strong light directly.<br />
May cause a product malfunction.<br />
May damage the CCD.<br />
COLOR CCD CAMERA<br />
6 User <strong>Guide</strong><br />
COLOR CCD CAMERA 7 User <strong>Guide</strong>
Precautions<br />
Overview<br />
Do not expose the camera to rain<br />
or other types of liquids.<br />
Do not expose the camera to<br />
radioactivity.<br />
Top<br />
Bottom<br />
1<br />
2<br />
May cause a product malfunction.Wipe dry any<br />
liquids. Liquids may contain minerals that are<br />
corrosive to electronic components.<br />
Radioactivity exposure may damage the CCD.<br />
Notes<br />
• Exposure to a spotlight or an object emitting strong light may cause smear or blooming.<br />
• Ensure that the power source complies with normal specifications before supplying it to<br />
the camera.<br />
Components and Accessories<br />
1 Tripod Mounting Bracket Screw Hole<br />
Used to fix tripod mounting bracket on top of<br />
the camera.<br />
2 Tripod Mounting Hole<br />
Used to install the camera on an optional tripod.<br />
The tripod must be equipped with screws with<br />
specifications shown on the right.<br />
1/4"-20 UNC (20 THREAD)<br />
L:4.5mm±0.2mm (ISO standard),<br />
or 0.197" (ASA standard)<br />
1 2 3<br />
1 37x <strong>Zoom</strong> <strong>Color</strong> <strong>Camera</strong> <strong>SDZ</strong>-370<br />
2 Instruction Manual<br />
3 8-PIN CABLE ASSY<br />
Attach the bracket to the top of the camera. Use screws included in<br />
the package or their equivalent (less than 6mm). Otherwise, the<br />
bracket may not assemble to the camera properly.<br />
COLOR CCD CAMERA<br />
8 User <strong>Guide</strong><br />
COLOR CCD CAMERA 9 User <strong>Guide</strong>
Overview<br />
Connection<br />
Bottom View<br />
Connecting to Monitor<br />
Connect Video Out Jack to the monitor's Video In jack as shown below.<br />
3<br />
5<br />
6<br />
4<br />
CCD <strong>Camera</strong><br />
Monitor<br />
7<br />
3 Key Buttons<br />
Following buttons control zoom, focus, and auto focus functions.<br />
WIDE button : To widen the view. (ZOOM OUT)<br />
TELE button : To close in on a far object. (ZOOM IN)<br />
F-NEAR button : To see a near object clearly.<br />
F-FAR button : To see a far object clearly.<br />
Pressing the 'SET' button locks the zoom control function of these buttons and<br />
prompts the main setup menu.<br />
Main setup menu can be navigated using these buttons.<br />
SET : To access the main setup menu.<br />
UP (TELE button) : To move the arrow indicator to up.<br />
DOWN (WIDE button) : To move the arrow indicator to down.<br />
LEFT (F-NEAR button) : To move the arrow indicator to left.<br />
RIGHT (F-FAR button) : To move the arrow indicator to right.<br />
4 Power Input Terminal<br />
Power supply terminal (DC12V±10%).<br />
5 Power LED<br />
Illuminates when power is supplied.<br />
6 Video Output Jack<br />
Used to connect an external video monitor in jack.<br />
7 RJ-45 JACK<br />
Terminals, such as RS-485 communications, MD OUT, ZOOM, and FOCUS, EX_DN<br />
are areincluded.<br />
• Connection methods may vary depending on the video equipment. Please refer to<br />
the model specific instruction manual.<br />
• Connect cables with the unit powered down.<br />
• Set the 75Ω / Hi-Z selection switch as shown below if you have an intermediate device.<br />
CCD <strong>Camera</strong><br />
Intermediate<br />
End monitor<br />
COLOR CCD CAMERA<br />
10 User <strong>Guide</strong><br />
COLOR CCD CAMERA 11 User <strong>Guide</strong>
Connection<br />
Connecting to Power<br />
DC Power Type (DC 12V, 500mA)<br />
Use DC 12V/500mA power source for <strong>SDZ</strong>-370N/P.<br />
Notes<br />
Power Input Terminal<br />
• Connect the power once the installation is complete.<br />
• The wire is polarized. Match '+' and '-' terminals properly.<br />
Connecting to 8P Control Terminal<br />
The camera can be controlled by using external controllers like a Remote controller.<br />
(RS-485 Communication)<br />
Connector Function Signal Level I/O<br />
ZOOM<br />
FOCUS<br />
Tele<br />
Wide<br />
Far<br />
Near<br />
COM COM<br />
-<br />
MD<br />
EX DN<br />
0V<br />
There is no motion<br />
5±0.5sec<br />
← →<br />
+6V ~ +12V<br />
COM<br />
COM<br />
- 6V ~ -12V<br />
+6V ~ +12V<br />
COM<br />
COM<br />
- 6V ~ -12V<br />
User Vcc<br />
There is motion<br />
DAY mode: D&N terminals must be OPEN to external signals.<br />
(Do not input voltage)<br />
NIGHT mode: D&N terminal must be connected to the ground<br />
I<br />
I<br />
O<br />
I<br />
Notes<br />
• MD(Motion Detection) Output format is Open Collector.<br />
• When using the MD function, the 'GND' should be connected to the frame ground.<br />
• Do not simultaneously connect the RS-485 (+) (-) communication line when you use<br />
voltage control ZOOM and FOCUS, using the RECEIVER BOX (SRX-100B).<br />
SCC-3100A<br />
* 8P Control Terminal Configuration<br />
SCC-101<br />
8-Pin CABLE ASSY<br />
Number Name Cable color Description Number Name Cable color Description<br />
1 ZOOM ORANGE<br />
5 GND BLUE -<br />
2 FOCUS WHITE/ORANGE 6 EX DN WHITE/BLUE External D/N<br />
-<br />
3 COM GREEN 7 485+ BROWN RS-485 communication<br />
4 MD OUT WHITE/GREEN 8 485- WHITE/BROWN RS-485 communication<br />
* Match the communication setup between devices when you use the wired controller<br />
(SCC-101) or SCC-3100A.<br />
ITEM<br />
SCC-101(fixed) SCC-3100A(Factory Default)<br />
MODE Serial Serial<br />
Data Bit 8 bit 8 bit<br />
Bit/Sec 9600bps 9600bps<br />
Parity EVEN NONE<br />
CAM ID NO. 0 1~255<br />
RETURN PACKET ENABLE See the SCC-3100A manual<br />
Notes<br />
• Contact an authorized<br />
technician for<br />
inspection.<br />
COLOR CCD CAMERA<br />
12 User <strong>Guide</strong><br />
COLOR CCD CAMERA 13 User <strong>Guide</strong>
Operating Your <strong>Camera</strong><br />
Menu Configuration<br />
Main Setup Menu<br />
WHITE BAL<br />
• ATW • MANUAL • AWC->SET<br />
• OUTDOOR • INDOOR<br />
BACKLIGHT • OFF • BLC • HLC<br />
MOTION DET • OFF • ON<br />
• MODE • ZOOM TRK • ZOOM SPEED<br />
FOCUS<br />
• D-ZOOM • ZOOM POS INIT • USER PRESET<br />
• LENS INIT • END<br />
• BRIGHTNESS • IRIS<br />
• SHUTTER<br />
EXPOSURE<br />
• AGC • SSNR • SENS-UP<br />
• END<br />
• PRIVACY • DAY/NIGHT • DIS<br />
SPECIAL<br />
• COMM ADJ • IMAGE ADJ • DISPLAY<br />
• END<br />
RESET<br />
EXIT<br />
Menu Setup<br />
Use the five buttons on back of the camera.<br />
UP button<br />
SET/AF button<br />
LEFT button<br />
DOWN button<br />
RIGHT button<br />
1. Press the SET button for 2 seconds. (Short-pressing the button activates<br />
the AUTO FOCUS).<br />
• Main setup menu is displayed on the monitor screen.<br />
Select feature using the UP or<br />
DOWN button.<br />
MAIN SETUP<br />
WHITE BAL ATW<br />
BACKLIGHT OFF<br />
MOTION DET OFF<br />
FOCUS<br />
EXPOSURE<br />
SPECIAL<br />
RESET<br />
EXIT<br />
2. Select the desired feature using the UP or DOWN button.<br />
• Each pressing of the UP or DOWN button moves the indicator to the next or<br />
previous feature.<br />
• Move the arrow indicator to the desired feature item.<br />
3. Change the status of the selected feature using the LEFT or RIGHT button.<br />
4. When completed, move the arrow indicator to 'EXIT' and press the SET button.<br />
Notes<br />
• Features marked with a have an accessible submenu.<br />
• Access the submenu by pressing the SET button.<br />
White Balance (White Bal.)<br />
MAIN SETUP<br />
WHITE BAL ATW<br />
BACKLIGHT OFF<br />
Change the status using the<br />
LEFT or RIGHT button.<br />
Use the White Balance function to adjust the screen color.<br />
1. When the SETUP menu screen is displayed, select ’White Bal.‘ by using the Up<br />
and Down buttons so that the arrow indicates ’White Bal.‘ .<br />
2. Select a desired mode using the Up and Down buttons.<br />
COLOR CCD CAMERA<br />
14 User <strong>Guide</strong><br />
COLOR CCD CAMERA 15 User <strong>Guide</strong>
Operating Your <strong>Camera</strong><br />
✽ Select one of the following 5 modes, as appropriate for your purpose.<br />
ATW : Select this when the color temperature is between 1800ºK and<br />
10500ºK<br />
INDOOR : Select this when the color temperature is between 4500ºK and 8500ºK.<br />
OUTDOOR : Select this when the color temperature is between 1800ºK and<br />
10500ºK. (sodium light inclusion)<br />
AWC →SET : To find the optimal setting for the current luminance environment in this<br />
mode, set the point the camera towards a sheet of white paper and press the<br />
SET button. If the environment changes, readjust it.<br />
MANUAL : Select this to fine-tune White Balance manually. Set White Balance first by<br />
using the ATW or AWC mode. After that switch to MANUAL mode, finetune<br />
the White Balance and then press the SET button.<br />
WHITE BAL MANUAL SETUP<br />
RED 117<br />
BLUE 93<br />
▶END<br />
||||||||||||||||||||||||||<br />
||||||||||||||||||||||||||<br />
Press SET to Return<br />
BACKLIGHT<br />
This camera is designed so that it delivers a distinctive subject and background at<br />
The same time, even when the subject is in backlight, unlike conventional cameras,<br />
By adopting a proprietary W-IV DSP chip.<br />
1. When the SETUP menu screen is displayed, select ‘BACKLIGHT’ by using the Up<br />
and Down buttons so that the arrow indicates ‘BACKLIGHT’.<br />
MAIN SETUP<br />
WHITE BAL ATW<br />
BACKLIGHT OFF<br />
MOTION DET OFF<br />
2. Select a desired mode using the Left and Right buttons depending on the camera pupose.<br />
BLC : Enables a user to directly select a desired area from a picture, and to view the<br />
area more clearly.<br />
HLC(<strong>High</strong> Light Compensation) : If the scene contains extremely bright light areas<br />
such as; from car headlight, the light can mask out<br />
much of the on-screen detail.<br />
Notes<br />
• White Balance may not work properly under the following conditions. In this case select<br />
the AWC mode.<br />
1 When the color temperature of environment surrounding the subject is out of the control<br />
range<br />
2 When the ambient illumination of the subject is dim.<br />
3 If the camera is directed towards a fluorescent light or is installed in a place where<br />
illumination changes dramatically, the White Balance operation may become unstable.<br />
COLOR CCD CAMERA<br />
16 User <strong>Guide</strong><br />
COLOR CCD CAMERA 17 User <strong>Guide</strong>
Operating Your <strong>Camera</strong><br />
OFF : Deactivates the BACKLIGHT function.<br />
3. Select a desired mode using the Left and Right<br />
button and press the SET button.<br />
• Select ‘BLC’ to adjust the area to be enhanced and<br />
enhancement level.<br />
• Select ‘HLC’ to adjust the HLC MASK TONE and<br />
LEVEL.<br />
BLC SETUP<br />
▶LEVEL LOW<br />
TOP 30<br />
BOTTOM 70<br />
LEFT 30<br />
RIGHT 70<br />
END<br />
HLC SETUP<br />
▶LEVEL LOW<br />
MASK TONE 5<br />
END<br />
||||||||||||||||||||||||||<br />
||||||||||||||||||||||||||<br />
||||||||||||||||||||||||||<br />
||||||||||||||||||||||||||<br />
||||||||||||||||||||||||||<br />
Motion Detection<br />
This product has a feature that allows you to observe movements of objects in 4<br />
different areas on the screen, and the words ‘MOTION DETECTED’ appear on the<br />
screen when movement is detected; hence a single individual can conduct<br />
supervision efficiently. The camera detects an object’s movement by sensing<br />
disparity of outline, and level of brightness and color. The camera receives detection<br />
signal from MD output terminal.<br />
MD SETUP<br />
▶AREA SEL AREA1<br />
AREA MODE ON<br />
SENSITIVITY LOW<br />
SMART ZOOM ON<br />
END<br />
AREA SETUP<br />
▶TOP 3<br />
BOTTOM 6<br />
LEFT 3<br />
RIGHT 6<br />
END<br />
||||||||||||||||||||||||||<br />
||||||||||||||||||||||||||<br />
||||||||||||||||||||||||||<br />
||||||||||||||||||||||||||<br />
Notes<br />
• Since the following symptoms may occur according to the ambient illumination when BLC<br />
is selected, set it to OFF.<br />
1 <strong>Color</strong> or screen changes unnaturally.<br />
2 Noise appears in the bright part of the screen.<br />
• Since the performance of the BLC function may be affected by the area of the bright part<br />
of the screen, optimize the installation angle for the best BLC performance.<br />
• If you increase LIMIT, the screen display may be distorted.<br />
• For high performance of BLC function, We recommend that you set IRIS to AUTO in the<br />
EXPOSURE setup.<br />
• Activating BLC may cause the camera to repeat the Auto Focus operation depending on<br />
lighting conditions. It is recommended that you use the Focus Setup menu in One-Push or<br />
Manual mode.<br />
• Smart <strong>Zoom</strong> and BLC cannot be used in conjunction with each other:<br />
• Setting up BLC and then Smart <strong>Zoom</strong> automatically cancels BLC.<br />
• Setting up Smart <strong>Zoom</strong> and then BLC automatically cancels Smart <strong>Zoom</strong>.<br />
• Please press the SETUP button.<br />
- OFF: MOTION DETECTION mode is cancelled.<br />
- ON: Any motion in the selected areas is observed.<br />
AREA SEL : You can select the area you wish to observe from the 8 area.<br />
AREA MODE<br />
SENSITIVITY<br />
: Determines whether to use the MD area selected in SENSITIVITY<br />
: You can select up to 8 MD areas. When SENSITIVITY number is<br />
high, motion detection sensitivity is increased to recognize even<br />
small movement<br />
SMART ZOOM SETUP<br />
▶START ZOOM X1<br />
TARGET ZOOM X5<br />
DWELL TIME 5 SEC<br />
END<br />
SMART ZOOM : Smart zoom is operated in connection with MOTION DETECTION.<br />
When the SMART ZOOM function is ‘ON’ while the MOTION<br />
DETECTION mode is ‘ON’, the zoom goes to the TARGET ZOOM<br />
position once motion is detected. Once the zoom action is finished<br />
and ‘DWELL TIME’ has passed, the zoom returns to the ‘START<br />
COLOR CCD CAMERA<br />
18 User <strong>Guide</strong><br />
COLOR CCD CAMERA 19 User <strong>Guide</strong>
Operating Your <strong>Camera</strong><br />
ZOOM’ position.<br />
• START ZOOM : Use the left or right button in the ‘START ZOOM’ item to select the zoom position<br />
from 1x to 37x to be returned after the ‘SMART ZOOM’ action is over.<br />
• TARGET ZOOM : Use the left or right button in the ‘TARGET ZOOM’ item to select the zoom<br />
position from 1x to 37x to be used during MOTION DETECTION.<br />
• DWELL TIME : Use the left or right button in the ‘DWELL TIME’ item to select a time between<br />
5 and 60 seconds for the dwell time before the zoom is returned to the ‘START<br />
ZOOM’ position. (5,7,10,15,20,30,40,60 sec)<br />
TOP, BOTTOM, LEFT,RIGHT : You can adjust the size of the area<br />
Notes<br />
Tips on Using the Motion Detection Feature<br />
• The feature may not function properly under flickering light conditions.<br />
• The camera interprets sudden changes in lighting and subsequent change in brightness of<br />
an object as motion.<br />
• With the feature enabled, other algorithms may require additional time to operate than<br />
usual.<br />
1. Press the SET button to access the main setup manu and then position the<br />
indicator over FOCUS using the UP or DOWN button.<br />
2. Press the SET button.<br />
MODE : You can select the most suitable zoom mode. Move the arrow indicator to<br />
’MODE‘ using UP or DOWN button.<br />
FOCUS SETUP<br />
MODE<br />
ONE-PUSH<br />
ZOOM TRK AUTO TRACK<br />
ZOOM SPEED FAST<br />
D-ZOOM<br />
OFF<br />
ZOOM POS INIT AUTO<br />
USER PRESET OFF<br />
LENS INIT MANUAL<br />
END<br />
FOCUS<br />
Notes<br />
• This system does not guarantee prevention of fire or theft. The<br />
manufacturer shall not be held responsible for any accident or<br />
damage incurred.<br />
• Connect an external alarm device to MD Out on back of the<br />
camera.<br />
MAIN SETUP<br />
WHITE BAL ATW<br />
BACKLIGHT OFF<br />
MOTION DET OFF<br />
FOCUS<br />
EXPOSURE<br />
• AUTO : Select AUTO and press the SET button to<br />
confirm. Increase or decrease optical zoom<br />
ZOOM POS SETUP<br />
(ZOOM) or digital zoom (D-ZOOM)<br />
positions using the UP or DOWN button<br />
while verifying the changes on screen.<br />
Enabling D-ZOOM (ON) means that digital<br />
↑ : TELE ↓ : WIDE<br />
zoom will activate once optical zoom<br />
ends. Focus is automatically adjusted with<br />
moving zoom.<br />
• ONE PUSH : Focus is automatically adjusted just once, ZOOM/FOCUS POS SETUP<br />
after zoom position is changed. Select<br />
'ONE PUSH' and press the SET button to<br />
confirm. Increase or decrease optical zoom<br />
↑ : TELE ↓ : WIDE<br />
(ZOOM) or digital zoom (D-ZOOM)<br />
← : NEAR → : FAR<br />
positions using the directional buttons<br />
while verifying the changes on screen.<br />
Press the SET button once desired image quality is obtained.<br />
COLOR CCD CAMERA<br />
20 User <strong>Guide</strong><br />
COLOR CCD CAMERA 21 User <strong>Guide</strong>
Operating Your <strong>Camera</strong><br />
• MANUAL : Select 'MANUAL' and press the SET button<br />
to confirm. Increase or decrease optical<br />
zoom (ZOOM) or digital zoom (D-ZOOM)<br />
positions using the directi onal buttons<br />
while verifying the changes on screen. Press<br />
the SET button on ce desired image quality<br />
is obtained. Focus can be manually<br />
adjusted, independent of moving zoom.<br />
FOCUS SETUP<br />
MODE<br />
ONE-PUSH<br />
ZOOM TRK AUTO TRACK<br />
ZOOM SPEED : Configure zoom tracing speed using this feature. Position the indicator<br />
over 'ZOOM SPEED' using the UP or DOWN button and then set to<br />
desired mode using the LEFT or RIGHT button.<br />
FOCUS SETUP<br />
MODE<br />
ONE-PUSH<br />
ZOOM TRK AUTO TRACK<br />
ZOOM SPEED FAST<br />
• FAST : To move zoom fast.<br />
• MEDIUM : To move zoom at medium speed.<br />
• SLOW : To move zoom slowly.<br />
Notes<br />
ZOOM/FOCUS POS SETUP<br />
↑ : TELE ↓ : WIDE<br />
← : NEAR → : FAR<br />
ZOOM TRK : Select ‘ON’ for the ‘SMART ZOOM’ item in the MOTION DETECTION menu<br />
and press SET button to change the settings for the ‘SMART ZOOM’ function.<br />
Use the left or right button in the ‘ZOOM’ item to select ‘AUTOTRACK’ or ‘TRACK’ and press<br />
SET button to activate the zoom action focus function.<br />
• AUTOTRACK: <strong>Zoom</strong>ing in while deciding or adjusting the status of the focus.<br />
• TRACK: <strong>Zoom</strong>ing in with no relevance to the focus.<br />
• OFF: Only the zoom lens moves.<br />
• The 'ZOOM SPEED' mode cannot be used if 'MODE' is set to 'AUTO' and 'ZOOM TRK' is<br />
'ON'.<br />
D-ZOOM : Configure magnification limit from x2~x12 using this feature. Position the<br />
indicator over 'D-ZOOM' using the UP or DOWN button. Set 'D-ZOOM' to<br />
'ON' and press the SET button to confirm.<br />
FOCUS SETUP<br />
MODE<br />
ONE-PUSH<br />
ZOOM TRK AUTO TRACK<br />
ZOOM SPEED FAST<br />
D-ZOOM<br />
OFF<br />
ZOOM POS INIT AUTO<br />
- Set 'ZOOM LIMIT' to the desired level using the<br />
LEFT or RIGHT button.<br />
Notes<br />
• When the DIS is enabled, you cannot use the D-ZOOM.<br />
D-ZOOM LIMIT SETUP<br />
▶LIMIT<br />
END<br />
ZOOM POS INIT: Moves to the controlled ZOOM position when the power truned<br />
on and is a function of the initial ZOOM position control.<br />
FOCUS SETUP<br />
MODE<br />
ONE-PUSH<br />
ZOOM TRK AUTO TRACK<br />
ZOOM SPEED FAST<br />
D-ZOOM<br />
OFF<br />
ZOOM POS INIT AUTO<br />
USER PRESET OFF<br />
X2<br />
COLOR CCD CAMERA<br />
22 User <strong>Guide</strong><br />
COLOR CCD CAMERA 23 User <strong>Guide</strong>
Operating Your <strong>Camera</strong><br />
- AUTO :If you turn the power off and on, the zoom magnification level is set to the<br />
previous level that was set before the power went off.<br />
- MANUAL : The zoom magnification level can be set from 1x to 37x.<br />
Notes<br />
• The zoom postion is saved after 5 seconds when you set zoom function.<br />
LENS INIT : Use the left or right button in the ‘Lens<br />
initialization’ item to select<br />
‘Automatic’ or ‘Manual’ and press the<br />
SET button to set up the initialization<br />
of the lens.<br />
USER PRESET SETUP<br />
PRESET NO 1<br />
PRESET SAVE<br />
▶ PRESET CLEAR<br />
END<br />
PRESET NOT DEFINED<br />
||||||||||||||||||||||||||<br />
USER PRESET<br />
• Preset user-designated configurations using this feature. Position the indicator over<br />
‘USER PRESET’ using the UP or DOWN button and then set to ‘ON’ using the LEFT<br />
or RIGHT button. Press the SET button to confirm.<br />
FOCUS SETUP<br />
MODE<br />
ONE-PUSH<br />
ZOOM TRK AUTO TRACK<br />
ZOOM SPEED FAST<br />
D-ZOOM<br />
OFF<br />
ZOOM POS INIT AUTO<br />
USER PRESET OFF<br />
LENS INIT MANUAL<br />
END<br />
ZOOM/FOCUS POS SETUP<br />
↑ : TELE ↓ : WIDE<br />
← : NEAR → : FAR<br />
• AUTO : The lens is initialized by setting the date. reset time can be set from 1 day to<br />
7 days and the lens resets every 24 hours from the set time.<br />
• Manual : The Lens will reset when you press the SET button.<br />
FOCUS SETUP<br />
MODE<br />
ONE-PUSH<br />
ZOOM TRK AUTO TRACK<br />
ZOOM SPEED FAST<br />
D-ZOOM<br />
OFF<br />
ZOOM POS INIT AUTO<br />
USER PRESET OFF<br />
LENS INIT MANUAL<br />
END<br />
LENS INIT SETUP<br />
DAY 1<br />
END<br />
- PRESET NO : Up to 128 preset configuratons are<br />
supported.<br />
- PRESET SAVE : Save configured preset.<br />
- PRESET CLEAR : Clear configured preset.<br />
- END : Revert to the FOCUS SETUP menu.<br />
USER PRESET SETUP<br />
▶ PRESET NO 1<br />
PRESET SAVE<br />
PRESET CLEAR<br />
END<br />
PRESET NOT DEFINED<br />
||||||||||||||||||||||||||<br />
USER PRESET SETUP<br />
PRESET NO 1<br />
▶ PRESET SAVE<br />
PRESET CLEAR<br />
END<br />
PRESET NOT DEFINED<br />
||||||||||||||||||||||||||<br />
END : To revert to the main setup menu.<br />
EXPOSURE<br />
MAIN SETUP<br />
WHITE BAL ATW<br />
BACKLIGHT OFF<br />
MOTION DET OFF<br />
FOCUS<br />
EXPOSURE<br />
SPECIAL<br />
COLOR CCD CAMERA<br />
24 User <strong>Guide</strong><br />
COLOR CCD CAMERA 25 User <strong>Guide</strong>
Operating Your <strong>Camera</strong><br />
1. Press the SET button to access the main setup menu and then position the<br />
indicator over 'EXPOSURE' using the UP or DOWN button.<br />
2. Press the SET button to confirm.<br />
BRIGHTNESS:<br />
Use this feature to adjust image brightness. Position the indicator over<br />
'BRIGHTNESS' using the UP or DOWN button. Then increase or decrease brightness<br />
level using the LEFT or RIGHT button while verifying the changes on screen. Set<br />
END once desired level is obtained.<br />
EXPOSURE SETUP<br />
BRIGHTNESS 50<br />
||||||||||||||||||||||||||<br />
IRIS<br />
AUTO<br />
IRIS: Set 'IRIS' to 'AUTO' or 'MANUAL'. Position the indicator over 'IRIS' using the UP<br />
or DOWN button and then select the desired iris mode using the LEFT or RIGHT<br />
button.<br />
EXPOSURE SETUP<br />
BRIGHTNESS 50<br />
IRIS<br />
AUTO<br />
SHUTTER ESC<br />
||||||||||||||||||||||||||<br />
• AUTO: The iris is automatically activated upon illumination.<br />
• MANUAL: Manual iris configuration. Set 'IRIS' to 'MANUAL' using the LEFT or RIGHT<br />
button and then press the SET button. Increase or decrease iris level using<br />
the LEFT or RIGHT button while verifying the changes on screen.<br />
SHUTTER : Control image brightness by adjusting shutter speed.<br />
1 Position the indicator over 'SHUTTER' using the UP or DOWN button. Then select<br />
the desired shutter mode (A.FLK, ESC, MANUAL) using the LEFT or RIGHT button.<br />
EXPOSURE SETUP<br />
BRIGHTNESS 50<br />
IRIS<br />
AUTO<br />
SHUTTER ESC<br />
AGC<br />
MEDIUM<br />
||||||||||||||||||||||||||<br />
• A.FLK (NTSC: 1/100, PAL: 1/120): Flicker-free mode<br />
• ESC : Automatic shutter speed setting (optimal).<br />
Auto operation is possible only when the IRIS is set to MANUAL.<br />
• MANUAL: Manual shutter speed setting<br />
2 If you choose ’MANUAL‘, select the optimal<br />
shutter speed.<br />
• In MANUAL mode, the optimal shutter speed<br />
needs to be designated. Select from 1/60 to<br />
1/120,000 (NTSC) or from 1/50 to 1/120,000<br />
(PAL). * 'Sens-Up' mode can be configured<br />
manually (2x to 256x).<br />
• Verify changes made to the shutter speed by<br />
referencing to changes in on screen brightness.<br />
3 Press the SET button to complete.<br />
SHUTTER MANUAL SETUP<br />
▶SHUTTER VAL 1/60<br />
END<br />
IRIS MANUAL SETUP<br />
▶IRIS VAL F1.6<br />
END<br />
Notes<br />
• Image may become unstable if the camera is set to 'ESC' mode and faces a strong<br />
fluorescent light.<br />
• Under 'ESC' mode, the brightness can be adjusted using the LEFT or RIGHT button.<br />
COLOR CCD CAMERA<br />
26 User <strong>Guide</strong><br />
COLOR CCD CAMERA 27 User <strong>Guide</strong>
Operating Your <strong>Camera</strong><br />
AGC (Auto Gain Control) : For brighter images.<br />
1 Position the indicator over 'AGC' using the UP or DOWN button.<br />
2 Set 'AGC' to the desired mode using the LEFT or RIGHT button.<br />
• HIGH : Wide range gain value adjustment<br />
• MEDIUM : MEDIUM range gain value adjustment<br />
• LOW : Narrow range gain value adjustment<br />
• MANUAL : Selecting gain value range. (5dB ~ 41dB)<br />
• OFF : Disabled<br />
EXPOSURE SETUP<br />
BRIGHTNESS 50<br />
IRIS<br />
AUTO<br />
SHUTTER ESC<br />
AGC<br />
MEDIUM<br />
SSNR<br />
MEDIUM<br />
||||||||||||||||||||||||||<br />
SSNR(Samsung Super Noise Reduction): On screen noise reduction.<br />
1 Position the indicator over 'SSNR' using the UP or DOWN button.<br />
2 Set 'SSNR' to the desired mode using the LEFT or RIGHT button.<br />
• LOW : Low noise reduction<br />
• MEDIUM : Medium noise reduction<br />
• HIGH : <strong>High</strong> noise reduction<br />
• OFF : Disabled<br />
EXPOSURE SETUP<br />
BRIGHTNESS 50<br />
IRIS<br />
AUTO<br />
SHUTTER ESC<br />
AGC<br />
MEDIUM<br />
SSNR<br />
MEDIUM<br />
SENS-UP OFF<br />
||||||||||||||||||||||||||<br />
GAIN MANUAL SETUP<br />
▶LEVEL 5dB<br />
END<br />
Notes<br />
• Changing 'AGC' setting from LOW to HIGH results in greater sensitivity, as well as on<br />
screen noise.<br />
• Setting 'AGC' to OFF locks 'SSNR' configuration.<br />
SENS-UP : This feature ensures clear images at night or under low lighting<br />
conditions.<br />
1 Position the indicator over 'SENS-UP' using the UP or DOWN button.<br />
2 Set 'SENS-UP' to the desired mode using the LEFT or RIGHT button.<br />
• AUTO : Select this mode for use in night time or under low lighting conditions.<br />
• OFF : Disabled<br />
Notes<br />
EXPOSURE SETUP<br />
BRIGHTNESS 50<br />
IRIS<br />
AUTO<br />
SHUTTER ESC<br />
AGC<br />
MEDIUM<br />
SSNR<br />
MEDIUM<br />
SENS-UP OFF<br />
||||||||||||||||||||||||||<br />
• Once 'AUTO' mode is set, the user can configure Sens-Up limit by increasing /decreasing<br />
the shutter speed (e.g.: X2,X4....... X32,X64,X128,X256).<br />
• Enabling Sens-Up increases camera sensitivity and may result in additional noise and/or<br />
other phenomenons. This is normal.<br />
COLOR CCD CAMERA<br />
28 User <strong>Guide</strong><br />
COLOR CCD CAMERA 29 User <strong>Guide</strong>
Operating Your <strong>Camera</strong><br />
SPECIAL<br />
MAIN SETUP<br />
WHITE BAL ATW<br />
BACKLIGHT OFF<br />
MOTION DET OFF<br />
FOCUS<br />
EXPOSURE<br />
SPECIAL<br />
RESET<br />
1. Press the SET button to access the main setup menu and then position the<br />
indicator over 'SPECIAL' using the UP or DOWN button.<br />
2. Press the SET button to confirm.<br />
PRIVACY : Hide an area you want to hide on the screen.<br />
SPECIAL SETUP<br />
PRIVACY OFF<br />
DAY/NIGHT AUTO<br />
DIS<br />
OFF<br />
1 When the SPECIAL menu screen is displayed, press<br />
the Up and Down buttons so that the arrow<br />
indicates ‘PRIVACY’.<br />
2 Set up the mode using the 4 direction buttons.<br />
• AREA SEL : You can select up to 8 MD areas.<br />
• AREA MODE : Determines whether to use the<br />
area selected in the AREA SEL, and<br />
the size and position of the area.<br />
• MASK COLOR : Determine area color. You can select<br />
Gray, Green, Red, Blue, Black, White.<br />
PRIVACY SETUP<br />
▶AREA SEL AREA1<br />
AREA MODE ON<br />
MASK COLOR GRAY<br />
MASK TONE 0<br />
END<br />
AREA SETUP<br />
||||||||||||||||||||||||||<br />
||||||||||||||||||||||||||<br />
▶TOP 45<br />
||||||||||||||||||||||||||<br />
BOTTOM 110<br />
||||||||||||||||||||||||||<br />
LEFT 20<br />
|||||||||||||||||||||||||<br />
RIGHT 20<br />
END 70 ||||||||||||||||||||||||||<br />
• MASK TONE : Determine the transparency of selected area as controlling number from<br />
0 to 3.<br />
• END : Select this to save the PRIVACY menu settings and return to the<br />
SPECIAL menu.<br />
DAY/NIGHT :You can display pictures in color or black and white.<br />
SPECIAL SETUP<br />
PRIVACY OFF<br />
DAY/NIGHT AUTO<br />
DIS<br />
OFF<br />
COMM ADJ<br />
1 When the SETUP menu screen is displayed, select ‘DAY/NIGHT’ by using the Up and<br />
Down buttons so that the arrow indicates 'DAY/NIGHT'.<br />
2 Select a desired mode using the Left and Right buttons according to the picture<br />
display you want.<br />
• COLOR : The picture is always displayed in color.<br />
• B/W : The picture is always displayed in black and white.<br />
• AUTO : The mode is switched to '<strong>Color</strong>' in a normal environment, but<br />
switches to 'B/W' mode when ambient illumination is low. To set up<br />
the sswitching time or speed for AUTO mode, press the SET button.<br />
- DWELL TIME : You can select the duration time<br />
about changing the day/night mode.<br />
→ 5,7,10,15,20,30,40, 60(sec)<br />
- DURATION : You can select brightness of<br />
illumination about changing the<br />
day/night mode.<br />
<strong>Color</strong> → B/W B/W → <strong>Color</strong><br />
Fast 2.5 lux 4 lux<br />
Slow 0.8 lux 6 lux<br />
DAY/NIGHT AUTO SETUP<br />
▶DWELL TIME 5 SEC<br />
DURATION FAST<br />
END<br />
• EXT : This mode allows you to apply a desired filter to external signals.<br />
COLOR CCD CAMERA<br />
30 User <strong>Guide</strong><br />
COLOR CCD CAMERA 31 User <strong>Guide</strong>
Operating Your <strong>Camera</strong><br />
Notes<br />
• When using a Video Auto Iris Lens, if you set the lens level to low, automatic switching<br />
between <strong>Color</strong> and Black & White may not occur.<br />
• You cannot control the DAY/NIGHT menu when AGC in the EXPOSURE menu is ‘OFF’.<br />
At this time, the exchange between DAY mode and NIGHT mode operates as like selecting<br />
‘COLOR’ mode.<br />
• The OSD key does not work for 3 seconds when switching to <strong>Color</strong> or B/W, to ensure<br />
stable camera operation.<br />
• The camera may focus less well under infrared illumination than under normal illumination.<br />
• Since the camera may not focus as well under infrared illumination at night as it does<br />
under normal illumination, install an Extra-low Dispersion Lens to obtain sharp pictures.<br />
• The brightness of illumination is changeable by installed environment.<br />
DIS : The DIS mode can compensate for vibration of the camera.<br />
SPECIAL SETUP<br />
PRIVACY OFF<br />
DAY/NIGHT COLOR<br />
DIS<br />
OFF<br />
COMM ADJ<br />
(between 0 and 255).<br />
• Protocol : Select the communication PROTOCOL. (STW/PELCO-D/PELCO-P/<br />
BOSCH/HONEYWELL/VICON/AD/SEC/PANASONIC)<br />
• BAUD RATE : You can select 2400/4800/9600/19200/38400/57600/115200 bps.<br />
• UART MODE : You can select NONE, EVEN or ODD for the parity bits.<br />
• TERMINATION : Function that sets the resistance at the end of RS-485<br />
communications.<br />
✽ Setting Termination Resistance.<br />
In order to prevent signal reduction, the termination resistance of the 2 end units,<br />
which are the distant paths for camera and controller to be connected on the RS485<br />
interface, should be connected.<br />
As the termination resistance is built in the camera, whether to make the termination<br />
resistance valid or invalid is selected with the TERMINATION.<br />
See the connection diagram for determining to which device the termination<br />
resistance will be connected to.<br />
Set up the termination resistance in the dark products.<br />
The installation distance of the product for the termination resistance setting should<br />
be less than 1.2 Km. (Maximum cable length is 1.2 Km according to the RS-485<br />
standards.)<br />
Notes<br />
• When DIS is operating, D-ZOOM does not operate.<br />
COMM ADJ (Communication Adjustment) :<br />
This function sets up the camera communication<br />
status when controlling the camera through an<br />
external control device.<br />
COMMUNICATION SETUP<br />
▶PROTOCOL STW<br />
CAM ID 1<br />
BAUD RATE 9600<br />
UART MODE 8-N-1<br />
TERMINATON OFF<br />
RET PKT DISABLE<br />
END<br />
||||||||||||||||||||||||||<br />
1 When the SPECIAL menu screen is displayed, press<br />
the Up and Down buttons so that the arrow indicates ‘COMM ADJ’.<br />
2 Set up the mode using the 4 direction buttons.<br />
• CAM ID : Determines the camera's identification number<br />
COLOR CCD CAMERA<br />
32 User <strong>Guide</strong><br />
COLOR CCD CAMERA 33 User <strong>Guide</strong>
Operating Your <strong>Camera</strong><br />
• RET PKT<br />
Notes<br />
: You can choose whether to send an ACK signal when the<br />
communication control command is issued to the camera.<br />
• If <strong>Camera</strong> is controlled by the Vicon Controller,function button may not work properly.<br />
• COLOR<br />
• END<br />
: Adjusting this value affects the chroma level only; the burst level<br />
is unaffected.<br />
: evert back to the USER PRESET menu.<br />
DISPLAY : Use this feature to designate a name for the camera, which will display<br />
on the monitor screen<br />
IMAGE ADJ : Includes image quality or special function factors.<br />
SPECIAL SETUP<br />
PRIVACY OFF<br />
DAY/NIGHT COLOR<br />
DIS<br />
OFF<br />
SYNC<br />
INT<br />
COMM ADJ<br />
IMAGE ADJ<br />
DISPLAY<br />
1 When the SETUP menu screen is displayed, select ‘IMAGE ADJ.’ by using the Up and<br />
Down buttons so that the arrow indicates 'IMAGE ADJ.<br />
2 Select a desired mode using the Up and Down buttons.<br />
• H-REV : You can flip the picture horizontally<br />
on the screen.<br />
• V-REV : You can flip the picture vertically on<br />
the screen.<br />
• SHARPNESS : As you increase this value, the picture<br />
outline becomes stronger and clearer.<br />
IMAGE SETUP<br />
▶H-REV OFF<br />
V-REV OFF<br />
SHARPNESS ON<br />
COLOR 50<br />
END<br />
||||||||||||||||||||||||<br />
SPECIAL SETUP<br />
PRIVACY OFF<br />
DAY/NIGHT COLOR<br />
DIS<br />
OFF<br />
SYNC<br />
INT<br />
COMM ADJ<br />
IMAGE ADJ<br />
DISPLAY<br />
END<br />
CAM TITLE<br />
1 Press the SET button to display the main setup menu and move the arrow indicator<br />
to ‘CAM TITLE’ using the UP or DOWN button.<br />
2 Set ‘CAM TITLE’ to ‘ON’ using the LEFT or RIGHT button.<br />
Notes<br />
SHARPNESS SETUP<br />
▶LEVEL 16<br />
END<br />
||||||||||||||||||||||||<br />
• If the CAM TITLE feature is set to ‘OFF’,<br />
the name will not displayed in the monitor<br />
DISPLAY SETUP<br />
▶CAM TITLE OFF<br />
CAM ID ON<br />
CAM INFO ON<br />
MD ALARM -----<br />
ZOOM MAG ON<br />
LANGUAGE ENGLISH<br />
END<br />
COLOR CCD CAMERA<br />
34 User <strong>Guide</strong><br />
COLOR CCD CAMERA 35 User <strong>Guide</strong>
Operating Your <strong>Camera</strong><br />
3 Press SET button.<br />
CAMERA TITLE SETUP<br />
ABCDEFGHIJKLM<br />
NOPQRSTUVWXYZ<br />
0123456789 ( )<br />
< >-/#¬S!?,.<br />
←→ CLR POS END<br />
• LANGUAGE<br />
• END<br />
UP or Down button. Then set to ON using the LEFT or RIGHT<br />
button.<br />
: You can select the menu language according to your<br />
requirements (Korean, ESPANOL, FRANCAIS, ITALIANO,<br />
DEUTSCH, ENGLISH, Japanese, Chinese, PORTUGUESE)<br />
: Select this to save the SPECIAL menu settings and return to the<br />
SPECIAL menu.<br />
4 You can enter up to 20 characters.<br />
a. Move the cursor to the character entry field using the LEFT or RIGHT button.<br />
b. Use UP, DOWN, LEFT and RIGHT buttons to select a desired character.<br />
c. Press the SET button to confirm selection of the blinking character. The character<br />
is then saved, and the cursor in the entry field moves to the next position.<br />
d. Repeat steps a through c until the desired name has been entered.<br />
Notes<br />
• Correcting Mistakes<br />
Move the cursor th ‘CLR’ and press the SET button to clear the entire entry. To modify one<br />
character, use LEFT or RIGHT to position the cursor above the character to be modified and<br />
click the SET button after selecting the character to enter.<br />
5 Enter a title, move the cursor to ‘POS’ and press<br />
the SET button. The entered title appears on the<br />
screen. Select the position to display the title on the<br />
screen by using the 4 direction butons and press<br />
the SET button.<br />
When the position is determined, select.<br />
FRONT DOOR<br />
• CAM ID : Displays camera ID on top left corner of the screen.<br />
• CAM INFO : Displays camera information on screen.<br />
• MOTION ALARM : You can toggle the use of the camera alarm.<br />
• ZOOM MAG : Use this feature to display the current zoom magnification level<br />
on screen. Position the indicator over ‘ZOOM MAG’ using the<br />
RESET<br />
To reset your camera to factory default condition.<br />
EXIT<br />
To finish setup menu.<br />
Troubleshooting<br />
If you have trouble operating your camera, refer to the following table.<br />
If the guidelines do not enable you to solve the problem, contact an authorized<br />
technician.<br />
• Nothing appears on the screen.<br />
- Check that the power cord and line connection between the camera and monitor are<br />
fixed properly.<br />
- Check that you have properly connected VIDEO cable to the camera VIDEO output jack.<br />
• The image on the screen is dim.<br />
- Is lens stained with dirt? Clean your lens with soft, clean cloth.<br />
- Set the monitor to proper condition.<br />
- If the camera is exposed to too strong light, change the camera position.<br />
COLOR CCD CAMERA<br />
36 User <strong>Guide</strong><br />
COLOR CCD CAMERA 37 User <strong>Guide</strong>
Troubleshooting<br />
Specifications<br />
• The image on the screen is dark.<br />
- Adjust the contrast feature of the monitor.<br />
- If you have an intermediate device, set the 75Ω / Hi-z properly.<br />
• The camera is not working properly, and the surface of the camera is hot.<br />
- Check that you have properly connected the camera to an appropriate power source.<br />
• The DAY/NIGHT menu does not work.<br />
- Check that AGC of EXPOSURE SETUP menu is ‘OFF’.<br />
• The SENS-UP function does not work.<br />
- Check that AGC of EXPOSURE SETUP menu is ‘OFF’.<br />
- Check that SHUTTER of EXPOSURE SETUP menu is ‘A.FLK’ or ‘MANUAL’.<br />
• The Motion Detection function does not work.<br />
- Check that MOTION DEF of SPECIAL SETUP menu is ‘OFF’.<br />
• <strong>Color</strong> is not correct.<br />
- Check the setting of WHITE BAL SETUP menu .<br />
• The screen flickers continually.<br />
- Check that direction of camera turns toward the Sun.<br />
• RS-485 communication fails.<br />
- Check the polarity between RS-485 Control Port and RS-485 cable.<br />
485 Control Board Connection Port RS-485 Control Port<br />
(+) CONNECTION TERMINAL (TRX+) 485+<br />
( - ) CONNECTION TERMINAL (TRX-) 485-<br />
- Check the RS-485 Communication establishment initial value<br />
* RS-485 Communication establishment initial value<br />
Item <strong>Camera</strong> ID BAUD RATE UART MODE RET PKT<br />
Initial value 1 9600 8-NONE-1 DISABLE<br />
- We recommend that you make ground connect between camera and controller in order to<br />
maintain safety communication control.<br />
<strong>SDZ</strong>-370N <strong>SDZ</strong>-370P Note<br />
Input Voltage DC 10.8V ~ 13.2V (Recommended : 12V )<br />
POWER<br />
2.8 W : Steady-state (at 12V)<br />
Power Consumption<br />
5.1 W : Max. (<strong>Zoom</strong>, Focus, Day&night motor operating, at 12V)<br />
Size<br />
1/4 Inch, Super HAD color CCD<br />
CCD Total Pixels 811(H) x 508(V) 795(H) x 596(V)<br />
Effective Pixels 768(H) x 494(V) 752(H) x 582(V)<br />
O Optics <strong>37X</strong>, f=3.5 to 129.5mm(F1.6 to 3.9)<br />
PTICS<br />
Min. Focus Distance<br />
1500mm<br />
D. ZOOM OFF/ON (Limit 12x)<br />
Angle Field of view H : Appr. 55.5˚(Wide) to 1.59˚(Tele) V : Appr. 42.5˚(Wide) to 1.19˚(Tele)<br />
Scanning System<br />
2:1 Interlace<br />
Sync. Synchronization<br />
Internal<br />
Frequency H: 15.734KHz / V: 59.94Hz H: 15.625KHz / V: 50.00Hz<br />
<strong>Resolution</strong><br />
550 TV Lines(Min.) : <strong>Color</strong> / 680 TV Lines(Min.) : B/W<br />
Min. Illumination<br />
0.4 Lux/F1.6(50IRE): <strong>Color</strong>/0.02 Lux/F1.6(50IRE): B/W<br />
S/N (Y signal) 50 dB (AGC OFF, Weight ON)<br />
Video Output<br />
CVBS (1.0Vp-p/75Ω)<br />
Focus<br />
AUTO/MANUAL/ONE-PUSH<br />
<strong>Zoom</strong> Movement Speed 2.5 Sec Wide to Tele<br />
IRIS Control<br />
AUTO/MANUAL<br />
Lens Initialize<br />
Built-In<br />
<strong>Camera</strong> Title ON/OFF 20 characters<br />
E<br />
ID:000 -><br />
<strong>Camera</strong> ID<br />
256EA<br />
L<br />
Remote only<br />
E Day & Night AUTO/COLOR/BW/EXT IR-Cut Filter<br />
C Gain Control LOW/MEDIUM/HIGH/MANUAL/OFF Removable<br />
T<br />
White Balance<br />
ATW/AWC/MANUAL/INDOOR/OUTDOOR<br />
R<br />
I BACK LIGHT<br />
BLC/HLC/OFF<br />
C Shutter Speed AUTO/MANUAL/A.FLK 1/120,000sec~X256<br />
A<br />
KOREAN,ESPANOL,FRANCAIS,ITALIANO,DEUTSCH,ENGLISH,JAPANESE,<br />
O.S.D<br />
L<br />
CHINESE, PORTUGUESE : total 9 languages<br />
Motion Detection<br />
ON/OFF<br />
Control Output<br />
RS-485 (2400/4800/9600/19200/38400/57600/115200bps)<br />
SSNR<br />
LOW/MEDIUM/HIGH/OFF<br />
Privacy Function<br />
ON/OFF (8 Zones)<br />
FLIP<br />
ON/OFF<br />
MIRROR<br />
ON/OFF<br />
DIS<br />
ON/OFF<br />
PRESET<br />
128 Positions<br />
PROTOCOL<br />
STW, PELCO-D, PELCO-P, SEC, PANASONIC, VICON, AD, HONEYWELL, BOSCH<br />
Operating Temperature/Humidity<br />
-10˚C to +50˚C / 20% to 80% RH<br />
Storge Temperature/Humidity<br />
-20˚C to +60˚C / 20% to 95% RH<br />
Dimension<br />
67.6(W)X67.6(H)X124.7(D) mm<br />
Weight<br />
450g<br />
COLOR CCD CAMERA<br />
38 User <strong>Guide</strong><br />
COLOR CCD CAMERA 39 User <strong>Guide</strong>
STW Protocol Command Description<br />
Command Name<br />
Reset<br />
Focus Far<br />
Focus Near<br />
<strong>Zoom</strong> Wide<br />
<strong>Zoom</strong> Tele<br />
ZOOM Direct<br />
AF Stop<br />
One push AF<br />
Byte1 Byte2 Byte3 Byte4 ll Byte5 Byte 6 Byte7 Byte8 Byte9 Byte10 Byte11<br />
Command Packet STX CAM ID HOST ADDR CAMMAND DATA3 DATA4 DATA5 DATA6 ETX CHECKSUM<br />
Return Packet STX CAM ID HOST ADDR CAMMAND DATA3 DATA4 DATA5 DATA6 ETX CHECKSUM<br />
Checksum CHECKSUM CALCULATION: UNARY OPERATION OF SUMMATION FROM BYTE2 TO BYTE9.<br />
EX) CHECKSUM = ~(BYTE2+BYTE3+... +BYTE8+ BYTE9);<br />
Function<br />
Reset all data to factory default value.<br />
Command Packet A0h CAM ID HOST ADDR 000Fh 00h 00h 00h 00h AFh CHECK SUM<br />
Return Packet A0h CAM ID HOST ADDR 000Fh 00h 00h 00h 00h AFh CHECK SUM<br />
Function<br />
Move focus lens to far direction.<br />
Command Packet A0h CAM ID HOST ADDR 0100h 00h 00h 00h 00h AFh CHECK SUM<br />
Return Packet A0h CAM ID HOST ADDR 0100h 00h 00h 00h 00h AFh CHECK SUM<br />
Function<br />
Move focus lens to near direction.<br />
Command Packet A0h CAM ID HOST ADDR 0200h 00h 00h 00h 00h AFh CHECK SUM<br />
Return Packet A0h CAM ID HOST ADDR 0200h 00h 00h 00h 00h AFh CHECK SUM<br />
Function<br />
Move zoom lens to wide direction.<br />
Command Packet A0h CAM ID HOST ADDR 0040h 00h 00h 00h 00h AFh CHECK SUM<br />
Return Packet A0h CAM ID HOST ADDR 0040h 00h 00h 00h 00h AFh CHECK SUM<br />
Function<br />
Move wide lens to tele direction.<br />
Command Packet A0h CAM ID HOST ADDR 0020h 00h 00h 00h 00h AFh CHECK SUM<br />
Return Packet A0h CAM ID HOST ADDR 0020h 00h 00h 00h 00h AFh CHECK SUM<br />
Function<br />
Move ZOOM lens to specific position directly<br />
Command Packet A0h CAM ID HOST ADDR 00FFh P1 P2 P3 00h AFh CHECK SUM<br />
Return Packet A0h CAM ID HOST ADDR 00FFh P1 P2 P3 00h AFh CHECK SUM<br />
Parameter<br />
P1, P2: OPTICAL ZOOM = 0000h~06EAh<br />
P3: DIGITAL ZOOM = ((256*10)/Ratio)-1<br />
ex) D-ZOOM 1.1x : P3 = E7h = ((256*10)/11)-1, Ratio 11 means 1.1x.<br />
D-ZOOM 2.0x : P3 = 7Fh = ((256*10)/20)-1, Ratio 20 means 2.0x.<br />
Function<br />
Stop zoom & focus lens moving.<br />
Command Packet A0h CAM ID HOST ADDR 0000h 00h 00h 00h 00h AFh CHECK SUM<br />
Return Packet A0h CAM ID HOST ADDR 0000h 00h 00h 00h 00h AFh CHECK SUM<br />
Function<br />
Unconditionally execute auto focus.<br />
Command Packet A0h CAM ID HOST ADDR 0045h 00h 00h 00h 00h AFh CHECK SUM<br />
Return Packet A0h CAM ID HOST ADDR 0045h 00h 00h 00h 00h AFh CHECK SUM<br />
COLOR CCD CAMERA<br />
40 User <strong>Guide</strong><br />
COLOR CCD CAMERA 41 User <strong>Guide</strong>
STW Protocol Command Description<br />
User Preset Save<br />
User Preset Exec.<br />
User Preset Clear<br />
OSD Menu On/Off<br />
Function<br />
Save current user preset configuration information.<br />
Command Packet A0h CAM ID HOST ADDR 0003h P1 00h 00h 00h Afh CHECK SUM<br />
Return Packet A0h CAM ID HOST ADDR 0003h P1 00h 00h 00h Afh CHECK SUM<br />
Parameter P1:00h(USER PRESET 1) ~80h(USER PRES ET 128)<br />
Function<br />
Execute selected user preset.<br />
Command Packet A0h CAM ID HOST ADDR 0007h P1 00h 00h 00h Afh CHECK SUM<br />
Return Packet A0h CAM ID HOST ADDR 0007h P1 00h 00h 00h Afh CHECK SUM<br />
Parameter P1:00h(USER PRESET 1) ~80h(USER PRES ET 128)<br />
Function<br />
Clear selected user preset.<br />
Command Packet A0h CAM ID HOST ADDR 0005h P1 00h 00h 00h Afh CHECK SUM<br />
Return Packet A0h CAM ID HOST ADDR 0005h P1 00h 00h 00h Afh CHECK SUM<br />
Parameter P1:00h(USER PRESET 1) ~80h(USER PRES ET 128)<br />
Function<br />
Display OSD menu on the screen.<br />
Clear OSD menu and save current menu setup.<br />
Command Packet A0h CAM ID HOST ADDR 00B1h P1 00h 00h 00h Afh CHECK SUM<br />
Return Packet A0h CAM ID HOST ADDR 00B1h P1 00h 00h 00h Afh CHECK SUM<br />
Parameter<br />
P1: 00h = ON<br />
01h = OFF<br />
COLOR CCD CAMERA<br />
42 User <strong>Guide</strong><br />
COLOR CCD CAMERA 43 User <strong>Guide</strong>
STW Protocol Command Description<br />
OSD Menu Up<br />
OSD Menu Down<br />
OSD Menu Left<br />
OSD Menu Right<br />
OSD Menu Set<br />
OSD Menu ESC<br />
Function<br />
Move OSD arrow to up.<br />
Command Packet A0h CAM ID HOST ADDR 0008h 00h 00h 00h 00h AFh CHECK SUM<br />
Return Packet A0h CAM ID HOST ADDR 0008h 00h 00h 00h 00h AFh CHECK SUM<br />
Function<br />
Move OSD arrow to down.<br />
Command Packet A0h CAM ID HOST ADDR 0010h 00h 00h 00h 00h AFh CHECK SUM<br />
Return Packet A0h CAM ID HOST ADDR 0010h 00h 00h 00h 00h AFh CHECK SUM<br />
Function<br />
Move OSD arrow to left.<br />
Command Packet A0h CAM ID HOST ADDR 0004h 00h 00h 00h 00h AFh CHECK SUM<br />
Return Packet A0h CAM ID HOST ADDR 0004h 00h 00h 00h 00h AFh CHECK SUM<br />
Function<br />
Move OSD arrow to right.<br />
Command Packet A0h CAM ID HOST ADDR 0002h 00h 00h 00h 00h AFh CHECK SUM<br />
Return Packet A0h CAM ID HOST ADDR 0002h 00h 00h 00h 00h AFh CHECK SUM<br />
Functio<br />
Move to inside menu<br />
Command Packet A0h CAM ID HOST ADDR 0100h 00h 00h 00h 00h AFh CHECK SUM<br />
Return Packet A0h CAM ID HOST ADDR 0100h 00h 00h 00h 00h AFh CHECK SUM<br />
Function<br />
Move to upper menu.<br />
Command Packet A0h CAM ID HOST ADDR 0200h 00h 00h 00h 00h AFh CHECK SUM<br />
Return Packet A0h CAM ID HOST ADDR 0200h 00h 00h 00h 00h AFh CHECK SUM<br />
COLOR CCD CAMERA<br />
44 User <strong>Guide</strong><br />
COLOR CCD CAMERA 45 User <strong>Guide</strong>
DECLARATION OF CONFORMITY<br />
MEMO<br />
Application of Council Directive(s) 89 / 336 / EEC<br />
Manufacturer's Name<br />
SAMSUNG TECHWIN CO., LTD<br />
Manufacturer's Address<br />
SAMSUNG TECHWIN CO., LTD<br />
42, SUNGJU-DONG CHANGWON-CITY,<br />
KYUNGNAM, KOREA, 641-716<br />
European Representative Name<br />
European Representative Address<br />
Equipment Type/Environment CCTV <strong>Camera</strong><br />
Model Name<br />
<strong>SDZ</strong>-370N, <strong>SDZ</strong>-370P<br />
Beginning Serial NO.<br />
S6400001<br />
Year of Manufacture 2008. 4. 1<br />
Conformance to EN 50081-1 : 1992<br />
EMC-Directive 89/336 EEC and 92/31/EEC<br />
EN 50130-4 : 1996<br />
We, the undersigned, hereby declare that the equipment specified above conforms<br />
to the above Directive(s).<br />
Manufacturer SAMSUNG TECHWIN CO., LTD Legal Representative in Europe<br />
Signature<br />
Signature<br />
Full Name BONJENG GU Full Name<br />
Position QUALITY CONTROL MANAGER Position<br />
Place CHANGWON, KOREA Place<br />
Date 2008. 4. 1 Date<br />
COLOR CCD CAMERA<br />
46 User <strong>Guide</strong><br />
COLOR CCD CAMERA 47 User <strong>Guide</strong>
SALES NETWORK<br />
• SAMSUNG TECHWIN CO., LTD.<br />
145-3, Sangdaewon 1-dong, Jungwon-gu, Seongnam-si Gyeonggi-do, Korea, 462-703<br />
TEL : +82-31-740-8151~8 FAX : +82-31-740-8145<br />
• SAMSUNG TECHWIN AMERICA Inc.<br />
1480 Charles Willard St, Carson, CA 90746, UNITED STATES<br />
Tol Free : +1-877-213-1222 FAX : +1-310-632-2195<br />
www.samsungcctvusa.com<br />
www.samsungtechwin.com<br />
www.samsungcctv.com<br />
• SAMSUNG TECHWIN EUROPE CO., LTD.<br />
Samsung House, 1000 Hillswood Drive, Hillswood Business<br />
Park Chertsey, Surrey, UNITED KINGDOM KT16 OPS<br />
TEL : +44-1932-45-5300 FAX : +44-1932-45-5325<br />
P/No. : Z6806-0949-01C<br />
VAN 09. 10


