PPC-200(W) - Yamato Corporation
PPC-200(W) - Yamato Corporation
PPC-200(W) - Yamato Corporation

Create successful ePaper yourself
Turn your PDF publications into a flip-book with our unique Google optimized e-Paper software.
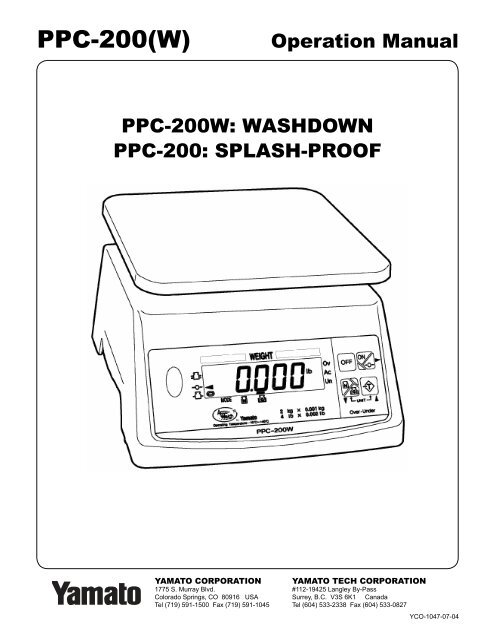
<strong>PPC</strong>-<strong>200</strong>(W)<br />
Operation Manual<br />
<strong>PPC</strong>-<strong>200</strong>W: WASHDOWN<br />
<strong>PPC</strong>-<strong>200</strong>: SPLASH-PROOF<br />
YAMATO CORPORATION<br />
1775 S. Murray Blvd.<br />
Colorado Springs, CO 80916 USA<br />
Tel (719) 591-1500 Fax (719) 591-1045<br />
YAMATO TECH CORPORATION<br />
#112-19425 Langley By-Pass<br />
Surrey, B.C. V3S 6K1 Canada<br />
Tel (604) 533-2338 Fax (604) 533-0827<br />
YCO-1047-07-04
<strong>PPC</strong>-<strong>200</strong>(W)<br />
Operation Manual<br />
SAFETY INSTRUCTIONS<br />
Before using the scale, carefully read, understand, and follow the “Safety Instructions” described in this manual. Observe the<br />
advice given in the “Operations” section to ensure proper operation. Keep this operation manual handy for ref er ence.<br />
1) DO NOT SHOCK LOAD the scale, Never step on or sit on the scale. Not only will the scale be damaged, but you may<br />
also be injured.<br />
2) DO NOT TWIST platform this will damage the scale.<br />
3) DO NOT APPLY DIRECT WATER SPRAY to underside of scale!!<br />
4) Do not operate the scale if there is smoke or a burnt smell coming from the scale. Remove the batteries or unplug the<br />
AC adaptor immediately. After making sure that there is no danger, consult your dealer. Never try to repair the scale<br />
by yourself.<br />
5) This scale is not an explosion-proof model. Do not use the scale in an atmosphere containing fl ammable gases or<br />
explosive fumes. A fire or an explosion can result.<br />
6) Place the item to be weighed in the center of the platform. Items placed on the edge of the platform may fall off and<br />
cause injury.<br />
7) When weighing a heavy, large or unbalanced item, make sure the item is stable on the platform, otherwise, an accident<br />
may occur.<br />
8) When carrying or moving the scale, be sure to hold it by the bottom of the base with both hands. If you hold it by the<br />
platform, the platform or the platform support may become detached causing the scale to fall. This will damage the scale.<br />
The platform is designed for easy removal and clean-up.<br />
9) Do not insert your fi nger into the gap or holes in the scale. You may be injured.<br />
10) The <strong>PPC</strong>-<strong>200</strong>(W) uses a liquid crystal display. If the LCD breaks and the liquid leaks from the LCD, do not touch it with<br />
your fi ngers. The liquid is toxic if ingested. Be especially careful around small children.<br />
To prevent damage to the scale<br />
1) Do not push the indicator or keys with sharp objects. They may break or puncture the switch mem brane panel.<br />
2) Use the specifi ed power supply and choose a suitable environment. If you do not, the weight read ings may be in ac cu rate<br />
and the scale may be damaged.<br />
3) The scale is a sensitive weighing instrument, avoid physical shocks. If you drop something on the scale, step on the platform,<br />
or drop it, the scale may be damaged and lose accuracy.<br />
4) If the scale becomes dirty, wipe it with a soft cloth. For stubborn stains, apply a little neutral de ter gent and then wipe the<br />
scale with a dry cloth. Do not use thinner, benzene, hot water, or chemical agents, all of which can cause deformation, discoloration,<br />
or deterioration of the scale.<br />
5) Never remove the case. The fi ne adjustment section may be damaged and you may be injured by sharp edges on the<br />
internal parts.<br />
6) Do not place the scale upside down on the scale platform.<br />
7) When the low battery indicator appears, replace all six of the batteries. When installing the batteries, install them according<br />
to the polarity markings in the case (+, -). If the scale will not be used for a long period, remove the batteries.<br />
To keep the scale working efficiently<br />
1) Place the scale on a fl at stable surface that will support the scale and the load.<br />
2) Do not place the scale in an area exposed to direct sunlight or to wind currents from an air con di tion er, oth er wise, the<br />
weights will not be accurate.<br />
3) Do not place the scale near machines that create vibrations or electromagnetic disturbance, such as microwave ovens,<br />
portable phones, or large motors. This will affect the accuracy.<br />
4) The operating temperature range is from –5°C to +35°C (23°F to 95°F). Do not subject the scale to sudden tem per a ture<br />
changes; allow the scale to adjust to the new temperature before use.<br />
5) If the scale is sealed, do not break the seal. If you break the seal, the scale will not be considered legal for trade. In this<br />
case, contact your dealer.<br />
6) Do not disassemble or modify the scale, you will void the warranty. Modifi ed scales will not be legal for trade.<br />
7) The <strong>PPC</strong>-<strong>200</strong> is not a washdown scale, it is splash-proof. Do not use a water sprayer on the <strong>PPC</strong>-<strong>200</strong> and do not use it in<br />
an extremely humid or dusty environment.<br />
8) The <strong>PPC</strong>-220W is a washdown scale, but is not a submersible scale. Do not place the <strong>PPC</strong>-<strong>200</strong>W in water higher than<br />
the bottom of the housing. Do not spray water up into the underside of the <strong>PPC</strong>-<strong>200</strong>W.<br />
YCO-1047-07-04
<strong>PPC</strong>-<strong>200</strong>(W)<br />
Operation Manual<br />
Table of Contents<br />
I. Name and Function of Parts 1<br />
II. Specifi cations 1<br />
III. Directions for Use 2<br />
A. Installing Batteries or AC Adaptor 2<br />
B. Levelling the Scale 2<br />
C. Turning the Scale On and Off 2<br />
D. Checking the Battery Level 2<br />
E. Zero the Display 2<br />
F. Switching Between LB and KG 2<br />
G. Setting the Over/Under Indicator 3<br />
H. Weighing 4<br />
1. Using the Over/Under Indicator 4<br />
2. Gross Weighing 4<br />
3. Net Weighing 5<br />
4. Batching 5<br />
IV. Entering User Parameter Mode 6<br />
V. Optional Analog Meter 7<br />
VI. Troubleshooting and Error Messages 9<br />
VII. User Parameter 10<br />
YCO-1047-07-04
<strong>PPC</strong>-<strong>200</strong>(W)<br />
Operation Manual<br />
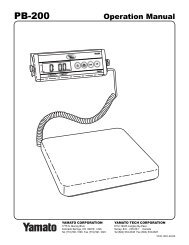
I Name and Function of Parts<br />
Fig. 1: Front side of the scale<br />
Fig. 2: Bottom of the scale<br />
1) ON/ZERO Key Turns the power on, and zeroes the display.<br />
2) OFF Key Turns the power off.<br />
3) TARE Key Tares off the weight on the scale platform.<br />
4) NET/GROSS Key Toggles between gross and net weights.<br />
5) Unit selection Press both keys si mul ta neous ly to toggle between pound and<br />
ki lo gram indications.<br />
6) LOW BATTERY Indicator Time to replace batteries.<br />
7) Spirit level device Used to level scale.<br />
8) CENTER ZERO Indicator Indicates scale is at gorss zero.<br />
9) STABLE Indicator Indicates that weight on the scale is stabilized.<br />
10) MODE Indicator Indicates scale is in setup mode and weighing is not allowed.<br />
11) NET WEIGHT Indicator Shows scale is in net mode.<br />
12) GROSS WEIGHT Indicator Shows scale is in gross mode.<br />
13) Battery Cover Tighten securely to maintain washdown seal.<br />
14) Outlet of AC adaptor cable Use of an AC adapter voids washdown seal.<br />
15) Levelling Legs Rotate to level the scale.<br />
II Specifications<br />
Weighing system:<br />
Strain-gauge load cell<br />
Platform:<br />
9” x 9” (230 x 230 mm), stainless steel<br />
Weight display:<br />
Single face display<br />
Type:<br />
7 segment LCD<br />
Character size, etc.:<br />
0.5” (12 mm) (W) x 0.9” (23 mm) (H), 5 digits<br />
Optional equipment: Batteries, AC adaptor, Analog limit meter *<br />
Power supply:<br />
6 “D” size batteries or AC adaptor*<br />
Consumption:<br />
0.12 W (max.)<br />
Battery life:<br />
1000 hours of continuous use (when using alkaline batteries)<br />
Operating temperature:<br />
14°F to 104°F (-10°C to 40°C)<br />
Operating humidity:<br />
25% to 85% RH<br />
Waterproof classifi cation:<br />
<strong>PPC</strong>-<strong>200</strong>W complies with JIS class 5 standard (drip-proof V type)<br />
<strong>PPC</strong>-<strong>200</strong> complies with JIS class 2 standard (drip-proof II type)<br />
* The scales is NOT washdown if it has been modifi ed for the analog meter or if the AC jack seal has<br />
been removed.<br />
1<br />
YCO-1047-07-04
<strong>PPC</strong>-<strong>200</strong>(W)<br />
Operation Manual<br />
III Directions for Use<br />
III.A Installing Batteries or AC adaptor<br />
Remove the stainless steel platform. Gently and carefully turn the scale on it's side. Ensure the surface<br />
around the battery cover is dry. Do not allow water to enter the battery compartment. Turn the battery<br />
cover thumb screw coun ter clock wise until it comes free. Swing the cover open. Install the batter<br />
ies ac cord ing to the po lar i ty mark ings. If you reverse the po lar i ties of the batteries, the scale will<br />
be dam aged. Swing the battery cover into place and insert the thumb screw. Tighten the thumbsrew<br />
securely. If the battery cover is loose, the washdown seal will leak.<br />
Use only the AC adaptor specifi ed for use with the scale. Using the wrong adaptor can damage the<br />
scale. Remove the battery cover and the batteries, if installed. Re place the bat tery cover. Remove<br />
the washdown plug from the jack. Insert the adaptor plug securely into the jack. Do not washdown<br />
the scale if an AC adaptor is in use or if the washdown plug has been removed from the AC jack.<br />
III.B Leveling the Scale<br />
Place the scale on a fl at and level surface. If the scale is not level, the read ings may<br />
not be ac cu rate. You can check whether the scale is level by using the bub ble<br />
level device po si tioned on the left front surface of the scale. Adjust the feet by turning<br />
them in or out to lower or raise the corner of the scale the foot is on.<br />
III.C Turning the Scale On and Off<br />
Remove everything from the platform surface and press the<br />
key. The display will briefl y fl ash all the LCDs. After ap prox i-<br />
mate ly 5 seconds, the display will stop fl ashing and au to mat i-<br />
cal ly set to zero.<br />
Press the key. The display will go off. Under battery op er a tion, the power will be shut off au to -<br />
mat i cal ly (AutoOff function) after about 15 minutes of non-use, even if you don’t press the<br />
key.<br />
III.D Checking the Battery Level<br />
Turn the scale on and push the key while the display is fl ashing.<br />
The remaining battery life will be displayed. The more “o”<br />
you see, the more life there is left in the batteries. After a few<br />
seconds, the scale will go to weighing mode.<br />
III.E Zero the Display<br />
The scale will zero automatically when turned on. If a value is dis played when the plat form is empty,<br />
push the key to zero the display. The maximum zero range during power up is approximately<br />
± 1.9% of the scale capacity.<br />
III.F Switching Between LB and KG<br />
To switch between LB and KG, press and hold the key and press the key.<br />
2<br />
YCO-1047-07-04
<strong>PPC</strong>-<strong>200</strong>(W)<br />
Operation Manual<br />
III Directions for Use<br />
III.G Setting the Over/Under Indicator<br />
1) Place the scale in normal weighing mode.<br />
2) Press and hold the key and push the key. (Yellow Corners)<br />
3) Press the key to select the digit you want to change. The<br />
underscore will ad vance to the right.<br />
4) Press the up and down arrows to select the desired value.<br />
5) Repeat steps 3 and 4 until all digits are set. All values below this<br />
setpoint will be indicated as under.<br />
6) Press and hold the key and push the key (Yellow Corners).<br />
This saves the lower limit and moves to the upper limit.<br />
7) Press the key to select the digit you want to change.<br />
8) Press the up and down arrows to select the desired value.<br />
9) Repeat steps 7 and 8 until all digits are set. All values above this<br />
setpoint will be indicated as over.<br />
10) Press and hold the key and push the key (Yellow<br />
Corners). This saves the upper limit and returns you to weigh ing<br />
mode.<br />
Note: See page 6 for optional Analog Meter operation.<br />
3<br />
YCO-1047-07-04
<strong>PPC</strong>-<strong>200</strong>(W)<br />
Operation Manual<br />
III Directions for Use<br />
III.H Weighing<br />
III.H.1<br />
Using the Under/Over Indicator<br />
1) Begin with no load on the scale, the display reading zero, and<br />
the center zero and stable indicators lit. The small up and down<br />
ar row heads on the right side of the display indicate that the over<br />
and under setpoints, re spec tive ly, have been set.<br />
2) Place the item(s) to be weighed on the scale platform. If the item<br />
weighs less than the under setpoint, the large under arrow will<br />
appear.<br />
3) If the item weighs from the lower setpoint to the upper setpoint,<br />
in clu sive, the accept bullseye will appear.<br />
4) If the item weighs more than the upper setpoint, the large over<br />
arrow will appear.<br />
III.H.2<br />
Gross Weighing<br />
1) Begin with no load on the scale, the display reading zero, and the<br />
center zero and stable indicators lit.<br />
2) Place the item(s) to weighed on the scale platform. The weight<br />
displayed will be the gross weight.<br />
4<br />
YCO-1047-07-04
<strong>PPC</strong>-<strong>200</strong>(W)<br />
Operation Manual<br />
III Directions for Use<br />
III.H Weighing<br />
III.H.3<br />
Net Weighing<br />
1) Begin with no load on the scale, the display reading zero, and the<br />
center zero and stable indicators lit.<br />
2) Place an empty container on the scale platform and press the<br />
key. The weight of the container will be deducted au to mat i-<br />
cal ly, the display will read zero and the net indicator will light.<br />
3) Place the item(s) to be weighed in the container. The weight<br />
displayed will be the net weight.<br />
4) To display the gross weight, press the key. The gross indicator<br />
will light and the weight displayed will be the gross weight of<br />
the item(s) and the container. Press the<br />
to the net weight.<br />
key again to return<br />
5) To return to gross weighing mode, remove all items from the<br />
scale platform and press the<br />
key.<br />
III.H.4<br />
Batching<br />
1) Begin with no load on the scale, the display reading zero, and the<br />
center zero and stable indicators lit.<br />
2) Place an empty container on the scale platform and press the<br />
key. The weight of the container will be deducted au to mat i-<br />
cal ly, the display will read zero and the net indicator will light.<br />
3) Place the fi rst item in the container until the desired weight is<br />
reached.<br />
4) Press the key and the display will return to zero. Place the<br />
next item in the container until the desired weight is reached.<br />
5<br />
YCO-1047-07-04
<strong>PPC</strong>-<strong>200</strong>(W)<br />
III Directions for Use<br />
Operation Manual<br />
III.H Weighing<br />
III.H.4<br />
Batching (continued)<br />
5) Continue in this manner until all items to be batched have been<br />
weighed. Do not allow the gross weight on the scale platform to<br />
ex ceed the ca pac i ty of the scale.<br />
6) Remove all items from the scale plat form and press the key.<br />
IV Entering User Parameter Mode<br />
1. Turn scale on. Press and to enter User<br />
Pa ram e ter Mode. The scale will indicate a keyword followed<br />
by it’s value.<br />
2. To select the desired keyword, use the keys as follows:<br />
- increase keyword by one<br />
+ - decrease keyword by one<br />
Note: Use the User Parameter List in Section VII to<br />
locate the function to be changed and it’s standard value.<br />
Keyword<br />
Parameter Value<br />
Example: To select lb/kg priority at power on press<br />
nine times.<br />
3. To change a parameter value, use the keys as follows:<br />
- increase value by one<br />
+ - increase value by ten<br />
- decrease value by one<br />
+ - decrease value by ten<br />
4. Press to save changes and press to exit User<br />
parameter.<br />
6<br />
YCO-1047-07-04
<strong>PPC</strong>-<strong>200</strong>(W)<br />
Operation Manual<br />
V Optional Analog Meter<br />
* * * WARNING * * *<br />
The <strong>PPC</strong>-<strong>200</strong>W is NOT WASHDOWN if the analog meter has been in stalled! Dam age will result to the<br />
scale and meter if an at tempt is made to washdown the scale after it has been modifi ed for the analog<br />
meter.<br />
NOTICE<br />
The analog meter option is NOT LEGAL FOR TRADE.<br />
The optional analog meter has three programmable over and under<br />
registers labelled A, B and C. They are se lect ed with the ,<br />
UNDER<br />
ACCEPT<br />
OVER<br />
and keys on the meter face. Pressing one of these<br />
keys once will cause the LED display to fl ash the under and over<br />
setpoints for that key. The meter must be calibrated before it can be<br />
set. Both procedures are detailed below.<br />
Calibrating the Analog Meter<br />
1) Press and hold the key 2-3 seconds. The display will<br />
read Adj for adjust and the indicator will move to the under range.<br />
2) Use the and keys to align the indicator with the<br />
low end of the under range.<br />
UNDER<br />
ACCEPT<br />
OVER<br />
3) Press the key. The indicator will move to the over range.<br />
4) Use the and keys to align the indicator with the<br />
high end of the over range.<br />
UNDER<br />
ACCEPT<br />
OVER<br />
5) Press the key to save the calibration and to return to<br />
normal weighing mode.<br />
7<br />
YCO-1047-07-04
<strong>PPC</strong>-<strong>200</strong>(W)<br />
Operation Manual<br />
V Optional Analog Meter<br />
Setting the Analog Meter<br />
1) Press and hold the key for 2-3 seconds. The display will<br />
show the current under setpoint.<br />
2) Press the key to select the digit you want to change.<br />
The underscore will move to the right.<br />
3) Press the or keys to set the desired value.<br />
4) Repeat steps 2 and 3 until the entire number is set.<br />
5) Press the key again to save the displayed under setpoint<br />
and to display the cur rent over setpoint.<br />
6) Press the key to select the digit you want to change.<br />
7) Press the or keys to set the desired value.<br />
8) Repeat steps 6 and 7 until the entire number is set.<br />
9) Press the key to save the displayed upper setpoint and<br />
to return to normal weighing mode.<br />
This sets the register A setpoints. To set the register B or register C<br />
setpoints, begin by holding the or key in step 1.<br />
8<br />
YCO-1047-07-04
<strong>PPC</strong>-<strong>200</strong>(W)<br />
Operation Manual<br />
VI Troubleshooting and Error Messages<br />
The scale can check various functions automatically. When a problem is detected, the fol low ing messag<br />
es will be displayed. If you take the steps described below but the problem is not fi xed, the scale<br />
needs to be serviced by a qualifi ed scale technician.<br />
1) The batteries are running low.<br />
When the batteries are running low, this indicator will come on.<br />
Replace all of the bat ter ies with new ones.<br />
2) The batteries are low.<br />
When the bat ter ies are too low, this indicator will be displayed.<br />
The batteries must be replaced to use the scale.<br />
3) The weight out of range.<br />
When the weighed value is 6 or more divisions heavi er than the<br />
scale’s ca pac i ty this message will be dis played.<br />
When the weighed value is 6 or more divisions below zero, this<br />
message will be displayed. It is usually dis played when the platform<br />
is removed or has something wedged under it.<br />
4) Initial error on startup.<br />
When the initial weight is heavi er than the permissible ze ro ing<br />
range and the<br />
key is pressed, this message will be displayed.<br />
Remove what ev er is on the platform and press the<br />
key again.<br />
When the initial weight is lighter than the permissive ze ro ing<br />
range and the key is pressed, this message will be displayed.<br />
Install the platform or remove any objects under the<br />
plat form, and press the<br />
key again.<br />
5) The weighing sen sor error.<br />
When the weight detecting sec tion has a prob lem, this message<br />
will be displayed. Turn off the power. Then turn the power on<br />
again.<br />
6) The electronic circuitry error.<br />
When the electronic circuit has a problem, this message may be<br />
dis played. Turn off the power. Then turn the power on again.<br />
7) The elec tro mag net ic disturbance error.<br />
This Indicator is oc ca sion al ly displayed due to strong static electric<br />
i ty and/or electro -magnetic disturbance. Turn off the power.<br />
Then turn the power on again.<br />
9<br />
YCO-1047-07-04
<strong>PPC</strong>-<strong>200</strong>(W)<br />
Operation Manual<br />
VII<br />
User Parameter<br />
Key Std Function Description<br />
Word Value<br />
01 015 Auto-off timer 000 Disables auto-off.<br />
001~240 Number of minutes unused to activate auto-off.<br />
02 000 Display hold timer 000 No display hold for changes less than four divisions.<br />
001~030 Display hold duration, in seconds, for changes less<br />
than four divisions.<br />
031 No display hold.<br />
03 001 Communication 000 No serial interface.<br />
001 Specifi ed commands acceptable.<br />
002 Sends zero detection.<br />
003 Sends motion detection.<br />
004 Sends continuously.<br />
04 000 Communication data 000 Net weight (1 batch)<br />
001 Net weight, tare weight, gross weight (1 batch)<br />
002 Net weight, tare weight, gross weight (3 batches)<br />
003 Display content (1 batch)<br />
004 Serial printer format (1 batch)<br />
05 000 Communication speed 000 9600 bps<br />
001 600 bps<br />
002 1<strong>200</strong> bps<br />
003 2400 bps<br />
004 4800 bps<br />
005 9600 bps<br />
006 19<strong>200</strong> bps<br />
007 38400 bps<br />
06 000 Character length 000 8 bits<br />
001 7 bits<br />
07 002 Parity 000 Non<br />
001 Odd<br />
002 Even<br />
08 001 Stop bit length 000 1 bit<br />
001 2 bits<br />
09 001 Default mode 000 kg<br />
001 lb/oz<br />
NOTICE<br />
The RS-232 serial interface option is only available and legal-for-trade on CPU versions 4.02 and<br />
above. See section 4 (Changing the Scale Setup - Test Mode) of the <strong>PPC</strong>-<strong>200</strong>(W) Technical Manual<br />
for instructions on how to enter test mode and view the CPU version. See the <strong>PPC</strong> RS232 Operation<br />
Manual for more information on using the RS-232 serial interface option.<br />
10<br />
YCO-1047-07-04