VCMS 6-Switch Panel Systems Owners Manuals ... - InPower Direct
VCMS 6-Switch Panel Systems Owners Manuals ... - InPower Direct
VCMS 6-Switch Panel Systems Owners Manuals ... - InPower Direct

You also want an ePaper? Increase the reach of your titles
YUMPU automatically turns print PDFs into web optimized ePapers that Google loves.
3. Installation, Continued<br />
3.3 Mount the Power Module<br />
3.3.1 Determine the best location for the power module. Take into consideration the routing of the interconnecting logic<br />
cable that attaches to the 10-pin connector on the top of the module. Also take into consideration the routing of the wires<br />
to the power outputs, inputs and the +12 volt fused power source.<br />
3.3.2 We recommend mounting the power module to a flat metal surface. This allows the transfer of heat from the module<br />
when operating high current draw loads. Mount the module using four 6-32 screws and lock washers. Do not drill out<br />
the mounting holes to accept larger screw sizes. This will break the module’s ground connection. Do not over<br />
tighten the mounting screws.<br />
3.3.3 The wiring terminals on the power module are male ¼ inch faston blade terminals. You will need to attach insulated<br />
female terminals to the wires. Use a good quality crimping tool and follow the manufacturer’s instructions for the correct<br />
terminal types for the wire size.<br />
NOTE We recommend using wire tags that allow proper wire identification in the event the wires are removed at<br />
a later date.<br />
3.3.4 Wire the ground (GND) terminal to a good quality vehicle ground (Battery Negative). It is important that this<br />
ground is connected to the power module before the interconnecting logic cable is connected.<br />
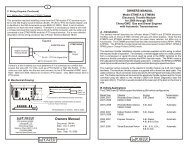
3.3.5 Wire the six module output terminals (O-1, O-2, O-3, O-4, O-5 & O-6) to the correct auxiliary loads using the <strong>VCMS</strong><br />
Input/Output Diagram (Figure 11) for reference. Note that some outputs may not be used.<br />
NOTE If inductive loads (motors, coils, etc.) are used it is important that these devices contain a diode suppressor<br />
across the device.<br />
3.3.6 Wire the digital input terminal I-1 to a source of +12 volt power that is activated only when the Ignition <strong>Switch</strong> is On.<br />
3.3.7 Locate the +12 volt battery power source. Install three 20 amp fuses at the power source as shown on the system’s<br />
InPut/Output Diagram (Figure 1). Install wires of suitable size for the amperage and length from the three fuses to the three<br />
BAT terminals on the power module. Be sure to determine the current draw of the six power outputs to ensure that<br />
the power module is not overloaded. The maximum current draw of the combined loads cannot exceed 60 amps.<br />
If the +12 volt power source is directly connected to the vehicle battery, note that a <strong>VCMS</strong> configuration with a single power<br />
module with all switches and back lights off will draw about 16 milliamps of power. Alternatively, you may obtain the +12<br />
volts power from an ignition switch-activated power source.<br />
4. Operation<br />
Turn the Ignition <strong>Switch</strong> to the On position. The switch module’s back lights will illuminate.<br />
Operating any push button on the switch module will cause its status LED to turn on and the corresponding power module<br />
output to be activated. Each switch is programmed to operate as either a 2-position latching (push to turn on, push again to<br />
turn off) or as a momentary switch (on for the durration the switch is depressed). This system is programmed as follows.<br />
<strong>Switch</strong> <strong>Switch</strong> Function Power Module Output<br />
SW1 2-Position Latching O-1<br />
SW2 Momentary O-2<br />
SW3 2-Position Latching O-3<br />
SW4 2-Position Latching O-4<br />
SW5 2-Position Latching O-5<br />
SW6 2-Position Latching O-6<br />
Note that if a switch is activated and the Ignition <strong>Switch</strong> is turned off the power module output will turn off and the switch<br />
will be reset to its Off position.<br />
© Copyright 2009 <strong>InPower</strong> LLC<br />
<strong>InPower</strong> LLC<br />
3555 Africa Road<br />
Galena, Ohio 43021 USA<br />
740-548-0965<br />
www.<strong>InPower</strong><strong>Direct</strong>.com<br />
Page<br />
5 of 6<br />
<strong>VCMS</strong> <strong>Owners</strong> Manual<br />
Document: OM-138 Version Code: A<br />
Date: Oct. 27, 2010 Date: Oct. 27, 2010