CoFFee mAker eCo310 ImportAnt InStruCtIonS ... - Home Depot
CoFFee mAker eCo310 ImportAnt InStruCtIonS ... - Home Depot
CoFFee mAker eCo310 ImportAnt InStruCtIonS ... - Home Depot

You also want an ePaper? Increase the reach of your titles
YUMPU automatically turns print PDFs into web optimized ePapers that Google loves.
Coffee maker ECO310<br />
important instructions - save these instructions<br />
Register this product on-line and receive a free trial issue of Cook’s Illustrated.<br />
Visit http://registration.delonghi-csservice.com.<br />
Visit www.delonghi.com for a list of service centers near you. (U.S. and Canada only).<br />
Machine à cafè ECO310<br />
mode d’emploi important - conservez les presentes instructions<br />
Enregistrez ce produit en ligne et recevez un numéro gratuit de Cook’s Illustrated. Visitez http://registration.delonghi-csservice.com.<br />
Visitez www.delonghi.com pour y voir une liste des centres de réparation proches de chez vous.<br />
(É.-U. et Canada seulement).<br />
cafetera ECO310<br />
instruciones importantes- repase y guarde estas instrucciones- LEA<br />
ESTE INSTRUCTIVO ANTES DE UTILIZAR EL APARATO<br />
Registre este producto en línea y reciba un ejemplar gratis de Cook’s Illustrated.<br />
Visite http://registration.delonghi-csservice.com.<br />
Visite www.delonghi.com para ver la lista de centros de servicios cercanos a usted.<br />
(Sólo Estados Unidos y Canada)<br />
Macchina per caffè ECO310<br />
Istruzioni importanti- conservare le istruzioni<br />
Registra questo prodotto “on-line” per ricevere una copia omaggio della rivista “Cook’s Illustrated”.<br />
Visita http://registration.delonghi-csservice.com.<br />
Visita www.delonghi.com per una lista dei centri di servizio a te piu vicini.<br />
(Solo Stati Uniti e Canada)<br />
Electronic Characteristics:<br />
Caractéristiques électriques:<br />
CARACTERISTICAS ELECTRICAS:<br />
Caratteristiche elettriche:<br />
120V˜60Hz 1100W
19<br />
20<br />
21<br />
1<br />
2<br />
4 23<br />
3<br />
18 6<br />
5<br />
17<br />
22<br />
12<br />
7<br />
8<br />
9<br />
10<br />
11<br />
16<br />
14<br />
13<br />
15<br />
3
1 2<br />
3<br />
4<br />
5<br />
6<br />
7<br />
8 9<br />
10 11 12<br />
4
13<br />
14 15<br />
16<br />
17 18<br />
19 21<br />
22<br />
20<br />
23 25 27<br />
24<br />
26<br />
5
IMPORTANT SAFEGUARDS<br />
When using electrical appliances, basic safety precautions should always be followed, including the following:<br />
• Read all instructions.<br />
• Do not touch hot surfaces. Use handles and knobs.<br />
• To protect against fire, electrical shock and personal injury, do not immerse cord, plug or appliance in<br />
water or other liquid.<br />
• Never allow the appliance to be used by children.<br />
• Unplug from the outlet when not in use and before cleaning. Allow to cool before fitting or taking off<br />
parts, and before cleaning the appliance.<br />
• Do not operate with a damaged cord or plug, or after the appliance malfunctions, or has been damaged<br />
in any manner. Return the appliance to the nearest authorized service facility for examination, repair or<br />
adjustment.<br />
• The use of accessory attachments or spare parts not recommended by the appliance manufacturer<br />
may result in fire, electrical shock or personal injury.<br />
• Do not use outdoors.<br />
• Do not let the cord hang over the edge of the table or counter, or touch hot surfaces.<br />
• Do not place on or near a hot gas or electrical burner, or in a heated oven.<br />
• Plug cord into the wall outlet. To disconnect, turn any control to “off”, then remove plug from wall<br />
outlet.<br />
• Do not use the appliance for other than the intended use. This appliance is to be utilized for domestic<br />
use only. Any other use is to be considered improper and therefore, dangerous.<br />
WARNING: To reduce the risk of fire or electric shock, do not remove the exterior of the unit or the<br />
cover. Don’t attempt to repair or modify the machine, doing so will void the warranty. Repair should<br />
be done by authorized service personnel only!<br />
SAVE THESE INSTRUCTIONS<br />
This product is for household use only<br />
short cord instructions<br />
- A short power cord is provided to reduce risks resulting from becoming entangled in or tripping over<br />
a longer cord.<br />
- Longer, detachable power supply cords or extension cords are available and may be used if care is<br />
exercised in their use.<br />
- If an extension cord is used, the marked electrical rating should be at least as great as the electrical<br />
rating of the appliance. If the appliance is provided with 3- wire, grounding type cord, the extension<br />
should be a GROUNDING TYPE 3 - WIRE CORD. The longer cord should be arranged so that it will not<br />
drape over the counter-top or table top where it can be pulled on by children or tripped over.<br />
- Your product is equipped with a polarized alternating current line plug (a plug having one blade wider<br />
than the other). This plug will fit into the power outlet only one way. This is a safety feature. If you<br />
are unable to insert the plug fully into the outlet, try reversing the plug. If the plug should still fail to<br />
fit, contact your electrician to replace your obsolete outlet. Do not defeat the safety purpose of the<br />
polarized plug.<br />
6
Introduction<br />
Thank you for having chosen our coffee machine.<br />
We hope you have fun with your new appliance.<br />
Take a few minutes to read these instructions.<br />
This is the only way to avoid danger and damage to the<br />
machine.<br />
Symbols used in these instructions<br />
The important recommendations have these symbols.<br />
These recommendations must be followed.<br />
Safety<br />
Danger! Failure to comply can be or is the cause<br />
of injury due to life-threatening electric shocks.<br />
Attention! Failure to comply can be or is cause of<br />
injury or damage to the appliance.<br />
Scalding hazard! Failure to comply can be or is<br />
the cause of scalding or burns.<br />
Information: This symbol highlights recommendations<br />
and important information for the user.<br />
Fundamental recommendations regarding safety<br />
Danger! This is an electrical appliance and may<br />
therefore cause electric shock.<br />
Follow the safety recommendations given:<br />
• Do not touch the appliance when you have wet<br />
hands or feet.<br />
• Do not touch the plug with wet hands.<br />
• Make sure that the outlet used can always be easily<br />
reached, so that the plug can be removed when<br />
required.<br />
• Do not pull on power cable when removing plug as<br />
this could cause damage. Pull plug directly from<br />
the outlet.<br />
• Remove the plug from the outlet to disconnect the<br />
appliance completely.<br />
• Do not attempt to repair the appliance if it should<br />
malfunction.<br />
Switch the appliance off, remove the plug from the<br />
socket and contact customer service.<br />
• If the plug or power supply cable are damaged,<br />
have them replaced only by De’Longhi authorized<br />
service centers, in order to prevent risks.<br />
Attention: Keep the packaging material (plastic<br />
bags, expanded polystyrene) out of the reach of<br />
children.<br />
7<br />
Attention: The appliance is not intended for use<br />
by persons (including children) with reduced<br />
physical, sensory or mental capabilities, or lack of<br />
experience and knowledge, unless they have been<br />
given supervision or instruction concerning use<br />
of the appliance by a person responsible for their<br />
safety. Children should be supervised to ensure<br />
that they do not play with the appliance.<br />
Scalding hazard! This appliance produces hot<br />
water and steam may form when it is operating.<br />
Pay attention not to come into contact with hot<br />
water sprays or steam.<br />
Do not touch the cup warmer plate when the appliance<br />
is on; it is hot.<br />
Use in compliance with destination.<br />
This appliance is manufactured for the preparation of<br />
coffee and to heat beverages.<br />
The appliance is designed and produced for domestic<br />
use only. It is not suitable for use in:<br />
- staff kitchens in shops, offices and other workplaces.<br />
- hotels, motels or other holiday accommodation<br />
Any other use must be considered improper and therefore<br />
dangerous.<br />
The manufacturer is not liable for damage deriving from<br />
the improper use of the appliance.<br />
Instructions for use<br />
Read these instructions carefully before using the appliance<br />
.<br />
- Failure to comply with these instructions can lead<br />
to injury and damage to the machine.<br />
The manufacturer is not liable for damage deriving<br />
from the failure to comply with the user instructions.<br />
InformationKeep these instructions safe. If the<br />
appliance should be transferred to other persons,<br />
these instructions must accompany it.<br />
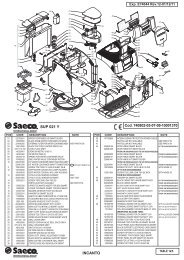
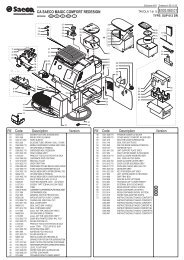
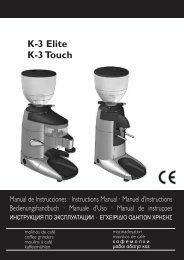
description<br />
1. Control panel<br />
2. Steam knob<br />
3. Water tank<br />
4. Water tank lid<br />
5. Power supply cable<br />
6. Frother tube<br />
7. Cup tray<br />
8. Drip tray<br />
9. Frothing cover<br />
10. Frothing nozzle<br />
11. Boiler outlet<br />
12. Coffee tamper<br />
13. Measure for ground coffee<br />
14. Filter-holder<br />
15. Large filter 2 doses
16. Small 1 dose filter or for pods<br />
17. Steam function selection button<br />
18. Coffee or hot water button<br />
19. On/off button<br />
20. On indicator light<br />
21. OK indicator light<br />
22. Steam function selected indicator light<br />
23. Cup warmer plate<br />
Preliminary operations<br />
Check after transport<br />
After the packaging has been removed, check the integrity<br />
of the appliance and the presence of all accessories.<br />
Do not use the appliance in the presence of obvious<br />
damage. Contact the De’Longhi customer service center..<br />
Installing the appliance<br />
The following safety measures must be complied with<br />
when installing the appliance:<br />
• The appliance could be damaged by the penetration<br />
of water.<br />
Do not position the appliance near sinks or faucets.<br />
• The appliance could be damaged if the water it<br />
contains freezes. Do not install the appliance in a<br />
room where the temperature can fall below freezing<br />
point.<br />
• Position the power supply cable in a way that it cannot<br />
be damaged by sharp edges or by contact with<br />
hot surfaces (e.g. electric plates).<br />
Connecting the appliance<br />
Attention! Make sure that the electric voltage<br />
corresponds with that indicated on the data plate<br />
on the base of the appliance.<br />
• Only connect the appliance to correctly installed<br />
socket with minimum rating of 12A and efficient<br />
earthing.<br />
• In the case of incompatibility between the socket<br />
and the plug on the appliance, have the plug replaced<br />
by a qualified technician.<br />
• The power supply cable on this appliance must<br />
never be replaced by the user as special tools are<br />
needed for this operation. Contact a De’Longhi<br />
authorized customer service center if the cable is<br />
damaged or must be replaced, in order to avoid all<br />
risks.<br />
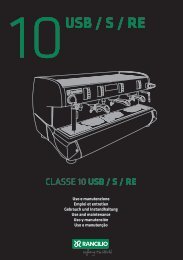
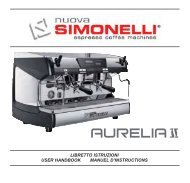
Filling the water tank<br />
1. Open the water tank lid (fig. 1) and then lift the tank<br />
to remove it (fig. 2).<br />
2. Fill the tank with fresh water but do not pass MAX.<br />
(fig. 3). Re-position the tank by pressing it lightly in<br />
place to open the valve situated on the base of the<br />
tank itself.<br />
8<br />
3. Alternately, do not remove the tank, fill by pouring<br />
in water from a jug.<br />
Attention: do not operate the appliance without<br />
water in the tank and always fill it when the water<br />
is a few centimeters from the bottom.<br />
Information: it is normal to find water in the<br />
compartment under the tank; dry using a clean<br />
sponge.<br />
HOW TO PREPARE ESPRESSO COFFEE<br />
Pre-heating the coffee machine<br />
It is advised to pre-heat the coffee machine as follows<br />
in order to obtain an espresso coffee at the right temperature:<br />
1. Press the ON/OFF button (the relative indicator light<br />
switches on) (fig. 4) and attach the empty filterholder<br />
to the machine (fig. 5) by fitting filter holder<br />
into place and turning from left to right.<br />
2. Place a cup under the filter-holder. Use the same<br />
cup in which the coffee is to be served so that it can<br />
be pre-heated.<br />
3. Wait until the OK light comes on (fig. 6) and then<br />
press the coffee button (fig. 7). Allow the water to<br />
run until the OK light switches off and then stop the<br />
water by pressing the coffee button again (fig. 7).<br />
4. Empty the cup, wait for the “OK” light to switch on<br />
again and repeat the same operation again.<br />
(It is normal for a small, harmless puff of steam to be<br />
released when the filter-holder is removed).<br />
HOW TO PREPARE THE ESPRESSO USING<br />
GROUND COFFEE<br />
1. After having pre-heated the machine as described<br />
in the previous paragraph, insert the ground coffee<br />
filter into the filter-holder, making sure that the<br />
projection is correctly inserted into the relative seat<br />
as indicated in fig. 8. Use the smallest filter for one<br />
coffee or the larger one to make two cups of coffee.<br />
2. To prepare one coffee, fill the filter with a level measuring<br />
scoop of ground coffee, about 2 tsp (7g)<br />
(fig. 9). If you wish to prepare two cups of coffee,<br />
fill the filter with two less-than-level measuring<br />
scoops of ground coffee (1 tbsp or 12g). Fill the<br />
filter with small amounts at a time to prevent the<br />
coffee spilling out.<br />
Attention: for correct use, before filling the filter<br />
with ground coffee always make sure there is no<br />
residual coffee in the filter from the previous infusion.<br />
3. Distribute the ground coffee evenly and press it<br />
lightly using the coffee tamper (fig. 10).<br />
Pressing the ground coffee is very important to ob-
tain a good espresso. If you press too hard, the coffee<br />
will run out slowly and the crema will be dark. If<br />
you press too lightly, the coffee will run out too fast<br />
and the crema will be very light.<br />
4. Remove any excess coffee from the rim of the filterholder<br />
and attach it to the machine: turn the grip to<br />
the right (fig. 5) to prevent water from escaping.<br />
5. Position the cup or cups under the filter-holder<br />
spouts (fig. 11). It is recommended to warm the<br />
cups before making the coffee by running them under<br />
hot water or leaving them to pre-heat on the<br />
cup warmer for at least 15-20 minutes (fig. 12).<br />
6. Make sure that the OK light (fig. 6) is on (if it is off,<br />
wait for it to switch on) and press the coffee button<br />
(fig. 7). Once the desired amount of coffee has been<br />
obtained, press the same button again (fig. 7). (It is<br />
recommended not to run the coffee for more than<br />
45 seconds).<br />
7. Turn the grip from right to left to release the filterholder.<br />
Scalding hazard! To prevent sprays, do not release<br />
the filter-holder while the machine is dispensing<br />
coffee.<br />
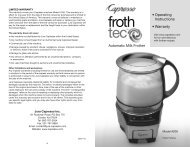
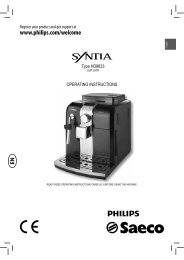
8. To remove the used coffee, lock the filter using the<br />
lever in the grip and let the coffee fall out by knocking<br />
the over-turned filter-holder (fig. 13).<br />
9. Turn the machine off by pressing the on/off button<br />
(fig. 4).<br />
Attention: Before using the machine for the first<br />
time all accessories and internal circuits must be<br />
washed by making at least five cups of coffee without<br />
using ground coffee.<br />
HOW TO PREPARE THE ESPRESSO USING<br />
PODS<br />
1. Pre-heat the machine as described in the “PRE-<br />
HEATING THE COFFEE MACHINE” chapter, making<br />
sure that the filter-holder is attached to the machine.<br />
Hotter coffee is obtained in this way.<br />
Information: use pods that comply<br />
with the ESE Standard: this<br />
will be indicated on the packaging<br />
by the icon to the right.<br />
The ESE Standard is a system accepted<br />
by the leading coffee pod manufacturers<br />
and allows espresso coffee to be made simply<br />
and without making a mess.<br />
2. Place the small filter in the filter-holder, making<br />
sure that the projection is correctly inserted into<br />
the relative seat as indicated in fig. 8.<br />
3. Insert the pod, centering it as far as possible on the<br />
filter (fig. 14). Always follow the instructions of the<br />
pod pack for correct positioning of the pod on the<br />
filter.<br />
4. Attach the filter-holder to the machine, by inserting<br />
the filter handle on the left side of the machine and<br />
then turn to the right (fig 5) to prevent water from<br />
escaping. Ensure that handle is tightly attached to<br />
the machine (fig. 5).<br />
5. Proceed as in points 5, 6 and 7 in the previous section.<br />
HOW TO MAKE CAPPUCCINO<br />
1. Prepare the espresso coffee as described in the previous<br />
paragraphs, using cups that are large enough<br />
to hold both the espresso and frothed milk..<br />
2. Press the steam button (fig. 15).<br />
3. In the meantime, fill a container with about 1/2 cup<br />
of milk for every cappuccino to be prepared. The<br />
milk must be cold and at refrigerator temperature<br />
(not hot!). When choosing the frothing container<br />
consider that the volume of the milk will increase<br />
by 2 or 3 times.<br />
Information: it is recommended to use semiskimmed<br />
milk at refrigerator temperature (41°F/<br />
5°C).<br />
4. Position the container with the milk under the frother.<br />
5. Wait for the indicator light next to the steam button<br />
to switch on (fig. 16). This indicates that the boiler<br />
has reached the ideal temperature for the production<br />
of steam<br />
6. Open the steam tap (2) for a few seconds to remove<br />
any water present in the circuit. Close the tap.<br />
7. Dip the frother into the milk a few millimeters (fig.<br />
17) making sure not to immerse the raised line on<br />
the cappuccino maker (indicated by the arrow in<br />
fig. 17). Turn the knob counterclockwise (fig. 18)<br />
for at least half a rotation. Steam escapes from the<br />
frother giving the milk a creamy appearance and increasing<br />
its volume. To obtain a creamier froth, dip<br />
the frother into the milk and turn the container with<br />
slow movements from the bottom upwards.<br />
8. When the volume of the milk has doubled, dip the<br />
frother far down into the frothing container and<br />
continue to heat the milk. When the desired temperature<br />
(ideal value is 140°F / 60°C) and the desired<br />
milk froth have been reached, interrupt the<br />
steam by turning the steam knob clockwise and<br />
release the steam button. Use the on/off button to<br />
switch the machine off (fig. 4) (The on/off indicator<br />
light switches off).<br />
9. Pour the frothed milk into the cups containing the<br />
previously-prepared espresso coffee. The cap-<br />
9
puccino is ready: add sugar at will and if desired,<br />
sprinkle a little powdered chocolate on top of the<br />
froth.<br />
Information<br />
• if more than one cappuccino is to be prepared, first<br />
make all of the coffees and then prepare the milk for<br />
all of the cappuccinos;<br />
• if more coffee must be prepared after the milk has<br />
been frothed, allow the boiler to cool first otherwise<br />
the coffee will be burned.<br />
To cool it, position a container under the filterholder<br />
spouts (fig. 11), press the steam button and<br />
allow water to run out until the steam function light<br />
switches off: then prepare the coffee.<br />
Do not deliver steam for more than 60 seconds at<br />
a time or froth more than 3 times consecutively.<br />
Attention: the frother must always be washed after<br />
use to ensure proper functioning and sterility.<br />
Proceed as follows:<br />
1. Discharge a small amount of steam for a few seconds<br />
(see points 2,5 and 6 of the previous paragraph)<br />
by turning the steam knob (fig. 18). By<br />
doing this, the frother empties any milk left inside.<br />
Switch the machine off by pressing the ON/OFF<br />
button.<br />
2. Use one hand to hold the cappuccino tube and the<br />
other to release the frothing cover by turning it<br />
clockwise and pulling it downwards (fig. 19).<br />
Danger! Do not touch stainless steel tube that attaches<br />
frother to machine. This will be very hot<br />
after frothing.<br />
3. Remove the frothing nozzle from the tube by pulling<br />
it downwards (fig. 20).<br />
4. Wash the frother and nozzle thoroughly in warm<br />
water.<br />
5. Make sure that the two holes indicated by the arrows<br />
in fig. 21 are not blocked. Clean using a pin if<br />
necessary.<br />
6. Re-mount the frothing nozzle by inserting it firmly<br />
upwards into the steam tube.<br />
7. Re-mount the frothing cover by inserting it upwards<br />
and turning it counterclockwise .<br />
PRODUCTION OF HOT WATER<br />
1. Switch the machine on by pressing the on/off button<br />
(fig. 4). Wait for the OK light to switch on (fig. 6).<br />
2. Position a container under the cappuccino maker.<br />
3. Press the coffee button (fig. 7) and turn the steam<br />
knob counterclockwise at the same time (fig. 18):<br />
the hot water will escape from the frother.<br />
4. To interrupt the hot water, turn the steam knob<br />
clockwise and press the coffee button again (fig.<br />
7).<br />
Maximum delivery of 60 seconds is recommended.<br />
CLEANING<br />
Danger! Before performing any cleaning operations<br />
of the external parts of the appliance, switch<br />
the machine off, remove the plug from the outlet<br />
and let the machine cool down.<br />
Cleaning and maintenance of the filter<br />
Clean the filter-holder and ground coffee filters about<br />
every 300 coffees and when the coffee drips through<br />
the filter-holder and does not flow completely:<br />
• Remove the filter from the filter-holder.<br />
• Unscrew the filter cap (fig. 22) in the direction indicated<br />
by the arrow on the cap itself.<br />
• Remove all parts of filter by pushing the black rubber<br />
holder and metal disc out of filter. Remove the<br />
metal disc from its backing. (There should be 5<br />
separate pieces to the filter)<br />
• Rinse all components and clean the metal filter disc<br />
thoroughly using hot water and a brush (fig. 23).<br />
Check that the holes in the metal filter disc are not<br />
blocked. If this is not the case, clean them using a<br />
pin (see fig. 24).<br />
• Re-mount the filter by placing the metal disc and<br />
backing inside the black rubber holder as indicated<br />
in figure 25. Make sure that the plastic disc pin is<br />
inserted inside the hole in the black plastic holder<br />
as indicated by the arrow in fig. 25.<br />
• Re-insert the black rubber holder that contains<br />
metal disc and backing into the metal holder (fig.<br />
26), making sure that the pin is inserted into the<br />
hole of the support itself (see arrow fig. 26).<br />
• Finally, tighten the filter cap .<br />
The warranty is not valid if the cleaning operations described<br />
above are not performed on a regular basis.<br />
Cleaning the boiler outlet<br />
About every 300 coffees the espresso boiler outlet must<br />
be cleaned as follows:<br />
• Make sure that the coffee machine is not hot and<br />
the plug is disconnected from the socket;<br />
• Use a screwdriver to remove the screw that fixes<br />
the espresso boiler outlet (fig. 27);<br />
• Remove the boiler outlet;<br />
• Clean the boiler using a damp cloth (fig. 27);<br />
• Clean the boiler outlet disc thoroughly using hot<br />
water and a brush. Check that the holes are not<br />
blocked. If this is not the case, clean them using a<br />
pin (fig. 24).<br />
• Rinse the boiler outlet disc under the tap, rubbing<br />
continuously.<br />
• Re-mount the boiler outlet, paying attention to position<br />
it correctly on the gasket.<br />
The warranty is not valid if the cleaning operations described<br />
above are not performed on a regular basis.<br />
10
Other cleaning operations<br />
1. Do not use solvents or abrasive detergents to clean<br />
the machine. Use a soft, damp cloth.<br />
2. Clean the filter-holder cup, the filters, drip tray and<br />
water tank regularly.<br />
To empty the drip tray, remove the cup warmer<br />
grid, remove the water and clean the tray using a<br />
cloth: then re-assemble the drip tray.<br />
Clean the water tank using a soft bottle-brush in<br />
order to reach the bottom.<br />
Danger! During cleaning, never immerse the machine<br />
in water: it is an electric appliance.<br />
descaling<br />
It is recommended to descale the machine about every<br />
200 coffees.<br />
We recommend using De’Longhi approved descaler<br />
which is available through customer service.<br />
Follow this procedure:<br />
1. Fill the tank with the descaling solution and dilute<br />
the solution with water, following directions on the<br />
descaling solution package.<br />
2. Press the on/off button and wait for the OK light to<br />
switch on.<br />
3. Make sure that the filter holder is not attached and<br />
position a container under the boiler outlet.<br />
4. Press the coffee button and allow about 1/4 of the<br />
solution contained in the tank to flow out: every<br />
now and again turn the steam knob and allow a<br />
small amount of solution to escape; then interrupt<br />
by pressing the button again and leave the solution<br />
to act for about 5 minutes.<br />
5. Repeat point 4 another 3 times, until the tank is<br />
completely empty.<br />
6. To eliminate residues of the solution and lime scale,<br />
rinse the tank well and fill it with clean water (without<br />
descaler).<br />
7. Press the coffee button (fig. 6) and operate the appliance<br />
until the tank is completely empty;<br />
8. Repeat operations 6 and 7 again.<br />
11
Problem POSSIBLE CAUSES SOLUTION<br />
Espresso coffee does not flow out • No water in the tank • Fill the water tank<br />
Espresso coffee drips from the edges<br />
of the filter-holder instead of<br />
through the holes<br />
• The holes in the filter-holder are blocked • Clean the holes in the filter-holder spouts<br />
• The espresso boiler outlet is blocked • Clean the boiler outlet as indicated in the<br />
“Cleaning the boiler outlet” paragraph<br />
• The filter-holder is inserted incorrectly • Attach the filter-holder correctly by<br />
placing filter holder on the left side of the<br />
machine and turning towards the right.<br />
Filter holder should be tightly locked in<br />
place.<br />
• The espresso boiler gasket has lost<br />
elasticity<br />
• The holes in the filter-holder spout are<br />
blocked<br />
The espresso coffee is cold • The espresso OK light is not on when the<br />
coffee button is pressed<br />
• Replace the espresso boiler gasket by<br />
calling customer service.<br />
• Clean the holes in the spouts.<br />
• Wait for the OK light to switch on<br />
• Pre-heating has not been carried out • Pre-heat as indicated in the “preheating<br />
the coffee machine” paragraph<br />
• The cups have not been pre-heated • Pre-heat the cups using hot water or<br />
leave them for at least 20 minutes on the<br />
cup warmer plate.<br />
Loud pump noise • The water tank is empty • Fill the water tank<br />
The coffee crema is clear (it flows<br />
quickly from the spout)<br />
• The tank is inserted incorrectly and the<br />
valve on the bottom is not open<br />
• The ground coffee has not been<br />
sufficiently pressed<br />
• Press the tank lightly to open the valve<br />
on the bottom<br />
• Tamper the ground coffee more (fig. 10))<br />
• Not enough ground coffee • Increase the amount of ground coffee<br />
• The coffee is not ground finely enough • Only use coffee ground specifically for<br />
espresso coffee machines<br />
The coffee crema is dark (it flows<br />
slowly from the spout)<br />
• Incorrect type of ground coffee • Change the type of the ground coffee. It<br />
is recommended to use a dark espresso<br />
roast.<br />
• The ground coffee is too tightly pressed • Tamper the coffee less (fig. 6)<br />
• Too much ground coffee • Decrease the amount of ground coffee<br />
• The espresso boiler outlet is blocked • Clean as indicated in the “Cleaning the<br />
espresso boiler outlet” paragraph.<br />
• The filter is blocked • Clean as indicated in the “cleaning the<br />
filter” paragraph.<br />
• The coffee is too finely ground • Only use coffee ground specifically for<br />
espresso coffee machines<br />
• The ground coffee is too fine or is damp • Only use coffee ground specifically for<br />
espresso coffee machines and it must<br />
not be too damp<br />
The milk does not froth when making<br />
a cappuccino<br />
• Incorrect type of ground coffee • Change the type of the ground coffee. It<br />
is recommended to use a dark espresso<br />
roast.<br />
• The milk is not cold enough • Always use milk at refrigerator<br />
temperature (41°F/5°C).<br />
• The frother is dirty • Carefully clean the holes in the frother in<br />
particular, those indicated in figure 21<br />
12
This warranty applies to all products with De’Longhi or Kenwood brand names.<br />
Limited Warranty<br />
What does the warranty cover?<br />
We warrant each appliance to be free from defects in material and workmanship. Our obligation under this<br />
warranty is limited to repair at our factory or authorized service center of any defective parts or part thereof,<br />
other than parts damaged in transit. In the event of a products replacement or return, the unit must be<br />
returned transportation prepaid. The repaired or new model will be returned at the company’s expense.<br />
This warranty shall apply only if the appliance is used in accordance with the factory directions, which<br />
accompany it, and on an Alternating current ( AC ) circuit.<br />
How long does the coverage last?<br />
This warranty runs for one year ( 1 ) from the purchase date found on your receipt and applies only to the<br />
original purchaser for use.<br />
What is not covered by the warranty?<br />
The warranty does not cover defects or damage of the appliance, which result from repairs or alterations<br />
to the appliance outside our factory or authorized service centers, nor shall it apply to any appliance,<br />
which has been subject to abuse, misuse, negligence or accidents. Also, consequential and incidental<br />
damage resulting from the use of this product or arising out of any breach of contract or breach of this<br />
warranty are not recoverable under this warranty. Some states do not allow the exclusion or limitation of<br />
incidental or consequential damage, so the above limitation may not apply to you.<br />
How do you get service?<br />
If repairs become necessary, see contact information below:<br />
U.S. Residents: Please contact our toll free hotline at 1-800-322-3848 or log onto our website at www.<br />
delonghiusa.com. For all accessories, spare parts or replacement parts, please contact our parts division<br />
at 1-800-865-6330.<br />
Residents of Canada: Please contact our toll free hotline at 1-888-335-6644 or log onto our website at<br />
www.delonghi.com.<br />
Residents of Mexico: Please refer to the Limited Warranty statement for Mexico.<br />
Please refer to the back page of the manual for De’Longhi addresses.<br />
The above warranty is in lieu of all other express warranties and representations. All implied warranties<br />
are limited to the applicable warranty period set forth above. This limitation does not apply if you enter<br />
into an extended warranty with De’Longhi. Some states do not allow limitations on how long an implied<br />
warranty lasts, so the above exclusions may not apply to you. De’Longhi does not authorize any other<br />
person or company to assume for it any liability in connection with the sale or use of its appliance.<br />
How does state law apply?<br />
This warranty gives you specific legal rights, and you may also have other rights, which vary from state<br />
to state.<br />
13
De’Longhi America, Inc.<br />
Park 80 West, Plaza One<br />
Saddle Brook, NJ 07663<br />
1-800-322-3848<br />
De’Longhi Canada, Inc.<br />
6150 McLaughlin Road<br />
Mississauga, Ontario<br />
L5R 4E1 Canada<br />
1-888-335-6644<br />
Fiducia Italiana S.A de C.V.<br />
Pestalozzi 814<br />
Col. Del Valle<br />
Del. Benito Juarez<br />
México D.F. 03100<br />
tels: 5543 1447 y 5543 6492<br />
Lada sin costo: 01800 711 8805<br />
www.delonghi.com<br />
xxxxxxxxxxx/06.09