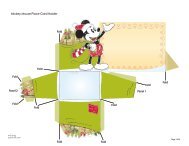
Download Felt Garland Decoration for Halloween Template - Spoonful
Download Felt Garland Decoration for Halloween Template - Spoonful
Download Felt Garland Decoration for Halloween Template - Spoonful

Create successful ePaper yourself
Turn your PDF publications into a flip-book with our unique Google optimized e-Paper software.
<strong>Felt</strong> <strong>Garland</strong> Instructions<br />
Decorate your mantel or doorways with a<br />
wickedly fun felt garland. This project requires<br />
purchasing printable fabric sheets. If you’d prefer<br />
to make this project using household items,<br />
download the Paper <strong>Garland</strong> <strong>Template</strong> and<br />
instructions.<br />
Materials :<br />
Fel t<br />
Marker/Chal k<br />
Ink Jet Fabric Sheet s<br />
Fusible W ebbing*<br />
I r o n<br />
Ra f fia or String or Y a r n<br />
Scissor s<br />
Glu e<br />
* Note: Check to see if your printable fabric shee t<br />
has fusible backing. If not you will need to pur -<br />
chase fusible webbing to insert between the fabri c<br />
image and felt piece to adhere them. If usin g<br />
fusible webbing, follow manufacturer ’s instr ucti ons.<br />
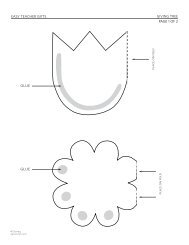
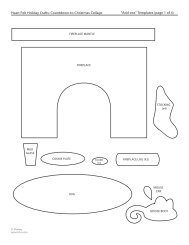
Step 1: Cu t<br />
Cut out <strong>Felt</strong> <strong>Garland</strong> Pattern below; lay pattern<br />
across felt square.<br />
Step 2: Trace & Cu t<br />
Trace around the pattern using a marker or<br />
chalk. Cut felt along traced line. Mark the fold<br />
line on the back side of the felt piece with marke r<br />
or chalk (consult the below <strong>Felt</strong> <strong>Garland</strong> Pattern<br />
to determine fold line). You have now created a<br />
hanging felt piece.<br />
Step 3: Print Designs on Fabric Pape r<br />
Load a printer fabric sheet following printer<br />
instructions. (Handle paper by the edges to avoid<br />
fingerprints.) Print the designs by clicking on the<br />
<strong>Felt</strong> <strong>Garland</strong> <strong>Template</strong> , using your ink jet<br />
printer and following manufacturer ’s directions.<br />
(For best results, load only one sheet at a time.)<br />
Tips & Tricks :<br />
• To select the proper print settings in Adobe<br />
Acrobat, click Print; in the print dialog box, select<br />
Properties; choose the appropriate paper type<br />
and then select the highest print qualit y.<br />
• W e recommend that you run a test print on<br />
regular paper to double check that you’re<br />
printing on the correct side of the pape r.<br />
(If problems occu r, check your printer manual <strong>for</strong><br />
additional printing instructions.)<br />
Step 4: Dr y<br />
Let paper dry several minutes be<strong>for</strong>e handling.<br />
Step 5: Cu t<br />
Cut all four designs from one sheet of fabric<br />
pape r.<br />
Step 6: Adhe r e<br />
Center the fabric design onto the felt pieces and<br />
adhere by fusing. (Approximately 1/4" of felt will<br />
be showing around the edge.)<br />
Step 7: Glue & Fold<br />
Fold the tab over towards the back of the felt<br />
piece to <strong>for</strong>m a loop. Glue the end of the tab to<br />
the back of the felt piece.<br />
Step 8: Connect Togethe r<br />
Repeat steps 1-7 until you’ve created all the felt<br />
pieces you want <strong>for</strong> the wall hanging. Thread a<br />
long piece of ra ffia, string, or yarn through each<br />
loop, tie it off, and continue to the next felt piece .<br />
PAGE 1<br />
© Disney<br />
spoonful.com
© Disney<br />
spoonful.com<br />
<strong>Felt</strong> <strong>Garland</strong> <strong>Template</strong>