Tifosi Rana - Adam Sloman
Tifosi Rana - Adam Sloman
Tifosi Rana - Adam Sloman

You also want an ePaper? Increase the reach of your titles
YUMPU automatically turns print PDFs into web optimized ePapers that Google loves.
TECHNICAL <strong>Tifosi</strong> RANA<br />
Midget<br />
Makeover<br />
Can’t afford a Frogeye but love the style? There is<br />
another way to put one on your driveway.<br />
By <strong>Adam</strong> <strong>Sloman</strong><br />
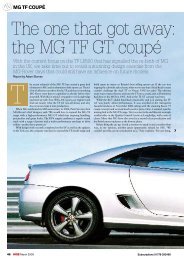
With 2008 seeing the Frogeye<br />
Sprite celebrating its 50th<br />
birthday, this year has really seen<br />
these characterful sports cars<br />
thrust into the limelight. But those distinctive<br />
Frogeye looks only lasted for three years before<br />
the more conventionally-styled Sprite and MG<br />
Midget took over, and values are high. As a<br />
result, demand consistantly exceeds supply and<br />
this has left a genuine Frogeye beyond the reach<br />
of many enthusiasts.<br />
One way around this is to take a later Midget<br />
and give it a makeover using a Forgeye-inspired<br />
<strong>Rana</strong> bodykit from Devon based company,<br />
<strong>Tifosi</strong>. The <strong>Rana</strong> (Italian for frog) is one of the<br />
most accessible kits on the market, making good<br />
use of the fact that the Midget’s basic structure<br />
remained unchanged when it lost the bug eyed<br />
look in 1961. As a result, fitting it is well within<br />
HOW TO DO IT<br />
the range of the home DIYer and the finished car<br />
does not require the stringent SVA test demanded<br />
by more extreme conversions.<br />
The kit is offered in two flavours: ‘Standard’<br />
retaining the Midget’s doors and wind up<br />
windows, or ‘Authentique’ which uses<br />
replacement fibreglass doors. It is the brainchild<br />
of lifelong MG enthusiast and former MG<br />
works mechanic, Kevin Moore. We took a trip<br />
down to his workshop in the quiet mid-Devon<br />
village of Chulmleigh to see how it is done.<br />
What follows is something of a simplified<br />
breakdown of how to go about the Midget-<br />
Sprite conversion, designed to help you assess<br />
whether building such a car is within your<br />
capabilities. It is important to remember though<br />
that the whole project can be done with your car<br />
as a runner – Kevin’s had some customers do the<br />
back one weekend and the front the next. <br />
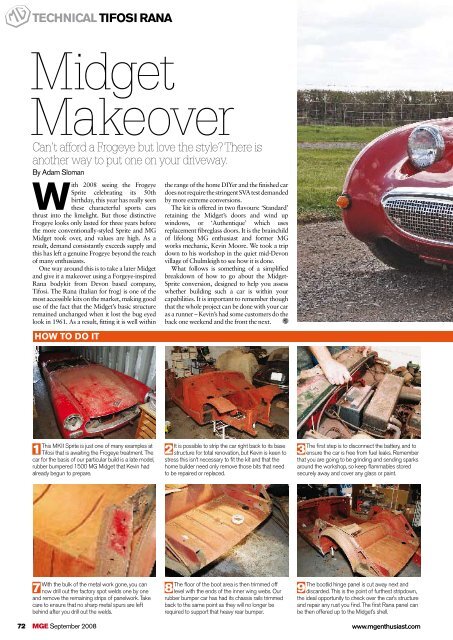
This MKII Sprite is just one of many examples at<br />
1 <strong>Tifosi</strong> that is awaiting the Frogeye treatment. The<br />
car for the basis of our particular build is a late model,<br />
rubber bumpered 1500 MG Midget that Kevin had<br />
already begun to prepare.<br />
It is possible to strip the car right back to its base<br />
2 structure for total renovation, but Kevin is keen to<br />
stress this isn’t necessary to fit the kit and that the<br />
home builder need only remove those bits that need<br />
to be repaired or replaced.<br />
3<br />
The first step is to disconnect the battery, and to<br />
ensure the car is free from fuel leaks. Remember<br />
that you are going to be grinding and sending sparks<br />
around the workshop, so keep flammables stored<br />
securely away and cover any glass or paint.<br />
With the bulk of the metal work gone, you can<br />
7 now drill out the factory spot welds one by one<br />
and remove the remaining strips of panelwork. Take<br />
care to ensure that no sharp metal spurs are left<br />
behind after you drill out the welds.<br />
The floor of the boot area is then trimmed off<br />
8 level with the ends of the inner wing webs. Our<br />
rubber bumper car has had its chassis rails trimmed<br />
back to the same point as they will no longer be<br />
required to support that heavy rear bumper.<br />
The bootlid hinge panel is cut away next and<br />
9 discarded. This is the point of furthest stripdown,<br />
the ideal opportunity to check over the car’s structure<br />
and repair any rust you find. The first <strong>Rana</strong> panel can<br />
be then offered up to the Midget’s shell.<br />
72 MGE September 2008<br />
www.mgenthusiast.com
A classic case of reverse<br />
engineering, the <strong>Tifosi</strong><br />
<strong>Rana</strong> is a relatively simple<br />
and cost-effective way to<br />
transform a tired Midget.<br />
Remove all the interior trim, as well as the<br />
4 headlamps and trim (keep these safe – they’ll<br />
become your Frog’s eyes). Remove the front wings,<br />
bonnet and grille surround. Some interior trim can be<br />
reused, saving your wallet from further pain.<br />
On rubber bumper variants, the grille surround<br />
5 has to be cut off; on early cars, this simply unbolts.<br />
The lips on the edges of the front wheel arches are<br />
then removed, as pictured above. The next step is<br />
rather more brutal...<br />
You now need to cut away the Midget’s outer<br />
6 panels. Get rid of the bulk quickly by cutting about<br />
an inch inboard of the seams. And yes, Kevin is being<br />
a bit naughty when posing for this shot – be sure to<br />
wear protective gloves and goggles when cutting.<br />
With the rear moulding in place, it is time to<br />
10 mark out the cut line on the inner rear wing.<br />
First draw around the new wheelarch, then remove<br />
the moulding – thanks to its fibreglass nature it is<br />
easily maneuverable even on your own.<br />
www.mgenthusiast.com<br />
You now need to measure one inch up from<br />
11 your marked line and the new arch profile can<br />
be cut. A repair section is included with the kit to<br />
cover any angle-grinder based mishaps. This picture<br />
shows the section of arch that needs to be cut away.<br />
The next job is to weld or bolt on these B-pillar<br />
12 supports (the kit is designed so that it can be<br />
fitted to a sound car without welding). These do not<br />
add structural strength, but reduce flexing stress<br />
which could, over time, cause the fibreglass to crack.<br />
September 2008 MGE 73
TECHNICAL RANA MIDGET<br />
HOW TO DO IT (continued)<br />
The rear end is then fitted and the rear cross<br />
13 member (the angle iron shown here already<br />
bolted across the middle of this picture) is offered up<br />
against the rear moulding. Mark the position of the<br />
cross member on the boot floor.<br />
Now remove the rear panel again so you can<br />
14 bolt and bond the crossmember to the boot<br />
floor. Apply sealant up the pillar, sill top, inner arches<br />
and the vertical face of the rear crossmember, then<br />
you can finally re-fit the rear end for the last time.<br />
You will then need to drill the B-pillar for up to<br />
15 12 rivets, and put three holes in the number<br />
plate mount. These are for bolts to hold the rear end<br />
in position while the sealant cures – they need only<br />
be nipped up as they are not structural.<br />
The back end will now look like this and can<br />
16 be left for the sealant to cure. Meanwhile, you<br />
can turn your attention to the front end and the most<br />
distinctive part of the car. This is also a one-piece<br />
moulding that can be offered up for trial fitment.<br />
The kit comes complete with plywood bonnet<br />
17 locator guides that fit with self tapping screws,<br />
allowing the bonnet to sit properly with the Midget’s<br />
scuttle panel. Measure the moulding’s lip carefully,<br />
then position these guides and secure them in place.<br />
The Midget dates from a time before computer<br />
18 aided design and robots, and there were<br />
variations between chassis produced at Abingdon.<br />
The hinge bracket comes with slotted holes so you<br />
can position it for the best fit.<br />
Getting the front end lined up correctly is the<br />
19 most crucial part of the build as it is key to<br />
getting the car to look right. On the <strong>Tifosi</strong> built car (as<br />
illustrated), the hinge is bolted and bonded to the<br />
fibreglass, but use of the bonding agent is optional.<br />
The front end can now be fitted permanently.<br />
20 The bonnet guides should ensure the bonnet<br />
locates correctly when shut. The exterior brightwork<br />
can be offered up, as well as the Midget’s headlights<br />
– only rubber bumper ones have integral sidelights.<br />
All the lighting for the <strong>Rana</strong> is included in the<br />
21 kit, except for the headlights (told you you’d<br />
need them). A popular modification is to fit a halogen<br />
headlamp conversion kit, vastly improving the visibility<br />
offered by the original sealed-beam units.<br />
Security locks can also be fitted to the front<br />
22 panel, adding a little extra piece of mind. Final<br />
fitment of the exterior equipment takes place once<br />
the panels have been painted. With paintwork<br />
complete, the interior can be refitted...<br />
... unless of course you chose to have an<br />
23 interior makeover too. A wide range of interior<br />
goodies are available from steering wheels to seats,<br />
as well as original-style clocks or even lightweight, allin-one<br />
stack style instrumentation.<br />
PRICING and contacts<br />
Standard kit (retaining donor vehicle’s dashboard,<br />
doors and wind-up windows) – £1650.<br />
Authentique kit (using fibreglass doors, and<br />
authentic dash) – £2000.<br />
<strong>Tifosi</strong> Sportscars: 01769 520706, <br />
tifosi@homecall.co.uk, www.tifosi-devon.co.uk<br />
Appointed agents for kits and builds:<br />
n Northern UK Region:<br />
Hall’s Garage, Morton, Lincs. 01778 570286<br />
n Southern UK Region:<br />
Frontline Developments, Bath. 01225 852777<br />
n Southwest UK Region:<br />
Devon Classic Cars, Ermington. 01548 831393<br />
n Australia: Tandem Chassis Developments,<br />
Seven Hills, NSW. 02 9764 4003<br />
74 MGE September 2008<br />
www.mgenthusiast.com