Version 5.3.02 - Serendipity Software
Version 5.3.02 - Serendipity Software
Version 5.3.02 - Serendipity Software

You also want an ePaper? Increase the reach of your titles
YUMPU automatically turns print PDFs into web optimized ePapers that Google loves.
User Manual <br />
<strong>Version</strong> <strong>5.3.02</strong>
Table of Contents <br />
Veripress User Manual.......................................................................................................................................5 <br />
Product Overview................................................................................................................................................6 <br />
Installation.............................................................................................................................................................7 <br />
What’s on the DVD?......................................................................................................................................................................................................7 <br />
Windows Installation .........................................................................................................................................8 <br />
Installing the Dongle Driver – Windows.............................................................................................................................................................8 <br />
Installing Veripress ......................................................................................................................................................................................................8 <br />
Installation of the <strong>Serendipity</strong> Agent....................................................................................................................................................................8 <br />
Mac OS X Installation..........................................................................................................................................9 <br />
Installing the Dongle Driver .....................................................................................................................................................................................9 <br />
Installing the <strong>Serendipity</strong> Printer Drivers..........................................................................................................................................................9 <br />
Installing Veripress ......................................................................................................................................................................................................9 <br />
Installation of the <strong>Serendipity</strong> Agent....................................................................................................................................................................9 <br />
Creating Dock Start Icons ..........................................................................................................................................................................................9 <br />
Linux Installation.............................................................................................................................................. 10 <br />
Installing the Dongle Driver .................................................................................................................................................................................. 10 <br />
Installing Veripress ................................................................................................................................................................................................... 10 <br />
To Install Veripress................................................................................................................................................................................................... 10 <br />
Upgrading to <strong>Version</strong> 5.3 ............................................................................................................................... 11 <br />
Windows – Upgrading to <strong>Version</strong> 5.3................................................................................................................................................................ 11 <br />
Mac OS X – Upgrading to <strong>Version</strong> 5.3 ................................................................................................................................................................ 13 <br />
Linux – Upgrading to <strong>Version</strong> 5.3........................................................................................................................................................................ 14 <br />
Saving/Restoring the Veripress Database and ICC Profiles using the File System ....................................................................... 15 <br />
To restore the database and ICC profiles to an upgraded Veripress................................................................................................... 15 <br />
Running the <strong>Software</strong>...................................................................................................................................... 16 <br />
Important Note: For Mac OS X users only ....................................................................................................................................................... 16 <br />
Before starting the Server and Client................................................................................................................................................................ 16 <br />
Starting the Server..................................................................................................................................................................................................... 16 <br />
Starting the Client ...................................................................................................................................................................................................... 17 <br />
Manual Client Configuration ................................................................................................................................................................................. 17 <br />
Monitoring Jobs – Configuration ......................................................................................................................................................................... 19 <br />
The Veripress Server....................................................................................................................................... 21 <br />
Server Options............................................................................................................................................................................................................. 21 <br />
The <strong>Serendipity</strong> Updater................................................................................................................................ 22 <br />
The Veripress Dongle Updater..................................................................................................................... 23 <br />
Updating the Dongle ................................................................................................................................................................................................. 23 <br />
The <strong>Serendipity</strong> Client .................................................................................................................................... 24 <br />
Look and Feel............................................................................................................................................................................................................... 24 <br />
Workbench.................................................................................................................................................................................................................... 24 <br />
Menu Options............................................................................................................................................................................................................... 25 <br />
Workbench Data Types .................................................................................................................................. 27 <br />
Bookfilter....................................................................................................................................................................................................................... 28 <br />
Calcheck Chart............................................................................................................................................................................................................. 29 <br />
Camera............................................................................................................................................................................................................................ 31 <br />
DotGain Curve.............................................................................................................................................................................................................. 31 <br />
Gradation Curve.......................................................................................................................................................................................................... 31 <br />
ICC Tweak Set .............................................................................................................................................................................................................. 32 <br />
Job Genie ........................................................................................................................................................................................................................ 33 <br />
<strong>Serendipity</strong> <strong>Software</strong> -‐ Veripress User Manual – <strong>Version</strong> <strong>5.3.02</strong> <br />
2
Media............................................................................................................................................................................................................................... 38 <br />
Output ............................................................................................................................................................................................................................. 40 <br />
Pagesetup ...................................................................................................................................................................................................................... 42 <br />
Press ................................................................................................................................................................................................................................ 48 <br />
Regular Expression ................................................................................................................................................................................................... 49 <br />
Replace Colour Set..................................................................................................................................................................................................... 50 <br />
RIP .................................................................................................................................................................................................................................... 52 <br />
Signature Group.......................................................................................................................................................................................................... 54 <br />
Special Colour Set....................................................................................................................................................................................................... 57 <br />
Modules................................................................................................................................................................ 60 <br />
BookMonitor ................................................................................................................................................................................................................ 61 <br />
ClientLog........................................................................................................................................................................................................................ 62 <br />
ClusterStatus................................................................................................................................................................................................................ 63 <br />
DropZone....................................................................................................................................................................................................................... 63 <br />
MediaStatus.................................................................................................................................................................................................................. 64 <br />
QueueManager ............................................................................................................................................................................................................ 65 <br />
QueueStatus.................................................................................................................................................................................................................. 68 <br />
RIPMonitor.................................................................................................................................................................................................................... 69 <br />
ServerLog....................................................................................................................................................................................................................... 70 <br />
Status............................................................................................................................................................................................................................... 71 <br />
Thumbnail..................................................................................................................................................................................................................... 71 <br />
VirtualPress.................................................................................................................................................................................................................. 71 <br />
Applications........................................................................................................................................................ 72 <br />
Archives.......................................................................................................................................................................................................................... 73 <br />
Clustering ...................................................................................................................................................................................................................... 74 <br />
Densitometer ............................................................................................................................................................................................................... 76 <br />
Displays .......................................................................................................................................................................................................................... 78 <br />
FlipBook......................................................................................................................................................................................................................... 82 <br />
Jobs................................................................................................................................................................................................................................... 85 <br />
Monitor........................................................................................................................................................................................................................... 86 <br />
Press Agent ................................................................................................................................................................................................................... 87 <br />
SoftProof ........................................................................................................................................................................................................................ 88 <br />
Spectro............................................................................................................................................................................................................................ 96 <br />
Touch Console ............................................................................................................................................................................................................. 97 <br />
<strong>Serendipity</strong> Client Menu Items...................................................................................................................102 <br />
Application Menu (Windows/Linux) or <strong>Serendipity</strong> Client Menu (Mac OS X) .............................................................................102 <br />
Submit Menu ..............................................................................................................................................................................................................102 <br />
Server Menu ...............................................................................................................................................................................................................104 <br />
Accounts Admin / Secure Mode.................................................................................................................105 <br />
Setting up Users and User Groups ....................................................................................................................................................................105 <br />
Activating Secure Mode.........................................................................................................................................................................................105 <br />
Configuration Panels ..............................................................................................................................................................................................105 <br />
System Settings................................................................................................................................................108 <br />
Client Settings............................................................................................................................................................................................................108 <br />
Server Settings ..........................................................................................................................................................................................................109 <br />
Web Server........................................................................................................................................................112 <br />
Accessing the Web Server ....................................................................................................................................................................................112 <br />
Publishing a Pagesetup on Mac OS X (10.6.x)........................................................................................114 <br />
Installing the <strong>Serendipity</strong> Printer Drivers.....................................................................................................................................................114 <br />
Configuring a Pagesetup for Publishing as a TCP/IP System Printer................................................................................................114 <br />
Creating a TCP/IP Mac OS X System Printer ................................................................................................................................................114 <br />
Configuring a Pagesetup for Publishing as a Bonjour Printer..............................................................................................................115 <br />
Creating a Bonjour System Printer for Mac OS X .......................................................................................................................................115 <br />
Publishing a Pagesetup on Windows 7....................................................................................................116 <br />
Megarip Printer Driver..........................................................................................................................................................................................116 <br />
Configuring the Pagesetup for Publishing as a System Printer............................................................................................................116 <br />
<strong>Serendipity</strong> <strong>Software</strong> -‐ Veripress User Manual – <strong>Version</strong> <strong>5.3.02</strong> <br />
3
Creating a TCP/IP Windows System Printer................................................................................................................................................116 <br />
Printing to a Published Pagesetup Printer across a Network .........................................................118 <br />
Printing from Mac OS X Mac OS X, or Windows Windows .........................................................................................................118 <br />
Printing from Mac OS X Windows, or Windows Mac OS X .........................................................................................................118 <br />
Troubleshooting .............................................................................................................................................119 <br />
Clustering ....................................................................................................................................................................................................................119 <br />
Glossary .............................................................................................................................................................120 <br />
Copyright Notices ...........................................................................................................................................121 <br />
Index ...................................................................................................................................................................128 <br />
<strong>Serendipity</strong> <strong>Software</strong> -‐ Veripress User Manual – <strong>Version</strong> <strong>5.3.02</strong> <br />
4
Veripress User Manual <br />
Copyright © <strong>Serendipity</strong> <strong>Software</strong> Pty Ltd <br />
Reproduction of any part of this user manual is strictly forbidden without prior written permission from <strong>Serendipity</strong> <br />
<strong>Software</strong> Pty Ltd. All company names, product names and trademarks mentioned in this manual are the property of the <br />
respective company. <br />
Important Notice <br />
Every effort is made to ensure the information contained within this user manual is correct. <strong>Serendipity</strong> <strong>Software</strong> Pty <br />
Ltd cannot be held responsible for any errors contained within this user manual and will not enter into any <br />
negotiations for claims of compensation relating to actions taken resulting from the information provided in this user <br />
manual for any reason whatsoever. <br />
<strong>Serendipity</strong> <strong>Software</strong> Pty Ltd is constantly making improvements to the software and as such, this user manual may not <br />
contain the latest information. Every effort is made to maintain the user manual and for the latest version please check <br />
the website: <br />
http://www.serendipity-‐software.com.au <br />
If you find any errors within this user manual, please detail them in an email to: support@serendipity-‐software.com.au <br />
Supporting Tutorial and HowTo documentation is available on our website: <br />
http://www.serendipity-‐software.com.au/support <br />
<strong>Serendipity</strong> <strong>Software</strong> -‐ Veripress User Manual – <strong>Version</strong> <strong>5.3.02</strong> <br />
5
Product Overview <br />
Veripress is used to accurately softproof post-‐RIP data on a calibrated monitor, replacing hardcopy proofs in the print <br />
production process. <br />
Veripress runs in a Server and Client configuration. The Server runs on a network computer and is protected by a USB <br />
dongle. The dongle licenses the level of software and the input filters and output drivers purchased. <br />
The Client is used as the configuration tool and monitoring application for the Server. It can be run on the same <br />
machine, or on another locally (LAN) or remotely (WAN) networked computer. The Client connects to the Server via <br />
standard TCP/IP network protocol and is not licensed, so it can be run multiple times on the network. <br />
Veripress has an input filter for most of the major manufacturers proprietary RIPs. The input filters read the native RIP <br />
format and understand how jobs are assembled, the plates associated with a job and the directory structure. RIPs that <br />
include databases and impositions are also read and understood. Jobs are proofed using the same post-‐RIP data that <br />
goes to the press, thus maintaining data integrity and accuracy of the proofs. <br />
Files are ripped once by the proprietary RIP and output as many times as desired. The jobs reside on the RIP, are <br />
monitored by the Veripress Server and are displayed by the Client in the RIPMonitor, with all associated plates stitched <br />
together. The files can be selected and submitted for processing by the Server as desired, or can be configured to <br />
process automatically. At the processing point, jobs are copied (spooled) over from the RIP to the Server, leaving the <br />
original untouched. Once the whole job is spooled, the Server begins to work on the files. <br />
Imaging is the first process to take place. Imaging interprets the file format, completes any imposition assembling <br />
required (for supported imposition RIPs) or any merging of CT/LW files, preserves any screening on the files and <br />
samples the jobs resolution to change it to that of the output format configured. An intermediate file format is created <br />
at this point, called the Imaged File. The Imaged File can be viewed using the SoftProof utility. The file format maintains <br />
all the plates associated with the job and is viewed at the full output resolution. The Imaged File can also be re-submitted<br />
at any time for processing to the same or a different output. There is no need to spool and interpret the job <br />
again. * Many Veripress workflows will primarily use these imaged files for proofing. <br />
After the imaging process has completed, the job is passed to the rendering engine. This takes the Imaged File and <br />
creates the file ready for output. The process includes applying any output characteristics such as orientation, cropping, <br />
colour management (ICC Profiles) and creation of the output file. <br />
The Imaged File can be rendered as many times as desired. Each time, any of the output characteristics can be changed <br />
prior to rendering. Once the job is rendered, it is saved internally as a <strong>Serendipity</strong> Blackmagic Image file and can be <br />
forwarded to a remote location for viewing. <br />
The Client monitors the whole process from start to finish, showing a jobs progress in a QueueManager and <br />
QueueStatus window. Jobs can be managed separately by placing a job on hold, releasing a job, cancelling or promoting <br />
as desired. The processes (queues) can be paused at any time, holding all jobs from spooling, imaging & rendering. If a <br />
job fails, the error can be examined, rectified and the job retried. There are logs reporting all Server and Client <br />
functionality and job information from first detection on the RIP to final output. The logs can be searched, filtered or <br />
saved to a file. <br />
Jobs in the QueueManager can be loaded and proofed in a press room environment to a calibrated monitor; controlled <br />
using an attached touch screen. <br />
The system creates a database of all configurations, calibration curves and other settings. This database can be backed-up<br />
on demand or automatically, so a working copy is always available. It can be copied to any other Veripress as a <br />
whole database or as individual items. <br />
*This applies to any output characteristics. If any changes are required for the Imaged File, e.g., changing plates, resolution etc, the file will need to be <br />
re-‐submitted from the RIPMonitor. <br />
<strong>Serendipity</strong> <strong>Software</strong> -‐ Veripress User Manual – <strong>Version</strong> <strong>5.3.02</strong> <br />
6
Installation <br />
The installation section describes the process for each platform in turn. <br />
The software is supplied on one DVD for Macintosh, Linux and Windows versions. All versions come with a dongle and <br />
require a dongle driver be installed. Existing installations of the software are given the opportunity to upgrade, <br />
preserving any existing configurations. <br />
What’s on the DVD? <br />
The DVD contains all elements required to run Veripress and associated programs. <br />
They are divided into directories, detailed below: <br />
• Agent – Contains the Agent software for all supported platforms. Choose the subdirectory that matches the <br />
required operating system. <br />
• Docs – Contains all documentation. <br />
• Dongle – Contains the dongle drivers for Linux, MacOSX and Windows. <br />
• Drivers – Contains the Megarip PPDs for all supported platforms. <br />
• Extras – Contains additional components and print drivers loaded as part of the install process. <br />
• HTML – Contains the information required for the web browser install. This automatically launches the default <br />
browser for installation to begin. <br />
• Linux – Contains the Veripress and AppleTalk installation packages for Linux. <br />
• MacOSX – Contains the Veripress installation package for MacOSX. <br />
• <strong>Serendipity</strong> Client – Contains the <strong>Serendipity</strong> Client for all supported platforms. <br />
• Testprn – Contains <strong>Serendipity</strong> internal test prints. <br />
• Windows – Contains the Veripress installation package for Windows. <br />
<strong>Serendipity</strong> <strong>Software</strong> -‐ Veripress User Manual – <strong>Version</strong> <strong>5.3.02</strong> <br />
7
Windows Installation <br />
Administrator rights are required to install Veripress and the <strong>Serendipity</strong> Agent. If upgrading from an existing <br />
installation to version 5.3, see “Upgrading to <strong>Version</strong> 5.3” within this manual. <br />
Installing the Dongle Driver – Windows <br />
The first step is to install the dongle driver. <br />
To install: <br />
1. Remove all SuperPro USB dongles. <br />
2. On the DVD, navigate to the dongle/windows folder. <br />
3. Double click the Sentinel Protection Installer.exe file to launch the installer. <br />
4. Follow the onscreen instructions to complete the installation. <br />
5. Restart the computer when finished. <br />
Installing Veripress <br />
The next step once the dongle driver is installed is to install Veripress. There are two (2) Windows files available for <br />
installation – 32 bit or 64 bit version. Select the appropriate file for your system to install. <br />
1. Either select and run the Veripress installer by clicking the link on the browser page (if it pops up as an <br />
Autoplay when the disk is inserted), or go to the DVD and navigate to the Windows directory to run the file <br />
Veripress.msi (32 or 64 bit version). <br />
2. Follow the onscreen instructions to complete the installation. <br />
Note: You can type your own path and the installation program will make the folder for you, provided your chosen <br />
location has valid permissions. Use back slashes (\) to separate directories. <br />
Installation of the <strong>Serendipity</strong> Agent <br />
If you are polling a RIP (or RIP folder) on a Windows machine, the most efficient method is to use the <strong>Serendipity</strong> <br />
Remote Agent. This runs a service on the Windows machine where the RIP is located. Veripress communicates with the <br />
Agent to poll and transfer jobs. <br />
To install: <br />
1. Either <br />
a. Select and run the Veripress installer by clicking the link on the browser page (if it pops up as an <br />
Autoplay when the disk is inserted), or <br />
b. Run the agent32.msi (32-bit) or agent64.msi (64-bit) file, located in the /agent/windows folder of <br />
the installation DVD. <br />
2. Follow the onscreen instructions to complete the installation. <br />
Once the installation has finished, proceed to the “Running the <strong>Software</strong>” section of this manual. <br />
<strong>Serendipity</strong> <strong>Software</strong> -‐ Veripress User Manual – <strong>Version</strong> <strong>5.3.02</strong> <br />
8
Mac OS X Installation <br />
Administrator rights are required to install Veripress and the <strong>Serendipity</strong> Agent. If upgrading from an existing <br />
installation to version 5.3, see the “Upgrading to <strong>Version</strong> 5.3” section within this manual. <br />
Installing the Dongle Driver <br />
The first step is to install the dongle driver. <br />
To install: <br />
1. Remove all SuperPro USB dongles. <br />
2. On the DVD, navigate to the dongle/macosx folder. <br />
3. Double click the Sentinel System Driver.pkg file to launch the installer. <br />
4. Follow the onscreen instructions to complete the installation. <br />
5. Restart the computer when finished. <br />
Installing the <strong>Serendipity</strong> Printer Drivers <br />
The <strong>Serendipity</strong> Printer Drivers are used when setting up a Published Pagesetup for printing (or proofing) from a third <br />
party application (e.g. Photoshop) directly to Veripress. <br />
The installation package is located on the Veripress 5.3 Installation DVD: <br />
1. Navigate to the /drivers/mac folder and run the file <strong>Serendipity</strong> Printer Drivers.pkg <br />
2. An installer window will appear. Follow the prompts to complete the installation of the drivers. The installer <br />
will require administrator access privileges. <br />
Installing Veripress <br />
1. Go to the macosx folder on the Veripress installation DVD. <br />
2. Double click the file Veripress.pkg to launch the installer. <br />
3. Follow the onscreen instructions to complete the installation. <br />
Important note: Before starting the software after installation, see the Running the <strong>Software</strong> section (Mac OS X only). <br />
Installation of the <strong>Serendipity</strong> Agent <br />
If you are polling a RIP (or RIP folder) on a Mac OS X machine, the most efficient method is to use the <strong>Serendipity</strong> <br />
Remote Agent. This runs a service on the Mac OS X machine where the RIP is located. Veripress communicates with the <br />
Agent to poll and transfer jobs. <br />
To install: <br />
1. Select and run <strong>Serendipity</strong> Agent.pkg file located in the agent/macosx folder on the installation DVD. <br />
2. Follow the onscreen instructions to complete the installation. <br />
Once the installation has finished, proceed to the “Running the <strong>Software</strong>” section of this manual. <br />
Creating Dock Start Icons <br />
To make it easy when starting the Server and Client, it is recommended you create a Dock shortcut. To do this: <br />
1. Run the Veripress Server and Client applications from the installation location. <br />
2. Once the Server and Client icons appear in the dock, right click (or CTRL+click) the mouse and select Keep in <br />
Dock from the menu. <br />
3. Alternatively, drag the Server and Client icons directly onto the Dock before they have been launched. <br />
4. To remove the Dock icons, drag them off the dock with the mouse onto the desktop and release. <br />
<strong>Serendipity</strong> <strong>Software</strong> -‐ Veripress User Manual – <strong>Version</strong> <strong>5.3.02</strong> <br />
9
Linux Installation <br />
Installing the Dongle Driver <br />
The first step is to install the dongle driver. <br />
To install: <br />
1. Remove all SuperPro USB dongles. <br />
2. Navigate to the dongle/linux folder on the installation DVD. <br />
3. Double click the sntl-sud-7.5.1-0.i386.rpm file to install the driver. <br />
Installing Veripress <br />
Important Note: Before installing on a Linux x64 operating system, please ensure the following i686 (32-‐bit) libraries <br />
are installed. <br />
• libstdc++.i686 GNU Standard C++ Library <br />
• mesa-‐libGLU.i686 Mesa libGLU runtime library <br />
• zlib.i686 The zlib compression and decompression library <br />
• freetype.i686 A free and portable font rendering engine <br />
• libXrender.i686 X.Org X11 libXrender runtime library <br />
• fontconfig.i686 Font configuration and customisation library <br />
• glib2.i686 A library of handy utility functions <br />
• libpng.i686 A library of functions for manipulating PNG image format files <br />
• libSM.i686 X.Org X11 Sm runtime library <br />
If the Package Installer can not locate the libraries, open a terminal window, go to the /root directory and install each <br />
library using the following command: <br />
yum install name of library <br />
To Install Veripress <br />
1. Navigate to the linux folder on the installation DVD. <br />
2. Double click the install.sh file and select “Run in Terminal”. <br />
3. A terminal window will popup and the installer will display the default installation directory. <br />
4. Press Enter to install or type an alternative path then press Enter. <br />
Note: If using an alternate install path, ensure the folder exists and that the current user has read/write/execute <br />
permissions for the folder. <br />
5. When the installation is complete the terminal window will close. <br />
Once the installation has finished, proceed to the “Running the <strong>Software</strong>” section of this manual. <br />
<strong>Serendipity</strong> <strong>Software</strong> -‐ Veripress User Manual – <strong>Version</strong> <strong>5.3.02</strong> <br />
10
Upgrading to <strong>Version</strong> 5.3 <br />
This section details upgrading an existing Veripress installation to version 5.3. The installer automatically upgrades the <br />
existing database to the current 5.3 format. As a precaution before upgrading, it is recommended that the Veripress <br />
database and ICC profiles are backed-‐up using the Archives application (see Windows Upgrade or Mac OS X Upgrade <br />
sections for details), or by copying the database directories (see Copying the Database and ICC Folders section for <br />
details). <br />
Important Note: Pagesetups imported from <strong>Version</strong> 3 archives will automatically be split into Media and Pagesetup <br />
data types but remain functionally linked. <strong>Version</strong> 5.3 archives cannot be opened or imported into previous versions of <br />
Veripress. <br />
Windows – Upgrading to <strong>Version</strong> 5.3 <br />
Archiving Current Installations <br />
To Archive a Database: <br />
1. Run the existing Veripress Server and <strong>Serendipity</strong> Client. <br />
2. Go to the <strong>Serendipity</strong> Client Application menu > Archives (This <br />
application is called Archiver in earlier versions). <br />
3. Select File menu > Perform Full Backup. <br />
4. Alternatively, select Edit menu > Add to Archive (All) and add <br />
all database items to the archive file, or right click in the <br />
Archives window and select Add to Archive (All) > Everything <br />
from the contextual menu. <br />
5. Once all database items have appeared in the Archives window, <br />
select File menu > Save Archive to save the .sdb archive file to a <br />
chosen location. <br />
6. Close the Archives application when finished. <br />
Installing the Dongle Driver Update <br />
<strong>Version</strong> 5 dongles (new or upgraded) require an up-‐to-‐date Safenet dongle driver in order to function. <br />
To upgrade: <br />
1. Make sure the Veripress Server and Client are not running and remove any Veripress (or any other SuperPro <br />
USB) dongles from the computer. <br />
2. On the Veripress installation DVD, navigate to the dongle/windows folder and run the Sentinel Protection <br />
Installer.exe file. Alternatively, download and run the latest driver install from the Safenet website <br />
(http://www.safenet-‐inc.com/support-‐downloads/sentinel-‐drivers/). <br />
3. Run the Sentinel installer. <br />
4. Select Upgrade and Next. <br />
5. Follow the onscreen instructions to complete the upgrade. <br />
6. Restart the computer when finished. <br />
Installing C++ Runtime Libraries <br />
To run correctly, Veripress 5.3 requires the installation of Microsoft Visual C++ Redistributable libraries that may not <br />
be present in your Windows operating system. If these were not installed for the existing Veripress version, they will <br />
need to be installed now. <br />
To install: <br />
1. Navigate to the windows folder on the Veripress DVD. <br />
a. For Windows 32-‐bit – Run the vcredist_x86.exe file <br />
b. For Windows 64-‐bit – Run the vcredist_x64.exe file <br />
2. Follow the prompts to install Microsoft Visual C++ 2008 Redistributable. <br />
<strong>Serendipity</strong> <strong>Software</strong> -‐ Veripress User Manual – <strong>Version</strong> <strong>5.3.02</strong> <br />
11
Installing the Veripress 5.3 Upgrade <br />
Current Windows file/folder security and permissions makes it necessary to install Veripress v5.3 in the root directory <br />
of the hard drive, e.g., C:\<strong>Serendipity</strong>\ rather than Program Files, where earlier versions of Veripress were installed. <br />
To upgrade: <br />
1. Insert the Veripress installation DVD and navigate to the windows folder. <br />
2. Run the veripress32.msi (32-bit) or the veripress64.msi (64-bit) file. <br />
3. If necessary, change the installation directory to the root directory of the hard drive, e.g. C:\<strong>Serendipity</strong>\ and <br />
click Next. <br />
4. Follow the onscreen instructions to complete the upgrade. <br />
5. Plug the Veripress dongle into an available USB port. <br />
6. Start the Veripress v5.3 Server and the <strong>Serendipity</strong> Client. <br />
If the installation location did not require changing, the existing database should appear once the Server and Client <br />
have restarted, reformatted and intact in the Workbench. The Client should open with the previous versions <br />
configuration. <br />
If the installation location was (or needed to be) changed, or in the event the existing database is not complete, the <br />
database backup needs to be imported using the Archives application. <br />
To import an existing database backup: <br />
1. Open the Archives application from the <strong>Serendipity</strong> Client Application menu. <br />
2. In Archives, select File menu > Open Archive. <br />
3. Navigate to and select the saved backup archive .sdb file. Click Open. The archive will open in the Archives <br />
window and display all database items from the previously backed-‐up configuration. <br />
4. Once the archive has loaded, select Edit menu > Add to Database > Whole Archive. This will import the entire <br />
database. <br />
5. Alternatively, choose individual items to import from the list and select Edit > Add to Database > Selected <br />
Nodes. <br />
6. The database items will be imported and appear in the Workbench for use. <br />
For further information on Archives and backing-‐up databases, see the “Archives” section of this manual. <br />
<strong>Serendipity</strong> <strong>Software</strong> -‐ Veripress User Manual – <strong>Version</strong> <strong>5.3.02</strong> <br />
12
Mac OS X – Upgrading to <strong>Version</strong> 5.3 <br />
Archiving Current Installations <br />
To Archive a Database: <br />
1. Run the existing Veripress Server and <strong>Serendipity</strong> Client. <br />
2. Go to the <strong>Serendipity</strong> Client Application menu > Archives (This <br />
application is called Archiver in earlier versions). <br />
3. Select File menu > Perform Full Backup. <br />
4. Alternatively, select Edit menu > Add to Archive (All) and add <br />
all database items to the archive file, or right-‐click in the <br />
Archives window and select Add to Archive (All) > Everything <br />
from the contextual menu. <br />
5. Once all database items have appeared in the Archives window, <br />
select File menu > Save Archive to save the .sdb archive file to a <br />
chosen location. <br />
6. Close the Archives application when finished. <br />
Installing the Dongle Driver <br />
The first step is to install the dongle driver. <br />
To install: <br />
1. Remove all SuperPro USB dongles. <br />
2. On the DVD, navigate to the dongle/macosx folder. <br />
3. Double click the Sentinel System Driver.pkg file to launch the installer. <br />
4. Follow the onscreen instructions to complete the installation. <br />
5. Restart the computer when finished. <br />
Installing the Veripress <strong>Version</strong> 5.3 Upgrade <br />
To upgrade: <br />
1. Insert the Veripress installation DVD and navigate to the macosx folder. <br />
2. Run the Veripress.pkg file. <br />
3. Select the drive and location to install the software. The installer will choose the current installation location <br />
by default, which in most cases is /Applications/<strong>Serendipity</strong>. <br />
4. Follow the onscreen instructions to complete the upgrade. <br />
5. Plug the Veripress dongle into an available USB port. <br />
6. Start the Veripress v5.3 Server and the <strong>Serendipity</strong> Client. <br />
If the installation location was not changed, the existing database should appear once the Server and Client have <br />
restarted, reformatted and intact in the Workbench. The Client should open with the previous versions configuration. <br />
If the installation location was changed, or in the event the existing database is not complete, the database backup <br />
needs to be imported using the Archives application. <br />
To import an existing database backup: <br />
1. Open the Archives application from the <strong>Serendipity</strong> Client Application menu. <br />
2. In Archives, select File menu > Open Archive. <br />
3. Navigate to and select the saved backup archive .sdb file. Click Open. The archive will open in the Archives <br />
window and display all database items from the previously backed-‐up configuration. <br />
4. Once the archive has loaded, select Edit menu > Add to Database > Whole Archive. This will import the entire <br />
database. <br />
5. Alternatively, choose individual items to import from the list and select Edit > Add to Database > Selected <br />
Nodes. <br />
6. The database items will be imported and appear in the Workbench for use. <br />
For further information on Archives and backing-‐up databases, see the “Archives” section of this manual. <br />
<strong>Serendipity</strong> <strong>Software</strong> -‐ Veripress User Manual – <strong>Version</strong> <strong>5.3.02</strong> <br />
13
Linux – Upgrading to <strong>Version</strong> 5.3 <br />
Archiving Current Installations <br />
To Archive a Database: <br />
1. Run the existing Veripress Server and <strong>Serendipity</strong> Client. <br />
2. Go to the <strong>Serendipity</strong> Client Application menu > Archives (This <br />
application is called Archiver in earlier versions). <br />
3. Select File menu > Perform Full Backup. <br />
4. Alternatively, select Edit menu > Add to Archive (All) and add <br />
all database items to the archive file, or right-‐click in the <br />
Archives window and select Add to Archive (All) > Everything <br />
from the contextual menu. <br />
5. Once all database items have appeared in the Archives window, <br />
select File menu > Save Archive to save the .sdb archive file to a <br />
chosen location. <br />
6. Close the Archives application when finished. <br />
Installing the Dongle Driver <br />
The first step is to install the dongle driver. <br />
1. Remove all SuperPro USB dongles. <br />
2. Navigate to the dongle/linux folder on the installation DVD. <br />
3. Double click the sntl-sud-7.5.1-0.i386.rpm file to install the driver. <br />
Installing the Veripress <strong>Version</strong> 5.3 Upgrade <br />
To upgrade: <br />
1. Navigate to the linux folder on the installation DVD. <br />
2. Double click the install.sh file and select “Run in Terminal”. <br />
3. A terminal window will popup and the installer will display the default installation directory. <br />
4. Press Enter to install or type an alternative path then press Enter. <br />
Note: If using an alternative install path, ensure the folder exists and that the current user has read/write/execute <br />
permissions for the folder. <br />
5. The terminal window will close when the installation is complete. <br />
6. Plug the Veripress dongle into an available USB port. <br />
7. Start the Veripress v5.3 Server and the <strong>Serendipity</strong> Client. <br />
If the installation location was not changed, the existing database should appear once the Server and Client have <br />
restarted, reformatted and intact in the Workbench. The Client should open with the previous versions configuration. <br />
If the installation location was changed, or in the event the existing database is not complete, the database backup <br />
needs to be imported using the Archives application. <br />
To import an existing database backup: <br />
1. Open the Archives application from the <strong>Serendipity</strong> Client Application menu. <br />
2. In Archives, select File menu > Open Archive. <br />
3. Navigate to and select the saved backup archive .sdb file. Click Open. The archive will open in the Archives <br />
window and display all database items from the previously backed-‐up configuration. <br />
4. Once the archive has loaded, select Edit menu > Add to Database > Whole Archive. This will import the entire <br />
database. <br />
5. Alternatively, choose individual items to import from the list and select Edit > Add to Database > Selected <br />
Nodes. <br />
6. The database items will be imported and appear in the Workbench for use. <br />
For further information on Archives and backing-‐up databases, see the “Archives” section of this manual. <br />
<strong>Serendipity</strong> <strong>Software</strong> -‐ Veripress User Manual – <strong>Version</strong> <strong>5.3.02</strong> <br />
14
Saving/Restoring the Veripress Database and ICC Profiles using the File System <br />
An alternate method for backing up the existing database and ICC profiles is to copy the relevant file folders from <br />
Veripress to another location before upgrading to version 5.3. <br />
The database items are held in a folder called defaultss.dbd in the following locations: <br />
Mac OS X <br />
Windows <br />
/Applications/Veripress/lib/defaultss.dbd/ <br />
C:\Program Files\Veripress\lib\defaultss.dbd\ (For versions 3.5.09 and below) <br />
C:\<strong>Serendipity</strong>\Veripress\lib\defaultss.dbd\ (For versions 4.0 and above) <br />
Linux/Sun/SGI <br />
~veripress\lib\defaultss.dbd\ <br />
The ICC Profiles are stored a folder called ICC in the following locations: <br />
Mac OS X <br />
Windows <br />
/Applications/Veripress/lib/ICC/ <br />
C:\Program Files\Veripress\lib\icc\ (For versions 3.5.09 and below) <br />
C:\<strong>Serendipity</strong>\Veripress\lib\icc\ (For versions 4.0 and above) <br />
Linux/Sun/SGI <br />
~veripress\lib\ICC\ <br />
To restore the database and ICC profiles to an upgraded Veripress <br />
1. First, ensure the Veripress Server and <strong>Serendipity</strong> Client are shutdown. <br />
2. Copy and replace the backed-‐up defaultss.dbd and ICC folders into the relevant locations (see above) for your <br />
install. <br />
3. Start the Server and Client. All previous database items should now appear in the Workbench. <br />
Important Note: Pagesetups imported from <strong>Version</strong> 3 archives will be automatically split into Media and Pagesetup <br />
data types, but remain functionally linked. <strong>Version</strong> 5.3 archives cannot be opened or imported into previous versions of <br />
Veripress. <br />
<strong>Serendipity</strong> <strong>Software</strong> -‐ Veripress User Manual – <strong>Version</strong> <strong>5.3.02</strong> <br />
15
Running the <strong>Software</strong> <br />
Once the software has been installed, launch the Server and Client to begin the configuration. The Server should be <br />
started first and allowed to complete its initialisation process before the Client is launched. If the Client is started first, <br />
it will attempt to connect to an active Server. If none are present, a Connect to Server window will open, waiting for an <br />
active Server to appear on the network. <br />
Important Note: For Mac OS X users only <br />
The Veripress Server and <strong>Serendipity</strong> Client (for Mac OS X) are able to run in either 32-‐bit or 64-‐bit modes. Running <br />
both in 64-‐bit mode is optimal for normal usage however, not all Spectrophotometer manufacturers have converted <br />
their drivers to support 64-‐bit and will be unavailable for use in 64-‐bit mode. <br />
New installations of the Server and Client are always in 32-‐bit mode by default. <br />
Before starting the Server and Client <br />
To switch the Server and Client from 32-‐bit to 64-‐bit mode: <br />
1. Open a Finder window <br />
2. Navigate to the Applications/<strong>Serendipity</strong>/Veripress folder. <br />
3. Highlight the <strong>Serendipity</strong> Client application and select CMD+I or right-‐click and select Get Info from the <br />
menu. <br />
4. Tick the checkbox to disable Open in 32-bit mode <br />
5. Repeat the above steps for the Veripress application. <br />
If the Open in 32-‐bit mode checkbox does not appear in the Get Info window it will <br />
necessary to reset the Mac OS X Finder: <br />
1. Open a Terminal window <br />
2. Type or copy the following command into the screen and hit Enter (with no line breaks): <br />
/System/Library/Frameworks/CoreServices.framework/<strong>Version</strong>s/A/Frameworks/LaunchServices.framework/Versio<br />
ns/A/Support/lsregister -‐domain local -‐domain user -‐domain system -‐kill -‐r <br />
3. The above command will make the Open in 32-‐bit mode option appear in the Get Info window. <br />
4. Go to the Finder window, right-‐click, Get Info and disable this option for Veripress and the <strong>Serendipity</strong> Client. <br />
Starting the Server <br />
1. Plug the dongle into an available USB port. <br />
2. Launch the Server by double clicking the Veripress file in the installation directory, or the shortcut <br />
desktop/dock icon. <br />
The Server window will appear showing information about the Server software and the initialisation <br />
process will commence. <br />
Note: The Server will not initialise if a recognised dongle is not present on the computer from which it is run. If the <br />
dongle is removed at any point while the Server is running, all job processing will cease and the Server will stop shortly <br />
afterwards. Once the dongle is reconnected, close and restart the Server. <br />
<strong>Serendipity</strong> <strong>Software</strong> -‐ Veripress User Manual – <strong>Version</strong> <strong>5.3.02</strong> <br />
16
Starting the Client <br />
Once the Server has completed initialisation the Client application can be opened. <br />
1. Launch the Client by double clicking the <strong>Serendipity</strong> Client file in the install directory, or the <br />
shortcut desktop/dock icon. <br />
The Client will connect to the active Server and display the default monitoring system -‐ Jobs -‐ on screen. From this <br />
point, configuration of the system or loading a pre-‐configured setup can be done. <br />
2. Choose Server Menu > Server Settings (Preferences). <br />
3. Select the Colour Management tab. <br />
4. Click on Change System Specials and select Reference-‐Lab (or your own specials) and click OK. <br />
5. Click OK to dismiss the System Settings window and apply the changes. <br />
Manual Client Configuration <br />
This section will explain how to setup a basic configuration in order to process and output a file for proofing and <br />
monitor the job throughout the process. For detailed information on specific modules mentioned, see the relevant <br />
sections of the user manual. <br />
The default monitoring application – Jobs – opens with a factory standard layout, including the QueueManager, <br />
Thumbnail and QueueStatus modules. System queues (Image, Render, Spool and AutoDetect) will be displayed in the <br />
QueueManager. <br />
There are four (4) sections that need configuring in order to process jobs. These are (in no particular order): <br />
• A RIP where the jobs are polled; <br />
• A Pagesetup and Media where jobs are processed; and <br />
• An Output where the <strong>Serendipity</strong> Blackmagic Image or Remote Proof file is sent. <br />
Note: Before a Pagesetup can be created first create a Media and an Output, as each Pagesetup must be linked to a valid <br />
one of each. <br />
To begin configuration: <br />
1. Select Application menu > Workbench. <br />
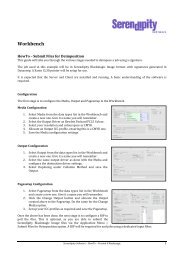
Output Configuration <br />
2. Select Output from the data types list on the left and create a <br />
new Output by selecting File menu > New. <br />
3. The Output name “Untitled” will appear in the items list, <br />
highlighted for renaming. This is the name of the Output that <br />
will appear in the Pagesetup. Rename and select the item. <br />
4. In the Queue panel of the gray configuration area, select the <br />
appropriate driver for use from the list of licensed drivers. <br />
5. In the Destination panel, select a destination driver (i.e., the <br />
connection method) for output of jobs and enter the <br />
appropriate information, for example, a local folder destination. <br />
6. Configure any collating or nesting requirements as needed. See <br />
the Workbench > Output section of this manual for further <br />
details on this option. <br />
7. OPTIONAL – After a Media is created, it can be assigned to the <br />
Output via the Change Media button. See the Media section of <br />
this manual for further information on Media functions. <br />
8. Save the Output configuration when completed by selecting File menu > Save. <br />
<strong>Serendipity</strong> <strong>Software</strong> -‐ Veripress User Manual – <strong>Version</strong> <strong>5.3.02</strong> <br />
17
Media Configuration <br />
1. Select Media from the data types list on the left and create a <br />
new Media by selecting File menu > New. <br />
2. The name “Untitled” will appear in the item list, highlighted for <br />
renaming. This is the name of the Media that will appear in the <br />
Output and Pagesetup. Rename and select the item. <br />
3. In the Output panel of the gray configuration area, select the <br />
appropriate driver from the dropdown list of licensed drivers. <br />
This should be the same driver as was selected in the Output <br />
configuration (<strong>Serendipity</strong> Blackmagic Image or <strong>Serendipity</strong> <br />
Remote Proof). <br />
4. Configure the resolution, colourspace and any custom settings <br />
required. <br />
5. Set the Output ICC profile to your Press ICC profile. <br />
6. Save the Media configuration when complete by selecting File <br />
menu > Save. <br />
Note: This Media configuration is the minimal setup required to get your proofing workflow functioning. For proofing <br />
work, the Media will need to be correctly calibrated. For a complete HowTo guide for configuring a calibrated <br />
Pagesetup/Media/Output, refer to the Support section of the <strong>Serendipity</strong> <strong>Software</strong> website. <br />
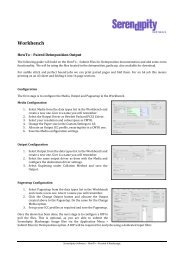
Pagesetup Configuration <br />
1. Select Pagesetup from the data types list and create a new Pagesetup by selecting File menu > New. <br />
2. The name “Untitled” will appear in the item list, highlighted for renaming. <br />
3. Rename and press Enter. Select the item. <br />
4. Assign the Output created earlier to the Pagesetup via the <br />
Change Media button. Select the Media in the popup window <br />
that appears and click OK. Jobs will be processed using this <br />
Media unless another is selected when submitting a job. <br />
5. Apply any Colour Correction curves if required by selecting the <br />
appropriate curve button in the Colour Correction panel. See the <br />
Workbench > Pagesetup section of this manual for further <br />
details. <br />
6. Select the input ICC profiles for RGB and Press <br />
(CMYK/Multicolour) respectively by clicking the RGB ICC Profile <br />
and Choose ICC Profile buttons in the ICC Profiles panel. <br />
7. Use the dropdown menus below each ICC profile to select the <br />
Rendering Intent to be used for each assigned ICC profile. <br />
Note: Veripress’ colour management system will match the proofer output to these assigned profiles once the Media <br />
has been correctly calibrated, press (correction) curves have been assigned and the Always Use ICC option in the ICC <br />
Profiles panel has been ticked. At this stage however, the assigned ICC profiles serve to inform the colour management <br />
system which colourspace to use when processing jobs. <br />
8. Configure any other sheet, effects, margins etc, as required in the other panels of the Pagesetup. See the <br />
Workbench > Pagesetup section of this manual for further details on the options available. <br />
9. Save the Pagesetup configuration when complete by selecting File menu > Save. <br />
<strong>Serendipity</strong> <strong>Software</strong> -‐ Veripress User Manual – <strong>Version</strong> <strong>5.3.02</strong> <br />
18
RIP Configuration <br />
If your Veripress install requires proofing RIP data, a RIP setup will need to be configured to poll the RIP jobs for <br />
processing. <br />
1. Select RIP from the data types list in the Workbench and create a new <br />
RIP by selecting File menu > New. <br />
2. A warning message will appear. Dismiss the message. <br />
3. The RIP name “Untitled” will appear in the item list, highlighted for <br />
renaming. Rename and select the item. <br />
4. In the Driver panel of the gray configuration area, select the appropriate <br />
RIP driver for the CTP RIP input from the dropdown list of licensed <br />
drivers. <br />
5. Configure the RIP driver options by enabling checkbox options and/or <br />
choosing Custom Settings by clicking the Edit button. <br />
6. Tick the Enable Polling checkbox in the Polling panel and enter a poll interval time, for example, 2 minutes. <br />
Note: Some RIP drivers and polling methods require the use of a Job Genie in order for the Veripress RIP setup to <br />
recognise incoming RIPped files. See the Workbench > Job Genie section of this manual for further details. Also, refer to <br />
the Support section of the <strong>Serendipity</strong> <strong>Software</strong> website for tutorials on creating your own customised Job Genies. <br />
7. Choose the method the RIP setup will use to connect to the RIP output folder from the dropdown menu in the <br />
Polling panel, for example, Localhost. Enter any Hostname/IP details if required. <br />
8. Enter the file path to the RIP folder in the Paths panel. To enter a path, click the New button below the panel. <br />
Click Browse on the popup window and navigate to the RIP folder to be polled. Click OK to save the path. <br />
9. If required, setup Stripe Paths. <br />
10. Click the Test button at the bottom of the Testing panel to Save and Test the RIP setup. The Testing panel will <br />
show a Polling OK result to confirm the RIP path is valid. Alternate messages will notify you if the RIP path is <br />
invalid, or if no RIPped files currently exist in the selected folder. <br />
This completes the basic configuration of Veripress. For information on how to see polled RIP jobs and submit them for <br />
proofing, see the Modules > RIP Monitor and <strong>Serendipity</strong> Client Menu Items > Submit Menu sections of this manual. <br />
Monitoring Jobs – Configuration <br />
Once the base configuration is complete for the Media, Output, Pagesetup and (optional) RIP, a monitoring application <br />
needs to be configured so jobs can be managed throughout the system. <br />
There are two (2) types available – the Jobs (default)or the Monitor application. <br />
Jobs <br />
This is the default application, launched when the Client is started for the <br />
first time. <br />
The Jobs application has a pre-‐configured set of tabs available for <br />
monitoring various processing throughout the entire workflow. The <br />
default tab layout includes the QueueManager, Thumbnail and <br />
QueueStatus modules. See the “Jobs” application section within this manual <br />
for further information. <br />
Any Outputs created in the earlier configuration will automatically appear <br />
in the QueueManager module. <br />
<strong>Serendipity</strong> <strong>Software</strong> -‐ Veripress User Manual – <strong>Version</strong> <strong>5.3.02</strong> <br />
19
The RIP Monitor will need to be added as a tab in order to poll jobs: <br />
1. In the Jobs application, select the Tabs menu > Add Tabs option. <br />
2. A window will appear with various factory default layouts available for use in the Jobs application. <br />
3. Select the RIP Monitor tab layout from the list. An example screen will appear to the right. <br />
4. Click Add. The RIP Monitor tab will appear in the Jobs window. <br />
5. Available RIP queues can be polled by selecting them from the dropdown list and clicking the Poll button three <br />
(3) times consecutively. <br />
6. Jobs appearing may now be submitted for processing. <br />
Additional pre-‐configured Tabs may be added to the Jobs application as required. See the “Jobs” application section of <br />
this manual for further information. <br />
Monitor <br />
The Monitor performs the same workflow monitoring functions as the Jobs application and was the default application <br />
for this purpose in previous versions of Veripress, before the Jobs application was introduced. Monitor allows the user <br />
to customise the size and layout of tabs and job management modules. <br />
1. Select Application menu > Monitor to open a Monitor window. The <br />
default view will include a Queues tab and a Logs tab. <br />
a. The Queues tab contains the QueueManager, Thumbnail <br />
and QueueStatus modules. <br />
b. The Logs tab contains the ClientLog and ServerLog <br />
modules. <br />
If you would prefer to have any new output queues automatically added to <br />
the QueueManager for future use, enable the Auto Queue Order checkbox <br />
via the Toolbar (spanner icon). <br />
A RIP Monitor tab will need to be added to the Monitor in order to poll jobs: <br />
1. Select Tab menu > New Tab to create a new tab for the RIP Monitor. <br />
2. Rename the tab to RIP Queues or similar to differentiate it from the other <br />
tabs. <br />
3. Select Layout > Add RIPMonitor. A module window will appear for the <br />
RIPMonitor. <br />
4. The window may be resized and positioned by selecting Layout > Edit. <br />
Select the window corner and resize it by dragging the mouse. Select <br />
Layout > Use when done. <br />
5. Click the spanner icon to expand the Toolbar. <br />
6. If no jobs appear in the RIP Queue, click the Poll button three (3) times <br />
consecutively. <br />
7. Jobs appearing may now be submitted for processing. <br />
Additional Tabs and Modules may be added to the Monitor as required. See the Monitor section of this manual for <br />
further information. <br />
<strong>Serendipity</strong> <strong>Software</strong> -‐ Veripress User Manual – <strong>Version</strong> <strong>5.3.02</strong> <br />
20
The Veripress Server <br />
The Veripress Server runs on the machine where the dongle is installed. The Server handles the processing of all jobs <br />
through the system and must be started before the Client is launched. <br />
As the Server starts, it checks to ensure a valid dongle is installed on the machine and which modules are enabled <br />
(licensed). The Server calculates the speed of the machine it is running on and checks the integrity of the database <br />
before loading it. <br />
Once the Server is up and running, a clock keeps track of the <br />
duration the Server is operational. <br />
Server Options <br />
The window below displays the Server information and various <br />
options once it is running. <br />
Veripress Menu Options <br />
• About – Shows information about the Server. Clicking <br />
More/Less Info shows or hides valid dongle options, <br />
including the versions of the current drivers. <br />
• Quit – Quit the Server application. <br />
File Menu Options <br />
• Stop Server – Stops the Server from running without quitting Veripress. <br />
• Start Server – Starts the Server if it is in a stopped state. <br />
• Restart Server – Restarts the Server. <br />
• Update Dongle – Allows users/administrators to update the dongle with activation codes to enable various <br />
input/output licenses or software versions. See the Dongle Updater section for further information. <br />
• Close – Closes the window. If the Server is running you are warned and asked to confirm Server shutdown. <br />
Startup Options <br />
• Start Server on Launch – The Server will start once the application is launched. <br />
• Restart Server on Crash – Restarts the Server automatically after a crash. <br />
• Start as Cluster Node – Starts the Server as a Cluster Node to be used by another Veripress Server for imaging <br />
and rendering tasks. <br />
Important: Do not use this option before reading further information in the Applications > Clustering section <br />
of this manual. <br />
• Start in Safe Mode – This option starts the Server but ceases all job processing and RIP polling tasks. Safe Mode <br />
is used for maintenance in the event a RIP queue, Pagesetup or other database item is corrupted, or is <br />
functioning incorrectly. Once maintenance is complete, the Server will need to be restarted in normal mode. <br />
Help Menu <br />
• Update Options – Configure a time for Veripress to periodically check for software updates. <br />
• Check for Updates – Choose this to immediately check for any software updates. <br />
• Install Local Updates – Allows users to manually update the <strong>Serendipity</strong> software package by downloading <br />
(.pax) package files. <br />
For further information on the automatic software update functions, see the <strong>Serendipity</strong> Updater section of this <br />
manual. <br />
<strong>Serendipity</strong> <strong>Software</strong> -‐ Veripress User Manual – <strong>Version</strong> <strong>5.3.02</strong> <br />
21
The <strong>Serendipity</strong> Updater <br />
The <strong>Serendipity</strong> Updater provides a simple and convenient way of updating Veripress and standalone <strong>Serendipity</strong> <br />
Clients. <br />
The Updater tracks your current software installation status and <br />
automatically checks for available software updates, bug fixes, <br />
maintenance patches and new drivers. <br />
New updates are listed along with release notes, previously installed <br />
updates are logged in the Updater, and notes can be viewed at any time. <br />
Note: The <strong>Serendipity</strong> Updater requires access to the internet to <br />
function. Updates are not downloaded or installed until initiated by the <br />
user, as the Server and/or Client are shutdown as part of the update <br />
process. <br />
The following update functions are available in the Help menu of the <br />
Veripress Server application and/or the Help menu of the standalone <br />
<strong>Serendipity</strong> Client: <br />
• Update Options – Configure a time for Veripress to periodically <br />
check for software updates. <br />
o Never – The software will not check for updates. <br />
o When (Time/Day) – Configure a time and day to <br />
automatically check for any software updates. <br />
Notify when updates are available – A message will appear onscreen when updates are <br />
available to install. <br />
• Check for Updates – Choose this to immediately check for any software updates. <br />
When configuring a time/day for checking for updates via the standalone Client Help menu, a restart of the Server is <br />
required for any changes to take effect. <br />
Note: The <strong>Serendipity</strong> Client installed on the Veripress Server machine is updated as part of Server updates and does <br />
not gain access to the “Check for Updates” Help menu option. If Secure Mode is active, users can be configured to <br />
receive an email when software updates are available. See the Accounts Admin section of this manual for further <br />
information on email configuration. <br />
<strong>Serendipity</strong> <strong>Software</strong> -‐ Veripress User Manual – <strong>Version</strong> <strong>5.3.02</strong> <br />
22
The Veripress Dongle Updater <br />
The Veripress dongle licenses the level (version) of software and enables the use of any input filters (RIPs) that have <br />
been purchased. If any additional licenses are activated, the relevant dongle will require updating with the new codes in <br />
order to access them. <br />
The Dongle Updater is a built-‐in feature, accessed via the Server File Menu > <br />
Update Dongle option. <br />
To avoid any abuse of the software, the dongle activation codes can only be <br />
used once. Any updating should be completed by your relevant Server <br />
administrator. <br />
Important Note: Before updating any dongles, please ensure your Server is <br />
in Stop mode. <br />
Updating the Dongle <br />
Before updating the dongle, an email must have been received with the new codes. This will either be sent from <br />
<strong>Serendipity</strong> <strong>Software</strong> directly, or via a Dealer of the product. <br />
Two (2) codes are required for entry in order to update the dongle, referred to as Key Code 1 and Key Code 2. <br />
The codes are located in the “Dongle reprogram string” field in the email and are separated by a space. <br />
The first, long string is Key Code 1. The second, shorter string is Key Code 2. <br />
To update the dongle: <br />
1. Plug the current USB dongle into the computer and run the Server application. <br />
2. Select the Server File menu > Update Dongle. The Server will stop. If there are any Clients open, a Connect to <br />
Server window and/or disconnection message may appear. <br />
3. A window will open for the Dongle Updater. <br />
4. Enter Key Codes 1 and 2 into the relevant fields. It is best practice to copy and paste the codes to avoid any <br />
keying errors. DO NOT copy the space between the codes. <br />
5. Once the codes have been entered correctly, the Update Dongle button will enable. Click it. <br />
6. A confirmation message will appear after the dongle has been successfully updated and a Server restart is <br />
required. <br />
7. Quit the Server application and restart. The dongle is now updated and any new filters or drivers will appear in <br />
the Client for use. <br />
<strong>Serendipity</strong> <strong>Software</strong> -‐ Veripress User Manual – <strong>Version</strong> <strong>5.3.02</strong> <br />
23
The <strong>Serendipity</strong> Client <br />
The <strong>Serendipity</strong> Client is a graphic user interface (GUI) used for configuration, maintenance and monitoring of the <br />
Veripress Server. <br />
The Client can be installed and run locally on the same machine, or from any supported computer on the network using <br />
TCP/IP protocol. There is no limit to the number of Clients that can be connected to the Server, and each Client will <br />
have its own settings, specific to the user. <br />
Once installed, the Client connects to a Veripress Server. Any Client can access the job management information and <br />
view the current status. The configuration can be open to all users or protected via Secure Mode, which allocates <br />
specific access for created users and user groups. For more information on how to setup access see the Secure Mode <br />
section of the manual. <br />
Look and Feel <br />
There is a common theme and functionality to the Client. There are many ways to complete the same task, such as <br />
configuring a Pagesetup from the QueueManager. Various options are available using the right mouse click to bring up <br />
other contextual menus. This will vary depending upon the section of the Client interface being used. <br />
Anywhere there is a chooser to select an item from the database, a search field will be indicated by a magnifying glass. <br />
Entering text in the search fields filters the list, showing only the matching items. <br />
The search can be inverted with CMD+SHIFT+I (Mac) or CTRL+SHIFT+I (Win) to <br />
hide the matching items. The search box will turn black to indicate inverse <br />
searching. Pressing ESC will dismiss the search. <br />
There are two (2) main sections to the Client – The Workbench and the Jobs application. <br />
• The Workbench is used to configure the various parts of the Server. This is used to create queues, setup input <br />
paths and various calibration functions. <br />
• Jobs (an application) is used for managing and viewing jobs as they pass through the system. <br />
The Applications and Modules add functionality and provide tools for managing the Server and the jobs passing <br />
through it. There are also various menu options containing system utilities and preferences. <br />
Workbench <br />
The Workbench is where the main software configuration takes place. RIPs, Medias, Pagesetups, Output paths, Colour <br />
Sets and Colour Correction Curves can all be setup here. <br />
When items are created or changed in the Workbench they are saved to <br />
a database read by the Server each time at startup. The database can be <br />
backed-‐up and copied to other (<strong>Version</strong> 5.3) Servers. <br />
The Workbench is a split window. The Data Types list the database item <br />
categories that can be selected for creation or editing. The items list <br />
show the available database items within each Data Type. The gray area <br />
shows the settings and options for each item. <br />
The Data Types section has two (2) views – Browse & Search. <br />
Browse allows the user to view and select any of the database items for display. The tab containing the magnifying glass <br />
flips to a Search window, which acts like a filter, showing any items containing the search text. <br />
<strong>Serendipity</strong> <strong>Software</strong> -‐ Veripress User Manual – <strong>Version</strong> <strong>5.3.02</strong> <br />
24
Menu Options <br />
Application <br />
• Access all available Applications via this menu. Each application will open in its own separate window. <br />
• System Settings (Windows OS) – Access the System Settings (Preferences) for the <strong>Serendipity</strong> Client. This <br />
option is available under the <strong>Serendipity</strong> Client menu for Mac OS X users. <br />
• Quit (Windows OS) – Quits the <strong>Serendipity</strong> Client application. This option is available under the <strong>Serendipity</strong> <br />
Client menu for Mac OS X users. <br />
Submit <br />
• Files – Select files to send to a Media and Pagesetup for processing. <br />
• Files for Deimposition – Submit files directly for de-‐imposition, assigning the files to one or more imposition <br />
signatures. <br />
• Files As Imposition – Submit files directly as an imposition, assigning the files to one or more imposition <br />
signatures. This option is only available for Veripress/Blackmagic Softproofing Add-‐On and allows jobs to be <br />
de-‐imposed on the fly (see Touch Console for details). <br />
• ICC Target – Submit an ICC Target to a selected Media and Pagesetup. <br />
• ICC Target without Colour correction – Submit an ICC Target to a selected Media and Pagesetup. All ICC options <br />
and colour correction curves are disabled. <br />
• Test Prints – Select one or more Media and Pagesetups to send internal test prints for processing. <br />
File <br />
• New – Create a new item in the database. <br />
• Save – Save changes to the database. <br />
• Duplicate – Make a copy of the currently selected item. <br />
• Revert – Reload the last saved version of the currently selected item. <br />
• Delete – Delete the currently selected item. <br />
• Print – Print the details of the currently selected item. <br />
• Get Info – Displays a popup window with two panels – General & Ownership. General displays the type, created <br />
and modified dates for the selected item. Ownership displays the User and User Group permissions for the <br />
item. <br />
• Show Orphans – Shows any item currently in the database not being used by a Pagesetup or RIP. <br />
• Add to Archive – Add the selected items into a new Archive window. See the Archives section for further <br />
information. <br />
• Export as C5 Pack – Allows users to export Media files from the Workbench to a specified location for use with <br />
the C5 application (Generally used with Blackmagic & Megarip products). <br />
• Export / Import Folders – Allows users to export or import the folder structure used within the workbench. It <br />
will not import or export the contents. <br />
Edit <br />
• Undo – Undo the last change. There are multiple undo options and this is configured via the Client Settings <br />
section. <br />
• Redo – Redo the last undone change. There are multiple redo options, depending on the undo status and <br />
configuration in the Client Settings. <br />
• Find – Opens a text box at the bottom of the Workbench panel to locate the search text on the screen. <br />
View <br />
• Split Vertical/Horizontal – Changes the view to either Vertical or Horizontal split on the screen. <br />
• Show Type Column – Used in conjunction with Show Usage to display the type of data listed. <br />
• Show Modified Time Column – Displays the last modified time for the items listed. <br />
• Show Usage – Displays the items within the database the currently selected item uses, e.g., a selected Pagesetup <br />
would show the Media and Output it currently uses. <br />
• Reverse Usage – Reverses the usage shown above. (Was called Show Referrers previously). <br />
• Organise Data Types – When enabled, this option will organise the Data Types in the Workbench list into <br />
related categories. This is the default view. <br />
Modules <br />
• Access all available Modules via this menu. A floating window will open for each separate module opened. <br />
Server <br />
• Server Settings – Access the System Settings or Preferences for the Veripress Server. <br />
• Connect to Server – Select a Veripress Server to connect to on the available network. <br />
<strong>Serendipity</strong> <strong>Software</strong> -‐ Veripress User Manual – <strong>Version</strong> <strong>5.3.02</strong> <br />
25
• Resume/Pause Processing – Allows users to pause or resume all job processing and Output queues. Queues <br />
will pause after completion of the current task. <br />
• Accounts Admin – Allows an authorised administrator to create, modify and manage user accounts and groups. <br />
• Chatterbox – Chat to other users connected to the same Server with this option. The Chatterbox window will <br />
display the Client’s connected to the Server. A nickname may be entered in the Client Settings, otherwise the <br />
machine name is used. If the user’s name cannot be selected, the user has selected the Away option and is not <br />
available. <br />
• Broadcast Message – This allows messages to be sent to all users connected with a Client to the same Server. <br />
Selecting the Broadcast option displays a message window to type into and send. The message is displayed on <br />
the users window for a short time and will automatically dismiss if it is not acknowledged by clicking OK. <br />
• Download PPD – Download the Megarip PPD from the Server to the desired location. This saves having to get <br />
the PPD from the disk. Use the PPD when installing a local printer. When installed, the Megarip PPD (Postscript <br />
Printer Description) is selected as the printer driver when setting up a Published Pagesetup as a print (output) <br />
destination for third party applications. <br />
Window <br />
• Bring All to Front – Shows any open window of the Client and can be selected to bring it to the front. <br />
• Cycle Through Windows (CMD+` or CTRL+`) – Cycles through the open windows within the Client. <br />
Help <br />
• Server Info – Provides information about the Server, including version, platform, speed, processors, hostname, <br />
IP, product and vendor. <br />
• What’s This – Select this and click on any part of the interface to display a short help description. <br />
Contextual Menu (Right Click) <br />
In addition to selected File menu options listed above, the following options are available via the contextual (right-click)<br />
menu: <br />
• New Folder – Folders are a great way to organise the data types list items. Folders are Client based, meaning <br />
each user can have their own folders if desired. <br />
• New Folder with Selection – Places any selected items into a new folder. <br />
• Remove Folder – Removes the selected folder, placing items within the folder back in to the general item list. <br />
• Open/Close Selected Folders – Expand or collapse the selected folders to show or hide the items within. <br />
Note: Folders in the items list are internal to the <strong>Serendipity</strong> Client, used to organise database items. They are not <br />
operating system file folders. <br />
<strong>Serendipity</strong> <strong>Software</strong> -‐ Veripress User Manual – <strong>Version</strong> <strong>5.3.02</strong> <br />
26
Workbench Data Types <br />
There are sixteen (16) data types (databases) within the Workbench that can be used and configured to accurately <br />
process jobs. Each will be explained in detail. The data types are: <br />
• Bookfilter – Allows for the polling and mapping of planning files for softproofing large multi-‐section or multi-edition<br />
jobs. This is a standard feature for Veripress and available as a Softproofing Add-‐on for Blackmagic. <br />
• Calcheck Chart – Used to provide a validation check for a hardcopy proof or a monitor. <br />
• Camera – Setup a camera ICC profile for use with the SoftProof application when viewing RGB images. <br />
• DotGain Curve – Used to compensate for or represent dot gain on the final output. <br />
• Gradation Curve – Used to adjust colour in a job by applying a curve to the individual process colours. <br />
• ICC Tweak Set – Build up a library of colours that need “tweaking” for accurate output. <br />
• Job Genie – A programmable file search filter used by some RIP input filters for polling and stitching together <br />
jobs and publications. <br />
• Media – Used to control configuration settings for Output, Colour Correction, ICC profiles and Output <br />
Screening. <br />
• Output – Determines where processed jobs are to be output. <br />
• Pagesetup – Consists of modules to be configured to process and manipulate jobs for the desired output. <br />
• Press – Contains the colour and dotgain attributes of a press. Used by the SoftProof application to show the <br />
effects of printing a job on a particular press. <br />
• Regular Expression – Used in conjunction with the RIPs for autoproofing jobs based on matching particular <br />
rule sets. <br />
• Replace Colour Set – Used to match and replace certain colours as they pass through the system. <br />
• RIP – Configure a polling path and auto proof settings for RIP data proofing. <br />
• Signature Group – Create or import signatures for de-‐imposition. <br />
• Special Colour Set – Used to identify and match colours when jobs are polled and processed. <br />
Data Types - User Interface and Context Menu <br />
The Bookfilter, Media, Output, Pagesetup, Pagesetup Pools, Press, RIP and Signature Data Types have multiple <br />
configuration panels or sections governing the different functions they control. <br />
These data types have a row of buttons or tiles across the top of their configuration panels allowing the user to <br />
instantly jump to the section named. If any of the panels are not required, they can be hidden by using the “X” in the top <br />
right corner of each. To show any hidden panels, click on the panel name in the row and it will appear. Shift+click will <br />
hide them again. <br />
A contextual (right-‐click) menu is accessible in any of these individual sections, allowing the user to access the Find <br />
function, Jump to another section, or change the background colour of the panel for easy identification. <br />
<strong>Serendipity</strong> <strong>Software</strong> -‐ Veripress User Manual – <strong>Version</strong> <strong>5.3.02</strong> <br />
27
Bookfilter <br />
The Bookfilter is used to setup an appropriate driver to read planning files to put finished publications <br />
together, greatly improving the speed, efficiency and automation of softproofing in publishing press environments. <br />
Bookfilter works similarly to a Job Genie based RIP queue in Veripress, but rather <br />
than polling for RIP jobs, it polls for publication planning files. Publications in the <br />
planning files are then displayed in the BookMonitor and may be selected for <br />
softproofing. <br />
Publications displayed in the BookMonitor can be expanded to show a list of <br />
pages and filenames associated with each page as defined by the planning file. <br />
The Bookfilter maps the page filenames to processed jobs in the QueueManager. <br />
When the publication is selected for softproofing, the Bookfilter searches the <br />
QueueManager for matching jobnames and collects them into a single <br />
publication. Any missing pages will appear as red in the page navigator. <br />
Configuration Options <br />
Driver <br />
• Book Driver – Select the appropriate driver for the planning file format <br />
used. <br />
Polling <br />
• Enable polling – Enable or disable the polling of planning files. <br />
• Language Encoding – Set the encoding to match your system to display filenames correctly. <br />
• Poll Interval – Configure how frequently to poll the files. Setting the Poll Interval too short can flood the <br />
network with polling requests (packets) causing it to slow down. Setting it too long can take a long time to <br />
show stable files ready for submission. <br />
• Fast Polling -‐ This will automatically poll two (2) more times as soon as one (1) automatic poll has completed. <br />
It will not wait for the next scheduled Poll Interval before it polls again. <br />
• Log Statistics -‐ Log the polling statistics in the Server log. The log message reports “Started automatic poll on <br />
” when polling starts and “Completed automatic poll on ” when finished. <br />
• Show Books Newer Than – When activated, this option sets the Bookfilter to display only polled publication <br />
planning files with time signatures newer than the specified (days/hours/min) time in the BookMonitor. <br />
Note: Older planning files are hidden from view, not deleted. <br />
• Job Genie – Select a Job Genie to apply if required. A Job Genie may be used optionally to remap the Publication <br />
and/or Jobnames in the polled planning file. <br />
• Connection – Specify the method used for polling. The options are: <br />
o Agent – The <strong>Serendipity</strong> Agent is installed on the RIP where the files are located. This is used for <br />
polling and submission of the files into Veripress. <br />
o Hostname/IP – Enter the hostname or IP address of the computer where the files are located and <br />
where the Agent is running. <br />
o Localhost – This is used when the files appear locally to Veripress. This can be on its own disk or via a <br />
mounted volume through NFS or mapped drive with NetBIOS. <br />
o FTP – Uses File Transfer Protocol (FTP) to poll and transfer the files to Veripress. <br />
o Secure FTP (SFTP) – Uses Secure File Transfer Protocol to poll and transfer the files to Veripress. <br />
• File Transfer Priority – Specify the priority to be used for transferring files to Veripress. Adjust from Lowest to <br />
Highest or anywhere in between. <br />
Paths <br />
Specify the paths to the files residing on the RIP. The options available are: <br />
• New – Adds a new path to the Paths field. Selecting this displays another window to type the path or browse to <br />
locate the folder containing the jobs. Browse will only work if the connection method has been specified and is <br />
valid. <br />
• Delete – Deletes the selected paths. <br />
• Delete All – Deletes all paths from the list. <br />
Testing <br />
Once the configuration is complete, test the parameters are correct. The configuration must be saved before a test can <br />
be done. If it is not saved, a prompt will appear to save and test. A test poll checks the connection, path validity and job <br />
presence. Messages appear in the window to alert you to any problems or give confirmation of a valid configuration. <br />
<strong>Serendipity</strong> <strong>Software</strong> -‐ Veripress User Manual – <strong>Version</strong> <strong>5.3.02</strong> <br />
28
Calcheck Chart <br />
The Calcheck Chart data type is where charts are configured and stored for use in colour validation checks. <br />
The charts are comprised of user-‐created or imported colour patches, along with target standards and tolerances. <br />
These items are saved to the database and can be used and/or adjusted at any time. The Calcheck Chart is then assigned <br />
to a Press and used in conjunction with the Displays <br />
application to provide a validation check for a softproofing <br />
monitor. <br />
Once the chart is setup, it normally requires no further <br />
changes; the standards to be used are saved with the chart. <br />
The window shows a list of the patches on the right and <br />
colour information on the left. For each patch selected its Lab <br />
values, delta tolerance and patch type can be adjusted. The <br />
overall target preferences are specified in the lower half of <br />
the left panel. <br />
Toolbar Options <br />
• New Colour – Create a new colour in the list with <br />
default* values. Values and colour names can be adjusted as desired. <br />
• Delete Colours – Deletes the selected colours from the list. <br />
• Duplicate Colours – Makes copies of the selected colours. Use shift or control keys for multi-‐selection. <br />
• Rename Colours – Pops up a renaming window, allowing for name changes on one or more colours <br />
simultaneously. <br />
• Import Patches from Files* -‐ Import a patch set from a colour data file, such as those of colour standards or ICC <br />
profile makers. <br />
• Reorder Patches – Reorder the patches. Selecting this will display another window to select one or more <br />
colours and drag them into a new order. Use the up and down arrow keys and shift or control to multi-‐select. <br />
• Generate Patches from ICC – Select an ICC profile from which to create a set of patches. Selecting this option <br />
displays a file chooser to select an ICC profile. A prompt will appear for the number of patches to generate. The <br />
minimum number is 16 and maximum is 512. <br />
• Add Colours From Library – Add colours to the currently selected Calcheck Chart from a Special Colour Set. <br />
*Note: When creating or importing new colours, they are stored with the default tolerance settings. This is user <br />
configurable and should be set before the patch set is created. <br />
Patch Definition <br />
On the left are a series of controls used to define each patch. Selecting a patch from the list <br />
will load the colour into the colour match box at the top and load the Lab/CMYK values into <br />
the respective fields. To change the value, simply type the new number into the relevant <br />
field. <br />
• Lab (or CMYK) – The Lab (or CMYK) value for the selected colour. <br />
• e tolerance – Set the maximum e value for the selected colour. <br />
• H tolerance – Set the maximum H value for the selected colour. <br />
• C tolerance – Set the maximum C value for the selected colour. <br />
• Patch Type – Identify important patch types from the set. The options are: <br />
o Paper – Select the patch that represents the paper being checked. <br />
o Cyan/Magenta/Yellow/Black – Identify a patch for each colour from your set. <br />
o<br />
o<br />
Gray – Used to identify gray patches in the chart. <br />
Generic – Most patches are generic and are classified as generic if they don’t fall into one of the above <br />
types. <br />
Note: When generating patches from an ICC profile, the patches are automatically assigned the correct type. <br />
<strong>Serendipity</strong> <strong>Software</strong> -‐ Veripress User Manual – <strong>Version</strong> <strong>5.3.02</strong> <br />
29
Target Standards <br />
There are three (3) standards that can be used to compare against a proof. <br />
These are e, H and C. <br />
The first standard e is always enabled. The other two standards must be enabled for the results to appear on the <br />
Calcheck. To enable, select the tab and tick the Target checkbox. <br />
For each standard, specify the limits used for a pass and fail status. For e, also choose which of the e standards are to <br />
be used – deltaE, CIE94 or CIE2000. Note: A e standard of CIE2000 is generally recommended when validating <br />
monitors. <br />
Important Note: The correct standard to be tested must be selected and saved with the chart. Only that standard will <br />
be tested for a pass or fail. If you want to check another standard, change it here and save it again. For example, if you <br />
are checking deltaE and you want CIE2000, you will need to change it, save and re-‐measure. <br />
The limits are: <br />
• Average – For all the patches in the chart that will be measured by Calcheck, the average must be below this <br />
value for a pass. <br />
• Maximum – This is the default value used when creating or importing patches. This value is only used for <br />
assigning maximum tolerance for the import. When the target is measured, the tolerance set per patch is the <br />
one used to determine a pass or fail status. <br />
• Standard (Std) Deviation – The standard deviation across all the patches must not exceed this value. <br />
The Calcheck will only report a pass if all of the measured patches in the target chart are within tolerance. <br />
• Patches Per Strip – Specify how many patches are printed per line, allowing the use of existing target standards <br />
such as the Fogra Media Wedge. <br />
Spectrophotometer <br />
Use one of the supported online instruments to measure colours directly into the Calcheck Chart. <br />
To measure colours: <br />
1. Select an instrument from the dropdown menu and click on Activate. The device must be connected and turned <br />
on. <br />
2. Follow the on-‐screen instructions, as some devices require calibration before measuring. <br />
3. When complete, click the Turn Off button. <br />
4. If the Lab text option is chosen, you will be prompted to choose a file to import. The format must be Lab values, <br />
space or tab delimited and no header information. <br />
Note: If importing characterisation data from one of the ICC profile packages or colour standards, use the Import <br />
Patches From Files option. <br />
Patches <br />
This section of the Calcheck Chart window displays the patches in the <br />
set. Each patch shows its respective colour, name and Lab values. <br />
There is also a patch type and the tolerances for each standard. The <br />
tolerances are assigned when the patches are created or imported and <br />
are based on the settings on the left. <br />
A tolerance setting can be altered by selecting the colour and entering a new value in the relevant box. <br />
The Chart type can be altered via the dropdown menu above the patches and <br />
a Press ICC Profile will appear if allocated. The Press ICC Profile button only <br />
becomes available for CMYK chart types. <br />
Search <br />
Above the patches list is a search box. Enter a string to filter out any patches not required and locate those that are. All <br />
fields within the panel are searched. The search can be inverted using CMD+SHIFT+I (Mac) or CTRL+SHIFT+I (Win). <br />
The box will appear black when the inverted search is enabled. <br />
<strong>Serendipity</strong> <strong>Software</strong> -‐ Veripress User Manual – <strong>Version</strong> <strong>5.3.02</strong> <br />
30
Camera <br />
The Camera data type is used to define an RGB (or Camera) ICC profile colourspace for use when viewing RGB <br />
images in the SoftProof application. Users can configure whether the default Camera profile or image embedded ICC <br />
profile is automatically selected and applied to an RGB image when opened in SoftProof. See Applications > SoftProof > <br />
SoftProof Settings for further details. <br />
Colour Management <br />
• Camera ICC Profile – Select the ICC profile to assign. <br />
• Rendering Intent – Select the rendering intent to be used. <br />
• Black Point Compensation – Enable/Disable Black Point <br />
Compensation. <br />
• Calcheck Chart – Assign a Calcheck Chart for Camera colour verification checks using the Displays application. <br />
DotGain Curve <br />
A DotGain Curve can be used to compensate for or represent dot gain on the final output. In this section, <br />
curves can be created for application to a Pagesetup in order to change the output. <br />
The curve may be applied for two (2) reasons: <br />
• After the initial calibration you may find that the resultant output is either slightly <br />
too dark or slightly too light. A DotGain Curve can be applied to the process or <br />
specials (or both) to make the print lighter or darker; or <br />
• To represent a press or printing process dot gain on the proof. <br />
Toolbar Options <br />
• Trace Saved Curve – A green line appears, showing where the curve was last saved <br />
to see where the curve has been edited. <br />
• Invert Curve – Invert the selected curve. An inverted curve can be used to compensate for the colour <br />
characterisation or platesetter dotgain curves output by a platesetter RIP, returning jobs to a linear state for <br />
proofing. <br />
• Dotgain Table – Enter values manually to adjust or create a curve. <br />
• Import from CSV – Import values from a CSV file. The file must contain exactly 23 values for each colour as <br />
defined in the Dotgain table editor. <br />
Note: The Process and Special DotGain curves only apply to CMYK input jobs. RGB jobs will not be affected. <br />
Gradation Curve <br />
A Gradation Curve is used to adjust colour in a job by applying a curve to the individual process colours. The <br />
Gradation Curve can be applied to a Media either as a Linearisation Curve or <br />
as a Correction Curve. A Linearisation Curve is normally applied as part of the <br />
early calibration stage and this is recommended. A Correction Curve is applied <br />
if a small amount of fine-‐tuning is required after normal calibration <br />
procedures. <br />
Toolbar Options <br />
• Trace Saved Curve – A green line appears, showing where the curve <br />
was last saved to see where the curve has been edited. <br />
• Invert Curve – Inverts the selected curve. <br />
• Gradation Table – Enter values manually to adjust or create a curve. <br />
• Preview Curves – Displays a window with all curves in their respective colours to assess them in relation to <br />
each other. This is updated dynamically as changes are made. <br />
• Lineariser – Loads a Linearisation Curve directly into the Lineariser application. <br />
<strong>Serendipity</strong> <strong>Software</strong> -‐ Veripress User Manual – <strong>Version</strong> <strong>5.3.02</strong> <br />
31
ICC Tweak Set <br />
Build up a library of colours that need “tweaking” (adjusting) for accurate output with the ICC Tweak Set data <br />
type. A tweak set alters colours during the ICC mapping stage from input to output profile and is selected on a <br />
per Media basis. <br />
The ICC profiles are not edited in any way and the tweak set can be selected as desired. Each colour requiring alteration <br />
is selected and adjusted by adding to or subtracting process colours from it, or making it lighter or darker. An accurate <br />
visual representation is shown on the screen and the point in the colourspace can also be viewed. Colours can be <br />
created manually or by entering the CMYK or Lab values, or input automatically using an online Spectrophotometer. <br />
The interface is split into two parts – the left side shows the input values and the right side shows where any <br />
adjustments (tweaks) have been made. <br />
Options <br />
• Colourspace – Choose between Input Profile or Lab input. If the profile selected is RGB, the sliders will change <br />
to RGB. If CMYK, the sliders will change accordingly. <br />
• Influence – Choose the area around the specified colours to be affected. This is determined as a scale of 1 to 5, <br />
with 1 being the least influence and 5 the greatest. <br />
• Tweak Value – Use the CMY sliders to add or subtract from the colour being adjusted. <br />
• Rendering Intent – Choose the rendering intent that the colour is to be altered in from either Perceptual, <br />
Colourimetric or Saturation. This must match the rendering intent of the Pagesetup for the mapping to work. <br />
• New Tweak – Create a new tweak in the rendering intent selected. <br />
• Copy – Available via the right click menu. Used to copy the selected tweaks. <br />
• Paste – Available via the right click menu once an item has been copied. Used to paste the copied tweak from <br />
the clipboard to the rendering intent selected. <br />
• Change White Point – Change the white point of the paper. Select the button and enter the X,Y,Z points. If a <br />
Spectrophotometer is connected, the white point can be measured directly into the system. <br />
• Zoom – Zoom in and out of the Lab colourspace to see the point you are tweaking in relation to the whole <br />
space. <br />
• L-‐value – Move up and down the L-‐value to see the point you are tweaking in relation to the lightness. Reset the <br />
value by clicking the ReCentre button. <br />
• ICC Profiles – Choose the input and output profiles you are using to tweak. These must match the ones selected <br />
in the Media, as they are stored with the tweak set and are used during the mapping process. <br />
• Spectrophotometer – Choose an online Spectrophotometer to read values directly into the tweak set. Once <br />
selected, press the Activate button to connect and take measurements. If the device is being used by another <br />
application (including a <strong>Serendipity</strong> application), it will fail to connect. Quit or disconnect all others first. <br />
<strong>Serendipity</strong> <strong>Software</strong> -‐ Veripress User Manual – <strong>Version</strong> <strong>5.3.02</strong> <br />
32
Job Genie <br />
Plate separated, single-‐bit screen TIFFs have become predominant in print industry workflows. The TIFF <br />
Based (Generic) input filter is designed to poll jobs from RIPs that produce 1-‐bit TIFF files; one file for each <br />
process or spot colour plate of a particular job. <br />
While the TIFF Based (Generic) input filter has a limited intelligence and can recognise standard filenames, such as <br />
jobname_plate.tif, it will not understand or be able to correctly poll a filename like J371P1S1CCyan.tif. <br />
The Job Genie utility allows for the configuration of a TIFF Based RIP input filter to poll and recognise any filename <br />
convention, no matter how unique or complex, and stitch the 1-‐bit files into single jobs. Job Genie can also be used to <br />
rename files to have more user-‐friendly onscreen names, or group files together into a single publication. <br />
The configuration window is split into two (2) sections. The column on the left allows you to enter a Task (see Tasks <br />
below). The main panel displays the five (5) tabbed sections requiring consideration when setting up each Task. After it <br />
is created, the Job Genie is selected in a RIP queue using an input filter such as TIFF Based RIP (User Configurable) to <br />
poll the chosen directories for the defined filenames. <br />
Tasks <br />
A Job Genie is made up of one or more user-‐defined tasks. Each task specifies how the job filenames are collected; how <br />
they are defined and grouped; how the job names will be displayed in the RIPMonitor; and if the jobs will be proofed as <br />
a publication when submitted for processing. <br />
Important Note: More than one task may be required to collect all the files in a given path if the naming varies. Jobs are <br />
constructed in the order of the tasks. Once a Jobname is matched by a given task, it is removed from subsequent <br />
searches, so the order of the tasks is very important. To change the order of a task, select it with the mouse and drag it <br />
to the desired position in the list. <br />
Interface Options <br />
• Log – Enable or disable to display the matching process in the ServerLog for the task selected. This can be <br />
useful to debug problems where configurations are not matching files properly. It is best to turn logging off for <br />
a Job Genie that is functioning correctly to avoid the ServerLog becoming too large or cluttered. <br />
• Add – Add another task to the list. <br />
• Duplicate – Copy the selected task to a new one. <br />
• Delete – Delete the currently selected task. <br />
Tabs – (1) Collect Files <br />
This tab specifies how the files are sorted and collected by the input filter. One or more search parameters can be <br />
entered, with each one comprising of an Action type, a Match criteria and a search <br />
String. <br />
It is not necessary to enter anything in this first tab if all the files in the RIP input <br />
filter path are valid for collection and proofing. <br />
As with tasks, each collection action is performed in order. Once a file has been <br />
excluded by a task, it is not looked at again so the order of the actions is very <br />
important. <br />
Action Options <br />
• Ignore Files – Do not include any files matching the definition specified <br />
when the input filter collects the ready for sorting. <br />
• Ignore Directories – Do not look in directories matching the definition specified when collecting files ready for <br />
sorting. <br />
• Descend Directories – Only look in directories specified by the definition when collecting files ready for sorting. <br />
• Include Files in Directories – Include all files in the definition specified directories when collecting files ready <br />
for sorting. <br />
• Include Files – Only collect files as specified by the definition. <br />
Note: Of the above actions, Include Files in Directories has precedence over all other actions. If this is matched, files and <br />
directories at the same level are ignored. Files and directories within the directory matched are then subjected to a <br />
search, governed by any other specified action. <br />
<strong>Serendipity</strong> <strong>Software</strong> -‐ Veripress User Manual – <strong>Version</strong> <strong>5.3.02</strong> <br />
33
Definition Options <br />
• Ending With – Any file or directory as specified in the action with a name ending with . <br />
• Beginning With – Any file or directory as specified in the action with a name beginning with . <br />
• Containing Text – Any file or directory as specified in the action where a name contains . <br />
• Named – Any file or directory as specified in the action explicitly named . <br />
• Add – Add the action and definition specified to the list of files to collect. <br />
• Apply – Apply any changes to the currently selected action and definition in the list. <br />
• Delete – Delete the currently selected action and definition from the list. <br />
• Filename Length – Specify a minimum and maximum filename length when searching for any files for sorting. <br />
Note: The Add, Apply and Delete buttons are only available if there is a change to an existing entry. If actions are not <br />
added or applied to the list before a save, the list is not updated. <br />
Tabs – (2) Filename Break Down <br />
Most job filenaming conventions contain common elements defining the job’s name, section, page or publication; and <br />
specific file markers or unique elements identifying things such as plate colour. <br />
This tab allows you to specify the construction of a filename. This is done by <br />
breaking it down into parts and giving each part a user-‐defined name. Once all <br />
parts of the filename are identified, they can be grouped together to make a <br />
complete job. <br />
Options <br />
• Case Sensitive Matches – Used to match case when the criteria for <br />
matching contains user specified input. For example, Part contains <br />
specific words, Match to separator and the Truncate option. If any of <br />
these are used and Case Sensitive Matches is selected, only those <br />
characters matching the specific case entered are matched. <br />
• Read Direction – The direction in which the filename is read. Click the <br />
arrow to change read directions. <br />
• Parts – This is a block diagram showing the breakdown of the job. Each part is given a name and identifies a <br />
section of the filename. Clicking the Read Direction arrow changes the order of the parts to show which part is <br />
going to be read first. If creating a new Job Genie, parts will not appear in the diagram until they are created. <br />
• Add – Add parts to the list. <br />
• Apply – Update the selected part with changes. <br />
• Delete – Delete the selected part from the list. <br />
• Part Name – Specify a name for the part you are about to describe. Meaningful names are useful when choosing <br />
the groups later. <br />
• Part Contains – Specify from the list what the part will contain. Choose from: <br />
o Any Character – The part can contain any valid character. <br />
o Numbers Only – The part may only contain numbers. <br />
o Hexadecimals Only – The part must only contain hexadecimal characters (0-‐9, A-‐F). <br />
o Specific Words – Specify a word or characters in the text box that the part must contain. <br />
• Match – Choose what point in the filename you are going to match to. This may be a specific separator or end of <br />
string, for example, read along the filename until this point, looking for valid part matching specified above. <br />
Choose from: <br />
o To Separator – Enter a character in the text box to specify as a separator, i.e., continue reading the part <br />
until you reach this separator. <br />
o To End of String – Match everything from this point to the end of the filename (string). <br />
o To Numeric Separator – Match everything from this point until you find a number. <br />
o To Non-‐Numeric Separator – Match everything from this point until you find anything that is not a <br />
number. <br />
o To “.” (full stop) Separator – Match everything from this point until you find a full stop. <br />
o To “-‐“ (hyphen) Separator – Match everything from this point until you find a hyphen. <br />
o To “_” (underscore) Separator – Match everything from this point until you find an underscore. <br />
o To “$” (dollar) Separator – Match everything from this point until you find a dollar sign symbol. <br />
o To “ ” (space) Separator – Match everything from this point until you find a space. <br />
o Number of Characters – Match the number of characters specified in the text box. A further option is <br />
available if this is selected: <br />
<br />
Truncate from Character – Choose a character to identify in the filename and remove all <br />
characters from the point onwards. For example, if you have a large number of 0’s in a group, <br />
you can choose to remove those 0’s from the group so they are not displayed. <br />
<strong>Serendipity</strong> <strong>Software</strong> -‐ Veripress User Manual – <strong>Version</strong> <strong>5.3.02</strong> <br />
34
Note: The To Separator and Truncate from Character options allow multiple entries separated by commas, where each <br />
entry searches for a match, i.e., you can specify “To Separator a, b, c” where if any of the separators a, b or c are matched <br />
it is valid. <br />
Separator Options <br />
Separators are the characters that determine the end and beginning of a part. For example, with cyan.tif the full stop <br />
between cyan and tif is the separator. As this is part of the filename, you still need to decide what to do with this <br />
separator. There are three (3) options: <br />
• Discard Separator – Ignores the separator. <br />
• Include Separator with this Part – Includes the separator with the part being described. <br />
• Include Separator with the next Part – Includes the separator with the next part described. <br />
Example: With a filename such as job.cyan.tif where we parse the name in the forward direction, we describe the first <br />
part as name to separator full stop (.) and the next part as plate to full stop (.) <br />
Discard Separator creates the two parts as job and cyan. <br />
Include Separator with this part (for name) would produce a part as job. <br />
Include Separator with next part (plate) produces a part as cyan. This is only used if the separator is a character you <br />
want to display in the RIPMonitor, such as a page marker. <br />
The most commonly used option is Discard Separator. In the above example, if the option Include Separator with Next <br />
Part was used, we could not identify the colours, as it will be called .cyan <br />
Tabs – (3) Jobname + Plate <br />
This tab allows you to configure which parts should be grouped together to complete a job and which part identifies the <br />
plates of the job. You can specify how the plates are described and control specific mapping. <br />
Job Grouping <br />
• Only group files in the same directory as job – Check this box to group filenames together in a directory. Files in <br />
different directories will not be grouped. <br />
This is used when job directories are created containing all the plates. <br />
Sometimes the filenames vary for the name of the job, but because <br />
they are all placed in one directory per job, they can be grouped <br />
together. <br />
• Group files with parts – This displays the parts created in Tab (2) – <br />
Filename Break Down. Select the part or parts that make up the job <br />
name by clicking the tiles onscreen. <br />
In most cases, the file part defined as the plate should not be chosen, <br />
as this would group files with the same plate together, rather than <br />
combining the different plate files into one job. <br />
Plate Identification <br />
This tab is where you define which part created in Tab (2) – Filename Break Down is the plate part and how it is <br />
written in the filename. <br />
• Plate Part – Select the part of the filename that describes the plate colour from the dropdown list. The list <br />
contains the part created in Tab (2). <br />
Plates are: <br />
• Defined by words – The plate names are complete names, for example, cyan, pantone 252. <br />
• Defined by numbers – The plates are defined by numbers, for example, 0 is cyan, 1 is Magenta etc. If this is <br />
selected, two other options are available: <br />
o Starting Plate Number – Enter the number the plates start at. This is usually 0 or 1. <br />
o Plate Order – Choose the plate order between KCMY+specials or CMYK+specials. <br />
<strong>Serendipity</strong> <strong>Software</strong> -‐ Veripress User Manual – <strong>Version</strong> <strong>5.3.02</strong> <br />
35
• Map Letters C, M, Y, K to Process Names – If the plates are named with just letters, for example, cyan is <br />
represented as c, selected Defined by words and choose this option. <br />
• Strip leading zeros from colour names – Sometimes colour names have multiple zeros before the plate number. <br />
This option can be used to remove these. <br />
Plate Mapping <br />
You can map plate names so they appear correctly in the RIPMonitor and are able to be matched to colours in the <br />
System Specials colour set (see Server Settings – Colour Management). A list of plates requiring mapping can be <br />
created. <br />
• Case Sensitive Mapping – Select this if the mapping should check for case. <br />
• Add – Add the mapping to the list. <br />
• Apply – Apply changes to the currently selected mapping. <br />
• Delete – Delete the currently selected mapping from the list. <br />
• Prefix number literals with user text – Add a prefix to numbers you are polling. For example, if the colour is <br />
called 254, you can prefix the word pantone in front of the number, making the special plate become pantone <br />
254. <br />
Tabs – (4) Publication + Pages <br />
This tab is where parts can be identified from the Filename Break Down as a Publication and a Page. This can help with <br />
autoproofing, as a job can be automatically filtered and gain all the attributes available to publications, such as grouping <br />
in the QueueManager and the Pages pane in SoftProof. <br />
• Page numbers are: <br />
o Defined by words – Attempts to assign page numbers from letters. <br />
o Defined by numbers – Attempts to assign page numbers as <br />
numbers. Numbers must be greater than 0. <br />
o Defined by sequence 1A, 1B, 2A, 2B – Attempts to assign page <br />
numbers in sequential order.’ <br />
• Page number part – Select the part that identifies the Page number from <br />
Jobname, Colour, Extensions or None. <br />
• Case Sensitive Mapping – Select this if the mapping should check for case. <br />
• Publication Part – Select the part that identifies the Publication part from <br />
the previously defined filename parts. <br />
When files are submitted for processing via the RIPMonitor, all jobs with a <br />
common Publication Part will be submitted to the QueueManager as one publication and will be viewable (and <br />
softproofed) as such. None means no Publication Part is being used. <br />
o IN / OUT – Map Publication abbreviations to full names (if required). For example, smh IN becomes <br />
Sydney Morning Herald OUT. <br />
• Section Part – Select the filename part defined as the Section Part from the dropdown menu. The default is <br />
None, meaning the Section Part is not being used. <br />
Many publications, such as newspapers, are made up of a composite of separate sections. The pages of these <br />
sections often use a filename convention where the page numbers represent the number within the section – <br />
not the page number within the whole publication. The Section Part makes it possible to proof a publication <br />
made up of multiple sections and to offset the pages of each section appropriately to allow viewing of the <br />
complete publication in the correct page order. <br />
o<br />
IN / OUT – Unlike the Publication Part where remapping is optional, if used, the Section Part requires <br />
you to input the section names (although IN and OUT can be the same) and a Page Offset value for each <br />
section. <br />
Note: Using Publication and Section Parts with Bookfilter <br />
In the case of a Job Genie being created for a Bookfilter poll, the Publication and Section Parts can be used to re-‐map <br />
publication and section (or edition) filename parts into more coherent or user-‐friendly names for display in the <br />
BookMonitor. The Page Offset function of the Section Part is not used – it is simply for renaming. <br />
<strong>Serendipity</strong> <strong>Software</strong> -‐ Veripress User Manual – <strong>Version</strong> <strong>5.3.02</strong> <br />
36
Tabs – (5) Display <br />
The Display tab allows you to configure how the Jobnames are displayed in the <br />
RIPMonitor. Click the Parts tiles to add the filename parts to the Jobname, Publication <br />
Name and (optional) Section Name strings. Parts can be entered in any order. <br />
Any other text to be shown in the RIPMonitor can be entered as part of the string. <br />
For example, clicking a part named Page will show in the string. This will <br />
display the page number only in the RIPMonitor. It may be useful to add “Page:” <br />
before the part so the RIPMonitor will display as “Page:1”. <br />
• Display Specification – Shows the parts created in Tab (2). <br />
• Jobname String – Shows the string that will be displayed in the Name column <br />
of the RIPMonitor and QueueManager. You can enter any valid character or <br />
use filename parts. <br />
• Job Directory – (Buttons) Allows you to enter the job directory into Jobname, Publication and/or Section String <br />
fields. <br />
• Publication Name String – Shows the string that will be displayed in the Publication column of the RIPMonitor <br />
and QueueManager (in Publication view). You can enter any valid character or use filename parts. <br />
• Section String – Shows the string that will be displayed in the Section column of the RIPMonitor. You can enter <br />
any valid character or use filename parts. <br />
Check the <strong>Serendipity</strong> <strong>Software</strong> website (http://www.serendipity-‐software.com.au/support/howto/workbench) for <br />
HowTo’s on creating Job Genie’s. <br />
<strong>Serendipity</strong> <strong>Software</strong> -‐ Veripress User Manual – <strong>Version</strong> <strong>5.3.02</strong> <br />
37
Media <br />
The Media data type contains all of the settings controlling the output of jobs as they pass through the <br />
Veripress colour management system (CMS) for proofing. Settings configured here are those directly related <br />
to the Output device, Colour Correction, ICC Profiles and Output Screening. <br />
A Media can be one of several assigned to a Pagesetup, which controls the input screening, resampling, rendering <br />
effects and intents of incoming jobs. All jobs are submitted to a combination of Pagesetup and Media destinations. <br />
When submitting, the user selects the Pagesetup to be used, at which point a list of compatible (user-‐created) output <br />
Media types in the database become available for selection. A default Media is assigned to a Pagesetup, so if a job is <br />
submitted without a specific chosen Media, the job will output to the default Media settings. An Output data type can <br />
optionally have a Media type assigned to it, in which case only jobs submitted to the Output using the assigned Media <br />
will be processed. All other jobs are held in the QueueManager until the assigned Media is removed from the Output, or <br />
the held jobs’ Media type is assigned to the Output. <br />
Output <br />
• Output Driver – Select the desired output driver from the <br />
available list. Those available will depend upon the options <br />
enabled on the dongle. The selected driver affects the options <br />
made available for Resolution and Colourspace. <br />
• Resolution – Select or enter the desired resolution (DPI). <br />
Colourspace – Select the output colourspace as desired. The <br />
selections will change depending upon the chosen output driver. <br />
• Media Width/Length – Sets the width and length of the Media. <br />
Jobs of greater width and length will be held in the QueueManager until an appropriate Media, or new width <br />
and length values are assigned. <br />
Note: Media Width/Length values override the width/length settings in the Nesting section of the Output, <br />
meaning jobs will not nest until within the width/length settings of the Media to which they were submitted. <br />
• Cut Sheet – Enable this if the Media being output to is Cut Sheet. The media to be used is selected from the <br />
dropdown menu. <br />
o Total Sheets – Enter the number of cut sheets loaded. Jobs will stop printing to the Media and be held <br />
in the QueueManager when MediaStatus has tracked that the assigned number of sheets have been <br />
used. A Total Sheets value of zero (0) assumes an unlimited sheet availability for tracking. Sheet count <br />
is reset using the Reset Counter button in the Usage panel. <br />
• Custom Settings – These options will vary, depending on which output driver has been selected. <br />
Usage <br />
The Usage panel shows the amount of media used based on the values <br />
entered for Media Length (above). <br />
• Usage Meter – Bar showing the amount of media used. Text under the bar shows the exact amount as “Used X <br />
Units of Total Units” (percentage %). <br />
• Logged Period – Time period (date and time, from and to) the Media has been tracked since the last reset. <br />
• Printed – Number of jobs and total printed area of jobs tracked since the last reset. <br />
• Reset Counter – Reset the usage count for the Media. <br />
Colour Correction <br />
• Correction LUT – Select a Correction LUT to be applied in the form of a <br />
Gradation Curve. You can preview the curves, edit them or create new curves. <br />
<strong>Serendipity</strong> <strong>Software</strong> -‐ Veripress User Manual – <strong>Version</strong> <strong>5.3.02</strong> <br />
38
ICC Profiles <br />
ICC Profiles are used to match colours from one device to another, for example, a Press to an Inkjet. It does this by <br />
mapping an input to an output colour. <br />
• Output ICC Profile – Select an output profile. This is the printer <br />
or other output profile and is used to convert the Lab data into <br />
the output colourspace. This output could be RGB, CMYK, <br />
CMYKOG, or N-‐Colour depending on the output device chosen <br />
and the detected colourspace. <br />
• Output ICC Tweak Set – Select a Tweak Set from the available <br />
list. Lists can be previewed, edited or new ones created. <br />
• Device Link Profile – Select a device link profile. If the job passing through does not match the colourspace of <br />
the Device Link Profile, the standard input and output profiles selected will be applied. <br />
Upload ICC – This option is available on all of the ICC choosers and is used to upload an ICC profile from a local or <br />
network folder location to the internal Veripress ICC folder. <br />
To Upload an ICC Profile: <br />
1. Click the Upload File button. <br />
2. Browse to the location of the ICC file. <br />
3. Open the file. <br />
4. Select the location to save the file (lib/icc is <br />
default) <br />
5. Click OK <br />
6. Save the setup (Media/Pagesetup etc) once the file <br />
has been uploaded. <br />
<strong>Serendipity</strong> <strong>Software</strong> -‐ Veripress User Manual – <strong>Version</strong> <strong>5.3.02</strong> <br />
39
Output <br />
The Output data type determines the output format of processed jobs and where they are sent to for printing <br />
(or file output). The Queue panel sets the output driver used and allows auto-‐cleaning of job Output queues. The printer <br />
connection or file destination is configured in the Destination panel. The Collating section has options for Nesting and <br />
Duplexing. Maintenance allows for automatic printer maintenance <br />
functions to be configured. <br />
Queue <br />
• Output Driver – Select the desired output driver from the <br />
dropdown list. Those available will depend upon the options <br />
enabled on the dongle. The selected driver affects the options <br />
in a Pagesetup and Media pointing to it. <br />
• Change Media – Select this to optionally assign a Media to the <br />
Output. A chooser window will appear with Media displayed <br />
matching the Output driver type. The options as set in the <br />
selected Media are displayed for view, can be edited or a new <br />
Media can be created. <br />
• Status – Choose whether the Output queue is Active or <br />
Inactive. This can also be controlled from the QueueManager. <br />
• AutoClean – Configures Veripress to automatically delete jobs from the Output queue based on time and <br />
or/number. Options include: <br />
o Job History – Keep Most Recent – When enabled, set a number of jobs. Veripress will keep that number <br />
o<br />
of most recent printed jobs in the Output queue, automatically deleting any excess jobs. <br />
Job History – Keep Jobs Newer Than – When enabled, Veripress looks at the time signature of printed <br />
jobs and deletes any jobs in the queue older than the specified (days/hours/min) time. <br />
• AutoPause – Select a time duration the queue should pause after processing a job. Used for double-‐sided <br />
plotters so there is a pause in sending the next job, giving the plotter time to turn a sheet ready for the back <br />
side to be printed, or time to load another sheet. <br />
Destination <br />
The Destination determines the method of delivery of the output job to the final destination. Depending on the <br />
destination driver selected, there may be some additional options available. <br />
Destination Drivers <br />
• Bonjour/Zeroconf – Select this to output to a Bonjour/Zeroconf network destination. The local network is <br />
polled for Bonjour/Zeroconf devices. Choose Edit and select the appropriate destination from the dropdown <br />
list. <br />
• Command/Script – Select a script or command to be run once a job has completed. <br />
• FTP – Send your completed job to remote machine using FTP. <br />
• Local Folder – Choose a local folder to send the output file to. Enter the path or select Choose to browse and <br />
select a folder. The folder must exist and have write permissions. <br />
• Local Print Queue – Print to a local print queue. Use this to print to a Windows printer on another machine. In <br />
the path location enter \\machine\printer where is the name of the Windows machine with the <br />
printer attached and is the exact name of the printer. The printer must be shared. <br />
• LPR Port – Use LPR to print jobs to printers accepting it. Enter the Hostname/IP address of the printer and the <br />
path. Not all devices require a path to be entered. This is a good option for Epson printers with a network card. <br />
This method is faster than TCP/IP printing for these devices. <br />
• Nowhere – This is used for internal testing purposes or for softproofing workflows. Files created by the print <br />
driver are not sent anywhere; they are left in the default raster location. A print time for simulation can be <br />
entered. <br />
• Secure FTP (sftp) – Send the job to a secure server using FTP. <br />
• TCP/IP Port – Print to a networked device over TCP/IP. <br />
<strong>Serendipity</strong> <strong>Software</strong> -‐ Veripress User Manual – <strong>Version</strong> <strong>5.3.02</strong> <br />
40
Collating <br />
Collating is a method of gathering various outputs and grouping <br />
them together. <br />
Nesting <br />
• Enable Automatic Nesting – Set the queue to nest jobs <br />
automatically when the configured conditions (such as <br />
Maximum Wait Time) are met. <br />
• Auto Rotate When Nesting – Enable auto rotation when <br />
nesting occurs. If this is enabled, make sure the option in the <br />
Pagesetup is set to None. There is no need to spend processing time rotating a job if it is rotated at nesting <br />
time. <br />
• Copies – Specify the number of copies you want to nest. For example, if you have 7 jobs making up a nest and <br />
enter 5 in the copies field, you will get 5 copies of the same 7 jobs nested and printed. <br />
• Maximum Wait Time – Specify how long to wait before nesting begins. Once reached, nesting will begin and <br />
any job waiting to nest will be nested into a single job. The start time is determined by the first job that appears <br />
waiting to nest. <br />
• Minimum Paper Coverage – Specify the minimum paper coverage to be reached by jobs waiting to nest before <br />
nesting will begin. Once reached, any waiting jobs will be nested into a single job. <br />
• Maximum Jobs – Specify the maximum number of jobs in a nest. If there are more jobs in the queue than the <br />
number specified, that number of jobs will nest and the remaining jobs will stay waiting to nest until the <br />
criteria is met again. <br />
• Media Width – Specify the media width. This is required for nesting to work. <br />
• Gap Between Jobs – Enter the size of the gap between jobs in the nest. <br />
• Minimum Total Height – Specify the minimum total height of a nest, i.e., if the combined height of the jobs <br />
waiting to nest reaches this value, nesting will begin. <br />
• Maximum Total Height -‐ Specify the maximum total height of a nest, i.e., if the combined height of the jobs <br />
waiting to nest reaches this value, nesting will begin. <br />
Note: If a Maximum Height is set, the Nesting algorithm will look at all the jobs waiting to nest and fit the most jobs <br />
between the minimum and maximum heights. If the available jobs can not cover the defined Paper Coverage (if set) of <br />
paper without exceeding the maximum height, jobs will not nest. If no Paper Coverage minimum is set, any job that <br />
would make the nest exceed the maximum height will be left in the queue -‐ the other jobs will be nested. Any single job <br />
exceeding the Maximum Height will also not print. If a job is too large, either the nesting parameters and/or the <br />
printing media but be changed. This makes it possible to effectively and efficiently nest using Cut Sheet media. <br />
<strong>Serendipity</strong> <strong>Software</strong> -‐ Veripress User Manual – <strong>Version</strong> <strong>5.3.02</strong> <br />
41
Pagesetup <br />
A Pagesetup consists of many configurable modules to manipulate your job for the desired output. This is <br />
where the Input Screening and ICC Profiles, Render Effects, Colour Keys and other Colour Management options are <br />
setup. <br />
Output <br />
• Change Output – Selects the Output method and assigns its configured <br />
properties to the Pagesetup. <br />
• Change Media – Select the default Media settings and assign its properties <br />
to the Pagesetup. If a job is submitted to the Pagesetup without a specific <br />
Media, the job will output using these default Media settings. <br />
• Output Settings: <br />
o Antialiasing – Choose from 2x2, 3x3, 4x4 or None. Antialiasing is <br />
designed to smooth jagged edges and is used when the Output <br />
does not have sufficient resolution to display edges smoothly. The values increase the amount of pixels <br />
used for Antialiasing. The default setting is None. <br />
o Priority – Assign a priority to a Pagesetup. The lower the number, the higher the priority. Numbers can <br />
be negative for a higher priority. The default is 0. Jobs waiting to Image or Render will process <br />
through a higher priority Pagesetup over jobs submitted to lower priority queues. <br />
o Auto Publication Name – Create unique publication names for each job passed through the Pagesetup. <br />
Use this feature for duplexing from PDF or PS files. Submitting a multi-‐page document as one job will <br />
allocate all pages with the same publication name. <br />
o 16 Bit Processing – Enable or disable 16-‐bit processing for jobs submitted to the Pagesetup. <br />
Note: Veripress V5 is able to accept files submitted in a 16-‐bit format. The files are normally processed and rendered in <br />
standard 8-‐bit colour, which for many workflows is sufficient for proofing. 16-‐bit processing improves render quality <br />
and can be useful for finding artifacts within a job. When enabled, files submitted to the Pagesetup in 8-‐bit are upscaled <br />
to 16-‐bit for processing. 16-‐bit mode requires more system memory for imaging/rendering jobs and produces larger <br />
output files. <br />
Publish <br />
Allows Pagesetups to be published on a network as a Drop Folder, or as a network print destination for output from <br />
another software application. To Publish a Pagesetup, it is necessary for the <strong>Serendipity</strong> Megarip PPD to be installed on <br />
the same system on which the Veripress Server runs (Server menu > Download PPD). <br />
• Publish DropFolder – Allocate a folder where files can be dropped in for processing. Valid File Types include <br />
Postscript, PDF, JPEG, TIFF Image, <strong>Serendipity</strong> Blackmagic Image, EPS, <br />
PNG. <br />
• Location – Select a folder as a DropFolder. The folder must exist and <br />
have read/write permissions. <br />
• Default – Reset the DropFolder location to the default one (<strong>Serendipity</strong> <br />
Veripress installation directory/drop/) <br />
• Printers – Choose to publish the Pagesetup as a network print <br />
destination, allowing third party applications to print directly to it. <br />
o Mac – Enable to publish the Pagesetup as a Bonjour/Zeroconf network destination for Mac OS X and <br />
Linux. This option also publishes the Pagesetup as an AppleTalk destination, where the Pagesetup <br />
name is used as the printer name. <br />
Note: When adding a new printer through System Preferences on Mac OS X, select the Bonjour address <br />
(pagesetup name@computer name) as the printer and <strong>Serendipity</strong> Megarip PPD as the driver. <br />
o Windows – Choose to publish the Pagesetup as a Windows local printer port destination. See the <br />
<strong>Serendipity</strong> <strong>Software</strong> website for details on how to create the Windows printer. <br />
• TCP Port – Choose to publish the Pagesetup to a TCP Port, allowing it to be setup as an IP printer destination, <br />
or as a destination for other Veripress Servers. <br />
o Activate Port Number – Enter the TCP port number the Pagesetup will publish to. It is necessary for <br />
the port number to be 10000 or over and for each Pagesetup to have a unique port. <br />
Note: When adding a new printer through System Preferences on Mac OS X, select IP printer, HP <br />
Jetdirect – Socket for the protocol. The address should be in this form – computername:10063. Select <br />
<strong>Serendipity</strong> Megarip as the driver. <br />
<strong>Serendipity</strong> <strong>Software</strong> -‐ Veripress User Manual – <strong>Version</strong> <strong>5.3.02</strong> <br />
42
When adding a new printer through Windows: <br />
1. Select Create a New Port -‐ Standard TCP/IP Port. <br />
2. Enter the computer’s network name in the Host ID field. <br />
3. When Windows requests additional info for the port, select Custom Settings. <br />
4. Rename the Port Name if desired. <br />
5. Set the Protocol to Raw and the Port Number to the one set in the Pagesetup to be published. <br />
6. Select <strong>Serendipity</strong> Megarip as the driver. If the driver is not already installed, choose Have <br />
Disk and get the driver (megarip.inf) from the <strong>Serendipity</strong> Installation DVD, found in the <br />
drivers/win/’OS <strong>Version</strong>’/ directory. <br />
• Flow Control – Select whether to hold the submitted file after Imaging or Rendering in order to prioritise jobs <br />
or make rendering attribute changes before releasing. Options include: <br />
o Hold After Imaging – Hold jobs submitted to the Published Pagesetup after imaging has completed. <br />
Held jobs can be released to continue processing via the QueueManager toolbar or contextual (right-click)<br />
menu. <br />
o Hold After Rendering – Hold jobs submitted to the Published Pagesetup after rendering has completed. <br />
Held jobs can be released to continue processing via the QueueManager toolbar or contextual (right-click)<br />
menu. <br />
o Nest – When enabled, this option will nest jobs submitted to the Published Pagesetup according to the <br />
criteria defined in the Output used by the Pagesetup/Media. <br />
Note: The Nest function only requires that the Output used has nesting parameters defined. The <br />
Output itself can have nesting disabled for normal use. This makes it possible to create multiple <br />
nesting or non-‐nesting Published Pagesetup’s to print via the same Output. <br />
Colour Correction <br />
• Replace Colour Set – Select a Replace Colour Set from the list of available sets. You are able to preview the set, <br />
edit it, or create a new one. <br />
• Cyan/Magenta/Yellow/Black DotGain Curves – Select a C, M,Y or K DotGain <br />
Curve to be applied. You are able to preview the curves, edit them or create <br />
new ones. <br />
• Specials DotGain Curve – Select a DotGain Curve to be applied to the Special <br />
Spot Plates only. One curve affects all Special Colours the same way. You can <br />
preview the curve, edit it or create a new one. <br />
• Device Linearisation Curve – Select a Device (platesetter) Linearisation Curve <br />
to be applied. You can preview the curve, edit it or create a new one. <br />
ICC Profiles <br />
• Always Use ICC – Enable this to always use the assigned ICC profiles for jobs submitted to the Pagesetup (and <br />
Media). If this is not enabled, the ICC profiles selected are only used in colourspace conversion. <br />
• Honour Embedded ICC Profiles – Enable this to use an ICC profile embedded in a submitted TIFF, JPEG or EPS <br />
file as the input match profile. When enabled, embedded file profiles will always take precedence over any <br />
Match ICC assigned to the Pagesetup. <br />
Note: The TIFF Image output driver has an option to embed an ICC profile into TIFF files that are output by Veripress. <br />
• Black Point Compensation – This setting is designed for use when <br />
processing input from large gamut sources such as photographs and RGB <br />
images. Black Point Compensation enhances shadow details in these <br />
images; assists when viewing shadowed areas in non-‐ideal or everyday <br />
lighting conditions; and prevents flooding in CMY gray areas. <br />
This setting only functions when using colourimetric intents, and when <br />
Always Use ICC is checked. <br />
Black Point Compensation should not be used for normal CMYK proofing <br />
jobs, which are generally well within the gamut of an output device (Inkjet <br />
printer). <br />
• Intent – Select the rendering intent to use. Options include: <br />
o Perceptual – All colours are moved proportionally to each other so the eye perceives the colours to be <br />
correct (i.e., colours out of gamut move into gamut, and those in gamut move proportionally to those <br />
out of gamut). <br />
<strong>Serendipity</strong> <strong>Software</strong> -‐ Veripress User Manual – <strong>Version</strong> <strong>5.3.02</strong> <br />
43
o Relative Colourimetric – Those colours out of gamut are moved into gamut, and those in gamut are left <br />
untouched. <br />
o Absolute Colourimetric – The colours are left alone so those out of gamut cannot be reproduced. <br />
Adjusts the white point of the media to match that in the input ICC profile. <br />
o Saturation – Those colours out of gamut move into gamut, but all colours increase in saturation as a <br />
result. <br />
• Retain Pure Black – When ICC profiles are used, all colours, even solids, are made up of a mix of different <br />
colours. Selecting Retain Pure Black uses only black for areas containing just black. When enabled, the <br />
following options become available: <br />
o<br />
o<br />
All – Uses black ink only in all areas defined as Black. <br />
Text – Uses black ink only in elements defined as Black text. This can improve the clarity and <br />
sharpness of the text. <br />
Note: This option is not always suitable for use with printers using light black inks, as many of these inks tend to have a <br />
non-‐black hue. <br />
• RGB ICC Profile – Select an RGB Input profile. This is used to convert input data from RGB to Lab and should be <br />
a scanner or digital camera profile. <br />
• Press ICC Profile – Select a Press profile. This is a Match profile and is used to convert input data from CMYK to <br />
Lab. This can be a multicolour profile or CMYK. If you select a multicolour profile, an additional option will <br />
become available – Press Inks. <br />
o Press Inks – For multicolour press profiles you must specify the plates used in the ICC and the order of <br />
those plates. Selecting this option displays a Special Colour Set chooser, allowing you to select a pre-defined<br />
set or create a new one. <br />
Important Note: For multicolour profiles to work, you must create the same colour names used in the ICC and have <br />
them in the same order. The order for the ICC is specified during ICC creation. This is independent of the actual press <br />
order. Change the order by dragging the colours around the set. The order is specified as the Colour (left column), order <br />
descending. <br />
• Upload ICC – This is available on all of the ICC choosers. If the ICC profile is located somewhere other than the <br />
default ICC folders, you can use this function to upload it to the Server ICC folders in order for it to be used. As <br />
this is a Client-‐side option, you can use this function for moving ICC profiles from the machine they were <br />
created on to the Server. This can be either on the LAN or WAN as a remote machine. <br />
• Print Calcheck – Select this to attach a calibration strip to every job passing through this Pagesetup. <br />
o Device – Choose the device you will use to measure the strip with. This creates the chart for the correct <br />
device. <br />
o Chart – Choose the chart for use from the popup window of Calcheck Charts. <br />
Note: The Calcheck Chart is a Data Type in the Workbench. This is where you create the chart. Use the Displays <br />
application to measure it and produce a report. <br />
ColourKeys <br />
Merge some plates and separate others from a single job submission with ColourKeys. For example, merge the CMYK <br />
plates together and print the 3 specials as separate jobs, or you can create progressive proofs with C, CM, CMY, CMYK, <br />
CMYKS1, etc. <br />
• Enable ColourKeys – Select this to turn the module on. <br />
• Plates – Shows a list of available plates. <br />
• Add – Adds the selected plates to the Plate <br />
• Combinations list. <br />
• Progressive – Used to make progressive proofs. After adding the first plate <br />
to be used in the proof, click the Progressive button one or more times to <br />
cumulatively add plates to the Plate Combinations list. The progression will <br />
start with the first plate on the Plates list by default if a first plate is not <br />
selected. <br />
• Deselect – Deselects any plates currently selected in the Plates list. <br />
• Remove –Removes the selected Plate Combination from the list. <br />
• Remove All – Clears the Plate Combination List. <br />
<strong>Serendipity</strong> <strong>Software</strong> -‐ Veripress User Manual – <strong>Version</strong> <strong>5.3.02</strong> <br />
44
Input Screening <br />
Input Screening determines how the screening on the input data is handled. There are two (2) choices – Preserve and <br />
Descreen. <br />
• Preserve – Preserves the dots from the incoming data so the same dots on the final job are shown on the proof. <br />
Further choices are: <br />
o Real Dot Technology – Used to preserve the dot structure. <br />
o Fast-‐2 – Similar to RDT but a faster method. <br />
o RDT Smooth 1, 2 and 3 – This is RDT with progressive levels of smoothing. <br />
Note: Fast-‐2 should be used where the dot structure is not very important. It will preserve the dot but is a quick, low <br />
quality method. The sharpest dot structure will be achieved using RDT, however you will sometimes get introduced <br />
moire, caused by the head weaving of the printer, the resolution and the screen ruling of the original file. <br />
• Descreen – Descreens the incoming data with either: <br />
o D-‐Dot – Removes the dots; or <br />
o Fast – Quick descreening algorithm <br />
Note: D-‐Dot is used where the output job is being sent to a photocopier or similar device, with a front-‐end RIP that <br />
applies a screen of its own. If you did not remove the dot, the job would be double screened, producing poor output. Use <br />
Fast for all other methods when the incoming screening is not to be preserved. <br />
• Plates and Plate/Type – Override the descreening mode selected with other modes for the plates. This is <br />
needed so that, for example, if RDT is used for all plates except Black (which uses RDT Smooth-‐2) you will <br />
avoid getting moire. <br />
Postscript / PDF Options <br />
The following options are only used when the incoming data is Postscript: <br />
• Use Bounding Box for Page Size – Some Postscript jobs do not place a page size in the job information. <br />
Checking this will use the bounding box as the page size. <br />
• Simple RGB to CMYK Conversion – This is a compatibility mode from older versions of the product. Images are <br />
converted from RGB to CMYK quickly using a basic method. The colour is not very accurate and is not <br />
recommended for contract proofs. <br />
• Fail on RGB Images – Causes a job to fail if it contains RGB images. If <br />
this is not checked, the jobs will process but RGB images will be <br />
ignored and not printed. <br />
• Antialiased Subsampling – Used to assist in the rendering of some <br />
fonts. <br />
• Disable PDF Autoseparation – Turns off autoseparation for PDF files. <br />
• Render in RGB – Allows Postscript file data to be processed in an <br />
RGB rendering mode, with a wide gamut suitable for digital <br />
photographic proofs/prints. <br />
• Use CMYK simulation from PDF for unknown colours – Allow the CMYK simulations from PDF files to be <br />
substituted for unknown spot colours. <br />
Note: An Unknown Specials colour set can now be assigned in the Server Settings. This allows unknown special/spot <br />
colours included in PDF or Postscript jobs to be automatically added to the set. <br />
Resampling <br />
Configure the method for sampling incoming data and changing the resolution from the input to that of the output. The <br />
options are: <br />
• Nearest Neighbour – The fastest method but less accurate. Choices are made as the closest pixels from input to <br />
output and can result in jagged edges or stepping effects. <br />
• Bilinear – A medium quality sampling method and can take longer than Nearest Neighbour. Bilinear takes the <br />
weighted average of 4 pixels from input to output. Best for use with screened data. <br />
• Bicubic – High quality sampling method which takes longer to calculate than Bilinear. Bicubic uses the <br />
weighted average of 16 pixels from input to output. This is the default option for any new Pagesetup’s created. <br />
<strong>Serendipity</strong> <strong>Software</strong> -‐ Veripress User Manual – <strong>Version</strong> <strong>5.3.02</strong> <br />
45
• Filtered – <strong>Serendipity</strong>’s own sampling method, giving the highest quality. It takes longer to process than <br />
Bicubic and uses an averaged area from input to output. This setting provides better resampling for contone <br />
data, such as Postscript and PDF. <br />
Logo <br />
Position your own company logo, sign-‐off slugline or colour bar for checking consistency <br />
anywhere around the job. The logo passes through the same colour management as the job <br />
and can therefore be verified. The file is not rotated during output (except if Auto Rotate <br />
When Nesting is enabled). If the logo file is positioned along the left or right sides, the EPS <br />
file should be created in the appropriate orientation. <br />
• Enable Logo – Turn the Logo effect on or off. <br />
• Dimensions – Enter the print dimensions of the Logo. <br />
• Logo File – Select this to choose your Logo file. <br />
Effects <br />
Various effects may be applied to jobs passing through the <br />
Pagesetup. Effects are applied in the order they appear here. Some <br />
effects have separate attributes for customisation and can be edited <br />
once they are in the Applied Effects column. <br />
The Effects are: <br />
• Border – Place a border around the job. Line width and colour can be specified. <br />
• Centering – Centre the job in the specified page area. <br />
• Convolution Matrix – Design your own filter effect according to a pre-‐defined mathematical operation known <br />
as convolution. <br />
• Cropmarks – Place crop marks around a job. Line width, length and clearance can be specified. <br />
• Edge Detect – Remove all content and just leave the edges. <br />
• Margins – Specify margins around the job. <br />
• Mirror – Mirrors the job. <br />
• Negative – Renders the job as a negative. <br />
• Pagenumber – Place the page number in the middle of the page as a watermark. Scale factor and opacity can be <br />
configured, and choose between page number of the job or the page number of the signature (when using De-‐<br />
Imposition). <br />
• Rectangle – Draw a rectangle around the job inset at the desired distance, line width and colour. <br />
• Registration Marks – When enabled, this effect will add registration marks at each corner of the submitted job. <br />
Line width, Inner and Outer Radius are all configurable. <br />
• Signature Decorations – Place page lines (from the signature) and page numbers on the job. Further options <br />
are available. Choosing lines for pages will print a line around the page. Lines for spreads will print a line <br />
around paired pages (spreads). <br />
• Slugline – Place job information on the job. There are a number of options available via the Edit button. If you <br />
are using a narrow format paper and the full slugline doesn’t fit, select Custom Slugline and turn all options on. <br />
This will show an item per line. Within Custom, fields selected will only be printed if they are relevant to the <br />
job. <br />
• Unsharp Mask – Apply an unsharp mask to the job. The Unsharp Mask affects the edges within an image and <br />
can be controlled with the available parameters. The radius tells us how large an area to affect around the <br />
edges. The larger the radius, the greater the effect and the longer it takes to process. If the preview resolution <br />
is high, a given radius will have less effect than if the resolution is lower. If the detail is quite fine, a smaller <br />
radius should be used. Higher radius values can also cause halos at the edges. The threshold gives a level that <br />
should be affected where 0 affects more of the image and 255 very little. The amount states the size of the <br />
change, where a higher value is a greater change at the edges. <br />
• Watermark – Place a watermark across the job. The scale of the watermark is proportional to the size of the <br />
job. 100% represents the same size as the job in the smallest direction. If the stretch option is selected, <br />
horizontal and vertical sides are stretched to the scale amount. The watermark will be scaled in an anamorphic <br />
manner. <br />
<strong>Serendipity</strong> <strong>Software</strong> -‐ Veripress User Manual – <strong>Version</strong> <strong>5.3.02</strong> <br />
46
Media Effects <br />
The attributes here allow you to manipulate the job in various ways: <br />
• Fitting Method <br />
o None – Fitting method is turned off. <br />
o Fit Width/Fit Height/Fit Width & Height – Shrinks <br />
jobs to fit within the set dimensions; proportions are <br />
maintained. <br />
o Scale Factor – Scales jobs by the amount specified. <br />
o Tiles – Tiles a job that is larger than the width & <br />
height specified. If required, an overlap can also be <br />
entered. Useful for large posters or billboards. <br />
o Best Fit Width/Best Fit Height/Best Fit Width & Height – As Fit, but will shrink or enlarge jobs to <br />
fit/fill dimensions entered while maintaining proportions. <br />
o De-‐Imposition -‐ Can be used to take an imposed file like an 8UP, de-‐impose it into 2UPs or singles and <br />
print it on a smaller printer; or produce a single page PDF file. If this option is selected, a further <br />
Signature Group button becomes available for selection. <br />
Note: If the Fit or Best Fit options are chosen and the width & height fields are left at 0, the Fit will default to the media <br />
width and height as defined in the Media assigned to the Pagesetup when printing (see Media for details). <br />
• Rotation – Choose from None, 90, 180, or 270 degrees. Automatic rotation may also be selected to best fit the <br />
job using the media width and height specified. <br />
Note: Auto Rotation is very useful for saving media, but if a job is rotated, it takes longer to process – the larger the job, <br />
the longer the process time. Rotation takes place at the beginning of the Rendering phase and will affect cropping, <br />
margins and so on. If you are auto-‐rotating when nesting (See Nesting in the Output section), it is advisable to have <br />
Sheet Auto Rotation turned off, otherwise the job rotation will be calculated twice, again increasing the process time. <br />
Increasing system memory can also improve processing times. <br />
• Centring – Choose between Vertically or Horizontally. <br />
Use this if you need to centre a job at any time. In particular, you may need to use it when printing to a double-sided<br />
printer to help match the front and back sides. <br />
• Accuracy Correction – Compensate for media stretch or paper feed errors by specifying a correction amount <br />
for width and height. <br />
• Cropping – Crop the job in all directions. When specifying cropping, you will need to take into account any <br />
rotation that has been applied, as cropping takes place after rotation. <br />
• Auto Crop – Enables auto-‐cropping to remove blank area around an image. The crop stops at the first coloured <br />
pixel encountered in the file image. <br />
• Margins – Specify a margin around the job. You may have to specify a margin to shift a job over or compensate <br />
for a printer’s set margin. As with cropping, take rotation into account. <br />
• Effects – Mirror or Negative your job by enabling either option. <br />
Note: The Mirror and Negative effects in the Sheet panel differ to those in the Effects panel in that they apply the effect <br />
at the Imaging stage of processing. <br />
<strong>Serendipity</strong> <strong>Software</strong> -‐ Veripress User Manual – <strong>Version</strong> <strong>5.3.02</strong> <br />
47
Press <br />
The Press data type is used to emulate the properties of a press for softproofing. Each Press configuration can be <br />
assigned a press ICC profile, dotgain curves, press sheet dimensions, the number of ink keys, ink and paper <br />
characteristics; all combining to produce accurate onscreen softproofs. <br />
The Press can be switched on-‐the-‐fly while softproofing to instantly show how a job will look if printed on a different <br />
press or on different stock. <br />
Dimensions <br />
Enter the size of the printable sheet area of the press <br />
and its number of Ink Keys. The Key Width is calculated <br />
from these values. <br />
Colour Management <br />
This panel is where the Press ICC profile is assigned, along with any process CMYK, spot colour or device (platesetter) <br />
dotgain curves required to reproduce the colour performance of the press. <br />
• Replace Colour Set – Select a Replace Colour Set to be applied. <br />
• Press ICC Profile – Select a press ICC. This can be one created <br />
on your press or a printing standard ICC which is used as the <br />
target or match profile. <br />
• CMYK DotGain Curves – Select individual C, M, Y, or K DotGain <br />
Curves to be applied. <br />
• Specials DotGain Curve – Select a DotGain Curve to be applied <br />
to any special or spot colours. <br />
• Device Linearisation Curve – Select a device (platesetter) <br />
DotGain Curve to be applied. <br />
• Calcheck Chart – Select a chart to verify the SoftProof’s <br />
calibration status. <br />
• Paper Colour – Three (3) options are available: <br />
o None – Do not change the paper colour; <br />
o<br />
o<br />
ICC Profile – Use the white point from the press ICC profile and apply as the paper colour; or <br />
Custom – Enter your own value for the paper colour or use a Spectrophotometer to measure the paper <br />
white directly into the configuration. <br />
Ink and Paper <br />
Configure the ink and paper properties of the press to simulate their effects in the SoftProof application. This helps to <br />
produce more accurate proofs, allowing you to build up a library of paper and press combinations. <br />
• Maximum Ink Weight – Enter a value for the maximum ink weight. This value is used by the InkKeyViewer to <br />
show excess ink. <br />
• Stretch Factor – Enter a compensation factor to allow for stretch. It can be used for distortion simulation or <br />
anamorphic scaling, where one direction will distort more than the other. <br />
Note: The easiest way to calculate stretch is to draw a rectangle 1m x 1m and print it. Measure the rectangle and enter <br />
the value. If the size is 98cm, enter 0.98. If the size is 102cm, enter 1.02. <br />
• Back Page Opacity – Enter a value between 0 and 100%. This controls the amount of show through of the back <br />
page through the front page when reverse page viewing in SoftProof. <br />
• Back Page DotGain Curve – Select a DotGain Curve to apply to the back page when using the Show Back Page <br />
option in SoftProof. <br />
• Back Page Rotation – Select the relative orientation of back page when using Show Back Page in SoftProof. <br />
• Top Page – Choose Even or Odd. This is used to determine which page backs onto which, so the correct back <br />
page is shown when requested. <br />
<strong>Serendipity</strong> <strong>Software</strong> -‐ Veripress User Manual – <strong>Version</strong> <strong>5.3.02</strong> <br />
48
Regular Expression <br />
The Regular Expression data type is assigned as a filter to an auto-‐proofing RIP queue. Here, the user <br />
constructs a set of rules whereby only files with a particular naming structure will be submitted for auto-‐proofing. <br />
Expressions <br />
Similar to the Job Genie, the Expressions (search tasks) are entered <br />
and displayed in the left list. Each expression is made up of one or <br />
more strings used to match or ignore files. <br />
The Expressions are handled in the order they appear in the list. If the <br />
first expression matches a job name and that expression rule is to <br />
ignore items, the job is not passed to the next expression for further <br />
consideration. Expressions can be reordered by selecting the item and <br />
dragging up or down the list as required. <br />
List Options <br />
• Add – Adds a new expression to the list. <br />
• Duplicate – Makes a copy of the currently selected expression. <br />
• Delete – Removes the currently selected expression. <br />
Match <br />
This is where you specify what you want to match and the rules to apply. You can enter one or more strings to match <br />
and apply different rules to each. <br />
Match options: <br />
• Match Items – Matches the strings entered. If no other expressions exist, the job is submitted for auto-‐proofing. <br />
• Ignore Items – Ignores anything that matches the strings entered. If a job name matches, it is ignored and not <br />
submitted for proofing or passed to other expressions for further matching. <br />
• Any of the Following – The match is true if any string match conditions are met. If you have two or more match <br />
strings in the one expression and either of them match a job name, the Match Items or Ignore Items rule is <br />
applied. <br />
• All of the Following – The match is only true if all string match conditions are met. <br />
String <br />
Enter the string to match in the text field at the bottom of the screen. This is a job name or part of a job name. The <br />
match depends on one of the following conditions, selected with the string: <br />
• Contains – The job name contains the entered string. <br />
• Begins With – The job name begins with the entered string. <br />
• Ends With – The job name ends with the entered string. <br />
• Is – The job name matches the entered string exactly. <br />
• Does Not Contain – The job name does not contain the entered string. <br />
• Does Not Begin With – The job name does not begin with the entered string. <br />
• Does Not End With – The job name does not end with the entered string. <br />
• Is Not – The job name is not the entered string exactly. <br />
Match String Options <br />
• Add – Adds the match string to the list. <br />
• Apply – Apply changes to the selected match string in the list. <br />
• Delete – Removes the currently selected match string from the list. <br />
<strong>Serendipity</strong> <strong>Software</strong> -‐ Veripress User Manual – <strong>Version</strong> <strong>5.3.02</strong> <br />
49
Replace Colour Set <br />
The Replace Colour Set is used to match and replace certain colours as they pass through the system. You can <br />
match and replace process or spot colours and choose to match by name or position. Colours can be created <br />
directly or imported from popular desktop applications, or a Special Colour Set. <br />
There are a few uses for the Replace Colour Set. It is used to create a <br />
digital blue line, which replaces all colours with varying hues of blue <br />
allowing traps to be easily seen. It can also be used for replacing <br />
special colours where the name varies, such as Pantone 101C and <br />
Pantone 101CVC. <br />
Toolbar Options <br />
• New Colour – Creates a new untitled colour in the list. Click <br />
on either the Match Plate or Original name to change it. <br />
• Delete Colours – Deletes the selected colour/s. <br />
• Duplicate Colours – Makes a copy of the selected colour/s. <br />
• Rename Match – Rename one or more Match Plates using a <br />
popup Find and Replace tool. <br />
• Rename Original – Rename one or more Original <br />
replacement colour names using a popup Find and Replace <br />
tool. <br />
• Add Colours From Library – Select one or more colours <br />
from a Special Colour Set within Veripress to be added to the Replace Colour Set. <br />
Alternatively, this window may be opened by double-‐clicking on an empty area of the list panel; or double-‐click <br />
on a selected colour in the list to open the Add Colours window and replace it with the chosen colour. <br />
• Import Colours From Files – Import colours from compatible third party applications, CGATS/ISO 12642 files <br />
or previously exported colour sets. N-‐Colour swatches will not import unless an N-‐colour ICC profile with <br />
matching process colour channels is first assigned to the Special Colour Set. If CMYK swatches are imported to <br />
an N-‐Colour set, extra colour channels with 0% values will be added to match the colour space. <br />
• Export Colours To File – Export the colour swatches to a CGATS/ISO 12642 file. If the set contains a mix of <br />
CMYK/N-‐colour and Lab colours, you will be prompted to export either CMYK/N-‐colour or Lab colours. The file <br />
standard limits exported colours to one colourspace. <br />
• Export Colour Set To File – Export the entire Replace Colour Set to a file. If the set contains a mix of CMYK and <br />
Lab colours, you will be asked whether to export CMYK or Lab. <br />
• Preview Set – Opens a popup window listing all the Replace Colours in the set with colour properties and <br />
replacement method. <br />
• N-‐Colour Profile – Assign a multi-‐colour ICC profile to the Replace Colour Set. <br />
Note: If an N-‐Colour multicolour ICC profile is assigned to the set, users will have the option to adjust colours in an Lab <br />
or N-‐Colour colourspace as defined by the ICC profile (e.g., Lab or CMYKOG). Colours for each Replace Colour Set can <br />
only be defined in Lab and/or a single other colourspace. If no N-‐Colour profile is assigned, colours are adjusted using <br />
either Lab or CMYK values. <br />
All the Toolbar options can be accessed via the contextual (right-‐click) menu available in the colour list panel. <br />
Replacement Method Tabs <br />
There are five (5) tabbed panels where colours are created or imported when making a Replace Set. Each tab performs <br />
a specific replacement function. <br />
Tab 1 – Process <br />
Specify any of the Process CMYK colours you want to be replaced. Each of the process colours listed in the panel has: <br />
• A swatch box showing the replacement for the process colour (left). Double-‐click this box to import a <br />
replacement colour; <br />
• An editable naming field for the process colour; and <br />
• A Reset button for the colour of the process plate (lower right) and a Cancel button to switch off replacement <br />
for that process colour (upper right). <br />
Process colour replacement is set to Off for all 4 colours by default. <br />
<strong>Serendipity</strong> <strong>Software</strong> -‐ Veripress User Manual – <strong>Version</strong> <strong>5.3.02</strong> <br />
50
Tab 2 – Exact <br />
When using the Exact replacement method, only incoming colours precisely matching the Match Plate name will be <br />
replaced with the new colour. Matching is not case sensitive. <br />
Tab 3 – Partial <br />
When using the Partial replacement method, any incoming colours are replaced with the new colour if any part of the <br />
name matches the Match Plate name. Matching is not case sensitive. <br />
Tab 4 – Position <br />
The Position method replaces any incoming Special colour in a particular plate position with the new colour. <br />
The Exact, Partial and Position panels have a Search box at the top right used for locating colours in the replacement <br />
list. The list itself has a series of sort columns detailing properties of each replacement colour. <br />
Colours can be selected and dragged to another position within the list. This is useful in Position replacement where the <br />
plate position is important. <br />
The order of the columns can be changed by dragging them to the desired location and the headers are configurable via <br />
a context menu. The available columns are: <br />
• Match Plate – Shows the replacement colour swatch. The Exact or Partial name in this field is the one to be <br />
matched to the incoming colour being replaced. In the case of Position replacement, the name shows the plate <br />
position. Click on the name to change it. <br />
• Values – Shows the colourspace values of the replacement colour. <br />
• Original Name – The original name of the replacement colour in the Match Plate swatch. Click on the name to <br />
change it. <br />
• Space – The colourspace of the replacement colour plate. <br />
• Mode – The Paint Mode of the colour: Overprint, Knockout, Primer, Opaque or Transparent. <br />
• Tint – The tint or intensity of the colour. <br />
• DotGain Curve – The name of the DotGain Curve applied to the plate (if any). <br />
• Weight (g/m 2 ) – The Press Ink Weight of the colour in g/m 2 (if assigned). <br />
Tab 5 – Remaining <br />
Allocate one colour to replace Special Plates that are not matched by anything else. This only replaces special colours <br />
and not CMYK process colours. This panel has a similar interface to the Process panel. <br />
Colour Adjustment Panel <br />
View and adjust the colourspace values and plate properties of a selected colour. <br />
The name of the colour selected is shown at the top. A window displays the Original colour and Modified colour as <br />
adjustments are being made. A correctly calibrated monitor with an assigned Match ICC profile will display an accurate <br />
representation of the colour/s. <br />
Available adjustment options are: <br />
• Colourspace – Choose between Lab or CMYK (or multicolour if an N-‐Colour ICC profile has been assigned to the <br />
Replace Colour Set). The sliders change accordingly for making adjustments to the Lab or CMYK/N-‐Colour <br />
values. These can be entered directly or fine-‐tuned using the up/down arrows. <br />
• Paint Mode – Choose the Paint Mode for the colour. The diagram shows the Paint Mode, Opacity and Tint of the <br />
selected colour. Choices are: <br />
o Overprint <br />
o Knockout <br />
o Primer <br />
o Opaque (adds an opacity % slider) <br />
o Transparent <br />
• Tint – Adjust the intensity of the colour by adjusting the slider, entering a tint value or using the up/down <br />
arrows. <br />
• DotGain Curve – Choose a DotGain Curve to apply to the colour. <br />
Note: A DotGain Curve applied to a replacement colour takes precedence over global Process or Specials DotGain <br />
Curves assigned to a Pagesetup. The Pagesetup curves are ignored for the colour. <br />
<strong>Serendipity</strong> <strong>Software</strong> -‐ Veripress User Manual – <strong>Version</strong> <strong>5.3.02</strong> <br />
51
• Weight – Optionally assign an Ink Weight (in g/m 2 ) to the selected colour. This weight is used in the <br />
InkKeyViewer (SoftProof) and in Calculate Ink Weights (QueueManager). <br />
• Spectrophotometer – Choose a supported Spectrophotometer to read colour values directly into the Special <br />
Colour Set. <br />
RIP <br />
Different RIPs store their files in different formats and in different locations. The RIP data type is used to <br />
configure how and where Veripress polls for these RIPped jobs. <br />
Driver <br />
This panel is where the driver used to poll and interpret the incoming file format is <br />
selected. The driver must match the type of RIPped file to be polled. Options available in <br />
other sections of the RIP configuration may change depending on the RIP input filter <br />
selected. <br />
• RIP Driver – Choose the RIP driver (input filter) from the list of supported RIPs. <br />
The list of available drivers will depend upon the bits enabled on the dongle. <br />
Custom Settings – Depending on the driver selected, there may be specific parameters requiring setup for a valid <br />
configuration. Use the Edit button to set up these parameters. <br />
Polling <br />
Polling is the method used to look for files. The configuration for polling the RIPped files is set up in this section. When <br />
you poll, Veripress looks in the specified location (defined under Paths) for files matching the RIP driver selected. A list <br />
is compiled and sent back to Veripress for display in the RIPMonitor. It takes <br />
three (3) successful polls before a file is shown in the RIPMonitor and the files <br />
must be stable (not changed since the last poll). <br />
The available options are: <br />
• Enable Polling – Turn polling on or off. <br />
• Poll Interval – Configure how frequently to poll for files. The Poll Interval should be set according to your <br />
specific requirements. Setting the Poll Interval too short can flood the network with polling requests (packets) <br />
causing it to slow down. Setting it too long can take a long time to show stable files ready for submission. <br />
• Fast Polling – This will automatically poll two (2) more times as soon as one (1) automatic poll has completed. <br />
It will not wait for the next scheduled Poll Interval before it polls again. Files may appear incomplete in the <br />
RIPMonitor if there has not been sufficient time between polls for a job’s complete set of plates to finish the RIP <br />
process. <br />
• Log Statistics – Log the polling statistics in the Server log. The log message reports “Started automatic poll on <br />
” when polling starts and “Completed automatic poll on ” when finished. <br />
• Ignore Mod Time – Ignore the modification time on the file. Useful for Harlequin RIPs that update the <br />
modification time on the file when moving the job between the Held and Active queues. <br />
• Job Genie – Assign a selected Job Genie to the RIP. This options becomes available when using a TIFF Based RIP <br />
(User Configurable), PDF or Postscript input filter. If used, only files defined as valid by the Job Genie will <br />
appear for submission in the RIPMonitor (see the Job Genie section for further details). <br />
Connection <br />
The connection specifies the method used for polling. The options are: <br />
• Agent – The most efficient connection method. This option connects to a <strong>Serendipity</strong> Polling Agent installed on <br />
the system where the RIP files are located. <br />
• Localhost – Polls a directory path on the computer where the Veripress Server is installed. <br />
• FTP – Uses File Transfer Protocol (FTP) to poll and transfer the files from the RIP to Veripress. <br />
• Secure FTP (SFTP) – Uses Secure File Transfer Protocol to poll and transfer the files from the RIP to Veripress. <br />
<strong>Serendipity</strong> <strong>Software</strong> -‐ Veripress User Manual – <strong>Version</strong> <strong>5.3.02</strong> <br />
52
File Transfer Priority <br />
This specifies the priority to be used for transferring files from the RIP to Veripress. You can adjust from Lowest to <br />
Highest or anywhere in between. <br />
Sometimes a high priority can affect the RIP performance, especially on older RIPs. This can cause problems, such as <br />
RIPs pausing. If this happens, reduce the priority level. <br />
Paths <br />
Specify the paths to the RIPped files residing on your RIP. This may be a single path or multiple paths and can be made <br />
up of striped paths. The path structure is dependent upon the RIP driver selected. The options available are detailed <br />
below. <br />
• New – Adds a new path or stripe path to the Paths field. Selecting this displays another window to type the <br />
path or browse to locate the folder containing the jobs. Browse will only work if the connection method has <br />
been specified and is valid. <br />
• Delete – Deletes the selected paths. <br />
• Delete All – Deletes all paths from the list. <br />
Most RIP drivers use recursive polling, i.e., they will poll down the directory structure into sub directories from the top-level<br />
directory specified in the path. The more sub directories to be searched, the longer it takes. Specify the path as <br />
close as possible to your files for quicker results. <br />
Stripe Paths <br />
Some RIPs place jobs on different drives, but in the same location. They can add more drives to a RIP, giving it a new <br />
mount point, for e.g., E:/RIPJobs, F:/RIPJobs and G:/RIPJobs. These all have a common path of RIPJobs, but are “striped” <br />
across 3 drives, therefore specify the drives (E:, F: and G:) in the Stripe Paths and the path (/RIPJobs) in Paths. <br />
Note: This is important for RIPs sharing plates from single jobs across multiple drives, for e.g., Cyan & Magenta on E <br />
drive and Yellow & Black of the same job on F drive. If this is not setup as a stripe, the plates will not be stitched <br />
together. <br />
AutoProofing <br />
Jobs can be submitted manually from the RIPMonitor as desired. Alternatively, you can configure the RIP to have jobs <br />
submitted automatically via the AutoProof facility. This way any new job that appears, if stable and meets the specified <br />
criteria, will be submitted for processing. The options available are listed below. <br />
• Enable AutoProofing – Turns AutoProofing on or off. <br />
• Printing – Specifies how the jobs are to be printed. Options are: <br />
o Copies – Specify the number of copies to be printed. Default is 0. <br />
o Use Pagesetup – Print to the selected Pagesetup. <br />
o Choose – Select an existing Pagesetup or create a new one if necessary. <br />
Criteria <br />
You can select certain conditions that must exist before a job is automatically submitted. The options are: <br />
• Delay (seconds) – The length of time to wait to see if a job changes prior to submitting. A job may change as <br />
other plates are RIPped and added to the job. A suitable amount of time needs to be specified in order to <br />
ensure a complete job is submitted. <br />
• Minimum Plate Count – Specify a certain number of plates that must exist before a job is submitted for <br />
AutoProofing. <br />
• Must Have – Select which process plates must exist in the job before AutoProofing. <br />
• Filter – Select a filter to use for AutoProofing. See the Regular Expression section for further information on <br />
Filters. <br />
• Delete Jobs From RIP After AutoProofing – Delete jobs after a successful AutoProof. This is only available when <br />
jobs are locally hosted (Localhost polling). This may be used when a temporary file is created, for example, <br />
when adding halftone dots to unscreened data. <br />
• Hold After Imaging – Places the job on hold in the Rendering queue after imaging has successfully completed. <br />
• Hold After Rendering – Places the job in a held state in the Output queue after rendering has successfully <br />
completed. <br />
Job Filtering <br />
This is only available when the RIP driver is set to poll imposition RIPs. You can specify if AutoProofing should be <br />
carried out on All Jobs or just Imposed Jobs. <br />
<strong>Serendipity</strong> <strong>Software</strong> -‐ Veripress User Manual – <strong>Version</strong> <strong>5.3.02</strong> <br />
53
Testing <br />
Once the configuration is complete, you can test the parameters are correct. The configuration must be saved before a <br />
test can be done. If it is not saved, you will be prompted to save and test. A test poll checks RIP connection, Path <br />
validity and job presence. Messages appear in the window to alert you to any problems or give confirmation of a valid <br />
configuration. <br />
Signature Group <br />
Import or create groups of Signatures, defining the page, sheet <br />
and size parameters of press impositions. The imposed files <br />
can then be submitted for de-‐imposition from the RIPMonitor and <br />
separated during processing into smaller groups or individual pages to <br />
fit the media, or to view a publication in its intended form. <br />
The interface has a toolbar with various options and a series of five (5) <br />
panels used to configure the Signatures. A display panel shows the <br />
layout of the selected signature(s) to the right. <br />
Toolbar Options <br />
• Group – Groups two or more pages together. Pages must be the <br />
same size and alignment. The Group button is only available when valid pages are selected. <br />
• Ungroup – Ungroup a group of pages. Only available when a group is selected. <br />
• Suppress Pages – Suppress the selected page or pages (marks it as not for print). <br />
• Auto Paginate – Automatically allocates page numbers to the signature. This will include any page currently <br />
suppressed. <br />
• Offset Page Numbers – Offsets the selected page numbers by the desired amount. Enter the offset value to be <br />
added to or subtracted from the page numbers. <br />
• Edit Page Numbers – Edits the page number of those selected. Tab moves to the next selected page. The page <br />
numbers can also be edited by clicking on the page. <br />
• Pair Pages – Automatically pairs the pages along the long sides. The pages must match, the headers must be in <br />
the same position and they must be joined (no gaps). If there is a gap, the manual pair option must be used. <br />
After pairing you may need to use the Close Page Number Gaps option. See below for further information. <br />
• Pair Pages Horizontally – Pairs pages in the horizontal direction. <br />
• Pair Pages Vertically – Pairs pages in the vertical direction. <br />
• Rotate Selected Signatures – Rotates the selected signatures by the amount chosen. The options are: <br />
o 90 Degrees Clockwise <br />
o 90 Degrees Counter Clockwise <br />
o 180 Degrees <br />
• Rename Signatures – Selecting this displays a rename box to search for and replace names. Options are: <br />
o<br />
o<br />
Find – Enter the characters to find in the list. <br />
Replace With – Enter the text to insert in place of the characters found. You can use any valid <br />
characters, including spaces. If nothing is entered, the characters found are deleted if one of the <br />
rename options is selected. <br />
o Ignore Case – Choose whether your match is case sensitive. <br />
o Wrap Around – Continue from the top of the list when the bottom is reached. <br />
o Rename All – Rename all items that are found. <br />
o Rename Selected – Rename the selected signatures if the characters are found. <br />
o Rename Current – Rename the currently selected signature if the characters are found. If more than <br />
one signature is selected, the first one in the list is checked for a match and renamed if true. <br />
o Find Previous – Searches backwards. <br />
o Find Next – Searches forwards. <br />
o Prefix With/Append – Two options allowing you to add characters before or after the names. <br />
• Import Signatures – Import a signature made by another application. The available types are: <br />
o DynaStrip – Files are usually named with a sheet number and a .dsf extension. <br />
o Preps – Files are Prep Templates. <br />
o Krause – Files usually end in a number, such as jobname.001. <br />
o JDF – Files usually have a .jdf extension. <br />
o Facilis – Files are usually named with a .dai extension. <br />
• Selective Import – Enable this to choose or alter any/all Signatures from the source file prior to import. The <br />
following options are available: <br />
<strong>Serendipity</strong> <strong>Software</strong> -‐ Veripress User Manual – <strong>Version</strong> <strong>5.3.02</strong> <br />
54
o<br />
o<br />
o<br />
o<br />
Group Pages – Group the pages together as they are imported. The pages must be the same size and <br />
align for grouping. The diagram shows a pink line around individual pages when they are not grouped <br />
or around all pages when they are grouped. Pages must group for pairing to work. <br />
Inclusive – This option attempts to group pages with parameters/alignments differing by very small <br />
amounts. <br />
Rotation – Choose to rotate the signatures during import. <br />
Offset Page Numbers – Offset the page numbers of those signatures imported by a number. <br />
Imported JDF files generally need to have the Offset Page Numbers set to 1, otherwise the first page <br />
will begin at 0. This can be changed after import if necessary. <br />
• Top Align / Left Align – Optional ways of viewing the interface, depending on your display and preferred <br />
layout. <br />
• Close Page Number Gaps – Use this to close the page numbers after pairing. When pairing a large publication, <br />
the lowest page number of the pair is used as the resultant paired page number. This usually produces gaps in <br />
the page numbers. Close Page Number Gaps closes the gaps so pages are sequential. <br />
• Import Language Encoding – Select the appropriate language encoding for the signatures so the names can be <br />
displayed correctly in the native language. This is set from the contextual menu (right click). <br />
Signatures <br />
This panel lists all of the Signatures in the group. The Plate, Sheet, Grid and Page options for <br />
the selected Signature are shown in the configuration panels on the screen. <br />
Signature Options: <br />
• New – Creates a new untitled signature. <br />
• Delete – Removes the selected signatures from the list. <br />
• Duplicate – Makes a copy of the selected signatures. <br />
Signatures can be multi-‐selected or dragged and dropped to another position in the list (for de-‐imposition purposes). <br />
When multiple Signatures are selected, all will be shown in the display panel. The Plate (if in use), Sheet and Pages <br />
settings can be edited to make mass changes to all selected Signatures. <br />
Display Panel <br />
Signatures selected from the list are displayed in this panel, with all Plate, Sheet and layout properties as defined in the <br />
configuration panels visually represented. If multiple signatures (or pages) are selected, differing parameter values will <br />
be shown by bold, underlined field titles in the configuration panels. <br />
The display panel is interactive and is used to: <br />
• Select one or more individual “pages” within a signature for editing in <br />
the Pages panel; <br />
• Select pages for grouping or ungrouping, pairing, or page offset; <br />
• Show where pages of multi-‐selected signatures fit within a publication <br />
in a bottom Page Navigator panel. Pages belonging to the signatures are <br />
shown in green; pages from non-‐selected signatures are shown in red; <br />
doubled-‐up pages are shown in purple. Selecting all signatures makes it <br />
simple to check the integrity of the Signature Group. <br />
• Select a page from the Page Navigator to highlight which signature it belongs to. <br />
When viewing multiple signatures, the thumbnail sizes can be increased or decreased with the cmd+/-‐ keys (Mac) or <br />
ctrl+/-‐ (Win). <br />
Plate <br />
Turn the Plate options on or off by selecting the Use Plate tick box. <br />
The Plate settings are: <br />
• Width <br />
• Height <br />
<strong>Serendipity</strong> <strong>Software</strong> -‐ Veripress User Manual – <strong>Version</strong> <strong>5.3.02</strong> <br />
55
• Centre Offset – The value to offset the centre by. This is dependent upon the gripper position. <br />
• Gripper Size <br />
• Gripper Position <br />
The plate width and height will alter the press Sheet size if the plate size is larger. If the plate size is smaller, the press <br />
Sheet size is not affected. A plate size larger than the sheet size will appear with a red line outline within the signature <br />
preview panel. <br />
Sheet <br />
Enter the dimensions of the press sheet in this panel. The options are: <br />
• Width <br />
• Height <br />
• AutoFit – Changes the press sheet size so the pages fit. <br />
Grid <br />
This panel is where the grid of pages that make up the imposition signature is defined or edited. The options are: <br />
• X and Y Position – This sets the top left position of the selected group or page in respect to the top left of the <br />
press sheet. <br />
• Page Size – Select the size of the single page selected from one of the <br />
pre-‐set page sizes or choose Custom. <br />
• Page Width – Enter the width of the single page selected. The pre-‐set <br />
page sizes automatically complete this field. <br />
• Page Height – Enter the height of the single page selected. The pre-‐set <br />
page sizes automatically complete this field. <br />
• Orientation – Select the orientation of the selected page between <br />
Portrait or Landscape. <br />
• Columns – Enter the number of columns for the signature. <br />
• Rows – Enter the number of rows for the signature. <br />
• Gutter X and Y – Enter the size of the gutter for the signature. If you select a gap first, the value is applied to the <br />
selected gutter only. If you wish to apply a value to All, Even or Odd, you need to select it from the pull down <br />
menu first and then enter the value. Press Enter to apply the value. <br />
• Delete – Deletes the selected pages or groups. <br />
• Duplicate – Duplicates the selected page or group. This is positioned at top left (X=0, Y=0). <br />
• New/Place – Creates a new page or group. Selecting this changes the button to Place. Enter the page attributes <br />
as desired and click Place to position the page or group. If you change your mind, press Esc to cancel. <br />
Pages <br />
• Number – Enter the page number of the selected pages. <br />
• Top Bleed – Enter the amount of top bleed to apply to the selected pages. <br />
• Bottom Bleed – Enter the amount of bottom bleed to apply to the selected pages. <br />
• Left Bleed – Enter the amount of left bleed to apply to the selected pages. <br />
• Right Bleed – Enter the amount of right bleed to apply to the selected pages. <br />
• Page Head – Select the position for the head of the currently selected pages. As you choose, the diagram shows <br />
the change. The page head is indicated by a line and folded corner. Choose between: <br />
o Page Head Up <br />
o Page Head Down <br />
o Page Head Left <br />
o Page Head Right <br />
<strong>Serendipity</strong> <strong>Software</strong> -‐ Veripress User Manual – <strong>Version</strong> <strong>5.3.02</strong> <br />
56
Special Colour Set <br />
Veripress uses special colour sets to identify and match colour plates when jobs are polled and processed. <br />
Special colours can be created manually, or imported from one of several popular applications. A library of <br />
sets can be built up for use in different proofing situations. <br />
Colours can be created in Lab and a CMYK or N-‐Colour colourspace, read directly into the system using an online <br />
Spectrophotometer, or imported from a CGATS file. Each colour <br />
can have its ink Paint Mode or Press Ink Weight set and have an <br />
individual DotGain Curve assigned to it. <br />
The interface includes a Toolbar with general creation and import <br />
options; a panel showing the list of colours in the Special Set; and <br />
another to adjust the properties of a selected colour. <br />
Toolbar Options <br />
• New Colour – Creates a new untitled colour in the list. <br />
Click on the name to change it. <br />
• Delete Colours – Deletes the selected colours. <br />
• Duplicate Colours – Makes a copy of the selected colours. <br />
• Rename Colours – Rename one or more colours using a <br />
popup Find and Replace tool. <br />
• Add Colours From Library – Select one or more colours <br />
from any other Special Colour Set created within <br />
Veripress. <br />
• Import Colours From Files – Import colours from <br />
compatible third party applications, CGATS/ISO 12642 <br />
files or previously exported colour sets. N-‐Colour swatches will not import unless an N-‐colour ICC profile with <br />
matching process colour channels is first assigned to the Special Colour Set. If CMYK swatches are imported to <br />
an N-‐Colour set, extra colour channels with 0% values will be added to match the colour space. <br />
• Export Colours To File – Export the colour swatches to a CGATS/ISO 12642 file. If the set contains a mix of <br />
CMYK/N-‐colour and Lab colours, you will be prompted to export either CMYK/N-‐colour or Lab colours. The file <br />
standard limits exported colours to one colourspace. <br />
• Reorder swatches – Change the order of the colour swatches as they appear in the list. <br />
Note: Swatch order can be important as a Pantone plate being matched from a number will be assigned the <br />
first colour when matching the number in the set list. <br />
• N-‐Colour Profile – Assign a multi-‐colour ICC profile to the Special Colour Set. <br />
Note: If an N-‐Colour multicolour ICC profile is assigned to the set, users will have the option to adjust colours in an Lab <br />
or N-‐Colour colourspace as defined by the ICC profile (e.g., Lab or CMYKOG). Colours for each Special Colour Set can <br />
only be defined in Lab and/or a single other colourspace. If no N-‐Colour profile is assigned, colours are adjusted using <br />
either Lab or CMYK values. <br />
All Toolbar options can be accessed via the contextual (right-‐click) menu available in the colour list panel, as well as: <br />
• Print – Prints the colour list of the Special Colour Set, with colour swatches and details for <br />
each colour (see below). <br />
• Print and Match Colour – Make adjustments to a selected special colour using printed <br />
swatch charts with variations of the colour. <br />
• Present Colour – Opens a resizable pop-‐up window displaying the selected colour along <br />
with its set and colour names. This option is useful for visually matching softproof special <br />
colours on screen. <br />
Colour List Panel <br />
This panel has a Search box at the top right for locating colours in the set list. The list has a series of sort columns, <br />
detailing properties of each special colour. <br />
The order of the columns can be changed by dragging them to the desired location and the headers are configurable via <br />
a context (right click) menu. The available columns are: <br />
• Colour – Gives a visual representation of the colour. <br />
• Name – The colour plate name (used to match the colours). Click on the colour name to change it. <br />
• Space – The colourspace of the plate. <br />
<strong>Serendipity</strong> <strong>Software</strong> -‐ Veripress User Manual – <strong>Version</strong> <strong>5.3.02</strong> <br />
57
• Values – Shows the colourspace values of the colour. <br />
• Mode – The Paint Mode of the colour (Overprint, Knockout, Primer, Opaque or Transparent). <br />
• Tint – The tint or intensity of the colour. <br />
• DotGain Curve – The name of the DotGain Curve applied to the plate (if any). <br />
• Weight (g/m 2 ) – The press Ink Weight of the colour in g/m 2 (if assigned). <br />
Double-‐clicking on an empty area of the list panel will open an Add Colours To Library window, allowing you to add <br />
colours to the set. Double-‐clicking on a selected colour in the list will open an Add Colours From Library window, <br />
allowing you to replace it with a chosen colour. <br />
Colour Adjustment <br />
View and adjust the colourspace values and plate properties of a selected colour. <br />
The name of the colour selected is shown at the top. A window displays the Original colour and the Modified colour as <br />
adjustments are made. A correctly calibrated monitor with an assigned Match ICC profile will display an accurate <br />
representation of the colours. <br />
Available adjustment options are: <br />
• ColourSpace – Choose between Lab or CMYK (or multicolour if an N-‐Colour ICC profile has been assigned to the <br />
Special Colour Set). The sliders change accordingly for making any adjustments to the Lab or CMYK/N-‐Colour <br />
values. The values can also be entered directly or fine-‐tuned using the up/down arrows. <br />
• Paint Mode – Choose the Paint mode for the colour. The choices are: <br />
o Overprint <br />
o Knockout <br />
o Primer <br />
o Opaque (Adds an Opacity % slider) <br />
o Transparent <br />
• Tint – Adjust the intensity of the colour by adjusting the slider, entering a tint value, or using the up/down <br />
arrows. <br />
• DotGain Curve – Choose a DotGain Curve to apply to the colour. <br />
Note: A DotGain Curve applied to a special colour has precedence over global Process or Special DotGain <br />
Curves assigned to a Pagesetup. The Pagesetup curves are ignored for the colour. <br />
• Weight – Optionally assign an Ink Weight (in g/m 2 ) to the selected colour. This weight is used in the <br />
InkKeyViewer (SoftProof) and in Calculate Ink Weights (QueueManager). <br />
• Spectrophotometer – Choose a supported Spectrophotometer to read colour values directly into the Special <br />
Colour Set. <br />
Print and Match Colour <br />
• Print and Match Colour is a tool used for visually matching special <br />
colours used in proofing to original print matieral, accessed via a <br />
button in the Special Colour Set toolbar. <br />
• The window has two (2) main panels – an upper Match Chart panel <br />
and a lower Colour List panel. <br />
Match Chart Panel <br />
• The upper panel displays three (3) swatch charts comprised of <br />
variations of the colour selected in the Special Colour Set. The <br />
selected (target) colour is the centre colour of the middle chart (chart <br />
2). <br />
• Any of the 27 patches can be selected to save as a new special colour, <br />
to save over and replace the originally selected colour, or set as the <br />
target (centre) colour for printing a new swatch chart set. <br />
• Variation – Controls the level of variance the swatch chart colours have from the <br />
original colour. Variation value steps in 0.5 increments from 0.5 to 10. The units <br />
represent L*, a* and b* variations from the Lab value of the original colour. Use the slider, up/down arrows, or <br />
type in the text field to change the current variation. <br />
• Set Target – Sets the currently selected colour patch as the Target (centre of chart 2). Swatch chart colours will <br />
change to variant colours of the new Target colour. <br />
• Print Match Chart – Prints the three (3) swatch charts displayed in the Match Chart panel for visual matching <br />
with original print/press material. <br />
<strong>Serendipity</strong> <strong>Software</strong> -‐ Veripress User Manual – <strong>Version</strong> <strong>5.3.02</strong> <br />
58
Note: The 3 swatch charts are printed as individual jobs and can be nested to save paper (see Output – <br />
Nesting). Charts should be oriented with the bars and text to the top for patch selection. Charts may not be <br />
nested in order so take note of the (1, 2, or 3) bars when selecting a patch in the interface. <br />
Colour List Panel <br />
The lower panel has two (2) tabs – Variations and Colour. <br />
Variations Tab <br />
This tab list includes a Colour Patch and Lab values for the original (Target) colour and the 26 variant colour patches. <br />
A colour selected in the Variations list will be highlighted by a box in the Match Chart panel. A colour selected in the <br />
Match Chart panel will be highlighted in the Variations list. <br />
Colour Tab <br />
This tab fills the panel with the currently selected colour variant. This option is useful for visually matching softproof <br />
special colours on screen. <br />
• Save – Saves the currently selected Target colour (centre of Chart 2) over the original special colour, replacing it. <br />
• Cancel – Cancels the Print and Match process without saving, closing the window. <br />
• Save As – Saves the currently selected Target colour (centre of Chart 2) to the set as a new special colour. Enter a <br />
name for the colour and click OK. Default name is that of the original colour followed by an asterisk (*). <br />
<strong>Serendipity</strong> <strong>Software</strong> -‐ Veripress User Manual – <strong>Version</strong> <strong>5.3.02</strong> <br />
59
Modules <br />
Modules are informational windows used for managing jobs as they pass through the system and to monitor Server and <br />
Client activity. Modules are arranged and utilised in a pre-‐configured format in the Jobs application; are able to be <br />
added and configured to a tabbed window as part of a Monitor layout via the Layout menu; or started up individually as <br />
standalone windows from the Module menu. <br />
There are twelve (12) modules to choose from: <br />
• BookMonitor – Similar to the RIPMonitor, this module displays a list of Books compiled via the Bookfilter. <br />
• ClientLog – Displays a log of Client messages that may be generated during normal Client operations. <br />
• ClusterStatus – Monitors the progress of Imaging and Rendering tasks on the Server and any active Cluster <br />
Nodes. <br />
• DropZone – A place to drag and drop files for processing. <br />
• MediaStatus – A window showing the current calibration status of a Media data type and a progress bar <br />
showing the amount of media (e.g. Paper) used. <br />
• QueueManager – View and manage jobs after they have been submitted for processing. <br />
• QueueStatus – A progress meter showing the current status of active jobs on the selected queue. <br />
• RIPMonitor – Displays the files polled using RIPs configured under the RIP data type within the Workbench. <br />
• ServerLog – Displays any system, error and polling messages from the Server. <br />
• Status – Shows the disk status (usage) of the Server processing areas. <br />
• Thumbnail – Displays a thumbnail of jobs as they image or render. <br />
• VirtualPress – Available within the RIPMonitor module. Allows for the assignment, alteration and management <br />
of plates to polled RIP jobs. <br />
<strong>Serendipity</strong> <strong>Software</strong> -‐ Veripress User Manual – <strong>Version</strong> <strong>5.3.02</strong> <br />
60
BookMonitor <br />
The BookMonitor module displays the publications polled from planning files using the BookFilter data type. The <br />
publications can be expanded to show a list of pages and filenames associated with each page. <br />
The module allows for quick viewing of large multi-‐section or multi-‐edition publications, such as newspapers. When <br />
View Original, Rendered or FlipBook are selected for a publication in the BookMonitor, it searches the chosen queues in <br />
the QueueManager for filenames matching those in the page list and assembles them on-‐the-‐fly for proofing in the <br />
SoftProof or FlipBook applications. The Page Navigator in both applications (SoftProof & FlipBook) will show any pages <br />
missing from the publication (those that have not yet arrived from the RIP). <br />
Toolbar Options <br />
• Expand/Collapse Jobs – Expand or Collapse the selected <br />
publications to list individual pages. Double-‐clicking a <br />
publication in the display panel will also expand/collapse the <br />
page list. <br />
• Poll – Poll the selected BookFilter for any planning files. Once <br />
polled, a list of the available planning file publications will be <br />
displayed. <br />
• Toggle Bookfilter Polling – Enable / Disable <br />
• Show BookFilter Menu – Enable / Disable a dropdown menu. <br />
• Show Bookfilter List – Enable / Disable <br />
• View Original – Opens the Imaged Preview of the selected <br />
publication in SoftProof. <br />
• View Printed – Opens the Rendered Preview of the selected publication in SoftProof. <br />
• View FlipBook – Opens the selected publication in FlipBook. <br />
• Queue Order – Select this to choose the Output queue in the QueueManager the Bookfilter will search for <br />
matching Imaged or Rendered job pages. <br />
• Calculate Ink Weight – Open the Ink Weights calculator window for the selected publication. <br />
Note: Books (publications) can be opened in one of two ways. Selecting the Book title, then View Original/View <br />
Rendered will open the Book at the first available page. Expanding a Book, selecting a specific page, then View <br />
Original/View Rendered will open the Book at the chosen page. <br />
View Options <br />
The following sort columns can be selected using the contextual (right click) menu on the sort column header bar in the <br />
Display panel: <br />
• Name – The name of the Publication / Page sourced from the planning file. <br />
• Section – Lists the section part of a page as defined in the Bookfilter JobGenie (optional) <br />
• Page – The page number of the page file as defined in the planning file. <br />
• Date – Date / Timestamp of the planning file <br />
• Date of Issue – The publication date of the publication/page as defined in the planning file. <br />
The order of the columns can be changed by clicking and dragging them to the desired position, or by using the <br />
Configure Headers option under the contextual (right click) menu. The columns can be manually resized by dragging <br />
the header divider bar to the desired width, or resized to fit content by double-‐clicking the divider bar. <br />
The contextual menu also has options to Edit BookFilter, change the Colour Scheme of the BookMonitor window, pick <br />
Font Options and choose the Language Encoding of the incoming poll data. <br />
<strong>Serendipity</strong> <strong>Software</strong> -‐ Veripress User Manual – <strong>Version</strong> <strong>5.3.02</strong> <br />
61
ClientLog <br />
The ClientLog displays any messages that pop up during normal Client <br />
operation. There are different levels of message, from informative to <br />
serious errors. All messages are held for a user-‐determined length of <br />
time. <br />
• Fetch back log – Displays the log for the time specified. For <br />
example, it retrieves and displays the last 4 hours of messages. <br />
Choose the time from the pull down list. <br />
• Trim older lines – Trims the log based on the time selected in <br />
Fetch back log. If this is set to 60 minutes, the log file is trimmed <br />
back so only the last 60 minutes remain. <br />
• Export – Export the log to a file. <br />
Note: When you export the log file you can choose to export everything in view or select entries to export. Use the <br />
filtering options and Fetch back log choice to limit the view before exporting. Selecting export displays a chooser, <br />
allowing you to enter a name and select the location to save the file. You can choose to save the file as html or as a tab <br />
delimited text file. <br />
Filtering Options <br />
You can choose which messages to display in the log and which to hide by ticking checkboxes for one or more of the <br />
following filters. All messages are saved to the log, even if filtered. <br />
• Question – Used for messages that ask questions, for e.g., “Job contains unassigned colours. Do you want to add <br />
them to VirtualPress.” <br />
• Information – Used for messages that tell you something, for e.g., “Job has a duplicate plate.” <br />
• Warning – Used where the message has a higher importance and (usually) the Client failed to do something, <br />
but operation can continue, for e.g., “Failed to save new password. Old password will continue to be used.” <br />
• Critical – Used for serious errors that will most likely affect operation, for e.g., “Failed to load rendering .dll.” <br />
You will normally be required to take action to rectify these errors before continuing. <br />
• Search – You can search the log for jobs or messages. Enter the text of characters you want to search for and <br />
the ClientLog only displays the lines that match the search. <br />
Display Options <br />
The following sort columns can be selected using the contextual (right click) menu on the sort column header bar in the <br />
log: <br />
• Type – The level of the message reported. For e.g., Question; Information; Warning or Critical. <br />
• Date – The time the message was reported. <br />
• Source – The module or application that reported the message. <br />
• Summary – A summary of the message that was reported. <br />
• Command – Internal command used to communicate messages to and from the Server by the Client. <br />
• Error – An error code reported by the Server. This is useful for de-‐bugging problems. <br />
• Action – The action taken by the user relating to the message. For e.g., the button pressed when the message <br />
popped up. <br />
The order of the columns can be changed by clicking and dragging them to the desired position, or by using the <br />
Configure Headers option under the contextual (right click) menu. <br />
<strong>Serendipity</strong> <strong>Software</strong> -‐ Veripress User Manual – <strong>Version</strong> <strong>5.3.02</strong> <br />
62
ClusterStatus <br />
The ClusterStatus is a monitor allowing you to see the current Imaging and Rendering status of jobs on any active <br />
Master Servers or Cluster Nodes: <br />
• Clustering – Open the Clustering application to manage the <br />
Cluster. <br />
• Refresh – Update the status. <br />
• Increase Inset (+) – Increases the gap between the list items. <br />
• Decrease Inset (-‐) – Decreases the gap between the list <br />
items. <br />
• Font Options – Change the size of the text. <br />
DropZone <br />
A DropZone is a place where you can drag and drop files for processing. The user selects Pagesetups or Pagesetup Pools <br />
to add to the DropZone as a DropSpot. These DropSpots accept the same file formats as the DropFolder (Postscript, <br />
PDF, JPEG, TIFF Image, <strong>Serendipity</strong> Blackmagic Image, EPS, PNG, PSD). <br />
The available contextual menu options are: <br />
• Add DropSpot – Select one or more Pagesetups/Media to add to the DropZone. Selecting this displays a chooser <br />
window, showing all available Pagesetups/Media. <br />
• Reorder DropSpots – Displays a reorder window. Select one or more DropSpots <br />
in the list and drag them to a new location, or use the up and down arrow keys to <br />
move the position. Click OK when finished. <br />
• Increase DropSpot Inset (+) – Increases the size of the DropSpot. <br />
• Decrease DropSpot Inset (-‐) – Decreases the size of the DropSpot. <br />
• Font Options – Change the size of the text. <br />
Additional contextual menu options are available for individual DropSpots: <br />
• Remove DropSpot – Remove the selected DropSpot. <br />
• Edit Pagesetup – Edit a section of the selected Pagesetup, all sections or create a <br />
new one. <br />
• Edit Media – Edit a section of the selected Media, all sections or create a new one. <br />
• Change DropSpot – Change an existing DropSpot. <br />
• Set Copies – Set the number of copies for every job dropped on the zone. <br />
• Set Colour – Select a colour from the list for the currently selected DropSpot. <br />
<strong>Serendipity</strong> <strong>Software</strong> -‐ Veripress User Manual – <strong>Version</strong> <strong>5.3.02</strong> <br />
63
MediaStatus <br />
The MediaStatus module’s function is to show how much of the media (e.g. Paper) has been used. <br />
A meter is displayed graphically, detailing the percentage used. For the Usage meter to function, values for the Media <br />
Length or the number of sheets loaded must be entered in the Output section of the Media data type. <br />
Each Media displayed in the MediaStatus window has the following information: <br />
• Media Name <br />
• Usage Meter – Bar showing the amount of media used. Text under the bar states the exact amount used as a <br />
percentage of the total units. <br />
• Reset Counter – Resets the usage count for the Media. <br />
• Logged Period – Time period (date and time, from and to) the Media has been tracked since the last reset. This <br />
information is shown/hidden using the Show Extended Info option. <br />
• Printed – Number of jobs and total printed area of jobs tracked since the last reset. <br />
A contextual (right click) menu has the following options: <br />
• Change Media – Change the selected Media for display in the status window. <br />
• Edit Media – Edit all or part of the selected Media. Copy it, or create a new one. <br />
• Media Order – Configure which queues are viewed by the MediaStatus window. Move Media between the <br />
Available and Showing columns in the popup chooser. <br />
• Show Extended Info – Show/Hide the Logged Period and Printed information for the selected Media. <br />
• Metric Units – Toggle between Metric or Imperial units for measurements shown in the MediaStatus window. <br />
This is enabled by default. <br />
• Increase /Decrease Status Width – Increase or Decrease the width or all Media panels in the window. <br />
• Font Options – Change the size of the text in the window. <br />
<strong>Serendipity</strong> <strong>Software</strong> -‐ Veripress User Manual – <strong>Version</strong> <strong>5.3.02</strong> <br />
64
QueueManager <br />
The QueueManager displays information about submitted jobs and the jobs’ current status. Queues can be viewed <br />
simultaneously, showing job progress through Imaging (where the incoming file is interpreted and its resolution <br />
sampled for conversion to the print resolution); Rendering (where colour management, cropping, rotation and effects <br />
are applied for printing); and Printing. <br />
The QueueManager also allows jobs to be <br />
manipulated in a number of ways, such as <br />
holding, promoting, deleting and re-‐rendering. <br />
View Options <br />
There is a lot of information available for viewing <br />
about each job as it passes through the system. <br />
The following sort columns can be selected using <br />
the contextual (right click) menu on the column <br />
header bar in the QueueManager display panel: <br />
• Name – Job name. <br />
• Process Time – Time taken to process the job. <br />
• Status – The jobs current status. <br />
• Source – The source of the submitted job. <br />
• Date – The date and time the job was <br />
processed. <br />
• Media – The Media used to process the job. <br />
• Pagesetup – The Pagesetup used to process the <br />
job. <br />
• Queue – The output queue the job was sent to <br />
for processing. <br />
• Size – The size of the job (disk space used). <br />
• Width – The width of the job <br />
• Height – The height of the job. <br />
• DPI – The imaged resolution of the job. <br />
• Output Colourspace – The colourspace of the <br />
output file. <br />
• Copies – When multiple copies of a job are sent <br />
for printing, this column counts down the <br />
number of jobs left to print. <br />
• Screening – The screening applied to the job. <br />
• Thumbnail – Shows a thumbnail of the job. <br />
• Job ID – The internal Veripress ID number for <br />
the job. <br />
• Node – The Server or Cluster Node the job was <br />
processed on. <br />
• Signature Group – The signature group used to <br />
de-‐impose the job. <br />
• Signature – The signature within the group <br />
used to de-‐impose the job. <br />
• Page – The page number of the job. <br />
• Publication – The publication name. <br />
• Notes – The number of notes saved with the <br />
job. <br />
• Section – The section of the publication.<br />
The columns can be manually resized by dragging the header divider bar to the desired width, or resized to fit content <br />
by double-‐clicking the divider bar. <br />
Toolbar Options <br />
• Queue Order – Configure which queues are viewed by the QueueManager – Available & Showing. <br />
• Render Queue Thumbnails – Enable or disable thumbnails for the Render Queue in the Thumbnails view of the <br />
QueueManager. <br />
• Show Idle Queues – Show/Hide entries in the QueueManager for idle processing queues. <br />
• Group by Queue – Enable/Disable the grouping of jobs by Queue before other column sorting is applied. <br />
• Show – Show certain jobs in the QueueManager. Select any or all of the options to filter jobs. Choose from: <br />
o Jobs – Display all jobs as text line entries. <br />
o Thumbnails – Display all jobs as thumbnails. This is the same as the Print Gallery mode. <br />
o Publications – Only display jobs belonging to a publication. <br />
For any of the above display modes, further filtering is available: <br />
Active – Jobs currently processing. <br />
Waiting – Jobs with a status of Waiting. <br />
Done – Completed jobs. <br />
• Search – Find jobs that are in the queue. All jobs matching the search text will be displayed. All elements of the <br />
jobs are searched against, not just the name, so this can be a useful filtering tool. The search can be inverted <br />
with cmd+shift+I (Mac) or ctrl+shift+I (Win). The search box will turn black to indicate when the inverse <br />
search is selected. <br />
<strong>Serendipity</strong> <strong>Software</strong> -‐ Veripress User Manual – <strong>Version</strong> <strong>5.3.02</strong> <br />
65
There are a number of actions that can be performed on a job. Options become available when one or more jobs are <br />
selected. Only actions valid for the job status are shown. For example, the action to Nest Now is only available if the job <br />
has a status of Waiting to Nest. <br />
The following are available in the Toolbar or by selecting job(s) and right clicking to access the context menu: <br />
• Job Info – Shows information about the currently selected job. The Job Info contains all details of how the job <br />
was processed and displays a thumbnail preview of the job and its configuration. Right clicking on the window <br />
and selecting Print can print the Job Info to a system printer. <br />
Note: Job Info & thumbnail can also be displayed by double clicking on the job. If multiple jobs are selected, double <br />
clicking will display info about all in the window. Holding the control key (Win) or command key (Mac) will allow the <br />
font size to be adjusted via the mouse wheel for easier viewing. <br />
• Job Ownership – Displays two panels – General and Ownership – showing the type, created and modified dates <br />
of the job plus the user and group permissions (See Accounts Admin/Secure Mode for more information). <br />
• Modify – Allows various attributes of the job to be modified. These include: <br />
o Name – Change the name of the job. <br />
o Publication Name – Change or add a publication name. <br />
o Page Number – Change the page number of the job. <br />
o Copies – Change the number of copies of a job. <br />
o Change Media – Change or assign a Media associated with the job. <br />
o De-‐Imposition – Change or assign a Signature and Signature Group to a job. <br />
• Reprint – Displays a window to reprint a job or jobs. <br />
• Cancel – Cancels the currently processing jobs. <br />
• Delete – Deletes the currently selected jobs. <br />
• Hold – Holds the currently selected job. Only available when the status is “Waiting”. <br />
• Release – Releases a currently selected Held job. <br />
• Retry – Retries a failed job. <br />
• View Errors – Views the errors of the selected job if the status is listed as Failed. <br />
• Rush Jobs – Moves the currently selected jobs to the top of the current queue for processing next. The status <br />
must be listed as Waiting. Jobs currently being processed will be completed first. <br />
Note: Rush Jobs will move the job up the current queue only. If the job is in the imaging queue and Rush Jobs is <br />
selected, the job moves to the top of the imaging queue. Once complete, it will move to the bottom of the rendering <br />
queue. You will need to Rush Jobs again to move it to the top of the rendering queue. <br />
• View Original – Views the Original/Imaged file for selected jobs in the SoftProof application. <br />
• View Printed – Views the Printed/Rendered file for selected jobs in the SoftProof application. <br />
• Render Again – Submits the selected jobs to the rendering queue for processing. Only available when the status <br />
is “Done”. <br />
• Move to Pagesetup – Moves the selected jobs to another Pagesetup. This will send the jobs to the rendering <br />
queue again with the attributes of the selected Pagesetup. View the Pagesetup, edit it, or create a new one prior <br />
to submitting the job. <br />
• Copy to Pagesetup – Copies the selected jobs to another Pagesetup. This will send the jobs to the rendering <br />
queue again with the attributes of the selected Pagesetup. View the Pagesetup, edit it, or create a new one prior <br />
to submitting the job. <br />
• Nest Jobs – Submits the selected jobs to be nested. This sends the job to the rendering queue to re-‐render for a <br />
nest. The Collating section of the Output is used for the nesting parameters. <br />
• Nest Now – This is available when the selected job has a status of Waiting to Nest. Only one job needs to be <br />
selected and all jobs with a Waiting to Nest status will be nested. <br />
• Duplex Now – Duplexes any job that has a status of Waiting to Duplex. Only one job needs to be selected and all <br />
jobs with a Waiting to Duplex status will be duplexed. <br />
• View FlipBook – Opens the selected job or publication in FlipBook. If the selected job is part of a publication, all <br />
pages will be shown. <br />
• Select Publication – Selects all the pages/jobs in the QueueManager belonging to the same Publication as the <br />
selected job. <br />
• Refresh All Queues – Updates the queues. <br />
• Export – Export data from the selected job. The available formats are: <br />
o CIP3 – Exports job information to a file in CIP3 format at the selected resolution. You can also select <br />
the orientation before exporting. Further options are: <br />
<strong>Version</strong> 2.1 <br />
<strong>Serendipity</strong> <strong>Software</strong> -‐ Veripress User Manual – <strong>Version</strong> <strong>5.3.02</strong> <br />
66
<strong>Version</strong> 3.0 <br />
Rotations <br />
Surface – Choose front or back. <br />
Compress Preview – Choose if the preview should be compressed. Some presses are unable to <br />
handle files in compressed format. <br />
o PDF – Exports the selected job in PDF at the resolution entered. Further options are: <br />
Compressions – JPEG, ZIP or LZW. For JPEG and ZIP you also have control on the level and <br />
quality of compression. <br />
o Postscript (separated) – Exports the current job as a separated PS file. <br />
o Tiff Multichannel – Exports the current file as a multichannel Tiff. <br />
• Calcheck Job – Launches the Calcheck application to check a job’s calibration status. The jobname is stored and <br />
the results can be exported or printed. Measurement results from the Calcheck are stored in the Job Info. <br />
• Calculate Ink Weight – Displays the Ink Weights window with the selected job’s ink weights and coverage <br />
shown. <br />
• Pause/Resume Printing/Processing – Pause or Resume the output queue of the selected job at their current <br />
stage of processing or printing (Imaging, Rendering, Nesting or Printing). Incomplete jobs in paused queues <br />
will display in red. <br />
• Change Output Media – Change the Media assigned to the output queue for the selected job. Once re-‐assigned, <br />
all jobs held awaiting the new Media will begin processing. <br />
• Auto Queue Order – When enabled, any new queues will be automatically shown in the QueueManager. <br />
Configuration Options <br />
The following options are available from the right click (contextual) menu within the QueueManager window: <br />
• Queue Colour – Select a colour for the currently selected Queue for easy identification. <br />
• Queue Order – Organise the queues into your preferred order, or adjust any settings. <br />
• Joblist View – View the queue in Joblist mode. This is the same as selecting Show > Jobs. <br />
• Publication View – View any publications in the queue. This is the same as selecting Show > Publications. <br />
• PrintGallery View – View the jobs as thumbnails. This is the same as selecting Show > Thumbnails. <br />
• Edit Output – Edit the Output and not the job. For changes to be effective, resubmit the job for printing or <br />
rendering, depending on the attribute changed. <br />
• Edit Media – Edit the Media the job was processed with. For changes to be effective, resubmit the job for <br />
imaging or rendering, depending on the attribute changed. <br />
• Edit Pagesetup – Edit the Pagesetup the job was processed with. For changes to be effective, resubmit the job <br />
for imaging or rendering, depending on the attribute changed. <br />
• Edit RIP – Edit the RIP of the source file (where the job was submitted from if a configured RIP). For changes to <br />
be effective, resubmit the job or refresh polling. <br />
• Edit Signature Group – Edit the Signature Group used for de-‐imposing of the currently selected job. For <br />
changes to be effective, resubmit the job for de-‐imposition. <br />
Important Note: When editing any of the items from here, you are editing the queue for all future jobs, not just the <br />
currently selected job. <br />
<strong>Serendipity</strong> <strong>Software</strong> -‐ Veripress User Manual – <strong>Version</strong> <strong>5.3.02</strong> <br />
67
QueueStatus <br />
The QueueStatus module is a progress meter that shows the current status of active jobs on the selected queue. The <br />
look and feel can be adjusted for the QueueStatus module and the queue it is monitoring. The options are available by <br />
right clicking on the window. <br />
Note: Not all options listed are available on all QueueStatus windows. Some are only available while the job is in <br />
progress. <br />
• Cancel Job – Cancels the currently active job and is only available when a job is active. <br />
• Job Info – Displays info about the currently active job. <br />
• Pause Printing/Processing – Pauses the queue so no further jobs will process. Any job currently active in the <br />
queue will finish. The text in the window changes to red, showing it to be in a paused state. <br />
• Resume Printing/Processing – Takes a queue out of a paused state so any waiting jobs can be processed. <br />
Note: The Pause/Resume function can be toggled using the tick box to the left of the progress bar. This <br />
function also affects the Output for the queue, changing the status to Active/Inactive. Inactive Output’s are <br />
displayed in red in the Workbench > Output > Items list. <br />
• Change Queue – Choose which queue the status window will show. <br />
• Edit Output – Edit the output or create a new one. You can only edit if the queue is showing an output. If the <br />
queue is set to Spooling, Auto Detect, Imaging or Rendering you can only make a new output. <br />
• Thumbnail – Turns on/off a mini thumbnail on the printer queues only, which gives an indication as to how <br />
much of the current job has printed. <br />
• Font Options – Change the size of the text. <br />
• Queue Order – Select which queues to view. Selecting this presents a chooser window showing two lists – The <br />
Available queues on the left and the Showing queues on the right. To move queues between lists, select one or <br />
more and drag from one list to another. Alternatively, double click to move between lists. The order of the <br />
queues in the Showing list determines the order of display. Queue Order can be used to show multiple Queues <br />
in a single QueueStatus window. <br />
• Increase/Decrease Indent – Increases or decreases the size of the QueueStatus in view. <br />
Double clicking the QueueStatus window displays a floating QueueManager window showing that queue. This has the <br />
full functionality of the standard QueueManager. <br />
<strong>Serendipity</strong> <strong>Software</strong> -‐ Veripress User Manual – <strong>Version</strong> <strong>5.3.02</strong> <br />
68
RIPMonitor <br />
The RIPMonitor displays the RIPs that have been configured under the RIP section of the Workbench. Jobs that have <br />
been successfully polled are displayed and can be expanded to show any associated plates. These jobs can then be <br />
submitted to a Pagesetup/Media for processing. <br />
View <br />
• Toolbar – Contains job handling functions and <br />
viewing options. <br />
• Jobs – This is the large window to the right and <br />
displays all successfully polled jobs from the selected <br />
RIP. <br />
• RIP List – A list of all the configured RIPs, allowing <br />
the user to select each in turn to display any jobs. <br />
This is on the left side of the window and can be <br />
shown or hidden as desired. Active RIP queues are displayed in black; inactive are red. <br />
• RIP Menu – This is a pull down list at the top of the window of RIPs configured and shows the current selection. <br />
Hiding the RIP Menu will also hide the Polling On/Off drop down selector. <br />
Note: If you only have one RIP configured it is better to hide the left RIP list and top RIP menu as there is nothing else to <br />
display. This will provide more room to view your jobs. <br />
Toolbar <br />
• Expand/Collapse Jobs – Show/Hide the plates associated with the selected jobs. Double clicking a job will also <br />
expand or collapse the plate view for the selected job. <br />
• Submit – Submits the selected jobs for processing. This pops up a chooser to select which Pagesetups and <br />
Medias to send the job to. <br />
• Submit for De-‐Imposition – Submits the jobs for de-‐imposition. This pops up a choose to select which Signature <br />
Group will be used to de-‐impose the job and which Pagesetup/Media combination will be used. <br />
• Submit As Imposition – Submits the job in it’s original form, but attaches a Signature Group via a popup <br />
chooser to allow the job to be deimposed on-‐the-‐fly using the De-‐Imposed Pages button in the Veripress <br />
SoftProof Touch Console (See the “Touch Console” section for more information). <br />
• VPress – Adds the selected jobs to the VirtualPress. For further information see the “VirtualPress” section. <br />
Note: The text in the Submit, Submit for De-‐Imposition, Submit as Imposition and VPress buttons will show in italics if <br />
the job selected has unrecognised or unassigned plates. The plates will need to be assigned using VirtualPress. <br />
• Group By Job – Keeps the plates in their respective job group when they are copied into the VirtualPress (see <br />
below note). <br />
Important Note: If you have multiple jobs selected for copying into VirtualPress, when this option is ticked they are <br />
kept as their respective jobs. If this is un-‐ticked, all the jobs and plates selected are copied in as one job. This is useful if <br />
you are polling a RIP and the plates are shown as separate jobs, with one plate each. <br />
• Poll – Initiates a manual poll of the selected RIP. <br />
• Toggle RIP Polling – Turns the polling on or off for the selected RIP. When the RIP is in the off state, the name in <br />
the RIP list turns red. <br />
Note: The RIP jobs list is cached and may require clearing. To do this, turn the RIP off and on again and click on the Poll <br />
button three (3) times consecutively. <br />
• Show RIP Menu – Shows or hides the RIP pull down list at the top of the window. <br />
• Show RIP List – Shows or hides the RIP list on the left. <br />
<strong>Serendipity</strong> <strong>Software</strong> -‐ Veripress User Manual – <strong>Version</strong> <strong>5.3.02</strong> <br />
69
Context Menu Options <br />
The following are available via the contextual menu (right click) from within the job Display panel: <br />
• Edit RIP – This enables the user to edit the RIP selected. Choose to edit a single section or all sections of the <br />
configuration. Alternatively, you can create a new RIP. <br />
• Colour Scheme – Choose a colour for the module. <br />
• Font Options – Choose the preferred font size. <br />
• Language Encoding – Choose the language encoding for the operating system. This allows jobs to display <br />
correctly in the RIPMonitor in the native language. <br />
Display Panel View Options <br />
The display panel columns can be configured to show specific information by right-‐clicking on the header titlebar. The <br />
following are available for display: <br />
• Name – Job Name (and plate names if expanded). <br />
• Size – The size of the job (disk space used). <br />
• Date – The data and time the newest plate belonging to the job was RIPped. <br />
• Path – The directory path to the RIPped file for an assigned job plate. This information is visible when the <br />
polled job is expanded. <br />
• Publication – The publication name. <br />
• Section – The section of the publication. <br />
• Page – The page number of the job. <br />
ServerLog <br />
The ServerLog shows messages from the Server. <br />
• Fetch back log – Displays the log for the time specified. For <br />
e.g., it retrieves and displays the last 4 hours of messages. <br />
Choose the time period from the pull down list. <br />
• Trim older lines – Trims the log based on the time selected <br />
in Fetch back log. If this is set to 60 minutes, the log file is <br />
trimmed back so only the last 60 minutes remain. <br />
• Export – Export the log to a file. Selecting this displays a window with further options as detailed below: <br />
o Destination File – Choose the filename and location where the file is to be saved. Use the Browse <br />
button to navigate to your preferred location. <br />
o Message Lines – Choose to save all messages in the log window or only those that are highlighted. This <br />
way you can save just a few lines if desired. <br />
o Format – Choose the format to save the file in, either html or plain text. The plain text file is saved with <br />
tab characters between the columns. <br />
o Cancel – Revert to the Server window without saving any changes. <br />
o Save – Save the file based on the settings selected. <br />
• Configure Filter – You can filter messages in the log. Choose between the following options: <br />
o Completed Jobs – Shows messages about completed jobs. <br />
o Polled Jobs – Shows messages about polled jobs. <br />
o Errors – Shows errors from the Server. <br />
• Search – You can search the log for messages. Enter the text of characters you want to search for and the <br />
ServerLog will only display the lines matching the search. <br />
Display Options <br />
• Module – This is the function that the Server used. <br />
• Routine – This is the operation inside the function. <br />
• Date – The time the Server called the module. <br />
• Message – The message resulting from the routine. <br />
<strong>Serendipity</strong> <strong>Software</strong> -‐ Veripress User Manual – <strong>Version</strong> <strong>5.3.02</strong> <br />
70
Status <br />
Status shows the current disk status (usage) of the Server processing areas, such as spooling, temporary directories and <br />
DropFolders. Editing the ss.conf file in the installation directory under the “etc” folder can change disk locations. <br />
The available options are: <br />
• Update – Checks the disks and updates the view. <br />
• Preferences – Sets the Status window preferences. A further option <br />
available is: <br />
o Update Interval – Sets the time between updates. <br />
• Colour Scheme – Changes the colour of the Status window. <br />
• Font options – Change the size of the text. <br />
Thumbnail <br />
This module displays a thumbnail of jobs as they are imaging and rendering. Thumbnail progress is updated at the <br />
same time as the Imaging or Rendering QueueStatus is updated. <br />
The following options are available from the contextual menu (right click): <br />
• Show Imaging – Show the Imaging thumbnail, denoted by “gears” in each inset. <br />
• Show Rendering – Show the Rendering thumbnail, denoted by a “paintbrush” in each inset. <br />
• Normal Thumbnail – Displays the default size thumbnail. <br />
• Large Thumbnail – Displays a large thumbnail. <br />
• Small Thumbnail – Displays a small thumbnail. <br />
Each active Thumbnail module may only show either Imaging or Rendering, not both. The module window displays as <br />
many Thumbnail insets as there are simultaneous Imaging/Rendering tasks configured in the Server Settings. <br />
VirtualPress <br />
VirtualPress gives users the ability to manage the plates of the job. You can drop plates, change plate colours and merge <br />
plates from other jobs. If a job contains an un-‐allocated plate (i.e., no colour), use VirtualPress to allocate a colour, <br />
unless a Replace Colour Set is selected containing the plate. <br />
• The History keeps jobs that have been imported into <br />
VirtualPress. Any changes or additions are kept so the <br />
jobs can be resubmitted at any time without having to <br />
recreate the changes. The history is held while the <br />
Client is running. Once the Client has quit, any history <br />
is purged. A 'Submit' button to the bottom left of the <br />
Virtual Press allows multiple VPress History items to <br />
be selected and printed simultaneously. <br />
• Quick Submit shows a pull down list of the configured <br />
Pagesetups. Clicking this button submits the selected job to the Pagesetup shown. The option to Hold After <br />
Imaging or Rendering is also available. <br />
• Edit Plate Colour displays a colour editor, allowing you to change the colour attributes for this plate only. The <br />
edit is not stored anywhere and does not affect the Special Colour Set. This option is also available when right <br />
clicking on a plate. <br />
• Choose allows you to select a colour from the colour libraries. This is only available for special plates. You can <br />
also double click the plate in the list to choose a colour from the libraries. <br />
• Reorder Plates allows you to change the order of the process plates. Plate position is used for Overprint, <br />
Knockout, Opacity and Transparency simulation. The order of the list dictates the order the plates are merged <br />
and can affect the job where plates have attributes such as Opacity. The button will appear in italics when the <br />
order has been changed from the original. <br />
<strong>Serendipity</strong> <strong>Software</strong> -‐ Veripress User Manual – <strong>Version</strong> <strong>5.3.02</strong> <br />
71
Applications <br />
The applications available within Veripress add functionality to the Client and provide additional tools for managing <br />
the Server and your jobs. <br />
There are twelve (12) Applications available, including the Workbench and Monitor. All are accessible via the <br />
Applications menu in the Client. Some can be launched via other Applications or Monitor Modules. <br />
The available Applications are listed here with further details on each following: <br />
• Archives – Make partial or complete backups of your Workbench configurations. <br />
• Clustering – Allocate and manage Imaging and Rendering tasks across multiple computers and networks. <br />
• Densitometer – Measure and display density readings taken with a Densitometer or Spectrophotometer. <br />
• Displays – Create ICC profiles for system monitors for accurate onscreen colour softproofing. <br />
• FlipBook – Display a publication as a 2D or 3D virtual book. <br />
• Jobs – Display jobs before, after and during processing and allows users to manage jobs through the system to <br />
plot their progress with a pre-‐configured user-‐interface. <br />
• Monitor – Display and manage jobs as they pass through Veripress (see the “Monitor” section for more <br />
information). <br />
• Press Agent – Interface with press console controls to load/reload softproofs. <br />
• SoftProof – Proof jobs onscreen. <br />
• Spectro – Display, compare and/or save colours measured using a Spectrophotometer. <br />
• Touch Console – Use a touch screen to load, manage and proof jobs within the SoftProof application. <br />
• Workbench – The principal configuration tool for Veripress (see the “Workbench” section for more <br />
information). <br />
<strong>Serendipity</strong> <strong>Software</strong> -‐ Veripress User Manual – <strong>Version</strong> <strong>5.3.02</strong> <br />
72
Archives <br />
The Archives Application allows you to make backups or archives of your Workbench configurations. Individual items <br />
or complete systems can be archived for safekeeping. Stored items can be loaded into the Archives Application for <br />
adding to the Veripress database. This can be used for copying a database to another Server, or for recovery from <br />
failure or corrupt configurations. You can configure the Archives <br />
Application to automatically backup your settings on a regular basis. <br />
Important Note: Archives cannot be back-‐ported to previous <br />
versions, i.e., version 5 archives cannot be used with version 3. <br />
<strong>Version</strong> 3 archives can be used with <strong>Version</strong> 5 however, and will be <br />
automatically allocated to their respective databases when loaded. <br />
File Menu Options <br />
• Open Archive – Open a previously saved archive. Browse and <br />
select an archive (.sdb file) to load. You can also load an <br />
archive by dragging the database into an open Archives <br />
Application. <br />
• Save Archive – Saves the archive to a (.sdb) file. <br />
• Close Archive – Closes the currently opened Archive. <br />
• Perform Full Backup – Adds all Workbench data types to a new Archives Application window. Once done, you <br />
are prompted to choose a name and location to save the file. Once saved, the Archives Application window is <br />
dismissed automatically. <br />
• Automatic Backup Preferences – Configure the frequency, time and location that a system backup is performed. <br />
The options are: <br />
o What Day – Choose a day of the week, every day, every number of days or never. <br />
o What Time – Choose the time the backup is performed. <br />
o Location – Choose the location the archive should be saved to. <br />
A check is performed when the Client is first started and every hour afterwards to see if a backup should be performed. <br />
The Client must be running for a backup to take place. The table below gives you a guide as to when a backup would <br />
occur in different scenarios. <br />
Auto Backup Time Client Started Client Quit Time Backup Performed <br />
Monday 2am Monday 9am No <br />
Tuesday 12:10pm <br />
Everyday <br />
12am Midnight <br />
Wednesday 11pm <br />
Tuesday <br />
9:30am <br />
Tuesday <br />
8:20am <br />
Thursday <br />
8:30am <br />
No <br />
No <br />
No <br />
Sunday 10pm Monday 8am Friday 5pm <br />
When Client is started – 9am <br />
Tuesday 12:30pm <br />
When Client is started – <br />
12:20am each day <br />
The following <br />
Wed at 11:30pm <br />
Never <br />
Edit Menu (and Context Menu) Options <br />
• Add to Archive (All) – Select everything or all of a particular data type, for e.g., All Pagesetups. <br />
• Add to Archive (Selection) – Select individual items from the database to add to the Archive. Selecting the type, <br />
for e.g., Gradation Curves, displays a chooser with all the Gradation Curves allowing you to choose one or more <br />
to add to the Archive. <br />
• Add to Database – Choose to add items from the Archive to the database. You can add the whole Archive or <br />
selected items. <br />
• Remove from Archive – Remove the selected items from the Archive. <br />
• Collapse – Collapses the selected items if they are expanded. <br />
• Expand – Expands selected items if the item contains references (denoted by a ‘+’). For example, a Pagesetup <br />
will contain at least a Media, an output and ICC Profiles. Expanding the Pagesetup will display the other items <br />
connected with it. <br />
• Open/Save/Close Archive – Open, save or Close the Archive as mentioned previously. <br />
<strong>Serendipity</strong> <strong>Software</strong> -‐ Veripress User Manual – <strong>Version</strong> <strong>5.3.02</strong> <br />
73
Clustering <br />
Clustering is the ability to share the workload of processing jobs across multiple devices. Slaves or cluster nodes can be <br />
installed on other machines on the network and jobs can be sent to them from the Master for processing. <br />
The Clustering application allows you to add and manage these cluster nodes. They can be enabled for use in imaging, <br />
rendering or both. <br />
As a node device starts up, its speed is calculated. When a job is submitted <br />
for processing, the Master machine has priority as no network traffic is <br />
required. If the Master is busy processing another job, the job can be sent <br />
to the fastest available node. The node processes the job and once <br />
completed, sends it back to the Master. It is then ready to accept another <br />
job. Nodes can be installed on any machine on the network. <br />
Running a Cluster Node requires a separate Veripress dongle. If you have extra Veripress dongles, any Server can act as <br />
a node if it is started as a Cluster Node (see “The Veripress Server” section for more information). <br />
Note: In this mode, the Server can only be used as a Node (slave) for another Server. It is recommended that the <br />
database be backed-‐up and job queues cleared before a Veripress Server is started as a Cluster Node. This avoids any <br />
conflicts with existing job IDs or settings. <br />
Master Panel <br />
This panel displays information about the Master Server machine. <br />
• Product – The Veripress software in use. <br />
• <strong>Version</strong> – The Server software version. <br />
• Hostname – The network name of the Master Server. <br />
• IP Address – The network IP address of the Server. <br />
• Speed – The relative speed of the Server, calculated by Veripress. <br />
• Processors – The number of CPUs in the Server machine. <br />
• Platform – The operating system/kernel version of the software. <br />
• Process Imaging/Rendering/Schedule Last – Check whether the Master Server is to perform any Imaging or <br />
Rendering Jobs. The Schedule Last option allows nodes to have priority over the Master when jobs are <br />
processing. This is advantageous when polling large RIPs, as it allows the Master to concentrate on gathering <br />
the list of jobs and displaying them. <br />
Cluster Nodes <br />
This list shows nodes that are available and running on the network. Information about each node is displayed in the <br />
window. Online nodes are displayed in green; offline nodes in red. <br />
The following sort columns can be selected using the contextual (right click) menu on the column header bar in the <br />
Cluster Node panel. Columns can be reordered by dragging and dropping them into the desired order, or by using the <br />
Configure Headers option in the contextual menu. <br />
The sort options are: <br />
• IP address – The network IP address of the Node. Checkboxes become available to enable the node and select if <br />
it is to be used for Imaging and/or Rendering tasks. Once enabled, the Master handles the clustering in the <br />
most efficient manner possible. <br />
• Hostname – The network name of the Node. <br />
• Speed – The relative speed of the Node calculated by Veripress. <br />
• Platform – The operating system/kernel version of the Node machine. <br />
• CPUs – The number of CPUs in the Server machine. <br />
• Product – The Veripress software being used for the Node. <br />
• <strong>Version</strong> – The Server software version of the Node. <br />
• Processing Pool – Optionally choose a Pagesetup Pool (see the Workbench – Pagesetup Pool section) for which <br />
the Node will perform image and render tasks. <br />
• Image – Shows the number of simultaneous Imaging tasks that can be performed by the Node. Click on the field <br />
to change the number. <br />
<strong>Serendipity</strong> <strong>Software</strong> -‐ Veripress User Manual – <strong>Version</strong> <strong>5.3.02</strong> <br />
74
• Render – Shows the number of simultaneous Rendering tasks that can be performed by the Node. Click on the <br />
field to change the number (see the Server Settings for details on Imaging and Rendering task settings). <br />
Refresh – The Refresh button polls the network for active Nodes and registers any Nodes in the list that are offline. <br />
Cluster Node activity can be monitored in the ClusterStatus module (see the Monitor Modules – ClusterStatus section <br />
for more information). <br />
Menu Options <br />
The following options are available from a contextual (right click) menu within the Cluster Node panel: <br />
• Add Node – Add a Cluster Node that cannot be seen. Sometimes Nodes on subnets cannot be detected. Enter <br />
the hostname or IP address of the Node and add it to the list manually. The Node to be added must be running. <br />
• Add Processing Pool – Select, change or remove the current Pagesetup Pool for which the Node performs <br />
Image and Render tasks. <br />
• Remove All Offline Slaves (Nodes) – Remove a Node from the list that has gone offline. <br />
• Remove Node – Available for offline Nodes only. This option removes the selected Node from the list. <br />
<strong>Serendipity</strong> <strong>Software</strong> -‐ Veripress User Manual – <strong>Version</strong> <strong>5.3.02</strong> <br />
75
Densitometer <br />
The Densitometer application allows you to measure and display density readings with a supported <br />
Spectrophotometer. When measuring a patch, the densities of all four process CMYK colours making up the patch are <br />
read. <br />
The Last Measured panel in the top half of the application window shows the density and dot percentage values for the <br />
dominant process colour of the measured patch, with the values of the other three colours to the right. The values can <br />
be recorded and saved to a file if desired. <br />
Note: The Densitometer application is a utility allowing you to use a Densitometer or Spectrophotometer that does not <br />
have a display to read values. This can be as a one-‐off reading to compare densities, or you may want to read values and <br />
export them for plotting on a graph. There is no requirement to use this for the normal operation of Veripress. <br />
Densitometer/Measurement/Paper Options <br />
• Yule Nielsen Number – Enter the YN number for the paper you are reading (if known). The default is 2.0. <br />
• Densitometer – Choose one of the supported instruments from the available list. <br />
• Instrument Default Density Standard – Select your desired density standard from the available list. <br />
• Activate/Deactivate – Connect or disconnect the chosen device. <br />
• Add – Add the measured values to the list. This appears after the Densitometer has successfully connected. <br />
To being measuring: <br />
1. Select a Densitometer from the dropdown list and click the Activate button. <br />
2. The status field is shown when the device connects without error. <br />
3. Follow any instructions when prompted – Calibrate, Measure Cyan Solid, etc. <br />
Measure Targets <br />
In order to read percentage tint values of any plate, you must first read the paper white and the solid density value for <br />
that colour. The Measure Targets menu or contextual (right click) menu allows for measuring the solid reference <br />
densities for the process colours and the paper white. With these values stored, colour percentages can be calculated <br />
and displayed. Measure or update an individual Solid density or Measure All Targets. <br />
Colour List <br />
This is a list of readings taken if the Add is enabled. Each reading is appended to the list and the values measured are <br />
displayed. The columns can be resized or reordered as required by dragging the header to the preferred position. <br />
The columns are: <br />
• Name – The name of the colour read. Defaults to “Untitled” but can be changed by selecting the name and <br />
entering a new one. <br />
• Colour – Shows the dominant colour read, i.e., the one with the highest density value. This may not be the <br />
colour you perceive it to be, but the contents making up the colour are recorded and the colour is calculated <br />
and shown. <br />
• Density – The density value for the colour. This is the highest density read from C, M, Y and K. It shows the <br />
density of the colour stated in the Colour column. <br />
• Cd/Md/Yd/Kd – The C, M, Y and K densities of the colour read. <br />
• Dot% – The dot percentage of the colour shown in the Colour column. <br />
• C%/M%/Y%/K% – The C, M, Y and K percentage values for the colour measured. If any of the % columns are <br />
blank, the reference paper white or solid density for that colour has not been measured. <br />
Export <br />
You can export the values from the Colour List to a file. The available options are: <br />
• All – Saves all entries in the list. <br />
• Selected – Save the selected entries in the list only. <br />
Selecting either of these options displays a window allowing you to choose the values to be saved. The choices are: <br />
<strong>Serendipity</strong> <strong>Software</strong> -‐ Veripress User Manual – <strong>Version</strong> <strong>5.3.02</strong> <br />
76
• Name – Save the name of the colour. <br />
• Colour Density – The highest density reading regardless of colour. <br />
• Cyan/Magenta/Yellow/Black Density – The density reading of the chosen colour. For e.g., if Cyan is selected, <br />
the Cyan density for each reading is taken. This is the value displayed in the Cd column of the list. <br />
• Colour Percentage – The percentage reading of the highest density read as displayed in the Dot% column. <br />
• Cyan/Magenta/Yellow/Black Percentage – The percentage reading of the chosen colour. For e.g., if Cyan is <br />
selected, the percentage of Cyan for each reading is taken. This is the value displayed in the C% column of the <br />
list. <br />
The percentage values must be present for the values to be exported. If they are not, the exported file will show a 1% <br />
value in place of the reading. <br />
• Order Values – Choose whether to export the file in CMYK or KCMY order. <br />
• Separate Values With – Choose to separate the values with either a tab character or a space. <br />
• Cancel – Cancels the Export action. <br />
• Export – Displays a file chooser allowing you to enter a name and select a location to save the file to. <br />
Table 1 – Supported Density Standards <br />
Density Standard - Status <br />
Instrument A E I T Default <br />
DTP41 <br />
DTP34 <br />
DTP22 <br />
DTP20 <br />
Spectrolino <br />
EyeOne <br />
Not all instruments support all density standards. <br />
This table is not a complete list. Consult your instrument user guide for more information. <br />
<strong>Serendipity</strong> <strong>Software</strong> -‐ Veripress User Manual – <strong>Version</strong> <strong>5.3.02</strong> <br />
77
Displays <br />
The Displays application uses a supported Spectrophotometer to calibrate and create an ICC profile for a selected <br />
monitor or light booth. Suitable graphics monitors can be calibrated to match a chosen print gamut, allowing colour <br />
accurate softproofing of print material and can be verified at any time to ensure correct colour output. <br />
Creation of a profile is very simple, requiring a supported instrument and a few minutes of time. The <br />
Spectrophotometer is placed on the screen to be calibrated. A series of adjustments are made to the screen gamma, <br />
white point and brightness (if available). Measurements are taken, from which an ICC profile is created and saved in <br />
Veripress and the operating system as the native display ICC profile. <br />
Note: The Displays application creates a profile for use with the Match ICC profile assigned to the monitor in Server <br />
Settings. Ensure the correct match profile is set before creating the monitor profile (see the Server Settings – Colour <br />
Management section for details). <br />
The Displays interface comprises of a function list (left) and a multi-‐purpose display area (right) that will change <br />
depending on the function selected. <br />
The function list is made up of the following selectable items: <br />
• Calibration – Lists each connected display available for calibration. <br />
• Calcheck – Lists each connected display available to calcheck. <br />
• History – Lists the calcheck history (reference only) of each connected display. <br />
• Ambient – Measure the ambient and white point of the light source. <br />
• Light Booth – Appears only when a light booth is connected and will list each connected <br />
device. <br />
Calibration <br />
The Calibration function displays currently connected monitors and their calibration status. <br />
By clicking on the Calibration header, each connected monitor shows the following details: <br />
• The name of the Display, viewable screen dimensions in mm x mm, and its <br />
identification number (in a multi-‐display environment). <br />
• Pixels (width/height). <br />
• Resolution (DPI). <br />
• ICC profile. <br />
• Calcheck Status. <br />
• Last Calibrated (time). <br />
• Calibration Expires (time period). <br />
• Hardware Calibration (supported or not for the particular display). <br />
By clicking on the Display name, calibration options and settings available for the monitor are shown. These include: <br />
• Brightness – Only available if hardware calibration is supported and selected for the monitor (see below). <br />
Choose to set the brightness level in either: <br />
o Candela – Brightness in cd/m 2 <br />
o Set the level from 0-‐100% <br />
o Measure – Click to use a connected <br />
Spectrophotometer to measure and display the <br />
brightness (cd/m 2) and white point (K) of the <br />
monitor. Follow any onscreen instructions for the <br />
selected instrument. The reading is constantly <br />
updated, allowing the user to manually adjust the <br />
brightness using the monitor’s own controls. This option is only available if the Use <strong>Software</strong> <br />
Calibration option is selected or is the only mode available (see below). <br />
• White Point – Select the white point temperature for the monitor. Choose from: <br />
<strong>Serendipity</strong> <strong>Software</strong> -‐ Veripress User Manual – <strong>Version</strong> <strong>5.3.02</strong> <br />
78
o Custom – Type in the field provided or use the slider to enter a custom temperature in Kelvin (K). <br />
o D50 – Sets the white point to D50 (5003 K/Horizon Light). <br />
o D65 – Sets the white point to D65 (6504 K/Noon Light). <br />
o Native – Sets the Displays application to use the monitors native white point. <br />
• Gamma – Select the gamma correction to be used for the monitor. <br />
o Custom – Type in the field provided or use the slider to enter a custom gamma value between 1.0 and <br />
2.6. The Custom button will auto-‐select if a non-‐standard gamma setting is chosen. Note: If either 1.8 <br />
or 2.2 are chosen, the 1.8 or 2.2 buttons will auto-‐select. <br />
o 1.8 – Select this to set the gamma correction value to 1.8. This button will auto-‐select if 1.8 is chosen <br />
via the Custom field/slider option. <br />
o 2.2 – Select this to set the gamma correction value to 2.2. This button will auto-‐select if 2.2 is chosen <br />
via the Custom field/slider option. <br />
• Options <br />
o Use Hardware Calibration – When supported, this option uses the monitor’s own internal hardware <br />
for calibration. <br />
o Use <strong>Software</strong> Calibration – Calibration is performed using the Displays application software. <br />
• Instrument (offline/online) / Instrument Name – Displays <br />
the currently activated instrument. <br />
o Instrument – Select from the list of supported <br />
Spectrophotometers to use for display calibration. <br />
o Display Type – Select the type of display being <br />
calibrated from LCD, CRT or RAW. <br />
• Monitor Identification Number – Click to popup an identification number in the centre of the screen for the <br />
display to be calibrated. <br />
• Calibrate – Click this button to start calibrating the selected display to the chosen settings and create the <br />
display ICC profile. Follow any onscreen instructions for your instrument. When calibration is complete, a file <br />
chooser will popup to name and save the ICC profile. The profile will be saved as the operating system native <br />
ICC profile for the display and will appear as the Native Profile in <strong>Serendipity</strong> Client Preferences > Colour <br />
Management (see System Settings for more information). <br />
• Save Profile – Opens a file chooser (as above) to save or rename the ICC profile. <br />
• Information Panel – Appears while the ICC profile is being generated, showing the progress and final results of <br />
the calibration process. <br />
Calcheck <br />
The Calcheck function displays Calcheck status summaries for all attached monitors, as compared to the values defined <br />
in the Calcheck Chart assigned to the SoftProof Default Press and Camera setting. <br />
Clicking on the Calcheck header allows users to quickly view whether a display is currently calibrated for softproofing a <br />
particular press profile. See Applications > SoftProof; Workbench > <br />
Press for details. <br />
Note: If a Calcheck summary is blank, this means: <br />
• No Calcheck data exists for the monitor; <br />
• That the current Calcheck for the monitor was measured <br />
against a different Calcheck Chart than the one assigned to the <br />
SoftProof Default Press; or <br />
• No Calcheck Chart has been assigned to the default Press. <br />
The top section of the display area shows: <br />
• Press – The currently selected SoftProof default Press configuration. <br />
• Calcheck Chart – The Calcheck Chart assigned to the above Press configuration. <br />
<strong>Serendipity</strong> <strong>Software</strong> -‐ Veripress User Manual – <strong>Version</strong> <strong>5.3.02</strong> <br />
79
The remainder of the display area shows the current Calcheck status of each connected monitor. Information includes: <br />
• Process Colour/Gray/Paper delta values <br />
• Average/maximum/standard deviation delta values <br />
• Display name (top left) <br />
• Timestamp of the last Calcheck (top right) <br />
• Chart and Instrument used (bottom left) <br />
• Overall Calcheck score (bottom left) <br />
Note: In cases where multiple areas of a screen have been calchecked, the summary will display the worst results from <br />
across all calchecked areas. <br />
Clicking on a Display name under the Calcheck header (e.g., iMac) will allow the user to perform a Calcheck on the <br />
chosen monitor. <br />
The main part of the display area (white box) will show the detail or summary of the Calcheck as it is performed. <br />
The top section above the main area has the following options: <br />
• Δ All – Shows all of the Δ results measured, as defined in the Calcheck Chart. <br />
• Δe – Shows all of the Δe results only. The Δe standard used <br />
(DeltaE/CIE94/CIE2000) is selected in the Calcheck Chart (see Workbench > Calcheck Chart for details). <br />
CIE2000 is a recommended standard to use for display verification. <br />
• ΔH – Shows all of the ΔH results only. <br />
• ΔC – Shows all of the ΔC results only. <br />
• Summary button – Shows Calcheck summary results. <br />
• Detail button – Shows results for each measured patch of the Calcheck Chart. <br />
The lower section of the main display area contains the following: <br />
• Screen Area buttons – These buttons enable the user to look at <br />
results from one of the nine (9) defined areas of the monitor <br />
screen. The buttons are grayed out (cannot be selected) if a <br />
screen area has not been calchecked. Areas that have been checked will enable the button and show whether <br />
the area passed (green) or failed (red) a Calcheck. <br />
• Instrument (offline/online) / Instrument Name – Displays the currently activated instrument. <br />
o<br />
o<br />
Instrument – Select which supported Spectrophotometer is to be used for the Calcheck. <br />
Measurement Type – Select which area of the screen to Calcheck or Calcheck the whole (3x3 grid) <br />
screen. The middle centre of the screen if the default option for standard Calchecks. <br />
History <br />
By clicking on the History header, users can see at a glance the Calcheck summaries for all attached monitors. This is <br />
useful for keeping track of any changes in your monitor’s performance (i.e., drifting). <br />
Information includes: <br />
• Process Colour/Gray/Paper delta values <br />
• Average/maximum/standard deviation delta values <br />
• Display name (top left) <br />
• Timestamp of the last Calcheck (top right) <br />
• Chart and Instrument used (bottom left) <br />
• Overall Calcheck score (bottom left) <br />
These summaries show Calcheck results for the monitor(s) in relation to <br />
the Calcheck Chart used at the time of checking (shown at the bottom left of the summary). The summaries are <br />
independent of the currently assigned SoftProof Default Press / Calcheck Chart although, in most cases they will match <br />
the current Calcheck summaries (see above section). <br />
<strong>Serendipity</strong> <strong>Software</strong> -‐ Veripress User Manual – <strong>Version</strong> <strong>5.3.02</strong> <br />
80
Clicking on a Display name under the History header (e.g., iMac) will allow the user to review past results of Calchecks <br />
for the monitor. The window shows a sort list of previous Calcheck results, with the time and date the Calcheck was <br />
performed and the Calcheck Chart used. Selecting a history item will display a summary or the detailed results. <br />
Calcheck history within the Displays application is only kept for a period of 30 days from creation for each history item <br />
Ambient <br />
By clicking on the Ambient header, the option to select a supported <br />
Spectrophotometer becomes available to measure the ambient (cd/m 2 ) <br />
and white point (K) of the light source, e.g., a light booth or room. <br />
• Instrument (offline/online) / Instrument Name – Displays the <br />
currently activated instrument. <br />
• Measure – Select from the list of supported ambient-‐mode <br />
Spectrophotometers to use for measurement. <br />
Note: For some Spectrophotometers, after initial instrument calibration, <br />
an ambient light filter will need to be attached before measurement. <br />
The lower, white area displays constantly updated measurements. <br />
Light Booth <br />
By clicking on the Light Booth header (when available), any currently connected <br />
light booths will be shown. <br />
Each connected light booth shows information on: <br />
• Name/Model <br />
• Driver <br />
• Driver <strong>Version</strong> <br />
Clicking on a light booth name under the header will make calibration options <br />
available for the booth. These include: <br />
• Brightness – Choose to set the brightness level in either: <br />
o Candela – Brightness in cd/m 2 <br />
o Set the level from 0-‐100% <br />
• Instrument (offline/online) / Instrument Name – Displays the <br />
currently activated instrument. <br />
o Instrument – Select which supported <br />
Spectrophotometer is to be used for the light booth <br />
calibration. <br />
o Adjust – Click this button to calibrate the brightness of <br />
the selected booth. Follow any onscreen instructions. <br />
Note: For some Spectrophotometers, after initial instrument calibration, an ambient light filter will need to be attached <br />
before placing it in the booth and commencing the booth adjustment. <br />
<strong>Serendipity</strong> <strong>Software</strong> -‐ Veripress User Manual – <strong>Version</strong> <strong>5.3.02</strong> <br />
81
FlipBook <br />
The FlipBook application is used to view a publication as a virtual book. In Veripress, a publication is defined as a group <br />
of pages with the same publication name. This is a collection of book or magazine signatures that have been de-imposed,<br />
but a publication may consist of any number of pages. <br />
FlipBook allows you to load the publication and flip through <br />
pages as you would with a real magazine or book. This enables <br />
you to check that the de-‐imposition has worked correctly, that <br />
pages are in the correct order, orientation and if there are any <br />
duplicates. Larger views of the pages can be called up and the <br />
whole publication can be exported to PDF or as a QuickTime <br />
movie. <br />
FlipBook can be opened in three ways: <br />
1. From the Application menu of the <strong>Serendipity</strong> Client. <br />
Publications can be dragged and dropped from the <br />
QueueManager into the FlipBook window and will open <br />
automatically. <br />
2. From the QueueManager application by selecting a job <br />
and choosing View Flipbook. The View FlipBook option <br />
is only available if the job has a publication name. <br />
3. From the BookMonitor application by selecting a <br />
Publication title and choosing View FlipBook. If the <br />
pages for the selected publication title have not been imaged or rendered in the QueueManager yet, the <br />
FlipBook will open but will not show any pages. <br />
The FlipBook window comprises of four (4) main panels – Publication, Pagination, Page View and Page Index. <br />
Publication Panel <br />
This panel contains the name of the Publication being viewed. <br />
Pagination Panel <br />
• Start – Enter the page number for the starting page or use the arrows to select the first page number of the <br />
FlipBook. If the first page loaded is page 1, you cannot alter the start page number. If the first page loaded is <br />
greater than 1, you can enter a lower value as the start page number. This can be used if you are viewing a part <br />
publication where the first pages have not been processed. <br />
• Top Page – Choose whether the top page of the FlipBook is Even or Odd. <br />
Page View Panel <br />
This panel is where the FlipBook pages can be viewed. When a FlipBook is opened, the pages of the publication are <br />
loaded and displayed in 2D (two-‐dimensional) view. There are various ways to navigate through the publication: <br />
• Clicking on the page of the image – If you click on the right page, you move forward through the publication. <br />
Clicking on the left page moves backwards. <br />
• Clicking on the pages in the Page Navigator Panel – displayed below the Page View panel. The view jumps to <br />
the page (pair) you select. <br />
• Space Bar – The space bar moves forward to the next pair of pages. Hold the shift key and press the space bar <br />
to move backwards. <br />
• PageUp/PageDown – Use these buttons on the keyboard to navigate forwards and backwards through the <br />
publication. <br />
• Arrow Keys – Use down or right arrow keys to move forward through the publication and left or up to move <br />
backwards. <br />
• Scroll Bar – Moving the scroll bar below the image moves forwards or backwards through the publication. <br />
<strong>Serendipity</strong> <strong>Software</strong> -‐ Veripress User Manual – <strong>Version</strong> <strong>5.3.02</strong> <br />
82
Page View (Contextual Menu) <br />
There are various options available from the context (right click) menu: <br />
• Open Publication – Opens a QueueManager showing all jobs processed in the system. Select a job or publication <br />
job to load and click OK. <br />
• Reload Publication – Reloads the current publication with files from the queue. This is used if additional files <br />
have been processed as part of the publication, or changes have been made and the publication needs to be <br />
updated. <br />
• Choose Press – Select a Press configuration to apply to the job currently (and subsequently) loaded into the <br />
FlipBook. (see Workbench -‐ Press for details) <br />
• Job Info – Displays the Job Info information about the currently selected page. (see Workbench -‐ <br />
QueueManager for details). <br />
• Swap Page with – Swap the page currently selected with another page from the same (currently loaded) <br />
publication. <br />
• View Original – Opens and views the imaged file of the selected page in the SoftProof application. <br />
• View Printed – Opens and views the rendered file of the selected page in the SoftProof application. <br />
• View 3D – Toggles between a 3D or 2D view of the publication. Three dimensional viewing shows the page <br />
turning as you navigate through. The turning speed can be adjusted FlipBook Settings. <br />
3D mode adds 2 sliders on the right side of the Page View. The first alters the angle at which the 3D virtual <br />
book is viewed, the second zooms the view in and out. <br />
Note: The performance of the page turning may vary depending on the size of the thumbnail being viewed and the <br />
performance of the graphics card. <br />
• View as Calendar – Only available in 3D mode. Changes the flip axis to horizontal so pages flip up and down in <br />
the same manner as a calendar. <br />
• Export – Exports the FlipBook as a PDF. Select the resolution, compression type and quality. Choose between <br />
exporting the whole book or a range of pages. <br />
• Export as Spreads – Exports the FlipBook as a PDF but as spreads. The same options as above apply. <br />
• Export as Movie (3D view mode only) – Exports the FlipBook as a QuickTime movie. After selecting this there <br />
are three further options: <br />
o Codec Type – Choose the preferred compression type from the menu. <br />
o Quality – Choose the preferred quality. <br />
o Keyframe Spacing – Choose how often a keyframe is saved. <br />
The settings you choose will affect the size of the movie, the quality and the compatibility with other applications. <br />
There are many Codec types available and not all work on all systems. Commonly used types are Apple MPEG4 and <br />
H.264 avc1. Increasing the quality setting also increases the file size. This is also true for the keyframes. The more <br />
keyframes, the better the quality but the larger the file size. Trial and error will provide you with the desired result. <br />
• Render Queue Thumbnails – View the Rendered thumbnails in rather than the default Imaged thumbnails. <br />
Page Index Panel <br />
The Page Index displays a numbered box for each page making up the loaded Publication. It allows for direct navigation <br />
to any page by clicking on it. <br />
The page boxes are colour coded: <br />
Light Green indicates the pages are loaded into the FlipBook and can be viewed. These show as dark <br />
green when selected. <br />
Purple indicates there are duplicate pages, i.e., they have the same publication name and page <br />
numbers. Dark purple indicates the pages are selected. <br />
Clicking on these pages allows you to select and view the alternative page: <br />
<strong>Serendipity</strong> <strong>Software</strong> -‐ Veripress User Manual – <strong>Version</strong> <strong>5.3.02</strong> <br />
83
Light Red indicates the page is not in the FlipBook. This occurs when there are other pages <br />
greater than the numbers displayed. This could be due to the imposition signature not yet being <br />
rendered. As they render, you can simply reload the publication to update the pages. <br />
The status colours are updated whenever Reload Publication is selected. <br />
A bar directly above the Page Navigator displays the Job Name for each currently viewed page on the left and right sides <br />
respectively. Pages with more than one version will show a dropdown to select which version to view. The Page <br />
Numbers being viewed are shown in the centre of the bar. <br />
Menu Options <br />
The following are available from the FlipBook File Menu: <br />
• Open Publication <br />
• Reload Publication <br />
• Export <br />
• Export as Spreads <br />
• Export as Movie <br />
Two other options are also available: <br />
• Edit Touch Console UI – Opens an Edit Interface window allowing for the configuration of the buttons enabled <br />
(and visible) for control of the FlipBook in the Main screen of the Touch Console (see the Applications – Touch <br />
Console section for more information). Enable or disable buttons by clicking on them. Those disabled will <br />
appear with a red cross and will be excluded from the Touch Console when using it to view a FlipBook. <br />
The Toolbar has a Preview toggle to see how the Touch Console controls will appear and a Reset button to <br />
restore and enable all buttons. <br />
• FlipBook Settings – Configure the FlipBook viewing options and press configuration. <br />
View Options <br />
o Allow Multiple Windows – Enable or disable. Allows multiple Publications to be opened and viewed in <br />
separate FlipBook windows. If disabled, a newly opened Publication will replace the one currently <br />
being viewed. <br />
o Page Order – Choose between reading left to right or right to left. <br />
o Flip Time (3D) – Select the speed for the flipping of pages when in 3D mode. <br />
o Render Queue Thumbnails – Enable or disable render queue thumbnails. <br />
o Show Borders (2D) – Enable or disable the borders when viewing in 2D mode. <br />
Press Configuration <br />
o View or change the Press configuration FlipBook uses to display Publications. <br />
View Menu <br />
These options are also available from the FlipBook View Menu: <br />
• View 3D <br />
• View as Calendar <br />
• Ink Weight – Opens the Ink Weights window displaying the FlipBook publication’s ink weights and coverage. <br />
<strong>Serendipity</strong> <strong>Software</strong> -‐ Veripress User Manual – <strong>Version</strong> <strong>5.3.02</strong> <br />
84
Jobs <br />
The Jobs application is used to display jobs before, after and during processing and allows users to manage jobs <br />
through the system to plot their progress. <br />
The Jobs application consists of an easy to navigate user-interface,<br />
with tabs and layouts available for various <br />
monitoring functions. Tab layouts may be added or managed <br />
according to individual preferences and are saved at the Client <br />
level, allowing different users to display information <br />
appropriate to their location and workflow. <br />
Jobs is the default monitoring application and will be run <br />
automatically on launch of Veripress after the initial software <br />
installation. <br />
Menu Options <br />
Tabs Menu <br />
• Add Tabs – Add a new tab to the Jobs application window. Select from a list of factory default layouts. New tabs <br />
can be imported for use via the Manage Tab Library option. <br />
The factory default tab layouts available are: <br />
o<br />
o<br />
o<br />
o<br />
o<br />
o<br />
o<br />
Job Queues (default loaded view) <br />
RIPMonitor – Adds a tab with the RIPMonitor module. <br />
Status and Drop – Contains the MediaStatus, Status, QueueStatus, DropZones and ClusterStatus <br />
modules. <br />
Logs – Contains the ServerLog and ClientLog modules. <br />
Jobs – Contains the QueueManager module with the Jobs view selected. <br />
Drop Area – Contains the DropZone module. Right-‐click to add any additional dropzones to the Drop <br />
Area tab. <br />
ServerLog – Contains the ServerLog module only. <br />
• Rename Tab – Rename the selected tab. <br />
• Manage Tab Library – Add, remove or preview tab layouts for Jobs application. <br />
• Close Tab – Close the currently selected tab. <br />
View Menu <br />
• Previous tab – Opens the previous tab window. <br />
• Next tab – Opens the next available tab window. <br />
• Titlebars – Show or hide the titlebars for each module within the Jobs application tabs. This will show or hide <br />
all titlebars in all tabs and is not limited to the currently selected tab. <br />
Job Queues Tab <br />
The default tab layout (Job Queues) for Jobs application contains the following modules: <br />
• QueueManager <br />
• Thumbnail – Imaging Preview <br />
• Thumbnail – Rendering Preview <br />
• QueueStatus – Imaging Queue <br />
For information on each module, see the relevant sections of this manual. <br />
<strong>Serendipity</strong> <strong>Software</strong> -‐ Veripress User Manual – <strong>Version</strong> <strong>5.3.02</strong> <br />
85
Monitor <br />
The Monitor application is an alternative user-‐configurable version of the Jobs application, central to the Veripress <br />
Client Interface (See Applications > Jobs). Like Jobs, it displays jobs before, during and after processing and allows users <br />
to manage jobs through the system to plot their progress. The <br />
Monitor provides feedback from the Server and Client via logs. <br />
Modules can be added and configured to suit specific <br />
requirements. See the Modules section for further information. <br />
The Monitor consists of one or more user-‐defined tabs. Modules <br />
are added, positioned and sized according to individual <br />
preferences. Settings are saved at the Client level, enabling <br />
<strong>Serendipity</strong> Clients on different systems or in different <br />
departments to display information appropriate to their location. <br />
The Monitor can be in one of two modes – Edit or Use. <br />
Edit <br />
This mode allows the user to move and resize modules on a tab. <br />
The mouse pointer changes to a cross when in Edit mode. Resize a module by grabbing the corners or sides and <br />
dragging to the preferred size. Click anywhere in the modules and drag it to the desired position. Modules close <br />
together will snap-‐to each other. <br />
While in Edit mode, all Monitor Modules have a contextual menu available (right-‐click) with the following options: <br />
• Remove (Module) – Removes the module from the Monitor tab. <br />
• Set Size For (Module) – Allow the user to enter a width and height (in pixels) for the selected module via a <br />
resize popup. <br />
• Duplicate (Module) – Duplicates the selected module. The duplicate has all the size, layout and configuration <br />
options of the original. <br />
• Use Layout – Switches the Monitor to Use Mode. <br />
Use <br />
This is the normal user mode. It locks the module sizes and position and allows you to configure the modules <br />
preferences and manage jobs. Select this after Editing to use the configured layout. <br />
Menu Options <br />
Layout <br />
• Edit – Switches the Monitor to Edit Mode (see above explanation). <br />
• Use – Switches the Monitor to Use Mode (see above explanation). <br />
• Dynamic Update – Enables or disables updates to the modules while in Edit mode. <br />
• Show Titlebars – Shows or hides module titlebars. <br />
• Add Modules – See the “Monitor Modules” section for further information on each module. <br />
• Load – Loads a previously saved Monitor configuration. <br />
• Save As – Saves the current Monitor configuration. <br />
• Search UI (User Interface) – Activates a search bar for finding buttons and functions in the current Monitor tab. <br />
Note: Module Toolbar functions can only be searched if the toolbar is open. <br />
Tabs <br />
• New Tab – Creates a new tab. <br />
• Rename Tab – Renames the currently selected tab. <br />
• Duplicate Tab – Duplicates the currently selected tab and all modules within it. <br />
• Choose Tab Colour – Select a colour for the currently selected tab. <br />
• Choose Tab Image – Select an image for the currently selected tab background. Valid types are PNG and JPEG. It <br />
is recommended a large image not be used, as it will take up memory. <br />
• Clear Tab Colour/Image – Reverts to the default background colour. <br />
• Remove Tab – Deletes the currently selected tab. <br />
• Remove All Tabs – Deletes all tabs. <br />
• Next/Previous Tab – Switches to the next or previous Monitor tab (right or left). <br />
Reordering Tabs <br />
Tabs can be moved to a new position by clicking on and dragging the tab to the desired place in the order. A red pointer <br />
appears, showing the drop point between two tabs. <br />
<strong>Serendipity</strong> <strong>Software</strong> -‐ Veripress User Manual – <strong>Version</strong> <strong>5.3.02</strong> <br />
86
Press Agent <br />
The Press Agent application allows Veripress to be connected to a Press console through a network port. <br />
After selecting the appropriate Press Agent Driver, a press operator can load or turn softproofing jobs/pages using <br />
press console buttons. <br />
Other options include interfacing with a press desk camera. The press operator turns a hardcopy page on the press <br />
desk -‐ Press Agent will use the page recognition data from the camera/console to automatically load the correct left and <br />
right pages, or page spreads. <br />
Log <br />
The Press Agent window has a central Log panel to show <br />
events/messages/commands received from the press console while <br />
the Agent is active. <br />
The following sort columns can be selected by using the contextual <br />
(right click) menu on the column header bar. Column order can be <br />
changed by dragging and dropping the columns, or by using the Configure Header option from the contextual menu: <br />
• Press – The Press console that generated the event/message/command. <br />
• Date – The date and time of the event/message/command. <br />
• Message – The event/message/command generated by the press console. <br />
Log Options <br />
• Fetch Back Log – Displays the log for the time specified. For example, it retrieves and displays the last 4 hours <br />
of messages. Choose the time from the dropdown list. <br />
• Trim Older Lines – Trims the log based on the time selected in Fetch Back Log. If this is set to 60 minutes, the <br />
log file is trimmed back so only the last 60 minutes remain. <br />
• Export – Export the log to a HTML or tab delimited text file. <br />
Interface Options <br />
• Press Agent Driver – Select the required Press Agent Driver from the dropdown list of supported press <br />
consoles. <br />
• Configure – Opens a Configuration pop-‐up for the selected Press Agent Driver. Available options vary <br />
dependent upon the press console driver. <br />
• Configure is not available while the Press Agent is running. Hit Stop if settings need to be changed. <br />
• Start/Stop Button – Starts or stops the Press Agent. <br />
<strong>Serendipity</strong> <strong>Software</strong> -‐ Veripress User Manual – <strong>Version</strong> <strong>5.3.02</strong> <br />
87
SoftProof <br />
The Softproof application is used to proof a job on the screen. There are many tools available to check every aspect of <br />
the job at any stage of production or processing. SoftProof can be used in conjunction with or instead of a hardcopy <br />
proof. Using a calibrated monitor and configured press settings, proofs <br />
can be viewed and verified onscreen with precise colour accuracy. <br />
All job plates are shown and can be turned on or off, or changed as <br />
desired. Colour attributes and plate characteristics can be changed to <br />
see the effects of different printing processes, including paper types <br />
and the effects of show-‐through from the reverse side. The data can be <br />
exported to various file formats, including CIP3 and PDF. An Ink Key <br />
Viewer can display a job as it would be on the press, with the values for <br />
each key shown. The ink weight can also be calculated and over-‐ink <br />
areas identified. The proof can also be verified using the Displays <br />
application to give a pass or fail status in accordance with colour <br />
standards. <br />
Layout <br />
The SoftProof application consists of a large, central viewing window for jobs; a visual Tools menu on the left and a <br />
View panel to the right; a Navigation Thumbnail at the top right; and a status bar along the bottom of the window. <br />
Navigation Thumbnail <br />
This thumbnail shows the entire image loaded for softproofing. The area currently shown in the <br />
main viewing area is represented by a rectangle on the thumbnail. Mouse over and left-‐click to <br />
view a new area of the proof. <br />
Status Bar <br />
This bar shows the information about the currently loaded proof, the SoftProof Press Setting and the current <br />
calibration status of the monitor in relation to the <br />
Press Setting (See Applications > Displays for more <br />
information on screen calibration). <br />
The left of the bar displays: <br />
• Jobname (Original/Printed Preview) and current zoom level % <br />
The right of the bar displays: <br />
• Current Press or Camera settings, along with the <br />
Embedded ICC Profile for the image (if applicable). Use the tick box to override the currently selected Press or <br />
Camera profile and enable the embedded ICC profile. <br />
Clicking on the Press or Camera profile button will popup a menu with the option to choose another Press/Camera <br />
setting if available. <br />
When Calcheck Managed is enabled (Client Preferences > Colour Management) a small tick <br />
or cross representing the Calcheck status will be displayed in the status bar at the bottom <br />
right of the SoftProof window. <br />
Hovering the mouse pointer over the cross or tick shows a tooltip (when Tooltips are enabled) displaying information <br />
including: <br />
• The ICC Profile used by the monitor (normally created using the Displays <br />
application, Calibrate option). <br />
• The Calcheck Chart assigned to the Press/Camera Settings currently used in <br />
SoftProof and the current Calcheck Status of the monitor. <br />
<strong>Serendipity</strong> <strong>Software</strong> -‐ Veripress User Manual – <strong>Version</strong> <strong>5.3.02</strong> <br />
88
Click on the Tick/Cross to popup a menu with the following options: <br />
• Calibrate – Begin calibration of the monitor using the current settings and Spectrophotometer assigned in the <br />
Displays application. Once calibrated, the monitor ICC profile is <br />
automatically saved as the operating system default replacing the <br />
previous ICC profile. <br />
Note: When calibrating or calchecking, the Spectrophotometer assigned in the Displays application for either tasks <br />
should be connected and ready for use. If the instrument is different to the assigned one an error will occur, ceasing the <br />
operation. It is recommended to check the appropriate Spectrophotometer has been assigned before using the Calibrate <br />
or Calcheck Monitor functions (see Applications > Displays). <br />
• Calcheck Monitor (Chart Name) – This option will open the Displays application and begin a Calcheck of the <br />
softproofing monitor using the Calcheck Chart assigned to the current Press settings. The chart is named in <br />
brackets. The pass/fail status may change as a result of the check. Detailed results can be viewed in the History <br />
area of the Displays application. <br />
Note on Spot Colours: When performing a monitor calcheck from the SoftProof application, any special/spot colours <br />
included in the currently loaded job are measured and added as extra patches to the end of the Calcheck Chart. <br />
Tools <br />
• Pan – Navigate around the image by clicking and dragging the job around the screen. <br />
• Zoom – Zoom in or out of the job. Clicking the mouse zooms twice the current percentage factor. <br />
SHIFT+Click will zoom out half the percentage factor. Click and drag over an area to zoom it. <br />
• Note – Create, manage and delete notes. <br />
• Measure – Take a measurement on the image. Use the shift key to draw straight lines. <br />
• Crop – Crop an image and resubmit it. <br />
• Guide – Display guide lines on the image to check for alignment. Change the orientation by pressing <br />
SHIFT. ESC will remove the guides. <br />
• Spectro – Take measurements of the job being viewed. A popup window will appear displaying the <br />
Lab/Lch/XYZ/Density values at the point the Spectro cursor is onscreen. <br />
Veripress only – Additionally, the Spectro Tool gives the user the option to choose an instrument which can <br />
be used to measure a hard proof. The measurement taken is compared to the softproof and the deltaE <br />
displayed onscreen. <br />
SoftProof Widgets <br />
There are four (4) sliding widgets available from the left panel of icons in the SoftProof viewing window. <br />
These include: <br />
• Channels <br />
• Publications <br />
• Ink Keys <br />
• Get Info <br />
Channels Widget <br />
The Channels Viewer shows the channels or plates of the job currently being <br />
viewed in SoftProof. Plates can be turned on or off by clicking the relevant coloured <br />
checkbox to the left of the plate name and can be reordered by clicking and <br />
dragging to a new position. The plate colour and associated attributes can be <br />
changed by double-‐clicking a choosing another Special Colour Set from the library, <br />
or edited for that SoftProof instance only. <br />
<strong>Serendipity</strong> <strong>Software</strong> -‐ Veripress User Manual – <strong>Version</strong> <strong>5.3.02</strong> <br />
89
• Name – The plate name. The checkbox indicates whether or not the plate is displayed. <br />
• Value – The percentage of colour at the point of the cursor in the window. Total ink displays the total amount <br />
of ink at the point of the colour selector, i.e., the sum of all plate percentages. For RGB it will show the relative <br />
RGB values only. <br />
The contextual menu (right-‐click) reveals additional options for non-RGB jobs only: <br />
• Choose Plate Colour – Select a plate colour from a Special Colour Set for the selected channel. Double-‐clicking <br />
will display the same Special Colour Set window. <br />
• Choose Paper Colour – Select a colour from the Special Colour Set to use to simulate the paper colour. Once set, <br />
the option to revert becomes available. <br />
• Edit Plate Colour – Displays a colour editing window to edit the selected colour for the current SoftProof <br />
instance only. The edits are not stored in a library. <br />
• Apply a Replace Colour Set – Select a Replace Colour Set to apply to the job. Any plates matching the set will be <br />
replaced. <br />
• Revert All Plates to Press Settings – Changes all plates back to the press configuration currently selected. <br />
• Apply Blueline Set – Replaces all colours with varying shades of blue to see any traps or bleed issues. <br />
Publications Widget <br />
When softproofing a job that forms part of a publication, additional controls and <br />
view options are available: <br />
• Single Page – Display just the single page selected. Disabling this option <br />
enables the following: <br />
o Show Back Page – Display the reverse side of a page through the <br />
page currently loaded, as if the final print was being held up to <br />
the light. The Back Page Opacity setting in the Press Settings <br />
controls the amount of show-‐through. <br />
o Show Page Spread – View the spread of the selected page, for example, pages 2 and 3 as a spread. <br />
• Edit Imposition – When an imposition flat is loaded, changes can be made to the Signature Group here without <br />
closing SoftProof. Any alterations can be viewed using Signature Overlay. <br />
o Show Signature – Overlays the signature used to de-‐impose onto the image. This is only available if the <br />
job has been de-‐imposed. <br />
o Show Deimposed Pages – When an imposition flat is being viewed, SoftProof will show all available <br />
pages when this is enabled. Each page from within the imposition may be previewed via the Page <br />
Index tab. <br />
Ink Keys Widget <br />
The Ink Keys icon will display the Ink Key Viewer containing the loaded image in the SoftProof window. <br />
At the bottom of the window will be a series of ink keys. Colour bars give a <br />
graphical display of the proportion of each ink contained within the job across the <br />
keys. <br />
For each key selected, the relative percentage of ink for each of the plates is <br />
shown. An information panel runs down the right side of the window. The top of <br />
the panel shows information about the currently loaded Press Settings. Job view <br />
and placement can be changed and ink weight can be calculated for any job. <br />
• Colour checkboxes – Positioned above the image, these show the inks or <br />
plates used in the job. Clicking on one will turn the others off and leave the <br />
ticked colour on. SHIFT+Click allows for multi-‐selection of colours. <br />
Double-‐click to show all. <br />
• Ink Keys – The keys at the bottom of the window show the inks selected to be viewed on a graph. The scale of <br />
the graph varies, depending on the amount of ink in the job. Hovering over or clicking on an ink key will display <br />
the key number and its ink values at the bottom of the information panel. <br />
• Press Settings – Shows the values for the currently loaded press. Click the box to show or hide the details. Press <br />
settings used are selected in the Default Press panel of the SoftProof Settings. <br />
<strong>Serendipity</strong> <strong>Software</strong> -‐ Veripress User Manual – <strong>Version</strong> <strong>5.3.02</strong> <br />
90
• Show Excess Ink Weight Area – Display areas exceeding the Maximum Ink Weight setting as defined in the <br />
Press configuration. <br />
• Max Ink Key Value – Set the size of the ink keys to match your press. Ink values are calculated based on the size <br />
entered. If the size is 100, percentages are displayed. <br />
• Sheet Placement – Show the job as positioned on the press sheet defined in the configuration. The job can be <br />
centered (selecting the Centre checkbox), or offset from the left (X) and bottom (Y). De-‐selecting this displays <br />
the whole job in the viewer and changes the ink keys to show total ink amounts for the job. <br />
• Ink Weight Calculator – Calculate the amount of ink required to print (x) number of copies. <br />
o Print Run Size – How many to print. <br />
o<br />
o<br />
Ink Weight (g/m 2 ) – Enter the weight of the ink used in grams per square metre. <br />
Calculate – Based on the values entered for ink weight and print run size, the total weight of ink for <br />
each colour will be calculated for the loaded job and displayed in the ink value area. <br />
Contextual (right-‐click) menu options include: <br />
• Show Ink Key Table – Shows a separate window, listing the ink key values of all keys for each plate. These can <br />
be printed using a local printer or exported to PDF. <br />
• Export Tab Delimited – Exports the values for the keys and ink values to a tab delimited text file. <br />
Get Info Widget <br />
The Get Info icon will display job information about the currently viewed image in SoftProof – <br />
how it was processed, what Pagesetup and Media were used and other useful processing <br />
information. Click the icon again to hide the panel. <br />
Loupe <br />
The Loupe is available via the sidebar menu. Once opened, the Loupe will appear <br />
with the default setting “Loupe to Mouse” enabled. <br />
Loupe Options (accessed via the Spanner icon): <br />
• Screened Pixel Readout (Veripress/Blackmagic Softproofing Add-‐On <br />
only) – Toggles the HUD between crosshair point measurement of ink <br />
percentages and a square for measuring area average dot percentages. <br />
The square resizes depending on the zoom level to always cover an area <br />
equal to a full halftone cell at the LPI defined in the SoftProof Settings. <br />
• Screening LPI – Enter the desired value for screen ruling for SoftProof in <br />
Lines Per Inch (LPI). The default is 150. <br />
• Loupe to Mouse – This is enabled by default. The mouse pointer location <br />
is used as the reference point for the Loupe display. This allows you to <br />
position the Loupe off image and use the mouse to display the relevant <br />
part of the image within the Loupe for proofing. <br />
• Rulers – Turn rulers on or off. The rulers will appear in the Loupe window with measurement units displayed. <br />
The rulers are centered or at the mouse pointer location if held over the Loupe window. <br />
<strong>Serendipity</strong> <strong>Software</strong> -‐ Veripress User Manual – <strong>Version</strong> <strong>5.3.02</strong> <br />
91
The Loupe is moved around the SoftProof by left-‐click and holding to drag it. <br />
The Loupe can be resized by clicking on the button with 3 lines (see image) and dragging outwards. The mouse scroll <br />
wheel will also increase/decrease the Loupe size when the mouse is positioned over the window. <br />
A number of display and control options are available via the buttons at the bottom of the Loupe window: <br />
• + (button) – Click to increase the zoom factor of the Loupe. The zoom factor is displayed at the bottom centre <br />
of the Loupe. Note: 100% = the resolution at which the proof was originally imaged, i.e., 1 screen pixel is 1 job <br />
pixel. <br />
• - (button) – Click to decrease the zoom factor of the Loupe. <br />
• Spanner – Opens the Loupe Options window. <br />
• Eye – Displays the HUD (Heads Up Display) showing the CMYK dot percentages at the centered crosshair or <br />
within the average percentage box. If the image is RGB, the relevant R, G and B values will be displayed. <br />
SoftProof Menu Options <br />
File Menu <br />
• Open Files – Load an image file directly into SoftProof. Supported file types are Canon RAW format (CRW), <br />
JPEG, PNG, PPM, <strong>Serendipity</strong> Blackmagic Image, TIFF and Adobe Photoshop PSD. <br />
• Open Jobs – Load completed jobs into SoftProof. The Imaged (Original) or Rendered (Printed) file may be <br />
viewed. <br />
• Save – Save the preview as a Blackmagic Image File. This can be submitted or placed in a hot folder, or on a <br />
DropSpot. <br />
• Export – Export data from SoftProof. The available formats are CIP3, PDF, Postscript (Separated) and TIFF <br />
Multichannel. <br />
• Submit – Submit the current job to a Media and Pagesetup with any changes. This re-‐images and re-‐renders the <br />
file. When submitting the image to be processed again with any relevant changes, the current image resolution <br />
is submitted. If the resolution is restricted in the Server Settings, this is the resolution that will be used. <br />
• Edit Touch Console UI – Opens an edit interface window to allow the configuration of the enabled (visible) <br />
buttons for control of SoftProof in the Main screen of the Touch Console. Buttons are enabled or disable by <br />
clicking on them. Any disabled will appear with a red cross and will be excluded from Touch Console when <br />
using it to view softproofs. The Toolbar has a preview checkbox to see how the Touch Console controls will <br />
appear and a Reset button to restore and enable all buttons. <br />
• SoftProof Settings – Opens the preferences for SoftProof, allowing for configuration of default viewing <br />
conditions. See below for further information. <br />
SoftProof Settings <br />
The SoftProof Settings allow you to select viewing preferences including how to load a job, and the quality and press <br />
settings used to produce accurate proofs. The settings window is split into three (3) tabs – View Options, Default Press <br />
and Default Camera. <br />
View Options <br />
Window <br />
• Allow Multiple Windows – When enabled, allows jobs to be opened <br />
and viewed in separate SoftProof windows. If disabled, each job <br />
viewed will appear in a tab running along the top of the same <br />
SoftProof window. If a job is dragged and dropped into SoftProof from <br />
the QueueManager, it will replace any open image in the viewing <br />
window selected. <br />
• Status Bar Size – Select the size of the status bar text from Small, <br />
Medium or Large. <br />
• Rulers – Show or hide the rulers. <br />
• Scrollbars – Show or hide the scrollbars. <br />
On Load <br />
• Honour Embedded ICC Profiles – When enabled, this will honour any <br />
embedded ICC profiles when viewing the image in SoftProof. <br />
<strong>Serendipity</strong> <strong>Software</strong> -‐ Veripress User Manual – <strong>Version</strong> <strong>5.3.02</strong> <br />
92
• Rotation – Control the orientation of jobs when they first load. The option None leaves the job in its imaged or <br />
rendered orientation. <br />
• Zoom Level – Select the default zoom setting. All fitting zoom modes calculate the size based on the monitor <br />
resolution. This is set in the Colour Management tab of the Client Settings. <br />
• Show Back Page – (Checkbox) Toggles whether publications with consecutive pages will open in SoftProof <br />
displaying back page show-‐through (based on Press settings) by default. <br />
Publications <br />
• Enable Pager Thumbnail – Enable or disable the thumbnail viewer when viewing a publication. When enabled, <br />
a thumbnail of the page appears when the mouse pointer hovers over the page number box. <br />
Image <br />
• Resampling Algorithm – Set the resampling algorithm for jobs as they are viewed in SoftProof. <br />
• Screening LPI – Enter the desired value for screen ruling in lines per inch (LPI). The default is 150. <br />
Default Press <br />
The default press tab allows you to select a Press configuration from the database to be <br />
applied to the loaded job and for all subsequent jobs opened in SoftProof. The results of <br />
the press settings can be seen on the output job and should match the printed copy. <br />
An information window shows the settings of the currently loaded Press setup. <br />
Configurations are managed in the Workbench and contain information such as size, <br />
number of keys and colour information. <br />
Default Camera <br />
The default camera tab allows you to select a Camera configuration from the database to <br />
be applied to any loaded jobs using an RGB colourspace. If Honour Embedded ICC <br />
Profiles in the SoftProof Settings is unchecked and the RGB image contains an ICC <br />
profile, the default camera configuration will be used in its place. <br />
An information window shows the settings of the currently loaded Camera setup. <br />
Camera configurations are managed in the Workbench and contain information such as <br />
the ICC profile to be used, rendering intents, black point compensation and Calcheck <br />
Chart reference. <br />
View Menu <br />
Select menu items are also available as icons within the SoftProof window (see image). <br />
• Tabs – Control the tabbed viewing of images in SoftProof. <br />
o New tab – Opens a new, empty tab ready for a job. Use the Open Job option <br />
or drag and drop a job from the QueueManager to view it. <br />
o Close Tab – Close the currently selected tab. <br />
o Next Tab – Loads the next available tab. <br />
o Previous Tab – Loads the previous tab. <br />
o Show Tab – Show/hide the tabs listed at the top of the screen. <br />
• Get Info – Display information about the softproofed job and how it was processed. <br />
• Show Page Boundary – Display a red line around the page area of the job. <br />
• Show Notes – Display any notes attached to the job. <br />
• Screened Pixel Readout – Toggles the HUD between crosshair point measurement of ink percentages and a <br />
square for measuring area average dot percentages. The square resizes depending on the zoom level to always <br />
cover an area equal to a full halftone cell at the LPI defined in the SoftProof Settings. <br />
• Ink Weights – Opens a window displaying the ink weights (source and print inks) for the job. <br />
• Proof Colours – For use with RGB images only. Automatically select a Press Configuration to display onscreen <br />
what the RGB image will print like using a specific Press profile. The selected Press will appear in the status bar <br />
at the bottom right of the screen. Clicking the status bar button will allow you to adjust which profile is used. <br />
• Zoom In/Out – Zoom in or out of the image. <br />
• Show All – Fit the entire job into the SoftProof window. <br />
<strong>Serendipity</strong> <strong>Software</strong> -‐ Veripress User Manual – <strong>Version</strong> <strong>5.3.02</strong> <br />
93
• Show Actual Pixels – One pixel of the screen is equal to one pixel of the job. <br />
This is shown at 100%. This view mode has the quickest load time as <br />
resampling for scaling is not required. <br />
• Show Actual Print Size – Show the print size of the job. <br />
• Fit Width/Height – Fit the job to the height or width of the SoftProof window. <br />
• 90 CW – Rotate the image 90 degrees clockwise. <br />
• 90 CCW – Rotate the image 90 degrees counter-‐clockwise. <br />
• 180 – Rotate the image 180 degrees. <br />
• Invert – Invert (negate) the image. <br />
• Mirror – Mirror the image. <br />
• Autocrop – Remove any whitespace around a job. There must be a completely <br />
clear area on any one side of the job. <br />
• Unsharp Mask – Apply an unsharp mask to the image. This will affect the edges <br />
within the image. <br />
• Full Screen – Switch between full screen mode and window mode. <br />
• Thumbnails – Select the Thumbnails tab within the SoftProof window. <br />
• Page Index – Select the Page Index tab within the SoftProof window. <br />
• Notes – Select the Notes tab within the SoftProof window. <br />
• Loupe – Display a virtual loupe on top of the loaded image. The loupe can be <br />
resized and magnification level changed if required. The current magnification <br />
is shown at the bottom of the Loupe; 100% means 1 screen to 1 job pixel. <br />
Thumbnail Panel <br />
The thumbnail panel displays a small image of any jobs currently open in SoftProof. Clicking on the <br />
relevant image will switch the SoftProof preview to that window. <br />
Notes Panel <br />
Notes gives users the ability to draw a text box on the imaged <br />
or rendered SoftProof to make a note. The note is attached to <br />
the job file and remains attached until it is either deleted or the job is <br />
removed from the system. There is no limit to how many notes can be <br />
created, and they can be shown or hidden as required. <br />
Notes cannot be attached to files opened in SoftProof via File Menu > Open <br />
Files. The file needs to be submitted as a job before any embedding of notes can take place. <br />
When creating a note with the Note Editor, a configurable arrowhead pointer option is available along with the existing <br />
area marker for a more precise commentary on the job. The User and Group of the note creator are also displayed (see <br />
Secure Mode). Notes can be edited or the pointer adjusted by double-‐clicking on the Note. <br />
The Note panel displays any notes attached to the job currently selected in the main viewing window. There is also a <br />
Note column in the QueueManager showing the number of notes attached to a particular job. The Notes icon on the left <br />
menu bar is used when adding Notes to the softproofed image. The Notes icon in the right panel is used to display or <br />
hide any notes on the image. <br />
• Show Notes – Show or hide the notes on the preview. Notes can also be toggled by clicking the icon on the right <br />
panel (see image above). <br />
• Text – The text making up the note. <br />
• User / Group – The User and Group responsible for the note. <br />
Page Index Panel <br />
The Page Index panel displays a numbered box for each page making up the loaded publication. This <br />
allows for direct navigation to any page by clicking on the page number. Hovering the mouse over a page <br />
number will pop-‐up a thumbnail for the page. <br />
<strong>Serendipity</strong> <strong>Software</strong> -‐ Veripress User Manual – <strong>Version</strong> <strong>5.3.02</strong> <br />
94
The page boxes are colour coded: <br />
Light Green indicates the Publication pages are loaded and can be viewed. These show as dark green <br />
when selected. <br />
Purple indicates there are duplicate pages, i.e., they have the same publication name and page <br />
numbers. Dark purple indicates the pages are selected. <br />
Clicking on these pages allows you to select and view the alternative page: <br />
Light Red indicates the page is not yet available for viewing in SoftProof. This normally occurs <br />
when there are page number gaps if pages have not yet imaged or rendered; or when processing <br />
a de-‐imposed publication with known (signature defined) page numbers. As the missing pages <br />
image/render, close and re-‐open SoftProof to update the publication pages. <br />
<strong>Serendipity</strong> <strong>Software</strong> -‐ Veripress User Manual – <strong>Version</strong> <strong>5.3.02</strong> <br />
95
Spectro <br />
The Spectro application allows for the measurement of colours with a Spectrophotometer. The accuracy of the <br />
measured value can be viewed against an imported value <br />
when mapped through a selected ICC profile. <br />
The window is split into two sections. The right side allows for <br />
the import and viewing of a Special Set, which is used as the <br />
comparison base. The left side displays the measured values. <br />
Selecting a particular measured value matches the closest <br />
colour of the imported set, giving it relative deltaE values. <br />
These can also be filtered to only show the closest matches for <br />
better viewing. <br />
Options <br />
• Load Set – Select a Special Colour Set to load. This is <br />
the set used to compare measured values with. Choose from any of the Special Colour Sets created. <br />
• Match ICC – Select a Match ICC profile. <br />
• Rendering Intent – Select the rendering intent for the Match profile. <br />
• Spectrophotometer – Select your device from the list of supported Spectrophotometers. <br />
• Activate – Connect to your selected device. Once connected, the pull down device list will change to display any <br />
status messages from the device and the values measured. <br />
• Turn Off – Disconnects the connected Spectrophotometer. Alternates with the Activate button. <br />
• Add – Select this to append to the list for each reading. If this is not selected, the last reading is updated. This is <br />
available after the device has successfully connected. <br />
• e – Select the value of deltaE to display for when comparing measured colours with those in a loaded set. This <br />
is used in conjunction with the Show All Swatches option. <br />
• Show All Swatches – Select this to view all swatches. By de-‐selecting this, only those swatches below or equal <br />
to the deltaE value entered will be displayed. Colours within the defined tolerance values will show in blue. <br />
Measured / Loaded Set Panels <br />
The Measure and Loaded Set panels show the following information: <br />
• Colour – A swatch visually representing the colour. <br />
• Name – The name of the colour. This can be edited by clicking in the name field. <br />
• Space – The colourspace of the colour (Lab or CMYK). <br />
• Mode – The paint mode of the colour. <br />
• Tint – The tint value of the colour. <br />
• DotGain – The dotgain curve assigned to the colour (if any). <br />
In addition, the Loaded Set panel displays the following: <br />
• e/CIE94/CMC (1:1)/CMC (2:1)/Delta L/Delta a/Delta b – These columns list the relative delta’s of the loaded <br />
set colours when compared to the selected, measured colour. <br />
Export Menu <br />
The Export menu allows for the measured values to be exported to a space or tab delimited file. Save all or only selected <br />
entries and select the format for export: <br />
• Lab – Export just the Lab values. <br />
• XYZ – Export just the XYZ values. <br />
• Lab XYZ – Export the Lab values followed by the XYZ values on the same line. <br />
• XYZ Lab – Export the XYZ values followed by the Lab values on the same line. <br />
• Separate Values With – Choose if the values are to be separated with spaces or tabs. <br />
A contextual (right-‐click) menu in the Measured / Loaded Set panels has the option to Delete (a selected colour); Delete <br />
All (measured colours); Print (the measured/loaded set to a system device); and Font Options. <br />
<strong>Serendipity</strong> <strong>Software</strong> -‐ Veripress User Manual – <strong>Version</strong> <strong>5.3.02</strong> <br />
96
Touch Console <br />
The Touch Console application offers enhanced control and usability of the SoftProof application through the use of a <br />
touch screen. Ideal for press room environments, the separate touch screen acts as the console, controlling jobs that are <br />
loaded and softproofed on the main screen. Individual jobs or entire publications can be quickly located for proofing. <br />
A Touch Console Settings menu saves valuable time, enabling the operator to choose default navigation options; the <br />
queues the Touch Console will search for jobs; and whether the console switches automatically to the Main control <br />
screen, the SoftProof view navigator, or the page navigator (for publications) once a job or jobs have loaded. <br />
A Mode Bar allows instant switching between control <br />
interfaces from the main Image and Navigation control, <br />
through to Ink Keys and Channels; the Virtual Loupe; <br />
Press Configurations; Page Navigation; Notes and <br />
Tabbed Views. <br />
When the Touch Console is launched, a blank screen <br />
will appear on both monitors (the touch screen and the <br />
main monitor) with instructions to select which <br />
monitor is the touch screen. Simply touch whichever <br />
screen is to be the Touch Console to begin. <br />
The Interface <br />
The interface occupies the whole of the touch screen. At the top is a banner advising which section the user is in at the <br />
time. The title banner will change to reflect the different modes in use. The bottom of the screen displays the various <br />
modes to use with SoftProof. Return to the starting point at any time by pressing the Home button. <br />
Using the Touch Console <br />
When first starting, Home is the default position. View the jobs in the system by selecting one of the mode buttons along <br />
the bottom of the screen: <br />
• Publications – View a list of jobs that are part of a publication only. <br />
• Books – View a list of jobs that make up a Book as defined by the Bookfilter and BookMonitor application. <br />
• Jobs – View a list of jobs that are not part of a publication only. <br />
• All – View a list of all jobs in the system. <br />
Jobs must be in the print queue to be displayed, i.e., they must have completed rendering. It will not show any jobs <br />
Waiting to Render or in a Held status. <br />
Once a mode has been selected, the screen will change to display the appropriate list of jobs with the available sorting <br />
and viewing options: <br />
Actions available include: <br />
• Select – Touch your finger on a job in the list and it becomes selected. The mode options change to display View <br />
Imaged, View Rendered and View Flipbook. <br />
• Scroll – Touch your finger on the list and drag it up or down the screen. Lift your finger off and position it again <br />
to scroll further. <br />
• Fast Scroll – Touch your finger on the list and drag it fast up or down and let go in a “throwing” action. To stop <br />
the list at any point, touch a job on the screen. <br />
• Scrollbar (optional) – If enabled, drag your finger down the overlaid scrollbar to move up and down the list. <br />
Moving your finger left-‐right will change the position of the scrollbar itself. <br />
<strong>Serendipity</strong> <strong>Software</strong> -‐ Veripress User Manual – <strong>Version</strong> <strong>5.3.02</strong> <br />
97
When the required job has been located and a viewing mode selected, the Touch Console will open the Main, Navigate <br />
or Pages control panel. <br />
Actions and modes of the Touch Console will adjust to give the options normally associated with the SoftProof <br />
application. Selecting View Flipbook will load the job into the standard Flipbook application with relevant actions and <br />
modes on the Touch Console. <br />
Modes available include: <br />
• Main – The default main screen displayed when a job is first loaded. This is a control screen for macro-manipulation<br />
of jobs. Includes functions such as image inversion and rotation, back page show through, image <br />
size on screen and so on. <br />
• Navigate – A control screen for closer examination of proofs – features controls for the viewed image size (fit <br />
width/height, original 100%, printed size) and zoom controls. <br />
• Loupe – Opens the Virtual Loupe on the main screen, with controls for the Touch Console. <br />
• Press Config – Opens a list of available Press configurations to apply to the SoftProof. This will switch to <br />
Camera Config when an RGB image is opened. <br />
• Show Pages – Opens a modified Page Navigator for instant page-‐to-‐page viewing. <br />
• Show Tabs – Displays a list of job currently loaded in SoftProof Tabs. <br />
• Calibrate – opens a control screen with Calibration and Calcheck options for the main SoftProof display. <br />
• Close – Closes the current job, publication or tab. <br />
Main <br />
A job can be manipulated in various ways once loaded, just as with the conventional controls for the SoftProof <br />
application. Some actions will only apply if certain types of jobs are viewed. The actions are colour coded to help group <br />
them into like actions. Buttons can be shown or hidden using the Touch Console settings. <br />
Window / Display <br />
Image manipulation <br />
Navigation <br />
Overlaying objects & <br />
viewing publications <br />
Fitting methods & tools <br />
• Text Tab – Toggles the text job name tabs for multiple loaded images in the SoftProof screen. <br />
• Image Tab – Toggles the job thumbnails in the SoftProof screen. <br />
• Tools – Toggles the Tool Palette in the SoftProof screen. The Palette must be enabled in the SoftProof <br />
application for this to function. <br />
• Full Screen – View the SoftProof window in full screen view or the user-‐defined view. <br />
• 90 CW/180/90 CCW/ -‐ Rotate the currently viewed proof in the desired direction. <br />
• Invert – Invert the image displayed. <br />
• Mirror – Mirror the image displayed. <br />
<strong>Serendipity</strong> <strong>Software</strong> -‐ Veripress User Manual – <strong>Version</strong> <strong>5.3.02</strong> <br />
98
• Auto Crop – Remove white space from around a job. There must be a completely clear area on any one side of <br />
the job. <br />
• Blueline – Replace all colours with varying shades of blue to see any traps. <br />
• Revert Channels – Revert to the original channel values. <br />
• Previous/Next Page – Move to the previous or next page when viewing a publication. <br />
• Notes – Show or hide any notes embedded in the job (see SoftProof – Notes for more information). <br />
• Previous/Next Tab – Move to the previous or next tab when viewing multiple tabbed jobs. <br />
• Page Boundary – Toggle a red line showing the page/image boundary of the proof. <br />
• Signature – Overlays the signature used to de-‐impose the job/page if it was submitted for de-‐imposition. This is <br />
only enabled when viewing a de-‐imposed job/publication. <br />
• Deimposed Pages – De-‐impose a job submitted as an imposition on-‐the-‐fly into separate pages, defined by the <br />
signature attached to the job and return it to its original state. (see RIPMonitor – Submit as Imposition for <br />
more information). <br />
• Back Page – Display the reverse (back) page through the page currently loaded as if the final print was being <br />
held up to light. The Back Page Opacity setting in the Press Settings controls the amount of show through. <br />
• Spread – View the spread of the selected page, for example, pages 2 and 3 as a spread. <br />
• Show Channels – Opens a simplified Channel Viewer touch console interface, featuring a coloured and labeled <br />
button for each process and spot ink channel. Selecting each button will toggle the ink channel on or off. If the <br />
Channel Viewer (see SoftProof) is open, the channel’s on/off state will be reflected in the panel. Touch the Main <br />
button in the Mode Bar to return to the Main screen. <br />
• Ink Keys – Opens the Ink Key Viewer for the current image on the main SoftProof screen and a set of controls <br />
for it on the Touch Console. Once settings such as Ink Weight and Sheet Placement have been set in SoftProof <br />
(see InkKeyViewer), the touch controls offer the ability to easily switch between Channels and Keys. The <br />
following control buttons are available: <br />
o Excess Ink Area – Toggles the view to show areas inked in excess the defined maximum ink key value. <br />
o Sheet Placement – Toggles the Sheet Placement view in Ink Keys, placing the page on the press plate <br />
defined in the Press Config. <br />
o Channels – Select which channel to view in the InkKeyViewer. Touching the currently active channel <br />
o<br />
button again will show all ink channels. <br />
Ink Keys – These are buttons for each separate Ink Key as defined in the loaded Press configuration. <br />
Press configurations with large numbers of Ink Keys may use more buttons than will fit on the Touch <br />
Console screen. Excess buttons can be accessed by touch-‐and-‐dragging the Ink Key controls up or <br />
down. Touch the Main button in the Mode Bar to return to the Main screen. <br />
• Find Note – If any Notes are attached to the currently viewed job/page/spread, this button will open a list of <br />
the Notes in the Touch Console. Select a Note to navigate to its location on the proof. Finding a Note will toggle <br />
the Notes button to show all notes. <br />
• Show All – Show the whole job within the SoftProof window. <br />
• Print Size – Show the job in the SoftProof window at print size. <br />
• Actual Pixels – Show the job in a one screen pixel to one job pixel ratio (i.e., 100% zoom). <br />
This view mode has the quickest load time as no resampling for scaling is required. <br />
• Fit Width/Height – Fit the job to the width or height of the SoftProof window. <br />
Navigate <br />
In Navigate mode, it is possible to pan around the image and change the zoom or fitting method. A thumbnail of the <br />
image is loaded into the centre action area of the console. <br />
Touch the thumbnail to jump to that location on the image in the <br />
SoftProof; or touch-‐drag around the thumbnail to pan around the <br />
proof. <br />
Around the edges of the thumbnail are the Touch Console controls for <br />
Show All, Print Size, Full Screen, Fit Width, Fit Height, 100% (Actual <br />
Pixels). <br />
The two remaining controls alternate between Previous Page/Next <br />
Page or Zoom In/Zoom Out. <br />
<strong>Serendipity</strong> <strong>Software</strong> -‐ Veripress User Manual – <strong>Version</strong> <strong>5.3.02</strong> <br />
99
Loupe <br />
The Loupe mode positions a loupe on the SoftProof window. The Touch Console action pane acts like a drawing tablet. <br />
Touch and drag your finger on the touch screen to move the loupe over your image. <br />
Buttons around the edges of the console control the <br />
Loupe’s features: <br />
• Smaller / Bigger – Decrease or increase the size of <br />
the loupe. <br />
• Zoom In / Out – Increase or decrease the <br />
magnification of the loupe. <br />
• Solo Previous / Next Channel – These controls <br />
allow individual Ink Channels of the job to be <br />
viewed within the Loupe, acting as the Show <br />
Channels function. The buttons cycle through each <br />
individual channel then show all channels (default <br />
view). <br />
• Toggle HUD – Toggles the Heads Up Display in the <br />
Loupe window, showing the CMYK dot percentages at the centered cross-‐hair or within the average % box. <br />
• Screened Pixel Readout – Toggles the HUD between cross-‐hair point measurement of ink percentages and a <br />
square for measuring area average dot percentages. The square resizes depending on the zoom % to always <br />
cover an area equal to a full halftone cell at the LPI defined in SoftProof Settings. <br />
Calibrate <br />
The Calibration control screen allows operators to initiate Monitor Calibration and Calchecks for the main SoftProof <br />
display. <br />
• Calibrate – Opens the Displays application and begins the calibration process for the main SoftProof display. <br />
Once calibrated, the monitor ICC profile is automatically saved as the operating system default, replacing the <br />
previous ICC profile. <br />
Note: When calibrating or calchecking, the Spectrophotometer assigned in the Displays application for either <br />
task should be connected and ready for use. If the instrument is different to the assigned one an error will <br />
occur, ceasing the operation. It is recommended to check the appropriate Spectrophotometers have been <br />
assigned before using the Calibrate or Calcheck functions (see Applications > Displays). <br />
• Calcheck – This option will open the Displays application, starting a Calcheck of the softproof display to the <br />
standard patch set in the chart assigned to the current Press. On completion, the Calcheck status of the monitor <br />
is updated with a tick/cross. This button is only available if the currently selected Press Config has an assigned <br />
Calcheck Chart. <br />
Note on Spot Colours: When performing a calcheck of the softproofing display, any special/spot colours included in <br />
the currently loaded job are measured and included in the Calcheck for the purposes of a pass or fail. <br />
View FlipBook <br />
View FlipBook displays a list of available publications that may be opened and viewed using the FlipBook application. <br />
Once a publication is opened, FlipBook controls will appear on the console: <br />
• View 3D, View Calendar, Show Borders and Rendered Thumbnails toggles. <br />
• Decrement/Increment Start Page, Even/Odd Top Page, Read Direction 1-‐>2 / 2
• Book Order – Select which BookFilter queues are made available for view/proofing in the Books list. <br />
• TouchConsole Settings – See below for more information. <br />
Touch Console Settings <br />
Default job viewing and touch screen navigation options can be configured using the Touch Console Settings. There are <br />
two tabs – TouchConsole and SoftProof: <br />
Touch Console <br />
• ScrollBar – Enable or disable the scrollbar and set the default side it <br />
appears on (Right or Left). <br />
• Thumbnails – Enable or disable viewing thumbnails for Publications, <br />
Jobs or All selection lists. <br />
• View – Enable or disable View Imaged (default), View Rendered <br />
and/or View Flipbook options for opening jobs or publications for <br />
softproofing. Note: If only one of the View Images or View Rendered <br />
is selected, the Touch Console button will simply be labelled “View”. If <br />
all options are disabled, View Imaged will be selected as the default <br />
option. <br />
• Button Size – Set the size of the Touch Console buttons in mm/inches. <br />
Note: The Touch Console application must be closed and restarted for settings to take effect. <br />
SoftProof <br />
• Entry Screen on Load – Select the control screen the Touch Console will default to when loading a new <br />
job/page: <br />
o Main – The console defaults to the Main screen on <br />
load. <br />
o Navigate – The console defaults to the Navigate <br />
o<br />
screen on load. <br />
Pages – The console defaults to the Show Pages <br />
screen on load. <br />
• Navigate Option – Choose whether the Navigate console <br />
screen has the Previous Page/Next Page or Zoom In/Zoom <br />
Out buttons. <br />
• Duplicate Page Settings (Veripress/Blackmagic Softproofing <br />
Add-‐On Only) – When viewing a publication with duplicate <br />
(purple) pages, choose from these page load options: <br />
o Manual Select – When a page with duplicates is selected in the Show Pages screen, the page to view <br />
must be manually selected. This is the default mode of a non-‐Veripress Touch Console. <br />
o Select Newest Page – Useful in publishing workflows where page updates/revisions are common. This <br />
option will automatically display the latest version of the page. <br />
• Publication Load Page (Veripress/Blackmagic Softproofing Add-‐On Only) – Set the page to be viewed on load <br />
when viewing a publication from the following options: <br />
o Manual Select – When a publication is selected for softproofing the Touch Console opens and the Show <br />
Pages screen allows the user to select the page to be viewed <br />
first. <br />
o<br />
First Available Page – Publications are loaded on the first <br />
available (lowest numbered) page. <br />
• Edit Touch Console UI – Opens an Edit Interface window to allow for the <br />
configuration of the enabled (visible) buttons for control of SoftProof in <br />
the Main screen of the Touch Console. <br />
Enable or disable buttons by selecting them. Those disabled will appear <br />
with a red cross and will be excluded from the Touch Console when <br />
using it to view softproofs. <br />
The Toolbar has a Preview checkbox to see how the Touch Console <br />
controls will appear and a Reset button to restore and enable all <br />
buttons. <br />
<strong>Serendipity</strong> <strong>Software</strong> -‐ Veripress User Manual – <strong>Version</strong> <strong>5.3.02</strong> <br />
101
<strong>Serendipity</strong> Client Menu Items <br />
The <strong>Serendipity</strong> Client menus provide access to direct job submission options, system settings, and extra functions and <br />
utilities. <br />
Application Menu (Windows/Linux) or <strong>Serendipity</strong> Client Menu (Mac OS X) <br />
Preferences – Select this menu option to open the Client Settings (Preferences) for the <strong>Serendipity</strong> Client, containing <br />
default values and preferences configured for the Client and its applications and modules. See the System Settings > <br />
Client Settings section of this manual for further information. <br />
Submit Menu <br />
Submit Files <br />
Select files to send to a Media and Pagesetup for processing. One or more files may be selected for processing. <br />
Selecting Open will present a chooser showing the Pagesetups and Medias available. Choose the combination to submit <br />
the files to and click the Submit button. This will copy the files into the system for processing. The flow control can be <br />
enabled to hold the job after imaging or rendering; the <br />
number of copies can be set; or jobs can be placed as <br />
pages in a publication. <br />
Submit Window <br />
The Submit window is comprised of four (4) sections – a <br />
Pagesetup selection list; a Media selection list; an <br />
Information panel displaying details of the currently <br />
selected Pagesetup or Media; and a Submission control <br />
panel. <br />
Pagesetup Selection List <br />
• Pagesetup – When selected, this button displays a list of Pagesetups available to submit jobs to. <br />
An active (selected) Pagesetup is highlighted in blue. <br />
Media Selection List <br />
This list is only active if the Pagesetup button is selected in the Pagesetup selection list. <br />
When a Pagesetup has been chosen, a list of Media compatible with the Pagesetup will be displayed for selection. <br />
An active (selected) Media is highlighted in blue. <br />
If no Media is selected, the submitted job(s) will be output to the Pagesetup’s default Media. <br />
Note: The <strong>Serendipity</strong> Client saves the last Pagesetup and Media selection so it need not be selected every time a job is <br />
submitted to the same Pagesetup. <br />
Information Panel <br />
This panel displays the settings for the currently selected Pagesetup or Media. <br />
Submit Options <br />
The lower section of the Submit window has the following options available when submitting files: <br />
Flow Control <br />
• Hold After Imaging – Check this box to hold the job after the Imaging stage has completed. Held jobs can be <br />
released to continue processing via the QueueManager toolbar or contextual (right click) menu. <br />
• Hold After Rendering – Check this box to hold the job after the Rendering stage has completed. Held jobs can be <br />
released to continue processing via the QueueManager toolbar or contextual (right click) menu. <br />
<strong>Serendipity</strong> <strong>Software</strong> -‐ Veripress User Manual – <strong>Version</strong> <strong>5.3.02</strong> <br />
102
• Nest – Submits the jobs for imaging and rendering, then on to be nested with other jobs. Nesting criteria are <br />
defined in the Output for the Pagesetup/Media to which the job is sent (see Workbench – Output for further <br />
information). Note: This Nesting function only requires that the Output used has nesting parameters defined. <br />
The Output itself can have nesting disabled for normal use. This allows selected jobs to be nested when <br />
submitted while leaving the Output non-‐nesting for normal use. <br />
• Rotate 90 – Rotates the job 90 degrees. This will override any rotation settings in a Pagesetup. <br />
Copies <br />
• No. of copies field – Enter the number of copies of the job to be printed. <br />
• Copy Lock button – Locks the number of copies to be printed for any files submitted until unlocked and <br />
changed. <br />
Publication <br />
• Publication Name field – Optionally type a publication name to which the submitted file will be assigned. The <br />
job will be viewable in the Publication View of the QueueManager. <br />
• First Page field – Enter the page number for the submitted file in the publication. If submitting multiple files, <br />
the page numbering will start at the defined page number and increase sequentially for each job. <br />
Submit Files For De-Imposition <br />
Also available via the RIPMonitor, this option allows for the submission of files directly for de-‐imposition, rather than <br />
from a RIP queue. After selecting one or more files, a chooser will appear to enable selection of a Pagesetup and Media, <br />
or Pagesetup Pool. A Signature Group can also be assigned to de-‐impose the files (see Workbench – Signature Groups <br />
for more information). <br />
Submit Files As Imposition <br />
Also available via the RIPMonitor, this option allows for the submission of files directly as an imposition, rather than <br />
from a RIP queue. This will submit an imposed job in its original form, but attaches a Signature Group (via popup <br />
chooser) to allow the job to be de-‐imposed on the fly using the Deimposed Pages button in the Veripress SoftProof <br />
Touch Console (see Touch Console for more information). <br />
Submit ICC Target <br />
After selecting one or more ICC target files, select a Pagesetup and Media to submit the ICC target file to. <br />
Note: This option is used as part of creating an ICC calibrated Pagesetup/Media. After creating and assigning a Paper <br />
Profile and Linearisation curve to a Media, this option is used to submit an ICC target file to the printer with all ICC <br />
options disabled. The target is then read by third party ICC profiling software and used to generate the printer’s output <br />
ICC profile, which is then assigned to the Media. <br />
Submit ICC Target Without Colour Correction <br />
After selecting one or more ICC target files, a chooser allows you to select a Pagesetup and Media to submit the ICC <br />
target file to. <br />
Note: This option works in a similar way to “Submit ICC Target” however, all Linearisation data will be disabled at the <br />
time of submission, unlike Submit ICC Target which enables colour correction curves. The job info will display <br />
Calibration Target, ICC Disabled in the Properties field. <br />
Test Prints <br />
Select one or more Pagesetups and Medias and send multiple copies (if desired) of internal test prints for processing. <br />
Note: You can add your own files to the lib/testprints directory for use as test prints. Any files you have permission to <br />
use that are placed in this directory will appear for selection in the Test Prints chooser window. <br />
<strong>Serendipity</strong> <strong>Software</strong> -‐ Veripress User Manual – <strong>Version</strong> <strong>5.3.02</strong> <br />
103
Server Menu <br />
Server Settings <br />
Select this menu option to open the System Settings (Preferences) for the <strong>Serendipity</strong> Server. The Systems Settings <br />
section contains default values and preferences configured for the Server. See the Server Settings section below for <br />
further information on each panel. <br />
Connect to Server <br />
This allows the <strong>Serendipity</strong> Client to connect to a Veripress Server running on the network. The Refresh button will <br />
search for and display any active Servers. Alternatively, you can enter the name or IP address of the Server in the <br />
Server Address field under the Manual tab. <br />
If there are multiple Servers (Masters) running on the network, the list is cached on the first “Connect to Server” <br />
selection. A dropdown list of available Servers is accessible via the Auto Detect tab. If a new Server appears after this <br />
time, the Refresh button must be pressed to find and add it to the list. Likewise, if a Server becomes unavailable, the <br />
connection will fail and the list will require a refresh. <br />
When the <strong>Serendipity</strong> Client is started, it will attempt to connect to the last Veripress Server accessed by default. <br />
Accounts Admin <br />
Accounts Admin allows an authorised administrator to create, modify and manage User accounts and User Groups. <br />
Users can be reassigned to groups dependent upon the operating privileges granted to each User Group. See the <br />
Accounts Admin/Secure Mode section below for further information. <br />
Log Out (Secure Mode only) <br />
This menu item only appears while Veripress is in Secure Mode (see Accounts Admin/Secure mode for more <br />
information). Selecting Log Out while using Veripress in Secure Mode simultaneously logs out the current user and <br />
generates the Login window. At this point, the options available are to enter a username and password; Choose Server <br />
before login; and to Quit the Veripress Client. <br />
While the Login window is displayed, the Veripress Client is effectively LOCKED to all users. The Server will continue to <br />
operate as normal. <br />
Chatterbox <br />
Chat to other users connected to the same Server. The Chatterbox window will display the Clients connected to the <br />
Server. If the user has entered a nickname in the System Settings, this name is displayed; otherwise the machine name <br />
is used. If the user’s name cannot be selected, the user has selected the Away option and is not available. <br />
Broadcast Message <br />
This allows messages to be sent to all users connected with a Client to the same Server. Selecting the Broadcast option <br />
displays a message window to type into and send. The message is displayed on the users window for a short time and <br />
will automatically dismiss if it is not acknowledged by clicking OK. <br />
Download PPD <br />
This option downloads the Megarip PPD from the Server to the desired location. A chooser will appear to navigate to <br />
the location for saving the PPD file on the drive. This saves having to get the PPD off the disk. Use the PPD when <br />
installing a local printer. When installed, the Megarip PPD (Postscript Printer Description) is selected as the printer <br />
driver when setting up a Veripress Published Pagesetup as a print destination for third party applications (see <br />
Workbench – Pagesetup and the Publish to a Windows Printer sections for more information). <br />
<strong>Serendipity</strong> <strong>Software</strong> -‐ Veripress User Manual – <strong>Version</strong> <strong>5.3.02</strong> <br />
104
Accounts Admin / Secure Mode <br />
Veripress gives users the option to login using Secure Mode, which allows the administrator to create accounts for <br />
users and groups, with each group configured to allow or deny its users access to particular applications and functions. <br />
When Secure Mode is active, users are required to enter a username <br />
and password whenever the Client is started or users are changed. <br />
The username and password are both case sensitive. <br />
The Accounts Admin menu option is selected in order to display the <br />
panels for configuring any Users and Groups and these should be <br />
created prior to activating Secure Mode. <br />
The Log Out option only appears once Secure Mode has been <br />
activated. Selecting this while using Veripress in Secure Mode <br />
simultaneously logs the current user out and generates the Login <br />
window with options to login as a new user and select a Server to <br />
connect to, or Quit the application. While the Login window is <br />
displayed, the Client is effectively locked to all users. The Server will <br />
continue to operate normally. <br />
Setting up Users and User Groups <br />
Veripress’ Secure Mode is set inactive by default. The software will continue to function normally whether or not <br />
Secure Mode is activated. <br />
Important Note: It is recommended all users and groups requiring access be setup BEFORE activating Secure Mode. <br />
Secure Mode cannot be activated until at least one (1) user has been created. This would usually be the Admin account, <br />
as this is automatically created when the Accounts Admin option is selected for the first time. <br />
1. Select Server Menu > Accounts Admin… to display the configuration panels. <br />
Activating Secure Mode <br />
Once the initial user account(s) have been setup, Secure Mode can be <br />
activated by checking the tick box located via Server menu > Server <br />
Settings (General tab). <br />
Secure Mode can only be activated or deactivated by an administrator (a <br />
member of the Admin group). <br />
Configuration Panels <br />
Users Panel <br />
The fields within the Users panel are: <br />
• Name – The username of the account. This is case sensitive. <br />
• User ID – This is a numerical ID assigned automatically but may be changed <br />
by the administrator. <br />
• Password / Verify – The password is entered and stored here. New <br />
passwords must be verified by entering the details in each field. The <br />
password is also case sensitive. <br />
• Permission – The level of permission for the user is created here. Click Edit to <br />
make changes to the user read/write/execute permissions. <br />
• Email – Enter the users email address here. <br />
• Comment – Allows the administrator to enter a note on the particular user account if necessary. <br />
<strong>Serendipity</strong> <strong>Software</strong> -‐ Veripress User Manual – <strong>Version</strong> <strong>5.3.02</strong> <br />
105
• Group (dropdown) – Assign a user group to the user account. <br />
• User Privileges – Privileges other than those in the user’s group can be added here. <br />
• Notifications – Select which email notifications the user is to receive by clicking the + icon or remove any via <br />
the – icon. Notifications are available for Job Spooling failure, Job Autodetection failure, Job Imaging/Rendering <br />
failure, Job Printing failure, Dongle removal, Server Crash, Media Remaining warnings and <strong>Software</strong> Updates <br />
available. <br />
To create a User: <br />
1. Click the + icon in the bottom left of the window. To delete a user, click the - icon <br />
2. Enter a username in the Name field. <br />
3. Enter a User ID number or leave the default value. <br />
4. Create a password for the user and verify the details. The password boxes will always display black dots <br />
irrespective of the length of your password. <br />
5. Edit the permission level to the required access level. <br />
6. Enter the user’s email address (if notifications are required). <br />
7. Add a comment against the user if necessary. <br />
8. Assign a Group for the user. <br />
9. Add any extra privileges to the user if required. This will only show privileges not included in the group <br />
selected for the user. <br />
10. Add any notifications to the user if required. <br />
11. Apply the changes or select Revert to cancel. <br />
Groups Panel <br />
An admin User and Group are created by default with access to all permissions and privileges when the Accounts <br />
Admin option is selected for the first time. The admin user and group cannot be deleted. It is recommended this be <br />
the only group with access to the Accounts Admin application. <br />
The fields within the Groups panel are: <br />
• Name – The name of the Group. <br />
• Group ID – This is assigned automatically but may be changed <br />
by the administrator. <br />
• Comment – Enter a note on the particular user group if <br />
necessary <br />
• Group Privileges – This is a list of available privileges relating to <br />
functions within Veripress. <br />
• Members – A list of Usernames and IDs belonging to the Group. <br />
To create a Group: <br />
1. Click the + icon in the bottom left of the window. To delete a group, click the – icon. <br />
2. Enter a name in the Name field. <br />
3. To add privileges, click the + icon in the Group Privileges panel. A list will appear to the left with all available <br />
items. To add, highlight the privilege and click the + icon at the top right of the window. <br />
4. Once you have finished adding privileges, click the X in the middle of the right edge of the panel to close the <br />
window. <br />
5. Click Apply to save any changes to the group or Revert to cancel. <br />
Assigning Users to a Group <br />
Users are assigned to the groups via the Users panel. <br />
1. Once you have created the user group, click on the Users panel. <br />
2. Select the User Name from the list of users. <br />
3. Select the Group to assign the user to from the Groups dropdown menu. <br />
4. Click Apply to save any changes or Revert to cancel. <br />
Important Note: A user can only be assigned to one User Group at a time. If extra privileges are required, these must <br />
be assigned against the user via the Users panel. <br />
<strong>Serendipity</strong> <strong>Software</strong> -‐ Veripress User Manual – <strong>Version</strong> <strong>5.3.02</strong> <br />
106
Hosts Panel <br />
The Hosts panel allows for the configuration of automatic Client logins for selected host computers or network IP <br />
addresses when using Secure Mode. <br />
The fields available are: <br />
• Name – Enter a name for the Host setup. <br />
• Hostname/IP – Enter the Hostname or IP address of the computer the user will automatically connect to. <br />
• Automatic Login – Disable or Select a User from the dropdown list. Only one user may be selected per Host <br />
setup. <br />
Activating Secure Mode <br />
Secure Mode should be activated after any users and/or groups have <br />
been created. Only an administrator or member of the admin group can <br />
activate or deactivate Secure Mode. <br />
To activate: <br />
1. Select Server menu > Server Settings. <br />
2. Click on the General tab. <br />
3. Tick the checkbox at the bottom of the screen – Secure mode <br />
– to activate or deactivate. <br />
4. Click OK and close the settings when done. <br />
5. If activating Secure Mode, a login window will appear as <br />
soon as you close the Server Settings. <br />
If Email Notifications are setup for users: <br />
• Enter the mail server details in the Mail Server field. This is the outgoing SMTP server. <br />
• Enter the email address for the Sender (From) field of the email in the Sender Email Address field. <br />
<strong>Serendipity</strong> <strong>Software</strong> -‐ Veripress User Manual – <strong>Version</strong> <strong>5.3.02</strong> <br />
107
System Settings <br />
The Systems Settings section contains default values and preferences configured for the Server and Client. The settings <br />
are split into two (2) different sections – Server and Client. <br />
Access the Client Settings via the Application menu (Win) or <strong>Serendipity</strong> Client menu (Mac). <br />
Access the Server Settings via the Server menu. <br />
Client Settings <br />
The Client settings are divided into three (3) tabbed categories: General, Colour Management and Working Paths. <br />
General <br />
• Internationalisation – Select your preferred language from those <br />
available. This displays all Client and log messages in the chosen <br />
language. The default is English. A restart is required if the language <br />
setting is changed. <br />
• Show Tooltips – Enable or disable tooltips within the Client. <br />
• Turn Sound FX Off – Check this to disable the sound effects. Sounds <br />
are used for things such as drag and drop, and error message alerts. <br />
• Undo Levels – Set the number of levels for Undo. The default is zero <br />
(0), which means no restriction. <br />
• Default Units – Set the measurement units used by the Client and all <br />
of the Applications/Modules. <br />
• Instant Messaging Nickname – Enter a nickname to use when <br />
accessing the Chatterbox application. <br />
• Memory Cache Maximum Size – Set the maximum cache size for the <br />
SoftProof application. The default is zero (0), where the Server <br />
chooses the default depending on system configuration. <br />
• Maximum Preview Resolution – Set the maximum preview resolution for SoftProof for both Imaged and <br />
Rendered options. The default is zero (0), which is the full job resolution of the output file. <br />
Colour Management <br />
• Choose Default Match ICC Profile – Select a default match ICC profile for accurate display of CMYK data. <br />
• CMS Dithering – Disabled by default. Use CMS Dithering for smoother <br />
results whenever conversion between 16 bits to 8 bits is required. <br />
• Calcheck Managed – Enabling this will display the current calibration <br />
status of the selected monitor. When selected, there will be a small <br />
icon showing a green tick or a red cross. This icon is shown in the <br />
bottom right corner of the SoftProof window. Its status depends on the <br />
expiration time of the monitor calibration (as set below) and the <br />
Calcheck status. <br />
• Use Native Profile – Enable this to use the operating system defined <br />
ICC profile for colour management. The Client will use the monitor <br />
profile as setup for the operating system, i.e., Mac OS will use what is <br />
in the Display Preferences Colour tab, Windows will use the Display <br />
Adapter Settings. <br />
• Choose Monitor ICC Profile – Select a monitor ICC profile for the <br />
display the Client is running on. The profiles are used so any colour <br />
element viewed on the display is shown as accurately as possible. This <br />
includes SoftProof and any colour swatch. It is recommended the <br />
monitor be calibrated and set to the same match profile as is used for <br />
the softproofing Pagesetup. <br />
• Resolution – Choose the default resolution to use for the monitors. This is used in SoftProof for calculating <br />
various fit methods. Options include: <br />
o Use System Settings – The Client will calculate the system’s monitor resolution. <br />
o Custom Resolution – Specify your own resolution. <br />
o Calibration Expires – Set a reminder to popup when a calibration needs updating. <br />
<strong>Serendipity</strong> <strong>Software</strong> -‐ Veripress User Manual – <strong>Version</strong> <strong>5.3.02</strong> <br />
108
Additional Monitors <br />
Specific settings may be set for each monitor when in a multi-‐monitor environment. The <br />
Client Settings will show additional sections with Monitor 2, Monitor 3 etc listed. To identify <br />
which monitor is which, press the monitor indicator button to display a graphic in the middle <br />
of the screen for the relevant monitor. <br />
Calcheck Managed <br />
The Calcheck Managed option (under Colour Management) constantly reports <br />
the status of the monitor used for softproofing. <br />
When this option is enabled, a small tick or cross representing the calcheck status <br />
will be displayed in the status bar at the bottom right of the SoftProof window. <br />
Hovering the mouse over the cross or tick will display profile information and <br />
status. <br />
Application Shortcuts <br />
This tab displays a list of the Applications and Modules for which keyboard shortcuts can be created. <br />
Note: It is the responsibility of the user to check the created shortcuts do not conflict with any other Veripress, third <br />
party software, or operating system shortcuts/hotkeys. <br />
To add a shortcut: <br />
1. Highlight the selected application or module in the list. <br />
2. Use the Edit option in the context menu (right click) or click in the Shortcut field to the right of the <br />
application/module name. <br />
3. Type in the key or key combination for the shortcut and press Enter. <br />
The shortcut will now appear in the Application menu of the Client. <br />
To remove a shortcut: <br />
1. Highlight the selected application or module in the list. <br />
2. Use the Clear option in the context menu (right click); or <br />
3. Click in the Shortcut field and delete the shortcut. <br />
Server Settings <br />
Server settings are saved to the Server and are common to all connected Clients. The Server settings are divided into <br />
three (3) tabbed categories – General, Colour Management and Working Paths. <br />
General <br />
• Default Units – Set the units used by the Server. Options are <br />
mm, cm, inches, points, picas, metres or feet. These units are <br />
used for Server related items and are not linked to the Client <br />
settings for Default Units. <br />
• Maximum Memory for PS RIP – Set the maximum memory <br />
used by the Postscript RIP. The default is 0MB (which uses <br />
the internal default amount). <br />
• Maximum Memory for Rotation – Set the maximum memory <br />
used for Rotation. The default is 0MB (Server chooses the <br />
default depending on system configuration). <br />
• Low Quality Thumbnail – Selecting this produces a lower <br />
quality thumbnail. This is faster but some detail may be lost <br />
in the thumbnail. <br />
• Compression – Control the compression for the intermediate <br />
<strong>Serendipity</strong> <strong>Software</strong> -‐ Veripress User Manual – <strong>Version</strong> <strong>5.3.02</strong> <br />
109
file format (the Imaged file). Choices are Faster or Better. The default is Faster. <br />
• Maximum Print Preview Resolution – Set the maximum resolution for the rendered preview. The default is <br />
180dpi. <br />
• Polling Service Refresh – Set the interval between poll service checks, i.e., how long between checks to see if <br />
any RIPs require polling. The default is 50 seconds if the times are left at 0. <br />
• Server Back Log – Number of days to keep the log. Older days are trimmed when the Server starts. Zero (0) <br />
means the log will not be trimmed. <br />
• Processes – Control the number of processes the machine will handle, i.e., the number of Imaging and <br />
Rendering tasks simultaneously run on the Server. The defaults are 1/1. Up to one imaging and rendering task <br />
can be set per CPU core the Server machine possesses. In practice, it is recommended the combined number of <br />
imaging and rendering tasks be set to no more than the number of cores. For example, 4 CPU cores = 2 Image/2 <br />
Render. <br />
• Minimum Broadcast Interval – Set the interval between the Server sending out updates to connected Clients. <br />
The default interval is 2sec. High-‐end systems with good networking are able to set the interval to 0sec for <br />
slightly improved image/render times when processing large numbers of jobs. Sites using the Client remotely <br />
connected via the internet should set a longer polling interval of 10-‐20sec. <br />
• Output Unknown Files to Printer – Output any unknown files direct to a printer. If this is unchecked, any <br />
unknown files will result in errors and will not be output. <br />
• Log Printed Jobs – When enabled, this option will log completed print jobs in the Server log. The jobname and <br />
dimensions are noted. <br />
• Secure Mode – Enable or disable Secure Mode. <br />
• Mail Server – Enter the details of the mail server for error notification emails when using Secure Mode. <br />
• Sender Email Address – Enter the details of the Sender (From) address for error notification emails. <br />
Colour Management <br />
• ICC Engine Accuracy – Select Faster or Better, depending on <br />
preferences. <br />
• Default ICC Profiles – Select the default ICC profiles used when <br />
first creating a new Pagesetup (Input profiles) and Media <br />
(Output profiles). <br />
• <strong>Version</strong> 3.4 spot colour handling – This is a compatibility <br />
setting for users with Spot colour setups, upgraded from <br />
<strong>Version</strong>s v3.4 or earlier to get consistent results from spot <br />
jobs. It is recommended as a temporary setting only and <br />
setups should be recreated using the improved and more <br />
accurate (post v3.4) spot colour handling. <br />
• Apply ICC Correction to CMYK Specials – Select this to apply <br />
ICC correction to CMYK Specials. <br />
• Force Relative Colourimetric Media White – Various ICC <br />
profiling packages and some older ICC v2 profiles included an <br />
Lab value for media (paper) white in the Relative <br />
Colourimetric Intent LUT. This has the effect of printing a paper layer when printing with Relative <br />
Colourimetric rendering intent. When enabled, this option ignores the Lab value for paper in the Relative LUT, <br />
leaving paper white areas unprinted. <br />
• CMS Dithering – Disabled by default. Use CMS Dithering for smoother results whenever conversion between 16 <br />
bits to 8 bits is required. <br />
• Change System Specials – Select a default Special Colour Set for plate matching. This is used by the RIPMonitor <br />
and polling service for plate assigning. Colours in this set are automatically assigned in the RIPMonitor. <br />
• Unknown Specials – Select a Special Colour Set (optional) to which unknown special/spot colours included in <br />
PDF or Postscript jobs can be automatically added. <br />
Working Paths <br />
Working Paths lists the default location of the paths the Server uses to <br />
process jobs. <br />
• Raster – Holds all the imaged, rendered and print jobs while <br />
they are live in the system. <br />
<strong>Serendipity</strong> <strong>Software</strong> -‐ Veripress User Manual – <strong>Version</strong> <strong>5.3.02</strong> <br />
110
• Spool – The location where the job is spooled prior to processing. <br />
• Temp – After spooling, the job is moved to the temp directory where it is worked on. <br />
• Drop – The default location for the DropFolders. <br />
The Raster directory holds all jobs while they are in the system and as such, can be very large. If this is moved it needs <br />
to be placed on a disk with plenty of space. A Server restart is required if any paths are changed in order for the <br />
changes to take effect. <br />
Important Note: All existing files in the new working path directory are <br />
deleted when the Server is restarted. Ensure the new working path directory <br />
has no essential data. A warning message will popup to confirm whether to <br />
proceed with the path change. <br />
<strong>Serendipity</strong> <strong>Software</strong> -‐ Veripress User Manual – <strong>Version</strong> <strong>5.3.02</strong> <br />
111
Web Server <br />
The Veripress Server has a built-‐in web server. Accessed via a web browser, the Web Server provides status <br />
information about the Server and jobs currently in the system. It cannot be used for submitting or managing files in the <br />
system. <br />
Accessing the Web Server <br />
To connect to the Web Server: <br />
1. Enter the IP address or machine name (if using DNS) of the computer running the Server in the browser <br />
window, followed by a colon and the port number 8080. For e.g., 192.168.3.43:8080 <br />
2. Press Enter once the address has been typed in. When it connects, the browser address bar will look like this: <br />
3. If you have a DNS Server, you can use the machine name instead: <br />
4. Once you are connected, the front page will appear with an options menu on the left: <br />
• Queues – Shows all the queues configured on the Server you are connected to. <br />
• Log file – View the log file. <br />
• System info – Displays information about the system. <br />
• Support – Shows various support options & information. <br />
Queues – Click on any of the queues to get information about jobs in that queue. <br />
Information about the job, including name and current status will be shown. <br />
<strong>Serendipity</strong> <strong>Software</strong> -‐ Veripress User Manual – <strong>Version</strong> <strong>5.3.02</strong> <br />
112
Log File – To view the log file, select the option from the list on the left. <br />
From here, you can select a particular time period to fetch from the Server. <br />
Once viewed, you can print the file or save it to disk. The log can be printed, <br />
saved or exported from the browser. <br />
System info – Choose this to display information about the system. <br />
Product Info, Licensed Modules – available printers and input filters; <br />
and Available Destinations are shown. <br />
Support – To access the <strong>Serendipity</strong> Support site, select this option <br />
from the menu. This is the same as if you accessed the <strong>Serendipity</strong> <br />
<strong>Software</strong> website directly. <br />
From here, you can download databases, release notes, manuals, <br />
updates, tutorials, FAQs and other helpful information. <br />
You will need to have an active Internet connection for access to the <br />
support website function. <br />
<strong>Serendipity</strong> <strong>Software</strong> -‐ Veripress User Manual – <strong>Version</strong> <strong>5.3.02</strong> <br />
113
Publishing a Pagesetup on Mac OS X (10.6.x) <br />
Veripress Pagesetup’s can be set up as a Mac OS X system printer destination to allow jobs to be easily submitted via <br />
the Print option of third party software or design packages. <br />
Jobs going to a Published Pagesetup will be automatically sent for processing and colour management in Veripress, <br />
eliminating the need for dropfolders or manual file submission. <br />
Note: Jobs processed via Veripress in this way must be in a file input format available to your Veripress version. <br />
Installing the <strong>Serendipity</strong> Printer Drivers <br />
The first step when Publishing a Pagesetup for the first time is to install the <strong>Serendipity</strong> Printer Drivers for Mac OS X. <br />
The installation package is located on the Veripress 5.3 Installation DVD: <br />
3. Navigate to the /drivers/mac folder and run the file <strong>Serendipity</strong> Printer Drivers.pkg <br />
4. An installer window will appear. Follow the prompts to complete the installation of the drivers. The installer <br />
will require administrator access privileges. <br />
Configuring a Pagesetup for Publishing as a TCP/IP System Printer <br />
To configure a calibrated Pagesetup for Publishing: <br />
1. In the Workbench, select the Pagesetup from the list of available data <br />
types. <br />
2. Go to the Publish panel and enable the checkbox for TCP Port: Activate <br />
port number option. <br />
3. Enter the TCP port number into the field and Save the Pagesetup. <br />
Port Numbers <br />
It is recommended that the port number assigned to a Pagesetup be a port over 10000 to avoid any conflict with the <br />
operating system or an existing application. Each Pagesetup to be published needs its own unique port number, for <br />
example, 10200, 10201, etc. <br />
Media <br />
When submitting jobs to a Published Pagesetup, the default Media assigned to the Pagesetup is used. If you wish to <br />
publish to different media on the same Output, each Media required needs to be assigned to its own Pagesetup, with its <br />
own unique port number. <br />
Creating a TCP/IP Mac OS X System Printer <br />
A system printer needs to be created and configured on the Mac OS X computer that is <br />
running the Veripress Server. <br />
1. Open the System Preferences for the Mac OS X. <br />
2. Choose Print & Fax. <br />
3. Click the + icon at the bottom of the printer list panel to create <br />
a new printer. <br />
4. Select the IP icon at the top of the Add Printer window. <br />
5. Protocol – Select HP Jetdirect -‐ Socket from the dropdown <br />
menu. <br />
6. Address – Enter the TCP/IP address and port information for <br />
the printer setup in the following format: Computer <br />
IPaddress:PagesetupPortNumber (see image for example). The <br />
IP address for the printer should not be used. <br />
7. Name – Enter the desired name for the printer. It should be <br />
easily recognisable as a Published Pagesetup and/or the particular <br />
Pagesetup being published. <br />
<strong>Serendipity</strong> <strong>Software</strong> -‐ Veripress User Manual – <strong>Version</strong> <strong>5.3.02</strong> <br />
114
8. Print Using – Select Printer <strong>Software</strong> from the dropdown menu. <br />
9. A list of available Mac OS X system printer drivers will popup. <br />
10. Either scroll down the list and select <strong>Serendipity</strong> Veripress, or type “<strong>Serendipity</strong>” in the filter field and select <br />
<strong>Serendipity</strong> Veripress and click OK. <br />
11. Click Add to add the new printer. <br />
12. Set the published Pagesetup “Printer” as <br />
the system default and/or share the <br />
printer on the network as required. <br />
Configuring a Pagesetup for Publishing as a Bonjour Printer <br />
To configure the Pagesetup for Publishing: <br />
1. In the Workbench, select the Pagesetup to be Published from the list of <br />
available items. <br />
2. Go to the Publish panel and enable the printer: Mac checkbox. This lists <br />
the Pagesetup in the Mac OS X system Bonjour destinations as <br />
“Pagesetup name @ computer name”. <br />
3. Save the Pagesetup configuration when done. <br />
Creating a Bonjour System Printer for Mac OS X <br />
A system printer needs to be created and configured on the Mac OS X computer running the Veripress Server. <br />
1. Open the System Preferences for Mac OS X. <br />
2. Choose Print & Fax. <br />
3. Select the Default icon at the top of the Add Printer window. <br />
4. Choose the Pagesetup from the Printer Name list. The Pagesetup will be <br />
listed as Kind: Bonjour and named “Pagesetup name @ computer name”. <br />
5. Print Using – If you have installed the <strong>Serendipity</strong> Printer Drivers, the <br />
Print Using field should auto-‐fill to show <strong>Serendipity</strong> Veripress. <br />
a. If the <strong>Serendipity</strong> Printer Drivers have not been installed, cancel <br />
the printer setup and install the drivers as per the above <br />
instructions. <br />
b. If the field does not auto-‐fill, choose Select Printer <strong>Software</strong> from <br />
the dropdown menu. A list of available Mac OS X system printer <br />
drivers will popup. Either scroll down the list and select <br />
<strong>Serendipity</strong> Veripress or type “<strong>Serendipity</strong>” in the filter field and <br />
select <strong>Serendipity</strong> Veripress. Click Add. <br />
6. Name – Enter the desired name for the printer. It should be named to be <br />
easily recognisable as a Published Pagesetup and/or the particular <br />
Pagesetup being published. <br />
7. Click Add to add the new printer. <br />
8. Set the published Pagesetup “Printer” as the system default and/or share <br />
the printer on the network as required. <br />
<strong>Serendipity</strong> <strong>Software</strong> -‐ Veripress User Manual – <strong>Version</strong> <strong>5.3.02</strong> <br />
115
Publishing a Pagesetup on Windows 7 <br />
Veripress Pagesetup’s can be set up as Windows system printer destinations to allow jobs to be easily submitted via the <br />
Print option of third party software or design packages. <br />
Jobs printed to a Published Pagesetup will be automatically sent for processing and colour management in Veripress, <br />
eliminating the need for dropfolders or manual file submission. <br />
Note: Jobs output via Veripress in this way must be in a file input format available to your Veripress version. <br />
Megarip Printer Driver <br />
The first step before proceeding is to enable access to the Megarip.inf driver file. The Megarip printer driver is a <br />
proprietary <strong>Serendipity</strong> <strong>Software</strong> driver that Windows will use as the printer driver. <br />
The file is located on the <strong>Serendipity</strong> Veripress installation DVD in the following directory: <br />
/drivers/win/win_xp_vista_7/ <br />
Configuring the Pagesetup for Publishing as a System Printer <br />
To configure a calibrated Pagesetup for Publishing: <br />
• In the Workbench, select the Pagesetup from the list of available data <br />
types. <br />
• Go to the Publish panel and enable the checkbox for TCP Port: Activate <br />
port number option. <br />
• Enter the TCP port number into the field and Save the Pagesetup. <br />
Port Numbers <br />
It is recommended that the port number assigned to a Pagesetup be a port over 10000 to avoid any conflict with the <br />
operating system or an existing application. Each Pagesetup to be published needs its own unique port number, for <br />
example, 10200, 10201, etc. <br />
Media <br />
When submitting jobs to a Published Pagesetup, the default Media assigned to the Pagesetup is used. If you wish to <br />
publish to different media on the same printer, each Media required needs to be assigned to its own Pagesetup, with its <br />
own unique port number. <br />
Creating a TCP/IP Windows System Printer <br />
A system printer needs to be created and configured on the Windows computer that <br />
is running the Veripress Server. <br />
• Select Windows Start Menu > Devices and Printers. <br />
• Click on Add Printer. The Add Printer wizard will appear. <br />
• Select Add a Local Printer and click Next. <br />
• Select Create a New Port and Standard TCP/IP Port from the Type of Port <br />
dropdown menu. <br />
• Click Next. <br />
• Type a Printer or Hostname Address: <br />
o<br />
o<br />
o<br />
Device Type – TCP/IP Device <br />
Hostname or IP address – Enter the Network IP address <br />
of the Windows computer running the Veripress Server. <br />
(e.g., 192.168.3.59). <br />
Port Name – Enter a name for the Windows port (this is <br />
NOT the printer name). <br />
o Uncheck the option to Query the Printer and <br />
Automatically Select the Driver to Use. <br />
<strong>Serendipity</strong> <strong>Software</strong> -‐ Veripress User Manual – <strong>Version</strong> <strong>5.3.02</strong> <br />
116
• Click Next. <br />
• Additional Port Information Required: <br />
o Device Type – Custom. <br />
o Click the Settings button. A configuration window will <br />
appear. <br />
• Configure Standard TCP/IP Port Monitor: <br />
o Protocol – Select Raw. <br />
Raw Settings: <br />
• Port Number – Enter the unique TCP <br />
Port number assigned to the Pagesetup <br />
to be published, e.g., 10201. <br />
• Click OK. The window will close and return to the <br />
Additional Port Information window. <br />
• Click Next. <br />
• Install the Printer Driver: <br />
o If this is the first time installing a Veripress system printer, insert <br />
the Veripress Installation DVD and select Have Disk. <br />
o Navigate to the /drivers/win/win_xp_vista_7/ directory. <br />
o Select the Megarip.inf file and click Open. The <strong>Serendipity</strong> <br />
Megarip driver should now be displayed. <br />
o Click Next. <br />
Note: The above step can be skipped for any subsequent installs of <br />
Veripress system printers. The driver can be chosen from the Windows <br />
printer driver list. <br />
• Which <strong>Version</strong> of the Driver do you want to use: <br />
o Select Use the driver that is currently installed (recommended) unless you are replacing an older <br />
installed version of the <strong>Serendipity</strong> Megarip driver. <br />
o Click Next. <br />
• Type a Printer Name: <br />
o Enter a name for the printer. This is the name that will appear in the Windows Printers list and be <br />
available as a printer option when printing from Windows applications. The name should be unique <br />
for the Published Pagesetup. <br />
o Click Next. <br />
• Printer Sharing: <br />
o Select Share this printer so that others on your network can find and use it. <br />
o Keep the default printer name or enter a share name. <br />
o Click Next. <br />
• You’ve Successfully added “Printer Name”: <br />
o Choose whether the Published Pagesetup destination is to be <br />
the default system printer. <br />
o If desired, click the Print a Test Page button. The test page job <br />
should appear in the Veripress QueueManager. <br />
o Click Finish to close the wizard. <br />
<strong>Serendipity</strong> <strong>Software</strong> -‐ Veripress User Manual – <strong>Version</strong> <strong>5.3.02</strong> <br />
117
Printing to a Published Pagesetup Printer across a Network <br />
Printing from Mac OS X Mac OS X, or Windows Windows <br />
Printing to a Published Pagesetup printer across a network where both computers (the machine sending the print and <br />
the machine running the Veripress Server) share a common operating system is straight forward. <br />
If network sharing has been enabled for the system printer destination created for use with the Veripress Pagesetup, <br />
the printer will be available in the printer options of any other computer on the network. <br />
Printing from Mac OS X Windows, or Windows Mac OS X <br />
Printing from a computer on the same network, but with a different operating system to the computer running the <br />
Veripress Server requires the creation of a new system printer on the computer wishing to print to Veripress. <br />
This is done by following the appropriate steps outlined previously for the relevant operating system. <br />
The only alteration is when entering the TCP/IP address and the TCP port number: <br />
1. Enter the network TCP/IP address of the computer on which the Veripress Server is running, i.e., the machine <br />
you wish to print to. <br />
2. Enter the TCP Port Number assigned to the Published Pagesetup you wish to print to. <br />
<strong>Serendipity</strong> <strong>Software</strong> -‐ Veripress User Manual – <strong>Version</strong> <strong>5.3.02</strong> <br />
118
Troubleshooting <br />
Clustering <br />
Here are some suggestions of where to look if you run into trouble and experience problems when using a Cluster. <br />
Jobs Not Processing Through a Cluster Node <br />
The possible reasons for this are: <br />
• The Cluster Node is not configured to image, render or both. Check the ClusterStatus to see if either of the <br />
processing tasks have been disabled. To enable them, open the Clustering Application and enable the <br />
appropriate task. <br />
• The Cluster Node has a Processing Pool attached and the Pagesetup you are submitting jobs to is not contained <br />
within the Pool. You can either unselect the Pool or add the Pagesetup to the Pagesetup Pool. <br />
• The Cluster Node has gone offline. To check, open the Clustering Application and check the node. If the <br />
Clustering Application is already open, click the Refresh button. This will check for node status. If the node <br />
appears grayed out or disabled, this indicates the node is not currently online. <br />
Here the Cluster Node called “pomelo” is currently offline. In this <br />
case, you would check the node server is up, the machine is still <br />
connected to the network and can see the Master. If there is a <br />
problem with the node, check the error log. One the problem is <br />
resolved, click the Refresh button or close and reopen the Clustering <br />
Application. <br />
• The Node and Master are different versions. The node <br />
should always be upgraded when the Master is to maintain the same versions in a Cluster. <br />
Cluster Nodes Errors Log <br />
The Cluster Nodes create an error log, which logs all the messages from the node. This is located in the Veripress <br />
installation directory on the node’s own machine and is called “errors.log”. This can be viewed with a normal text editor <br />
and can help to track a problem, or it can be sent to support for assistance in tracing a problem. <br />
A Node Cannot Be Found <br />
Once you have started your node successfully, you should be able to see it in the Clustering Application. If not, you need <br />
to add the node manually. If this fails, there are a few things to check: <br />
• Verify the node is still running and the clock is still counting up. <br />
• Check the error log for any messages. <br />
• Check that the Master machine can ping the node machine. If not, there may be a network issue and you will <br />
need to contact your network administrator for assistance. <br />
• Check the ports on the machines are open for the node to connect to the Master and they are not being used by <br />
anything else. The port numbers for the node are as follows: <br />
o 9103/tcp – Server connects here and submits jobs via this port. <br />
o 9103/udp – Listens to broadcasts so the Server can enumerate available Node Servers. <br />
• Make sure the node is the same version as the Master. Nodes (Veripress Slaves) should always be upgraded at <br />
the same time as the Master. <br />
<strong>Serendipity</strong> <strong>Software</strong> -‐ Veripress User Manual – <strong>Version</strong> <strong>5.3.02</strong> <br />
119
Glossary <br />
Client – GUI that monitors jobs and allows configuration of the Server. <br />
Clustering – The use of multiple machines on a network for distributed processing. <br />
CMM – Colour Management Module. <br />
CRT – Cathode Ray Tube. Describes the type of monitor. <br />
CTP – Computer to Plate. <br />
CUPS – Common UNIX Printing System. <br />
Data Types – Database groups such as Pagesetups or RIPs etc. <br />
DPI – Dots Per Inch (resolution). <br />
EPS – Encapsulated Postscript File. <br />
FTP – File Transfer Protocol – Method for copying files between computers across networks. <br />
GUI – Graphical User Interface. <br />
ICC – International Color Consortium. <br />
ICC Profile – A colour lookup table used for converting colour of a job from one device to another. <br />
LAN – Local Area Network. <br />
LCD – Liquid Crystal Display. <br />
LPI – Lines Per Inch (Screen Ruling). <br />
Master – A Master Server, controlling Slave nodes in a Clustering environment. <br />
QueueManager – Client module that displays job queues and jobs in those queues. <br />
QueueStatus – Monitors the progress of a job through the system. <br />
Real Density – Colour content of a patch as measured. <br />
RIP – Raster Image Processor. <br />
Server – <strong>Software</strong> module that handles the processing of jobs. <br />
Slave (Node) – A separate processing node on the network. Used for processing jobs by a Master. <br />
TCP/IP – Transmission Control Protocol / Internet Protocol. <br />
Visual Density – The darkness of the patch measured (how much light is absorbed). The more light absorbed, the <br />
darker the Visual Density. <br />
WAN – Wide Area Network. <br />
Workbench – Client application used to configure the Server. <br />
YN – Yule Nielsen Number. <br />
Yule Nielsen Number – A “fudge factor” used when calculating % tint (dot area) from density readings. <br />
<strong>Serendipity</strong> <strong>Software</strong> -‐ Veripress User Manual – <strong>Version</strong> <strong>5.3.02</strong> <br />
120
Copyright Notices <br />
PNG Library Copyright <br />
Copyright © 1995, 1996 Guy Eric Schalnat, Group 42, Inc. <br />
Contributing Authors: Andreas Dilger, Dave Martindale, Guy Eric Schalnat, Paul Schmidt, Tim Wegner. <br />
The contributing authors would like to thank all those who helped with testing, bug fixes and patience. You know who <br />
you are. This wouldn’t have been possible without all of you. <br />
Thanks to Frank J. T. Wojcik for reviewing the documentation. <br />
The PNG Reference Library is supplied “as is”. The Contributing Authors and Group 42, Inc. disclaim all warranties, <br />
expressed or implied, including without limitation, the warranties of merchantability and of fitness for any purpose. <br />
The Contributing Authors and Group 42, Inc. assume no liability for damages, direct or consequential, which may result <br />
from the use of the PNG Reference Library. <br />
Permission is hereby granted to use, copy, modify and distribute this source code, or portions hereof, for any purpose, <br />
without fee, subject to the following restrictions: <br />
1. The origin of this source code must not be misrepresented. <br />
2. Altered versions must be plainly marked as such and must not be misrepresented as being the original source. <br />
3. This Copyright Notice may not be removed or altered from any source or altered source distribution. <br />
Compression Library Copyright <br />
Copyright © 1995 Jean-loup Gailly and Mark Adler. <br />
This software is provided “as is”, without any express or implied warranty. In no event will the authors be held liable <br />
for any damages arising from the use of this software. <br />
Permission is granted to anyone to use this software for any purpose, including commercial applications and to alter it <br />
and redistribute it freely, subject to the following restrictions: <br />
1. The origin of this software must not be misrepresented; you must not claim that you wrote the original <br />
software. If you use this software in a product, an acknowledgment in the product documentation would be <br />
appreciated but is not required. <br />
2. Altered source versions must be plainly marked as such, and must not be misrepresented as being the original <br />
software. <br />
3. This notice may not be removed or altered from any source distribution. <br />
Jean-‐loup Gailly and Mark Adler. <br />
gzip@prep.ai.mit.edu madler@alumni.caltech.edu <br />
Independent JPEG Group’s Copyright <br />
The authors make no warranty or representation, either express or implied, with respect to this software, its quality, <br />
accuracy, merchantability, or fitness for a particular purpose. This software is provided “as is” and you, its user, assume <br />
the entire risk as to its quality and accuracy. <br />
This software is copyright © 1991, 1992, 1993, 1994, 1995, Thomas G. Lane. All Rights Reserved except as <br />
specified below. <br />
Permission is hereby granted to use, copy, modify and distribute this software (or portions thereof) for any purpose, <br />
without fee, subject to these conditions: <br />
1. If any part of the source code for this software is distributed, then this README file must be included, with this <br />
copyright an no-‐warranty notice unaltered; and any additions, deletions, or changes to the original files must <br />
be clearly indicated in accompanying documentation. <br />
<strong>Serendipity</strong> <strong>Software</strong> -‐ Veripress User Manual – <strong>Version</strong> <strong>5.3.02</strong> <br />
121
2. If only executable code is distributed, then the accompanying documentation must state that “this software is <br />
based in part on the work of the Independent JPEG Group”. <br />
3. Permission for use of this software is granted only if the user accepts full responsibility for any undesirable <br />
consequences; the authors accept NO LIABILITY for damages of any kind. <br />
These conditions apply to any software derived from or based on the IJG code, not just to the unmodified library. If you <br />
use our work, you ought to acknowledge us. <br />
Permission is NOT granted for the use of any IJG author’s name or company name in advertising or publicity relating to <br />
this software or products derived from it. This software may be referred to only as “the Independent JPEG Group’s <br />
software”. <br />
We specifically permit and encourage the use of this software as the basis of commercial products, provided that all <br />
warranty or liability claims are assumed by the product vendor. <br />
ansi2knr.c is included in this distribution by permission of L. Peter Deutsch, sole proprietor of its copyright holder, <br />
Aladdin Enterprises of Menlo Park, CA. ansi2knr.c is NOT covered by the above copyright and conditions, but instead <br />
by the usual distribution terms of the Free <strong>Software</strong> Foundation; principally, that you must include source code if you <br />
redistribute it. (See the file ansi2knr.c for full details). However, since ansi2knr.c is not needed as part of any program <br />
generated from the IJG code, this does not limit you more than the foregoing paragraphs do. <br />
“The Graphics Interchange Format © is the Copyright property of CompuServe Incorporated. GIF (sm) is a Service Mark <br />
property of CompuServe Incorporated.” <br />
Copyright © 1980, 1993 <br />
The Regents of the University of California. All Rights Reserved. <br />
Redistribution and use in source and binary forms, with or without modification, are permitted provided that the <br />
following conditions are met: <br />
1. Redistributions of source code must retain the above copyright notice, this list of conditions and the following <br />
disclaimer. <br />
2. Redistributions in binary form must reproduce the above copyright notice, this list of conditions and the <br />
following disclaimer in the documentation and/or other materials provided with the distribution. <br />
3. All advertising materials mentioning features or use of this software must display the following <br />
acknowledgment: <br />
4. This product includes software developed by the University of California, Berkeley and its contributors. <br />
5. Neither the name of the University nor the names of its contributors may be used to endorse or promote <br />
products derived from this software without specific prior written permission. <br />
THIS SOFTWARE IS PROVIDED BY THE REGENTS AND CONTRIBUTORS “AS IS” AND ANY EXPRESS OR IMPLIED <br />
WARRANTIES, INCLUDING, BUT NOT LIMITED TO, THE IMPLIED WARRANTIES OF MERCHANTABILITY AND FITNESS <br />
FOR A PARTICULAR PURPOSE ARE DISCLAIMED. IN NO EVENT SHALL THE REGENTS OR CONTRIBUTORS BE LIABLE <br />
FOR ANY DIRECT, INDIRECT, INCIDENTAL, SPECIAL, EXEMPLARY, OR CONSEQUENTIAL DAMAGES (INCLUDING, BUT <br />
NOT LIMITED TO, PROCUREMENT OF SUBSTITUTE GOODS OR SERVICES; LOSS OF USE, DATA OR PROFITS; OR <br />
BUSINESS INTERRUPTION) HOWEVER CAUSED AND ON ANY THEORY OF LIABILITY, WHETHER IN CONTRACT, <br />
STRICT LIABILITY, OR TORT (INCLUDING NEGLIGENCE OR OTHERWISE) ARISING IN ANY WAY OUT OF THE USE OF <br />
THIS SOFTWARE, EVEN IF ADVISED OF THE POSSIBILITY OF SUCH DAMAGE. <br />
Copyright © 1990, 1994 Regents of the University of Michigan <br />
All Rights Reserved. <br />
Permission to use, copy, modify and distribute this software and its documentation for any purpose and without fee is <br />
hereby granted, provided that the above copyright notice appears in all copies and that both that copyright notice and <br />
this permission notice appear in supporting documentation, and that the name of The University of Michigan not be <br />
used in advertising or publicity pertaining to distribution of the software without specific, written prior permission. <br />
This software is supplied as is without expressed or implied warranties of any kind. <br />
This product includes software developed by the University of California, Berkeley and its contributors. <br />
<strong>Serendipity</strong> <strong>Software</strong> -‐ Veripress User Manual – <strong>Version</strong> <strong>5.3.02</strong> <br />
122
Code in sys/linux is developed by Alan Cox. You may redistribute it and/or modify it under the terms of the GNU <br />
General Public License as published by the Free <strong>Software</strong> Foundation; either version 2 of the License, or (at your <br />
option) any later version. <br />
Research Systems Unix Group <br />
The University of Michigan <br />
C/O Wesley Craig <br />
535 W. William Street <br />
Ann Arbor, Michigan <br />
+1-‐313-‐764-‐2278 <br />
netatalk@umich.edu <br />
GNU GENERAL PUBLIC LICENSE <br />
<strong>Version</strong> 2, June 1991 <br />
Copyright © 1989, 1991 Free <strong>Software</strong> Foundation, Inc. <br />
675 Mass Ave, <br />
Cambridge, <br />
MA 02139, USA <br />
Everyone is permitted to copy and distribute verbatim copies of this license document, but changing it is not allowed. <br />
Preamble <br />
The licenses for most software are designed to take away your freedom to share and change it. By contrast, the GNU <br />
General Public License is intended to guarantee your freedom to share and change free software-‐to make sure the <br />
software is free for all its users. This General Public License applies to most of the Free <strong>Software</strong> Foundation’s software <br />
and to any other program whose authors commit to using it. (Some other Free <strong>Software</strong> Foundation software is <br />
covered by the GNU Library General Public License instead). You can apply it to your programs, too. When we speak of <br />
free software, we are referring to freedom, not price. Our General Public Licenses are designed to make sure that you <br />
have the freedom to distribute copies of free software (and charge for this service if you wish), that you receive source <br />
code or can get it if you want it, that you can change the software or use pieces of it in new free programs; and that you <br />
know you can do these things. <br />
To protect your rights, we need to make restrictions that forbid anyone to deny you these rights or to ask you to <br />
surrender the rights. These restrictions translate to certain responsibilities for you if you distribute copies of the <br />
software, or if you modify it. <br />
For example, if you distribute copies of such a program, whether gratis or for a fee, you must give the recipients all the <br />
rights that you have. You must make sure that they too, receive or can get the source code. And you must show them <br />
these terms so they know their rights. <br />
We protect your rights with two steps: (1) copyright the software, and (2) offer you this license which gives you legal <br />
permission to copy, distribute and/or modify the software. <br />
Also, for each author’s protection and ours, we want to make certain that everyone understands that there is no <br />
warranty for this free software. If the software is modified by someone else and passed on, we want its recipients to <br />
know that what they have is not the original, so that any problems introduced by others will not reflect on the original <br />
author’s reputations. <br />
Finally, any free program is threatened constantly by software patents. We wish to avoid the danger that redistributors <br />
of a free program will individually obtain patent licenses, in effect making the program proprietary. To prevent this, we <br />
have made it clear that any patent must be licensed for everyone’s free use or not licensed at all. The precise terms and <br />
conditions for copying, distribution and modification follow. <br />
<strong>Serendipity</strong> <strong>Software</strong> -‐ Veripress User Manual – <strong>Version</strong> <strong>5.3.02</strong> <br />
123
GNU GENERAL PUBLIC LICENSE <br />
TERMS AND CONDITIONS FOR COPYING, DISTRIBUTION AND MODIFICATION <br />
0. This License applies to any program or other work which contains a notice placed by the copyright holder <br />
saying it may be distributed under the terms of this General Public License. The “Program”, below, refers to any <br />
such program or work, and a “work based on the Program” means either the Program or any derivative work <br />
under copyright law: that is to say, a work containing the Program or a portion of it, either verbatim or with <br />
modifications and/or translated into another language. (Hereinafter, translation is included without limitation <br />
in the term “modification”). Each licensee is addressed as “you”. <br />
Activities other than copying, distribution and modification are not covered by this License; they are outside its <br />
scope. The act of running the Program is not restricted, and the output from the Program is covered only if its <br />
contents constitute a work based on the Program (independent of having been made by running the Program). <br />
Whether that is true depends on what the Program does. <br />
1. You may copy and distribute verbatim copies of the Program’s source code as you receive it, in any medium, <br />
provided that you conspicuously and appropriately publish on each copy an appropriate copyright notice and <br />
disclaimer of warranty; keep intact all the notices that refer to this License and to the absence of any warranty; <br />
and give any other recipients of the Program a copy of this License along with the Program. <br />
2. You may modify your copy or copies of the Program or any portion of it, thus forming a work based on the <br />
Program, and copy and distribute such modifications or work under the terms of Section 1 above, provided <br />
that you also meet all of these conditions: <br />
a. You must cause the modified files to carry prominent notices stating that you changed the files and the <br />
date of any change. <br />
b. You must cause any work that you distribute or publish, that in whole or in part contains or is derived <br />
from the Program or any part thereof, to be licensed as a whole at no charge to all third parties under <br />
the terms of this License. <br />
c. If the modified program normally reads commands interactively when run, you must cause it, when <br />
started running for such interactive use in the most ordinary way, to print or display an <br />
announcement including an appropriate copyright notice and a notice that there is no warranty (or <br />
else, saying that you provide a warranty) and that users may redistribute the program under these <br />
conditions, and telling the user how to view a copy of this License. (Exception: if the Program itself is <br />
interactive but does not normally print such an announcement, your work based on the Program is not <br />
required to print an announcement). <br />
These requirements apply to the modified work as a whole. If identifiable sections of that work are not derived from <br />
the Program, and can be reasonably considered independent and separate works in themselves, then this License, and <br />
its terms, do not apply to those sections when you distribute them as separate works. But when you distribute the same <br />
sections as part of a whole which is a work based on the Program, the distribution of the whole must be on the terms of <br />
this License, whose permissions for other licensees extend to the entire whole, and thus to each and every part <br />
regardless of who wrote it. <br />
Thus, it is not the intent of this section to claim rights or contest your rights to work written entirely by you; rather, the <br />
intent is to exercise the right to control the distribution of derivative or collective works based on the Program. In <br />
addition, mere aggregation of another work not based on the Program with the Program (or with a work based on the <br />
Program) on a volume of a storage or distribution medium does not bring the other work under the scope of this <br />
License. <br />
3. You may copy and distribute the Program (or a work based on it, under Section 2) in object code or executable <br />
form under the terms of Sections 1 and 2 above provided that you also do one of the following: <br />
a. Accompany it with the complete corresponding machine-‐readable source code, which must be <br />
distributed under the terms of Sections 1 and 2 above on a medium customarily used for software <br />
interchange; or, <br />
b. Accompany it with a written offer, valid for at least three years, to give any third party, for a charge no <br />
more than your cost of physically performing source distribution, a complete machine-‐readable copy <br />
of the corresponding source code, to be distributed under the terms of Sections 1 and 2 above on a <br />
medium customarily used for software interchange; or, <br />
c. Accompany it with the information you received as to the offer to distribute corresponding source <br />
code. (This alternative is allowed only for noncommercial distribution and only if you received the <br />
program in object code or executable form with such an offer, in accord with Subsection b above). <br />
The source code for a work means the preferred form of the work for making modifications to it. For an executable <br />
work, complete source code means all the source code for all modules it contains, plus any associated interface <br />
definition files, plus the scripts used to control compilation and installation of the executable. However, as a special <br />
exception, the source code distributed need not include anything that is normally distributed (in either source or binary <br />
form) with the major components (compiler, kernel, and so on) of the operating system on which the executable runs, <br />
unless that component itself accompanies the executable. <br />
<strong>Serendipity</strong> <strong>Software</strong> -‐ Veripress User Manual – <strong>Version</strong> <strong>5.3.02</strong> <br />
124
If distribution of executable or object code is made by offering access to copy from a designated place, then offering <br />
equivalent access to copy the source code from the same place counts as distribution of the source code, even though <br />
third parties are not compelled to copy the source along with the object code. <br />
4. You may not copy, modify, sublicense, or distribute the Program except as expressly provided under this <br />
License. Any attempt otherwise to copy, modify, sublicense or distribute the Program is void, and will <br />
automatically terminate your rights under this License. However, parties who have received copies, or rights, <br />
from you under this License will not have their Licenses terminated so long as such parties remain in full <br />
compliance. <br />
5. You are not required to accept this License, since you have not signed it. However, nothing else grants you <br />
permission to modify or distribute the Program or its derivative works. These actions are prohibited by law if <br />
you do not accept this License. Therefore, by modifying or distributing the Program (or any work based on the <br />
Program), you indicate your acceptance of this License to do so, and all its terms and conditions for copying, <br />
distributing or modifying the Program or works based on it. <br />
6. Each time you redistribute the Program (or any work based on the Program), the recipient automatically <br />
receives a license from the original licensor to copy, distribute or modify the Program subject to these terms <br />
and conditions. You may not impose any further restrictions on the recipients’ exercise of the rights granted <br />
herein. You are not responsible for enforcing compliance by third parties to this License. <br />
7. If, as a consequence of a court judgment or allegation of patent infringement or for any other reason (not <br />
limited to patent issues), conditions are imposed on you (whether by court order, agreement or otherwise) <br />
that contradict the conditions of this License, they do not excuse you from the conditions of this License. If you <br />
cannot distribute so as to satisfy simultaneously your obligations under this License and any other pertinent <br />
obligations, then as a consequence you may not distribute the Program at all. For example, if a patent license <br />
would not permit royalty-‐free redistribution of the Program by all those who receive copies directly or <br />
indirectly through you, then the only way you could satisfy both it and this License would be to refrain entirely <br />
from distribution of the Program. <br />
If any portion of this section is held invalid or unenforceable under any particular circumstance, the <br />
balance of the section is intended to apply and the section as a whole is intended to apply in other <br />
circumstances. <br />
It is not the purpose of this section to induce you to infringe any patents or other property right claims <br />
or to contest validity of any such claims; this section has the sole purpose of protecting the integrity of <br />
the free software distribution system, which is implemented by public license practices. Many people <br />
have made generous contributions to the wide range of software distributed through that system in <br />
reliance on consistent application of that system; it is up to the author/donor to decide if he or she is <br />
willing to distribute software through any other system and a licensee cannot impose that choice. <br />
This section is intended to make thoroughly clear what is believed to be a consequence of the rest of <br />
this License. <br />
8. If the distribution and/or use of the Program is restricted in certain countries either by patents or by <br />
copyrighted interfaces, the original copyright holder who places the Program under this License may add an <br />
explicit geographical distribution limitation excluding those countries, so that distribution is permitted only in <br />
or among countries not thus excluded. In such case, this License incorporates the limitation as if written in the <br />
body of this License. <br />
9. The Free <strong>Software</strong> Foundation may publish revised and/or new versions of the General Public License from <br />
time to time. Such new versions will be similar in spirit to the present version, but may differ in detail to <br />
address new problems or concerns. <br />
Each version is given a distinguishing version number. If the Program specifies a version number of <br />
this License which applies to it and “any later version”, you have the option of following the terms and <br />
conditions either of that version or of any later version published by the Free <strong>Software</strong> Foundation. If <br />
the Program does not specify a version number of this License, you may choose any version ever <br />
published by the Free <strong>Software</strong> Foundation. <br />
10. If you wish to incorporate parts of the Program into other free programs whose distribution conditions are <br />
different, write to the author to ask for permission. For software which is copyrighted by the Free <strong>Software</strong> <br />
Foundation, write to the Free <strong>Software</strong> Foundation; we sometimes make exceptions for this. Our decision will <br />
be guided by the two goals of preserving the free status of all derivatives of our free software and of promoting <br />
the sharing and reuse of software generally. <br />
NO WARRANTY <br />
11. BECAUSE THE PROGRAM IS LICENSED FREE OF CHARGE, THERE IS NO WARRANTY FOR THE PROGRAM, TO <br />
THE EXTENT PERMITTED BY APPLICABLE LAW. EXCEPT WHEN OTHERWISE STATED IN WRITING THE <br />
COPYRIGHT HOLDERS AND/OR OTHER PARTIES PROVIDE THE PROGRAM “AS IS” WITHOUT WARRANTY OF <br />
ANY KIND, EITHER EXPRESSED OR IMPLIED, INCLUDING, BUT NOT LIMITED TO, THE IMPLIED WARRANTIES <br />
OF MERCHANTABILITY AND FITNESS FOR A PARTICULAR PURPOSE. THE ENTIRE RISK AS TO THE QUALITY <br />
<strong>Serendipity</strong> <strong>Software</strong> -‐ Veripress User Manual – <strong>Version</strong> <strong>5.3.02</strong> <br />
125
AND PERFORMANCE OF THE PROGRAM IS WITH YOU. SHOULD THE PROGRAM PROVE DEFECTIVE, YOU <br />
ASSUME THE COST OF ALL NECESSARY SERVICING, REPAIR OR CORRECTION. <br />
12. IN NO EVENT UNLESS REQUIRED BY APPLICABLE LAW OR AGREED TO IN WRITING WILL ANY COPYRIGHT <br />
HOLDER, OR ANY OTHER PARTY WHO MAY MODIFY AND/OR REDISTRIBUTE THE PROGRAM AS PERMITTED <br />
ABOVE, BE LIABLE TO YOU FOR DAMAGES, INCLUDING ANY GENERAL, SPECIAL, INCIDENTAL OR <br />
CONSEQUENTIAL DAMAGES ARISING OUT OF THE USE OR INABILITY TO USE THE PROGRAM (INCLUDING <br />
BUT NOT LIMITED TO LOSS OF DATA OR DATA BEING RENDERED INACCURATE OR LOSSES SUSTAINED BY <br />
YOU OR THIRD PARTIES OR A FAILURE OF THE PROGRAM TO OPERATE WITH ANY OTHER PROGRAMS), <br />
EVEN IF SUCH HOLDER OR OTHER PARTY HAS BEEN ADVISED OF THE POSSIBILITY OF SUCH DAMAGES. <br />
END OF TERMS AND CONDITIONS <br />
Appendix: How to Apply These Terms to Your new Programs <br />
If you develop a new program, and you want it to be of the greatest possible use to the public, the best way to achieve <br />
this is to make it free software which everyone can redistribute and change under these terms. <br />
To do so, attached the following notices to the program. It is safest to attach them to the start of each source file to most <br />
effectively convey the exclusion of warranty; and each file should have at least the “copyright” line and a pointer to <br />
where the full notice is found. <br />
<br />
Copyright © 19yy <br />
This program is free software; you can redistribute it and/or modify it under the terms of the GNU General <br />
Public License as published by the Free <strong>Software</strong> Foundation; either version 2 of the License, or (at your <br />
option) any later version. <br />
This program is distributed in the hope that it will be useful, but WITHOUT ANY WARRANTY; without even the <br />
implied warranty of MERCHANTABILITY or FITNESS FOR A PARTICULAR PURPOSE. See the GNU General <br />
Public License for more details. <br />
You should have received a copy of the GNU General Public License along with this program; if not, write to the <br />
Free <strong>Software</strong> Foundation, Inc., 675 Mass Ave, Cambridge, MA 02139, USA. <br />
Also add information on how to contact you by electronic and paper mail. <br />
If the program is interactive, make it output a short notice like this when it starts in an interactive mode: <br />
Gnomovision version 69, Copyright © 19yy name of author <br />
Gnomovision comes with ABSOLUTELY NO WARRANTY; for details type “show w”. This is free software, and <br />
you are welcome to redistribute it under certain conditions; type “show c” for details. <br />
The hypothetical commands “show w” and “show c” should show the appropriate parts of the General Public License. Of <br />
course, the commands you use may be called something other than “show w” and “show c”; they could even be mouse-clicks<br />
or menu items-‐whatever suits your program. <br />
You should also get your employer (if you work as a programmer) or your school, if any, to sign a “copyright <br />
disclaimer” for the program, if necessary. Here is a sample; alter the names: <br />
Yoyodyne Inc., hereby disclaims all copyright interest in the program “Gnomovision” (which makes passes at <br />
compilers) written by James Hacker. <br />
, 1 April 1989 <br />
Ty Coon, President of Vice <br />
This General Public License does not permit incorporating your program into proprietary programs. If your program is <br />
a subroutine library, you may consider it more useful to permit linking proprietary applications with the library. If this <br />
is what you want to do, use the GNU Library General Public License instead of this License. <br />
<strong>Serendipity</strong> <strong>Software</strong> -‐ Veripress User Manual – <strong>Version</strong> <strong>5.3.02</strong> <br />
126
Copyright <br />
The XFree86 Project, Inc. <br />
Copyright © 1994, 1995 The XFree86 Project, Inc. All Rights Reserved. <br />
Permission is hereby granted, free of charge, to any person obtaining a copy of this software and associated <br />
documentation files (the “<strong>Software</strong>”), to deal in the <strong>Software</strong> without restriction, including without limitation the rights <br />
to use, copy, modify, merge, publish, distribute, sublicense, and/or sell copies of the <strong>Software</strong>, and to permit persons to <br />
whom the <strong>Software</strong> is furnished to do so, subject to the following conditions: <br />
The above copyright notice and this permission notice shall be included in all copies or substantial portions of the <br />
<strong>Software</strong>. THE SOFTWARE IS PROVIDED “AS IS”, WITHOUT WARRANTY OF ANY KIND, EXPRESS OR IMPLIED, <br />
INCLUDING BUT NOT LIMITED TO THE WARRANTIES OF MERCHANTABILITY, FITNESS FOR A PARTICULAR PURPOSE <br />
AND NONINFRINGEMENT. IN NO EVENT SHALL THE XFREE86 PROJECT BE LIABLE FOR ANY CLAIM, DAMAGES OR <br />
OTHER LIABILITY, WHETHER IN AN ACTION OF CONTRACT, TORT OR OTHERWISE, ARISING FROM, OUT OF OR IN <br />
CONNECTION WITH THE SOFTWARE OR THE USE OR OTHER DEALINGS IN THE SOFTWARE. <br />
Except as contained in this notice, the name of the XFree86 Project shall not be used in advertising or otherwise to <br />
promote the sale, use or other dealings in this <strong>Software</strong> without prior written authorization from the XFree86 Project. <br />
$XConsortium: CPYRIGHT.sgml,v 1.2/95/01/16 13:17:39 kaleb Exp $ <br />
Generated from XFree86: xc/programs/Xserver/hw/xfree86/doc/sgml/CPYRIGHT.sgml,v 3.3 1995/01/28 16:01:20 <br />
dawes Exp $ <br />
$XFree86: xc/programs/Xserver/hw/xfree86/doc/COPYRIGHT,v 3.8 1995/07/24 06:52:11 dawes Exp $ <br />
<strong>Serendipity</strong> <strong>Software</strong> -‐ Veripress User Manual – <strong>Version</strong> <strong>5.3.02</strong> <br />
127
Index <br />
1 <br />
16 bit Processing .............................................. 42 <br />
A <br />
Absolute Colourimetric Rendering Intent<br />
........................................................................... 44 <br />
Accounts Admin..............................................105 <br />
Accuracy Correction........................................ 47 <br />
Always Use ICC.................................................. 43 <br />
Antialiased Subsampling............................... 45 <br />
Antialiasing ......................................................... 42 <br />
Application Menu ...........................................102 <br />
Application Menu Items ..............................102 <br />
Accounts Admin.......................................104 <br />
Broadcast Message.................................104 <br />
Chatterbox .................................................104 <br />
Connect to Server....................................104 <br />
Download PPD .........................................104 <br />
Submit Files As Imposition.................103 <br />
Submit Files For De-‐Imposition........103 <br />
Submit ICC Target...................................103 <br />
Test Prints..................................................103 <br />
Applications........................................................ 72 <br />
Archives ........................................................ 72 <br />
Clustering ..................................................... 72 <br />
Densitometer .............................................. 72 <br />
Displays......................................................... 72 <br />
FlipBook........................................................ 72 <br />
Jobs.................................................................. 72 <br />
Monitor.......................................................... 72 <br />
Press Agent.................................................. 72 <br />
SoftProof....................................................... 72 <br />
Touch Console............................................ 72 <br />
Archives................................................................ 73 <br />
Adding items to.......................................... 73 <br />
Automatic Backup .................................... 73 <br />
Auto Crop............................................................. 47 <br />
Auto Publication Name.................................. 42 <br />
AutoClean ............................................................ 40 <br />
AutoPause............................................................ 40 <br />
B <br />
Back Page DotGain Curve.............................. 48 <br />
Back Page Opacity............................................ 48 <br />
Backing up the Database............................... 73 <br />
Black Point Compensation ........................... 43 <br />
Bonjour..........................................................40, 42 <br />
Bookfilter............................................................. 28 <br />
Driver ............................................................. 28 <br />
Paths............................................................... 28 <br />
Polling ............................................................ 28 <br />
Testing ........................................................... 28 <br />
BookMonitor ...................................................... 61 <br />
Options .......................................................... 61 <br />
Border ................................................................... 46 <br />
C <br />
Calcheck Chart................................................... 29 <br />
Add Colours From Library.................... 29 <br />
Generate Patches from ICC ................... 29 <br />
Import Patches........................................... 29 <br />
Patch Definition......................................... 29 <br />
Patches .......................................................... 30 <br />
Patches Per Strip....................................... 30 <br />
Reorder Patches ........................................ 29 <br />
Spectrophotometer.................................. 30 <br />
Target Standards....................................... 30 <br />
Tolerances.................................................... 29 <br />
Calcheck Managed............................... 108, 109 <br />
Calibration Reminder ...................................108 <br />
Camera.................................................................. 31 <br />
Change White Point......................................... 32 <br />
CIP3 ........................................................................ 66 <br />
Client...................................................................... 24 <br />
Interface........................................................ 24 <br />
Workbench .................................................. 24 <br />
Client Settings ..................................................108 <br />
Additional Monitors...............................109 <br />
Application Shortcuts............................109 <br />
Colour Management...............................108 <br />
General.........................................................108 <br />
ClientLog .............................................................. 62 <br />
Display Options.......................................... 62 <br />
Export From ................................................ 62 <br />
Fetch Back Log ........................................... 62 <br />
Filtering Options........................................ 62 <br />
Clustering............................................................. 74 <br />
Cluster Nodes.............................................. 74 <br />
Master ............................................................ 74 <br />
ClusterStatus ...................................................... 63 <br />
CMS Dithering....................................... 108, 110 <br />
CMYK Simulation from PDF......................... 45 <br />
Colour Management <br />
Default ICC Profiles ................................110 <br />
ICC Engine Accuracy..............................110 <br />
Press ............................................................... 48 <br />
Server Settings .........................................110 <br />
Colourspace ..................................32, 38, 58, 65 <br />
Convolution Matrix.......................................... 46 <br />
Copyright Notices...........................................121 <br />
Correction LUT.................................................. 38 <br />
Cropmarks........................................................... 46 <br />
Cropping............................................................... 47 <br />
D <br />
D-‐Dot...................................................................... 45 <br />
De-‐Imposition .................................................... 47 <br />
Modify ............................................................ 66 <br />
Densitometer...................................................... 76 <br />
Export Values.............................................. 76 <br />
Measure Targets........................................ 76 <br />
Device Link Profile........................................... 39 <br />
Disable PDF Autoseparation........................ 45 <br />
Displays ................................................................ 78 <br />
Ambient......................................................... 81 <br />
Calcheck ........................................................ 79 <br />
Calcheck History........................................ 80 <br />
Calibration.................................................... 78 <br />
Light Booth .................................................. 81 <br />
White Point.................................................. 78 <br />
Dongle <br />
What’s on the DVD.......................................7 <br />
Dongle Updater ................................................. 23 <br />
Updating the Dongle ................................ 23 <br />
DotGain Curve.................................................... 31 <br />
Applying to a Pagesetup......................... 43 <br />
Import from CSV........................................ 31 <br />
Invert Curve................................................. 31 <br />
Table............................................................... 31 <br />
Trace Saved Curve .................................... 31 <br />
Drawing a Rectangle around a Job............ 46 <br />
DropFolders........................................................ 42 <br />
DropSpot <br />
Setting the colour...................................... 63 <br />
Setting the number of copies ............... 63 <br />
DropZone ............................................................. 63 <br />
Add DropSpot ............................................. 63 <br />
Reordering DropSpots............................ 63 <br />
E <br />
Edge Detect ......................................................... 46 <br />
Edit <br />
Media from QueueManager.................. 67 <br />
Output from QueueManager ................ 67 <br />
Output from QueueStatus...................... 68 <br />
Pagesetup from DropZone.................... 63 <br />
Pagesetup from QueueManager ......... 67 <br />
Plate Colour in VirtualPress ................. 71 <br />
RIP from QueueManager ....................... 67 <br />
RIP from RIPMonitor............................... 70 <br />
Signature Group from QueueManager<br />
................................................................... 67 <br />
Effects.................................................................... 46 <br />
Entering a new polling path..................28, 53 <br />
Export <br />
From ClientLog........................................... 62 <br />
From QueueManager............................... 66 <br />
From ServerLog......................................... 70 <br />
From Special Colour Set..................50, 57 <br />
F <br />
Fail on RGB Images.......................................... 45 <br />
Fast Polling.......................................................... 52 <br />
Fitting Methods................................................. 47 <br />
FlipBook ............................................................... 82 <br />
Allow Multiple Windows ....................... 84 <br />
Borders around Pages............................. 84 <br />
Navigation.................................................... 82 <br />
Page Order ................................................... 84 <br />
Settings.......................................................... 84 <br />
Flow Control.............................................43, 102 <br />
Folders <br />
Adding to the Workbench ..................... 26 <br />
FTP...................................................................28, 40 <br />
Polling ............................................................ 53 <br />
G <br />
Gap Between Jobs in a Nest.......................... 41 <br />
Glossary..............................................................120 <br />
Gradation Curve................................................ 31 <br />
Invert Curve................................................. 31 <br />
Preview Curves.......................................... 31 <br />
Table............................................................... 31 <br />
Trace Saved Curve.................................... 31 <br />
Gripper Size ........................................................ 56 <br />
Group <br />
By Job ............................................................. 69 <br />
Pages within Signature Group............. 54 <br />
H <br />
Hold After Imaging ...................................53, 71 <br />
Hold After Rendering...............................53, 71 <br />
Honour Embedded ICC Profiles ................. 43 <br />
I <br />
ICC <br />
Apply Correction to CMYK Specials 110 <br />
Engine Accuracy ......................................110 <br />
Upload ICC to Server................................ 39 <br />
ICC Profiles...................................................32, 39 <br />
ICC Tweak Set .................................................... 32 <br />
Tweak Value................................................ 32 <br />
Ignore Items ....................................................... 49 <br />
Import <br />
Language Encoding .................................. 55 <br />
Import Colours <br />
Into Special Colour Set.....................50, 57 <br />
<strong>Serendipity</strong> <strong>Software</strong> -‐ Veripress User Manual – <strong>Version</strong> <strong>5.3.02</strong> <br />
128
Importing Signatures <br />
Dynastrip...................................................... 54 <br />
Facilis ............................................................. 54 <br />
JDF ................................................................... 54 <br />
Krause............................................................ 54 <br />
Impositions <br />
Grouping pages.......................................... 54 <br />
Inclusive Page Grouping <br />
In a Signature.............................................. 55 <br />
Ink and Paper <br />
Press Configurations ............................... 48 <br />
Input Filter .......................................................... 52 <br />
Installation .............................................................7 <br />
What’s on the DVD?.....................................7 <br />
J <br />
Job Genie .............................................................. 33 <br />
Actions........................................................... 33 <br />
Definitions.................................................... 34 <br />
Interface Options ...................................... 33 <br />
Job Grouping ............................................... 35 <br />
Plate Identification................................... 35 <br />
Plate Mapping............................................. 36 <br />
Separator Options..................................... 35 <br />
Tabs <br />
Collect Files .......................................... 33 <br />
Display.................................................... 37 <br />
Filename Break Down ..................... 34 <br />
Options............................................ 34 <br />
Jobname + Plate.................................. 35 <br />
Publication + Pages........................... 36 <br />
Publication Part .......................... 36 <br />
Section Part................................... 36 <br />
Tasks............................................................... 33 <br />
Job Info...........................................................66, 68 <br />
Jobs......................................................................... 85 <br />
Tabs................................................................. 85 <br />
Viewing in RIPMonitor ........................... 69 <br />
K <br />
Knockout.............................................................. 58 <br />
L <br />
Language Encoding <br />
Signature Group......................................... 55 <br />
Linux <br />
What’s on the DVD.......................................7 <br />
Localhost Polling .............................................. 28 <br />
Log File <br />
Web Server ................................................113 <br />
Logo........................................................................ 46 <br />
M <br />
Mac OS X Installation <br />
Printer Drivers..............................................9 <br />
Macintosh Installation <br />
What’s on the DVD.......................................7 <br />
Margins..........................................................46, 47 <br />
Match <br />
Items (Regular Expression).................. 49 <br />
Maximum Ink Weight..................................... 48 <br />
Media ..................................................................... 38 <br />
Colour Correction ..................................... 38 <br />
ICC Profiles .................................................. 39 <br />
Output............................................................ 38 <br />
Usage .............................................................. 38 <br />
MediaStatus ........................................................ 64 <br />
Minimum Plate Count..................................... 53 <br />
Monitor................................................................. 86 <br />
Add Modules ............................................... 86 <br />
Edit Mode ..................................................... 86 <br />
Imaging Thumbnail.................................. 71 <br />
Layout Options........................................... 86 <br />
Load a saved layout.................................. 86 <br />
Rendering Thumbnail............................. 71 <br />
Tabs................................................................. 86 <br />
Use Mode ...................................................... 86 <br />
Monitor Modules .............................................. 60 <br />
BookMonitor............................................... 60 <br />
ClientLog....................................................... 60 <br />
ClusterStatus............................................... 60 <br />
DropZone...................................................... 60 <br />
MediaStatus................................................. 60 <br />
QueueManager ........................................... 60 <br />
QueueStatus................................................. 60 <br />
RIPMonitor .................................................. 60 <br />
ServerLog ..................................................... 60 <br />
Status.............................................................. 60 <br />
Thumbnail.................................................... 60 <br />
VirtualPress................................................. 60 <br />
N <br />
Nest Jobs............................................................... 66 <br />
O <br />
Open <br />
An Archive.................................................... 73 <br />
Output ................................................................... 40 <br />
Collating ........................................................ 41 <br />
Automatic Nesting............................. 41 <br />
Nesting ................................................... 41 <br />
Destinations................................................. 40 <br />
Queue ............................................................. 40 <br />
P <br />
Page Head Direction <br />
Signature Group......................................... 56 <br />
Page Number <br />
Changing ....................................................... 66 <br />
Pagenumber........................................................ 46 <br />
Pagesetup............................................................. 42 <br />
Colour Correction ..................................... 43 <br />
Colour Keys.................................................. 44 <br />
ColourKeys................................................... 44 <br />
Configuration.............................................. 18 <br />
Effects............................................................. 46 <br />
ICC Profiles................................................... 43 <br />
Input Screening.......................................... 45 <br />
Logo................................................................. 46 <br />
Media Effects............................................... 47 <br />
Output ............................................................ 42 <br />
Postscript/PDF Options ......................... 45 <br />
Priority........................................................... 42 <br />
Publish ........................................................... 42 <br />
Resampling .................................................. 45 <br />
Paint Mode .......................................................... 58 <br />
Pair Pages <br />
Signatures..................................................... 54 <br />
Perceptual Rendering Intent....................... 43 <br />
Polling.................................................................... 52 <br />
Creating a RIP to poll jobs ..................... 52 <br />
FTP .................................................................. 53 <br />
Ignore Mod Time....................................... 52 <br />
Initiate a Manual Poll............................... 69 <br />
Logging Statistics ...................................... 52 <br />
Method to use ......................................28, 52 <br />
Paths ............................................................... 53 <br />
Testing Configuration ............................. 54 <br />
PPD <br />
What’s on the DVD.......................................7 <br />
Press....................................................................... 48 <br />
Colour Management................................. 48 <br />
Dimensions .................................................. 48 <br />
Ink and Paper.............................................. 48 <br />
Press Agent ......................................................... 87 <br />
Log ................................................................... 87 <br />
Press Sheet Settings ........................................ 56 <br />
Print Calcheck.................................................... 44 <br />
Progressive Proofs........................................... 44 <br />
Q <br />
QueueManager .................................................. 65 <br />
Configuration Options............................. 67 <br />
Modify ............................................................ 66 <br />
Viewing Options ........................................ 65 <br />
QueueStatus........................................................ 68 <br />
Change Queue............................................. 68 <br />
Queue Order................................................ 68 <br />
R <br />
Real Dot Technology....................................... 45 <br />
Registration Marks .......................................... 46 <br />
Regular Expression.......................................... 49 <br />
Conditions .................................................... 49 <br />
Expressions ................................................. 49 <br />
String Entry ................................................. 49 <br />
Relative Colourimetric Rendering Intent44 <br />
Render Again...................................................... 66 <br />
Render in RGB.................................................... 45 <br />
Rendering Intents ............................................ 43 <br />
Replace Colour Set........................................... 50 <br />
Tabs................................................................. 50 <br />
Resampling <br />
Bicubic ........................................................... 45 <br />
Bilinear .......................................................... 45 <br />
Filtered .......................................................... 46 <br />
Nearest Neighbour ................................... 45 <br />
Retain Pure Black............................................. 44 <br />
RGB to CMYK Conversion ............................. 45 <br />
RIP........................................................................... 52 <br />
AutoProofing............................................... 53 <br />
Configuration.............................................. 19 <br />
Connection................................................... 52 <br />
Driver ............................................................. 52 <br />
Job Filtering................................................. 53 <br />
Paths............................................................... 53 <br />
Polling ............................................................ 52 <br />
Stripe Paths.................................................. 53 <br />
Testing Poll Configuration .................... 54 <br />
RIPMonitor.......................................................... 69 <br />
Rip List........................................................... 69 <br />
Submit Jobs for De-‐Imposition............ 69 <br />
VirtualPress................................................. 69 <br />
Rotation................................................................ 47 <br />
Running the <strong>Software</strong>..................................... 16 <br />
32 bit............................................................... 16 <br />
Starting the Client..................................... 17 <br />
Starting the Server.................................... 16 <br />
Rush Jobs.............................................................. 66 <br />
S <br />
Saturation Rendering Intent........................ 44 <br />
Save <br />
An Archive.................................................... 73 <br />
The Database .............................................. 73 <br />
Scheduled Backup............................................ 73 <br />
Search.................................................................... 30 <br />
Searching <br />
For messages in the ClientLog............. 62 <br />
For messgaes in the ServerLog ........... 70 <br />
Secure Mode .......................................... 105, 110 <br />
Activating....................................................107 <br />
Configuration............................................105 <br />
Creating Groups.......................................106 <br />
Creating Users ..........................................106 <br />
Error Notifications .................................106 <br />
Hosts Panel ................................................107 <br />
Setting up Users and Groups..............105 <br />
User Privileges .........................................106 <br />
Selective Import <br />
Choosing Signatures to import into <br />
Signature Group ................................. 54 <br />
Sending <br />
A Job to another Pagesetup .................. 66 <br />
Separated Postscript....................................... 67 <br />
<strong>Serendipity</strong> Client Menu Items <br />
Submitt ICC Target Without Colour <br />
Correction ...........................................103 <br />
Server .................................................................... 21 <br />
<strong>Serendipity</strong> <strong>Software</strong> -‐ Veripress User Manual – <strong>Version</strong> <strong>5.3.02</strong> <br />
129
Help Menu.................................................... 21 <br />
Info .................................................................. 26 <br />
Options .......................................................... 21 <br />
Server Settings <br />
Colour Management...............................110 <br />
General ........................................................109 <br />
Working Paths..........................................110 <br />
ServerLog............................................................. 70 <br />
Filtering messages.................................... 70 <br />
Setting <br />
The Colour of a DropSpot...................... 63 <br />
Signature <br />
Delete ............................................................. 55 <br />
Duplicate....................................................... 55 <br />
New ................................................................. 55 <br />
Signature Decorations.................................... 46 <br />
Signature Group................................................ 54 <br />
Auto Paginate.............................................. 54 <br />
Close Page Number Gaps....................... 55 <br />
Deleting a Page........................................... 56 <br />
Deleting Signatures.................................. 55 <br />
Duplicating a Page .................................... 56 <br />
Duplicating Signatures ........................... 55 <br />
Editing Page Numbers ............................ 54 <br />
Grid Attributes ........................................... 56 <br />
Gripper Size................................................. 56 <br />
Grouping Pages.......................................... 54 <br />
Import Signatures..................................... 54 <br />
Language Encoding.................................. 55 <br />
Multi-‐selecting Signatures .................... 55 <br />
Offset Page Numbers............................... 54 <br />
Page Attributes .......................................... 56 <br />
Page head direction ................................. 56 <br />
Page Orientation........................................ 56 <br />
Pair Pages..................................................... 54 <br />
Plate Options............................................... 55 <br />
Press Sheet Settings................................. 56 <br />
Rename Signatures .................................. 54 <br />
Rotate Selected Signatures ................... 54 <br />
Rotating Signatures.................................. 54 <br />
Selecting Import ........................................ 54 <br />
Setting Page Size........................................ 56 <br />
Setting Page Width................................... 56 <br />
Suppress Pages .......................................... 54 <br />
Toolbar .......................................................... 54 <br />
Slugline ................................................................. 46 <br />
SoftProof <br />
Notes............................................................... 94 <br />
Publications................................................. 94 <br />
<strong>Software</strong> Updates............................................. 22 <br />
Sound FX ............................................................108 <br />
Special Colour Set............................................. 57 <br />
Adding Colours from Library............... 57 <br />
Adjusting Colour Intensity.................... 58 <br />
Create a new colour ................................. 57 <br />
Delete colours............................................. 57 <br />
Duplicate colours ...................................... 57 <br />
Export colours to a file.....................50, 57 <br />
Import colours from files................50, 57 <br />
Paint Modes................................................. 58 <br />
Spectro .................................................................. 96 <br />
Activate.......................................................... 96 <br />
Export Values.............................................. 96 <br />
Load Set......................................................... 96 <br />
Status ..................................................................... 71 <br />
Stretch Factor..................................................... 48 <br />
Submit <br />
For De-‐Imposition..................................... 69 <br />
Support <br />
Web Server ..................................... 112, 113 <br />
System Info <br />
Web Server ................................................113 <br />
System Settings ...............................................108 <br />
Client.............................................................108 <br />
Server...........................................................109 <br />
T <br />
Tabs <br />
Reordering ................................................... 86 <br />
The <strong>Serendipity</strong> Updater............................... 22 <br />
The Veripress Client........................................ 24 <br />
The Veripress Dongle Updater ................... 23 <br />
The Veripress Server ...................................... 21 <br />
Thumbnail ........................................................... 71 <br />
Preview.......................................................... 66 <br />
QueueStatus................................................. 68 <br />
Show Imaging ............................................. 71 <br />
Show Rendering ........................................ 71 <br />
Tiff Multichannel <br />
Export............................................................. 67 <br />
Touch Console.................................................... 97 <br />
Fast Scrolling............................................... 97 <br />
Interface........................................................ 97 <br />
Modes............................................................. 98 <br />
Loupe ....................................................100 <br />
Main......................................................... 98 <br />
Navigate................................................. 99 <br />
Settings........................................................101 <br />
Trimming <br />
The ClientLog.............................................. 62 <br />
The ServerLog ............................................ 70 <br />
Troubleshooting .............................................119 <br />
U <br />
Ungroup pages <br />
Signature Group......................................... 54 <br />
Unsharp Mask .................................................... 46 <br />
V <br />
Veripress <br />
Product Overview........................................6 <br />
View <br />
Errors ............................................................. 66 <br />
Imaged ........................................................... 66 <br />
Rendered ...................................................... 66 <br />
View Errors......................................................... 66 <br />
VirtualPress ........................................................ 71 <br />
Edit Plate Colour........................................ 71 <br />
History ........................................................... 71 <br />
Quick Submit............................................... 71 <br />
W <br />
Watermark.......................................................... 46 <br />
Web Server........................................................112 <br />
Accessing the Web Server ...................112 <br />
Log File ........................................................113 <br />
Queues .........................................................112 <br />
Support........................................................113 <br />
System Info ................................................113 <br />
Windows Installation ........................................8 <br />
32 bit..................................................................8 <br />
32 bit Agent ....................................................8 <br />
64 bit..................................................................8 <br />
64 bit Agent ....................................................8 <br />
Dongle Driver.................................................8 <br />
<strong>Serendipity</strong> Agent ........................................8 <br />
Veripress..........................................................8 <br />
What’s on the DVD.......................................7 <br />
Workbench.......................................................... 24 <br />
Organise Data Types................................ 25 <br />
Workbench Data Types ................................. 27 <br />
Bookfilter...................................................... 27 <br />
Calcheck Chart............................................ 27 <br />
Camera........................................................... 27 <br />
DotGain Curve ............................................ 27 <br />
Gradation Curve......................................... 27 <br />
ICC Tweak Set............................................. 27 <br />
Job Genie....................................................... 27 <br />
Media.............................................................. 27 <br />
Output ............................................................ 27 <br />
Pagesetup ..................................................... 27 <br />
Press ............................................................... 27 <br />
Regular Expression .................................. 27 <br />
Replace Colour Set.................................... 27 <br />
RIP ................................................................... 27 <br />
Signature Group......................................... 27 <br />
Special Colour Set ..................................... 27 <br />
Y <br />
Yule Nielsen Number....................................120 <br />
<strong>Serendipity</strong> <strong>Software</strong> -‐ Veripress User Manual – <strong>Version</strong> <strong>5.3.02</strong> <br />
130