wiring instructions - Seymour Duncan
wiring instructions - Seymour Duncan
wiring instructions - Seymour Duncan

You also want an ePaper? Increase the reach of your titles
YUMPU automatically turns print PDFs into web optimized ePapers that Google loves.
Congratulations on your purchase of a fine, hand-built, <strong>Seymour</strong> <strong>Duncan</strong> electric guitar pickup! Installing<br />
this pickup in your guitar isn’t rocket science. And, if you’re already handy with tools, it’ll be a snap for<br />
you–and fun too! But if you have no experience handling red-hot soldering irons, you’d be well advised<br />
to take your new pickup and your trusty guitar to a qualified guitar tech.<br />
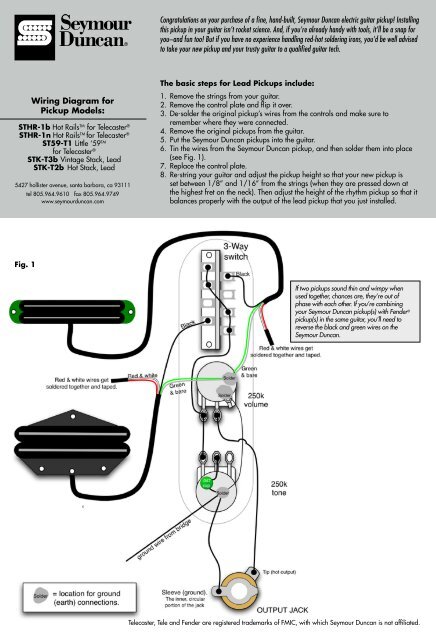
Wiring Diagram for<br />
Pickup Models:<br />
STHR-1b Hot Rails TM for Telecaster ®<br />
STHR-1n Hot Rails TM for Telecaster ®<br />
ST59-T1 Little ‘59 TM<br />
for Telecaster ®<br />
STK-T3b Vintage Stack, Lead<br />
STK-T2b Hot Stack, Lead<br />
5427 hollister avenue, santa barbara, ca 93111<br />
tel 805.964.9610 fax 805.964.9749<br />
www.seymourduncan.com<br />
The basic steps for Lead Pickups include:<br />
1. Remove the strings from your guitar.<br />
2. Remove the control plate and flip it over.<br />
3. De-solder the original pickup’s wires from the controls and make sure to<br />
remember where they were connected.<br />
4. Remove the original pickups from the guitar.<br />
5. Put the <strong>Seymour</strong> <strong>Duncan</strong> pickups into the guitar.<br />
6. Tin the wires from the <strong>Seymour</strong> <strong>Duncan</strong> pickup, and then solder them into place<br />
(see Fig. 1).<br />
7. Replace the control plate.<br />
8. Re-string your guitar and adjust the pickup height so that your new pickup is<br />
set between 1/8” and 1/16” from the strings (when they are pressed down at<br />
the highest fret on the neck). Then adjust the height of the rhythm pickup so that it<br />
balances properly with the output of the lead pickup that you just installed.<br />
Fig. 1<br />
If two pickups sound thin and wimpy when<br />
used together, chances are, they’re out of<br />
phase with each other. If you’re combining<br />
your <strong>Seymour</strong> <strong>Duncan</strong> pickup(s) with Fender ®<br />
pickup(s) in the same guitar, you’ll need to<br />
reverse the black and green wires on the<br />
<strong>Seymour</strong> <strong>Duncan</strong>.<br />
‘<br />
Telecaster, Tele and Fender are registered trademarks of FMIC, with which <strong>Seymour</strong> <strong>Duncan</strong> is not affiliated.
Bridge Grounding<br />
If you are replacing a standard Telecaster ® lead pickup that has a metal bottom plate, the bridge & strings were (most likely) being<br />
grounded via the bottom plate. The particular model of <strong>Seymour</strong> <strong>Duncan</strong> pickup that you are installing has no bottom plate, and so<br />
you may need to connect a separate wire to ground your bridge.<br />
To do this: take a piece of wire, and solder one end of it to the bottom of the volume pot. Run the other end of that wire into the lead<br />
pickup cavity. Strip about one inch of insulation from the end of that wire. Place the exposed end of that wire on top of the guitar’s<br />
body, and screw the bridge down on top of it. The metal bridge will contact the wire, and create a ground connection for the bridge<br />
& strings.<br />
Coil Splitting<br />
Confused? Watch the free installation videos on the<br />
<strong>Seymour</strong> <strong>Duncan</strong> website (under “Support”). You’ll<br />
see how <strong>Seymour</strong> himself does it and you’ll learn<br />
lots of great tech tips. Also, for real-time peer-topeer<br />
tech support, consult the gurus on the <strong>Seymour</strong><br />
<strong>Duncan</strong> User Group Forum.<br />
-<br />
Series/parallel (with push/pull)<br />
Series/split/parallel (with on/on/on mini-toggle)<br />
We’re not just pickups anymore. <strong>Seymour</strong> <strong>Duncan</strong><br />
also makes a variety of super cool stompboxes.<br />
Visit seymourduncan.com for additional <strong>wiring</strong> diagrams.<br />
P/N 501015-115 Rev. D