Wiring instructions - Seymour Duncan
Wiring instructions - Seymour Duncan
Wiring instructions - Seymour Duncan

You also want an ePaper? Increase the reach of your titles
YUMPU automatically turns print PDFs into web optimized ePapers that Google loves.
Congratulations on your purchase of a fine, hand-built, <strong>Seymour</strong> <strong>Duncan</strong> electric guitar pickup! Installing<br />
this pickup in your guitar isn’t rocket science. And, if you’re already handy with tools, it’ll be a snap for<br />
you–and fun too! But if you have no experience handling red-hot soldering irons, you’d be well advised<br />
to take your new pickup and your trusty guitar to a qualified guitar tech.<br />
<strong>Wiring</strong> Diagram for<br />
Pickup Models:<br />
BLACKOUTS TM HEAVY METAL<br />
AHB-2 Active Humbuckers<br />
5427 hollister avenue, santa barbara, ca 93111<br />
tel 805.964.9610 fax 805.964.9749<br />
www.seymourduncan.com<br />
The basic installation steps include:<br />
1. Remove the strings from your guitar.<br />
2. Remove the pickguard, or mounting ring, and control plate cover from your guitar.<br />
3. De-solder the original pickup’s wires and be sure to remember where they were<br />
connected.<br />
4. Remove the original pickup from the pickguard or mounting ring.<br />
5. Install the <strong>Seymour</strong> <strong>Duncan</strong> pickup into the pickguard or mounting ring.<br />
6. If your original pickups were passive, remove the original pots and output jack,<br />
and replace them with the provided 25k pots and stereo output jack---you<br />
can re-use the capacitor from your tone control.<br />
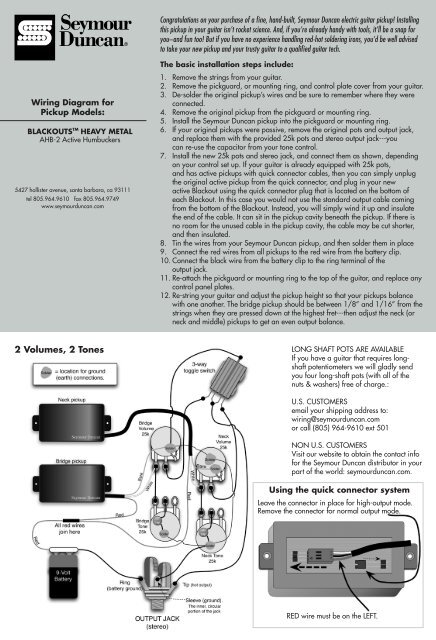
7. Install the new 25k pots and stereo jack, and connect them as shown, depending<br />
on your control set up. If your guitar is already equipped with 25k pots,<br />
and has active pickups with quick connector cables, then you can simply unplug<br />
the original active pickup from the quick connector, and plug in your new<br />
active Blackout using the quick connector plug that is located on the bottom of<br />
each Blackout. In this case you would not use the standard output cable coming<br />
from the bottom of the Blackout. Instead, you will simply wind it up and insulate<br />
the end of the cable. It can sit in the pickup cavity beneath the pickup. If there is<br />
no room for the unused cable in the pickup cavity, the cable may be cut shorter,<br />
and then insulated.<br />
8. Tin the wires from your <strong>Seymour</strong> <strong>Duncan</strong> pickup, and then solder them in place<br />
9. Connect the red wires from all pickups to the red wire from the battery clip.<br />
10. Connect the black wire from the battery clip to the ring terminal of the<br />
output jack.<br />
11. Re-attach the pickguard or mounting ring to the top of the guitar, and replace any<br />
control panel plates.<br />
12. Re-string your guitar and adjust the pickup height so that your pickups balance<br />
with one another. The bridge pickup should be between 1/8” and 1/16” from the<br />
strings when they are pressed down at the highest fret---then adjust the neck (or<br />
neck and middle) pickups to get an even output balance.<br />
2 Volumes, 2 Tones LONG SHAFT POTS ARE AVAILABLE<br />
If you have a guitar that requires longshaft<br />
potentiometers we will gladly send<br />
you four long-shaft pots (with all of the<br />
nuts & washers) free of charge.:<br />
U.S. CUSTOMERS<br />
email your shipping address to:<br />
wiring@seymourduncan.com<br />
or call (805) 964-9610 ext 501<br />
NON U.S. CUSTOMERS<br />
Visit our website to obtain the contact info<br />
for the <strong>Seymour</strong> <strong>Duncan</strong> distributor in your<br />
part of the world: seymourduncan.com.<br />
Using the quick connector system<br />
Leave the connector in place for high-output mode.<br />
Remove the connector for normal output mode.<br />
RED wire must be on the LEFT.
2 Volumes, 1 Tone<br />
P/N 501020-130 Rev. A<br />
1 Volume, 1 Tone<br />
We do not recommend<br />
combining active and<br />
passive pickups in the<br />
same guitar. There are<br />
enough differences in the<br />
way they work, and in the<br />
components they use,<br />
that the result is usually<br />
problematic.<br />
Stereo output jacks are often wider<br />
than most mono output jacks, and this<br />
can cause them to come into contact<br />
with the inside of your guitar’s control<br />
cavity. If your guitar has been shielded<br />
internally (with shielding paint or<br />
copper tape), any contact between the<br />
jack and the shielding can cause the<br />
output of your guitar to greatly diminish,<br />
or short out completely. This will<br />
not cause any harm to your pickups,<br />
but it will cause the guitar to not work<br />
properly. So check to make sure<br />
that your stereo output jack is not<br />
touching the inside of your guitar.<br />
Visit seymourduncan.com for additional wiring diagrams.