

Manual - Petit RC
Manual - Petit RC
Manual - Petit RC

Create successful ePaper yourself
Turn your PDF publications into a flip-book with our unique Google optimized e-Paper software.
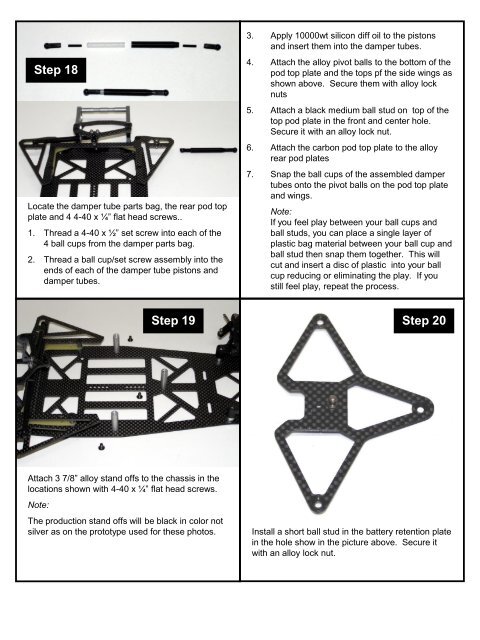
Step 18<br />
Locate the damper tube parts bag, the rear pod top<br />
plate and 4 4-40 x ¼” flat head screws..<br />
1. Thread a 4-40 x ½” set screw into each of the<br />
4 ball cups from the damper parts bag.<br />
2. Thread a ball cup/set screw assembly into the<br />
ends of each of the damper tube pistons and<br />
damper tubes.<br />
3. Apply 10000wt silicon diff oil to the pistons<br />
and insert them into the damper tubes.<br />
4. Attach the alloy pivot balls to the bottom of the<br />
pod top plate and the tops pf the side wings as<br />
shown above. Secure them with alloy lock<br />
nuts<br />
5. Attach a black medium ball stud on top of the<br />
top pod plate in the front and center hole.<br />
Secure it with an alloy lock nut.<br />
6. Attach the carbon pod top plate to the alloy<br />
rear pod plates<br />
7. Snap the ball cups of the assembled damper<br />
tubes onto the pivot balls on the pod top plate<br />
and wings.<br />
Note:<br />
If you feel play between your ball cups and<br />
ball studs, you can place a single layer of<br />
plastic bag material between your ball cup and<br />
ball stud then snap them together. This will<br />
cut and insert a disc of plastic into your ball<br />
cup reducing or eliminating the play. If you<br />
still feel play, repeat the process.<br />
Step 19<br />
Step 20<br />
Attach 3 7/8” alloy stand offs to the chassis in the<br />
locations shown with 4-40 x ¼” flat head screws.<br />
Note:<br />
The production stand offs will be black in color not<br />
silver as on the prototype used for these photos.<br />
Install a short ball stud in the battery retention plate<br />
in the hole show in the picture above. Secure it<br />
with an alloy lock nut.


